
Policies
IPv6 security policies are created both for an IPv6 network and a transitional network. A transitional network is a network that is transitioning over to IPv6 but must still have access to the Internet or must connect over an IPv4 network.
These policies allow for this specific type of traffic to travel between the IPv6 and IPv4 networks. The IPv6 options for creating these policies is hidden by default. You must enable this feature under System > Config > Features.
IPv6 policy route

IPv6 policy routing
IPv6 policy routing functions in the same was as IPv4 policy routing. To add an IPv6 policy route, go to Network > Policy Routes and select Create New > IPv6 Policy Route.
Adding an IPv6 Policy route

You can also use the following command to add IPv6 policy routes:
config router policy6
edit 0
set input-device <interface>
set src <ipv6_ip>
set dst <ipv6_ip>
set protocol <0-255>
set gateway <ipv6_ip>
set output-device <interface>
set tos <bit_pattern>
set tos-mask <bit_mask>
end
IPv6 security policies
IPv6 security policies support all the features supported by IPv4 security policies:
- Policy types and subtypes.
- NAT support including using the destination interface IP address, fixed port, and dynamic IP pools.
- All security features (antivirus, web filtering, application control, IPS, email filtering, DLP, VoIP, and ICAP).
- All traffic shaping options, including: shared traffic shaping, reverse shared traffic shaping, and per-IP traffic shaping.
- All user and device authentication options.
IPv6 explicit web proxy
You can use the explicit web proxy for IPv6 traffic. To do this you need to:
- Enable the IPv6 explicit web proxy from the CLI.
- Enable the explicit web proxy for one or more FortiGate interfaces. These interfaces also need IPv6 addresses.
- Add IPv6 web proxy security policies to allow the explicit web proxy to accept IPv6 traffic.
Use the following steps to set up a FortiGate unit to accept IPv6 traffic for the explicit web proxy at the Internal interface and forward IPv6 explicit proxy traffic out the wan1 interface to the Internet.
- Enter the following CLI command to enable the IPv6 explicit web proxy:
config web-proxy explicit
set status enable
set ipv6-status enable
end
- Go to Network > Interfaces and edit the internal interface, select Enable Explicit Web Proxy and select OK.
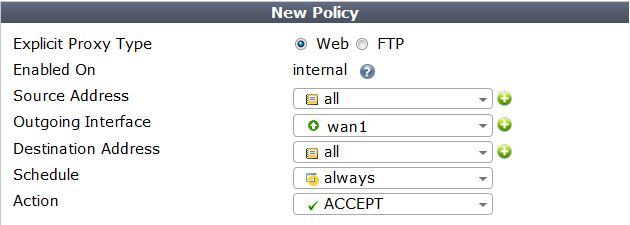
- Go to Policy & Objects > Proxy Policy and select Create New to add an IPv6 explicit web proxy security policy with the following settings shown.
This IPv6 explicit web proxy policy allows traffic from all IPv6 IP addresses to connect through the explicit web proxy and through the wan1 interface to any IPv6 addresses that are accessible from the wan1 interface.
|
|
If you have enabled both the IPv4 and the IPv6 explicit web proxy, you can combine IPv4 and IPv6 addresses in a single explicit web proxy policy to allow both IPv4 and IPv6 traffic through the proxy. |
Example IPv6 Explicit Web Proxy security policy
Restricting the IP address of the explicit IPv6 web proxy
You can use the following command to restrict access to the IPv6 explicit web proxy using only one IPv6 address. The IPv6 address that you specify must be the IPv6 address of an interface that the explicit HTTP proxy is enabled on. You might want to use this option if the explicit web proxy is enabled on an interface with multiple IPv6 addresses.
For example, to require users to connect to the IPv6 address 2001:db8:0:2::30 to connect to the explicit IPv6 HTTP proxy, use the following command:
config web-proxy explicit
set incoming-ipv6 2001:db8:0:2::30
end
Restricting the outgoing source IP address of the IPv6 explicit web proxy
You can use the following command to restrict the source address of outgoing web proxy packets to a single IPv6 address. The IP address that you specify must be the IPv6 address of an interface that the explicit HTTP proxy is enabled on. You might want to use this option if the explicit HTTP proxy is enabled on an interface with multiple IPv6 addresses.
For example, to restrict the outgoing packet source address to 2001:db8:0:2::50:
config http-proxy explicit
set outgoing-ip6 2001:db8:0:2::50
end
VIP64
VIP64 policies can be used to configure static NAT virtual IPv6 address for IPv4 addresses. VIP64 can be configured from the CLI using the following commands:
config firewall vip64
edit <zname_str>
set arp-reply {enable | disable}
set color <color_int>
set comment <comment_str>
set extip <address_ipv6>[-address_ipv6]
set extport <port_int>
set id <id_num_str>
set mappedip [<start_ipv4>-<end_ipv4>]
set mappedport <port_int>
set portforward {enable | disable}
set src-filter <addr_str>
end
VIP64 CLI Variables and Defaults
| Variable | Description | Default |
|---|---|---|
<zname_str>
|
Enter the name of this virtual IP address. | No default. |
arp-reply
{enable | disable}
|
Select to respond to ARP requests for this virtual IP address. | enable |
color <color_int>
|
Enter the number of the color to use for the group icon in the GUI. | 0 |
comment <comment_str>
|
Enter comments relevant to the configured virtual IP. | No default. |
extip <address_ipv6>[-address_ipv6]
|
Enter the IP address or address range on the external interface that you want to map to an address or address range on the destination network. If mappedip is an IP address range, the FortiGate unit uses extip as the first IP address in the external IP address range, and calculates the last IP address required to create an equal number of external and mapped IP addresses for one-to-one mapping.To configure a dynamic virtual IP that accepts connections destined for any IP address, set extip to ::. |
:: |
extport <port_int>
|
Enter the external port number that you want to map to a port number on the destination network. This option only appears if portforward is enabled.If portforward is enabled and you want to configure a static NAT virtual IP that maps a range of external port numbers to a range of destination port numbers, set extport to the first port number in the range. Then set mappedport to the start and end of the destination port range. The FortiGate unit automatically calculates the end of the extport port number range. |
0 |
id <id_num_str>
|
Enter a unique identification number for the configured virtual IP. Not checked for uniqueness. Range 0 - 65535. | No default. |
mappedip
[<start_ipv4>-<end_ipv4>]
|
Enter the IP address or IP address range on the destination network to which the external IP address is mapped. If mappedip is an IP address range, the FortiGate unit uses extip as the first IP address in the external IP address range, and calculates the last IP address required to create an equal number of external and mapped IP addresses for one-to-one mapping.If mappedip is an IP address range, the FortiGate unit uses extip as a single IP address to create a one-to-many mapping. |
0.0.0.0 |
mappedport <port_int>
|
Enter the port number on the destination network to which the external port number is mapped. You can also enter a port number range to forward packets to multiple ports on the destination network. For a static NAT virtual IP, if you add a map to port range the FortiGate unit calculates the external port number range. |
0 |
portforward
{enable | disable}
|
Select to enable port forwarding. You must also specify the port forwarding mappings by configuring extport and mappedport. |
disable |
src-filter <addr_str>
|
Enter a source address filter. Each address must be in the form of an IPv4 subnet (x:x:x:x:x:x:x:x/n). Separate addresses with spaces. | null |
VIP46 policies can be used to configure static NAT virtual IPv4 address for IPv6 addresses. VIP46 can be configured from the CLI using the following commands (see the table below for variable details):
config firewall vip46
edit <name_str>
set arp-reply {enable | disable}
set color <color_int>
set comment <comment_str>
set extip <address_ipv4>[-address_ipv4]
set extport <port_int>
set id <id_num_str>
set mappedip [<start_ipv6>-<end_ipv6>]
set mappedport <port_int>
set portforward {enable | disable}
set src-filter <add_str>
end
VIP46 CLI Variables and Defaults
| Variable | Description | Default |
|---|---|---|
<name_str>
|
Enter the name of this virtual IP address. | No default. |
arp-reply
{enable | disable}
|
Select to respond to ARP requests for this virtual IP address. | enable |
color <color_int>
|
Enter the number of the color to use for the group icon in the GUI. | 0 |
comment <comment_str>
|
Enter comments relevant to the configured virtual IP. | No default. |
extip <address_ipv4>[-address_ipv4]
|
Enter the IP address or address range on the external interface that you want to map to an address or address range on the destination network. If mappedip is an IP address range, the FortiGate unit uses extip as the first IP address in the external IP address range, and calculates the last IP address required to create an equal number of external and mapped IP addresses for one-to-one mapping.To configure a dynamic virtual IP that accepts connections destined for any IP address, set extip to 0.0.0.0. |
0.0.0.0 |
extport <port_int>
|
Enter the external port number that you want to map to a port number on the destination network. This option only appears if portforward is enabled.If portforward is enabled and you want to configure a static NAT virtual IP that maps a range of external port numbers to a range of destination port numbers, set extport to the first port number in the range. Then set mappedport to the start and end of the destination port range. The FortiGate unit automatically calculates the end of the extport port number range. |
0 |
id <id_num_str>
|
Enter a unique identification number for the configured virtual IP. Not checked for uniqueness. Range 0 - 65535. | No default. |
mappedip
[<start_ipv6>-<end_ipv6>]
|
Enter the IP address or IP address range on the destination network to which the external IP address is mapped. If mappedip is an IP address range, the FortiGate unit uses extip as the first IP address in the external IP address range, and calculates the last IP address required to create an equal number of external and mapped IP addresses for one-to-one mapping.If mappedip is an IP address range, the FortiGate unit uses extip as a single IP address to create a one-to-many mapping. |
:: |
mappedport <port_int>
|
Enter the port number on the destination network to which the external port number is mapped. You can also enter a port number range to forward packets to multiple ports on the destination network. For a static NAT virtual IP, if you add a map to port range the FortiGate unit calculates the external port number range. |
0 |
portforward
{enable | disable}
|
Select to enable port forwarding. You must also specify the port forwarding mappings by configuring extport and mappedport. |
disable |
src-filter <addr_str>
|
Enter a source address filter. Each address must be in the form of an IPv4 subnet (x.x.x.x/n). Separate addresses with spaces. | null |