
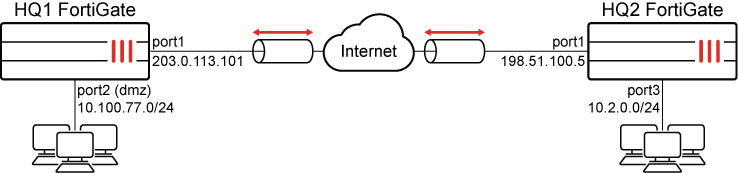
This is a sample configuration of IPsec VPN authenticating a remote FortiGate peer with a certificate. The certificate on one peer is validated by the presence of the CA certificate that is installed on the other peer.
The VPN Wizard is used to configure a site-to-site VPN tunnel.
It is assumed that the certificates have been configured and imported to the FortiGates. For information about configuring certificates using third party tools, such as XCA, see Creating certificates with XCA. For information about importing a certificate, see Import a certificate.
Individual settings can vary, but in order for the tunnel to come up, the configuration must be the same on both FortiGates.
For more information on IPsec settings, see Phase 1 configuration and Phase 2 configuration.
To configure an IPsec VPN using the VPN Wizard on the HQ1 FortiGate:
-
Go to VPN > VPN Wizard.
-
Enter a name for the VPN in the Tunnel name field. In this example, HQ2B2
-
Set Select a template to Site to Site.
-
Click Begin.
-
Configure the VPN tunnel settings:
Field
Value
Authentication method
Signature
Certificate name
Select a certificate.
Peer certificate CA
Select a peer CA certificate.
IKE
Version 2
Transport
Auto
Leave Use Fortinet encapsulation toggled off.
NAT traversal
Enable
Set Keepalive frequency to 10.
-
Click Next.
-
Configure the Remote site settings:
Field
Value
Remote site device type
FortiGate
Remote site device
Accessible and static
Set IP/FQDN to 198.51.100.5.
Route this device's internet traffic through the remote site.
Disabled
Remote site subnets that can access VPN
10.2.0.0/24
-
Click Next.
-
Configure the Local site settings:
Field
Value
Outgoing interface that binds to tunnel
port1 (the WAN interface in this example)
Disable Create and add interface to zone if you do not need a zone to be created.
Local interface
port2 (in this example)
Local subnets that can access VPN
This field automatically uses the IP address related to the selected local interface. In this example, 10.100.77.0/24
Allow remote site's internet traffic through this device
Disabled
-
Click Next.
-
Review the configuration and, if everything is correct, click Submit.
To configure an IPsec VPN using the VPN Wizard on the HQ2 FortiGate:
-
Go to VPN > VPN Wizard.
-
Enter a name for the VPN in the Tunnel name field. In this example, B2toHQ
-
Set Select a template to Site to Site.
-
Click Begin.
-
Configure the VPN tunnel settings:
Field
Value
Authentication method
Signature
Certificate name
Select a certificate.
Peer certificate CA
Select a peer CA certificate.
IKE
Version 2
Transport
Auto
Leave Use Fortinet encapsulation toggled off.
NAT traversal
Enable
Set Keepalive frequency to 10.
-
Click Next.
-
Configure the Remote site settings:
Field
Value
Remote site device type
FortiGate
Remote site device
Accessible and static
Set IP/FQDN to 203.0.113.101.
Route this device's internet traffic through the remote site.
Disabled
Remote site subnets that can access VPN
10.100.77.0/24
-
Click Next.
-
Configure the Local site settings:
Field
Value
Outgoing interface that binds to tunnel
port1 (the WAN interface in this example)
Enable Create and add interface to zone.
Local interface
port3 (in this example)
Local subnets that can access VPN
This field automatically uses the IP address related to the selected local interface. In this example, 10.2.0.0/24
Allow remote site's internet traffic through this device
Disabled
-
Click Next.
-
Review the configuration and, if everything is correct, click Submit.
To configure HQ1 for IPsec VPN authenticating a remote FortiGate peer with a digital certificate using the CLI:
-
Configure the WAN interface and default route.
The WAN interface is the interface connected to the ISP. The IPsec tunnel is established over the WAN interface.
config system interface edit "port1" set vdom "root" set ip 203.0.113.101 255.255.255.0 next end config router static edit 1 set gateway 203.0.113.102 set device "port1" next end -
Configure address objects for internal protected networks.
config firewall address edit "10.2.0.0" set subnet 10.2.0.0 255.255.255.0 next edit "10.100.77.0" set subnet 10.100.77.0 255.255.255.0 next end -
Configure the internal (protected subnet) interface.
The internal interface connects to the corporate internal network. Traffic from this interface routes out the IPsec VPN tunnel.
config system interface edit "port2" set vdom "root" set ip 10.100.77.0 255.255.255.0 next end -
Configure the import certificate and its CA certificate information.
The certificate and its CA certificate must be imported on the remote peer FortiGate and on the primary FortiGate before configuring IPsec VPN tunnels. If the built-in Fortinet_Factory certificate and the Fortinet_CA CA certificate are used for authentication, you can skip this step.
config vpn certificate local edit "test1" ... set range global next end config vpn certificate ca edit "CA_Cert_1" ... set range global next end -
Configure the peer user.
The peer user is used in the IPsec VPN tunnel peer setting to authenticate the remote peer FortiGate.
-
If not using the built-in Fortinet_Factory certificate and Fortinet_CA CA certificate:
config user peer edit "peer1" set ca "CA_Cert_1" next end -
If the built-in Fortinet_Factory certificate and Fortinet_CA CA certificate are used for authentication, the peer user must be configured based on Fortinet_CA:
config user peer
    edit "peer1"
        set ca "Fortinet_CA"
    next
end
-
-
Configure the IPsec phase1-interface.
config vpn ipsec phase1-interface edit "HQ2B2" set interface "port1" set ike-version 2 set authmethod signature set net-device enable set proposal aes128-sha256 aes256-sha256 aes128-sha1 aes256-sha1 set remote-gw 198.51.100.5 set certificate "test1" set peer "peer1" next end -
Configure the IPsec phase2-interface.
config vpn ipsec phase2-interface edit "HQ2B2" set phase1name "HQ2B2 " set proposal aes128-sha1 aes256-sha1 aes128-sha256 aes256-sha256 aes128gcm aes256gcm chacha20poly1305 set auto-negotiate enable set src-addr-type name set dst-addr-type name set src-name "10.100.77.0" set dst-name "10.2.0.0" next end -
Configure the static routes.
Two static routes are added to reach the remote protected subnet. The blackhole route is important to ensure that IPsec traffic does not match the default route when the IPsec tunnel is down.
config router static edit 2 set dst 10.20.0.0 255.255.255.0 set device "HQ2B2" next edit 3 set dst 10.20.0.0 255.255.255.0 set blackhole enable set distance 254 next end -
Configure two firewall policies to allow bidirectional IPsec traffic flow over the IPsec VPN tunnel.
config firewall policy
    edit 1
        set name "inbound"
        set srcintf "HQ2B2"
        set dstintf "port2"
        set srcaddr "10.2.0.0"
        set dstaddr "10.100.77.0"
        set action accept
        set schedule "always"
        set service "ALL"
    next
    edit 2
        set name "outbound"
        set srcintf "port2"
        set dstintf "HQ2B2"
        set srcaddr "10.100.77.0"
        set dstaddr "10.2.0.0"
        set action accept
        set schedule "always"
        set service "ALL"
    next
end
To configure HQ2 for IPsec VPN authenticating a remote FortiGate peer with a digital certificate using the CLI:
-
Configure the WAN interface and default route.
config system interface edit "port1" set vdom "root" set ip 198.51.100.5 255.255.255.0 next end config router static edit 1 set gateway 198.51.100.2 set device "port1" next end -
Configure address objects for internal protected networks.
config firewall address edit "10.2.0.0" set subnet 10.2.0.0 255.255.255.0 next end config firewall address edit "10.100.77.0" set subnet 10.100.77.0 255.255.255.0 next end -
Configure the internal (protected subnet) interface.
config system interface edit "port3" set vdom "root" set ip 10.2.0.0 255.255.255.0 next end -
Configure the import certificate and its CA certificate information.
config vpn certificate local edit "test2" ... set range global next end config vpn certificate ca edit "CA_Cert_1" ... set range global next end -
Configure the peer user.
-
If not using the built-in Fortinet_Factory certificate and Fortinet_CA CA certificate:
config user peer edit "peer2" set ca "CA_Cert_1" next end -
If the built-in Fortinet_Factory certificate and Fortinet_CA CA certificate are used for authentication, the peer user must be configured based on Fortinet_CA:
config user peer
    edit "peer2"
        set ca "Fortinet_CA"
    next
end
-
-
Configure the IPsec phase1-interface.
config vpn ipsec phase1-interface edit "HQ2B2" set interface "port1" set ike-version 2 set authmethod signature set net-device enable set proposal aes128-sha256 aes256-sha256 aes128-sha1 aes256-sha1 set remote-gw 198.51.100.5 set certificate "test1" set peer "peer1" next end -
Configure the IPsec phase2-interface.
config vpn ipsec phase2-interface edit "B2toHQ" set phase1name "B2toHQ" set proposal aes128-sha1 aes256-sha1 aes128-sha256 aes256-sha256 aes128gcm aes256gcm chacha20poly1305 set auto-negotiate enable set src-addr-type name set dst-addr-type name set src-name "10.2.0.0" set dst-name "10.100.77.0" next end -
Configure the static routes.
config router static edit 2 set dst 10.100.77.0 255.255.255.0 set device "B2toHQ" next edit 3 set dst 10.100.77.0 255.255.255.0 set blackhole enable set distance 254 next end -
Configure two firewall policies to allow bidirectional IPsec traffic flow over the IPsec VPN tunnel.
config firewall policy
    edit 1
        set name "inbound"
        set srcintf "B2toHQ"
        set dstintf "port3"
        set srcaddr "10.100.77.0"
        set dstaddr "10.2.0.0"
        set action accept
        set schedule "always"
        set service "ALL"
    next
    edit 2
        set name "outbound"
        set srcintf "port3"
        set dstintf "B2toHQ"
        set srcaddr "10.2.0.0"
        set dstaddr "10.100.77.0"
        set action accept
        set schedule "always"
        set service "ALL"
    next
end
To verify the tunnel status in the GUI:
-
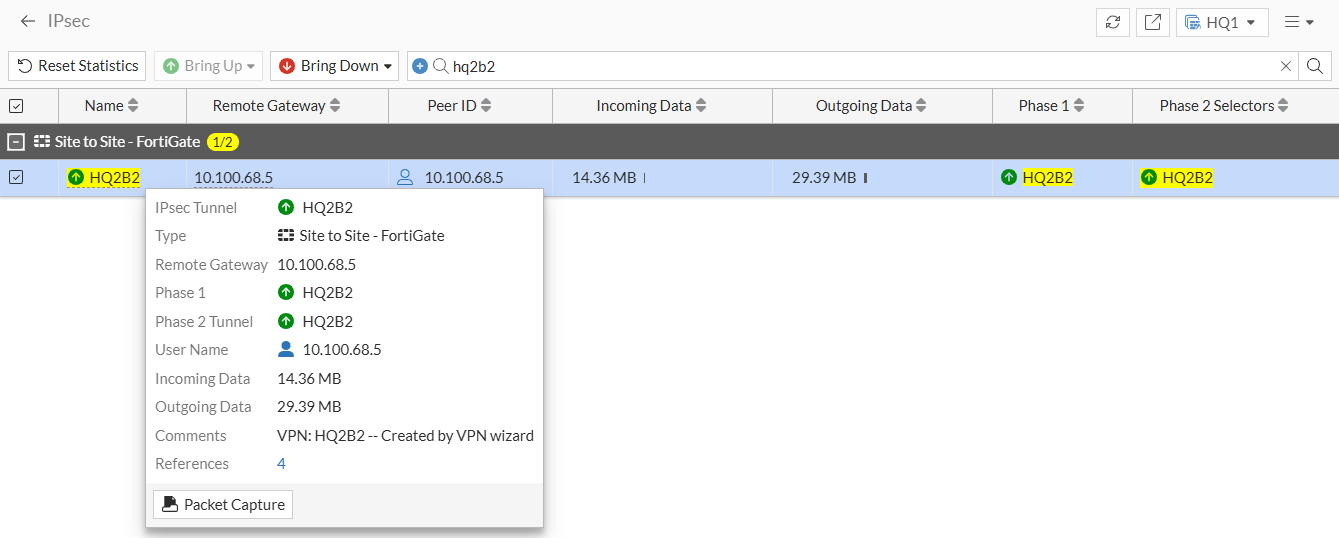
On FortiGate HQ1, go to Dashboard > Network and expand the IPsec widget.
-
Find the new tunnel, HQ2B2 in this example, and check that both Phase 1 and Phase 2 Tunnel are up.
-
Verify the tunnel status on HQ2 in the same way.
To verify the tunnel status in the CLI:
-
On FortiGate HQ1, run the following command:
# diagnose vpn ike gateway list name HQ2B2
vd: root/0
name: HQ2B2
version: 2
interface: port1 3
addr: 203.0.113.101:500 -> 198.51.100.5:500
tun_id: 198.51.100.5/::198.51.100.5
remote_location: 0.0.0.0
network-id: 0
transport: UDP
created: 852804s ago
peer-id: 198.51.100.5
peer-id-auth: no
pending-queue: 0
PPK: no
IKE SA: created 1/11  established 1/11  time 0/820/9010 ms
IPsec SA: created 1/21  established 1/21  time 0/433/9010 ms

id/spi: 8895 45e69522bd784183/69be2940ae314677
direction: responder
status: established 77898-77898s ago = 0ms
proposal: aes128-sha256
child: yes
SK_ei: 07446ef38bd406fa-18e45bec886a2bd3
SK_er: b940f4338b27f369-7beaa308b7241a1b
SK_ai: 61eeb720d062c70b-e606340beab6f9d5-3a4da2966373ab15-e5766540cf6c7dd1
SK_ar: bbdd888b98dbda7b-669da7a726ce2148-3f08940f802f580c-52b6ef93f48672aa
message-id sent/recv: 0/1783
QKD: no
lifetime/rekey: 86400/8231
DPD sent/recv: 00000000/00000000
peer-id: 198.51.100.5
Note that HQ1 acted as the responder, and established the tunnel with remote peer 198.51.100.5 over UDP/500.
-
On FortiGate HQ2, run the following command:
# diagnose vpn ike gateway list name B2toHQ
vd: root/0
name: B2toHQ
version: 2
interface: port1 3
addr: 198.51.100.5:500 -> 203.0.113.101:500
tun_id: 203.0.113.101/::203.0.113.101
remote_location: 0.0.0.0
network-id: 0
transport: UDP
created: 853181s ago
peer-id: 203.0.113.101
peer-id-auth: no
pending-queue: 0
PPK: no
IKE SA: created 1/11  established 1/11  time 0/5/10 ms
IPsec SA: created 1/21  established 1/21  time 0/0/10 ms

id/spi: 5788 45e69522bd784183/69be2940ae314677
direction: initiator
status: established 78281-78281s ago = 10ms
proposal: aes128-sha256
child: yes
SK_ei: 07446ef38bd406fa-18e45bec886a2bd3
SK_er: b940f4338b27f369-7beaa308b7241a1b
SK_ai: 61eeb720d062c70b-e606340beab6f9d5-3a4da2966373ab15-e5766540cf6c7dd1
SK_ar: bbdd888b98dbda7b-669da7a726ce2148-3f08940f802f580c-52b6ef93f48672aa
message-id sent/recv: 1792/0
QKD: no
lifetime/rekey: 86400/7818
DPD sent/recv: 00001ed7/00001ed7
peer-id: 203.0.113.101
Note that HQ2 acted as the initiator, and established the tunnel with remote peer 203.0.113.101 over UDP/500.
To verify traffic through the IPsec tunnel:
-
On a PC connected behind the port2 interface of HQ1, initiate ICMP traffic to the 10.2.0.0/24 network and verify that traffic goes through:
root@dmz-public-server:~# ping 10.2.0.7
PING 10.2.0.7 (10.2.0.7) 56(84) bytes of data.
64 bytes from 10.2.0.7: icmp_seq=1 ttl=62 time=9.84 ms
64 bytes from 10.2.0.7: icmp_seq=2 ttl=62 time=0.808 ms
-
Verify the traffic on HQ1:
# diagnose sniffer packet any 'host 10.2.0.7' 4 0 l
Using Original Sniffing Mode
interfaces=[any]
filters=[host 10.2.0.7]
2024-11-05 12:06:05.509027 port2 in 10.100.77.101 -> 10.2.0.7: icmp: echo request
2024-11-05 12:06:05.509074 HQ2B2 out 10.100.77.101 -> 10.2.0.7: icmp: echo request
2024-11-05 12:06:05.518607 HQ2B2 in 10.2.0.7 -> 10.100.77.101: icmp: echo reply
2024-11-05 12:06:05.518632 port2 out 10.2.0.7 -> 10.100.77.101: icmp: echo reply
The ICMP request packets are received on port2 and routed to the HQ2B2 tunnel. ICMP reply packets are received on the HQ2B2 tunnel and routed back out port2.
-
Verify the traffic on HQ12:
# diagnose sniffer packet any 'host 10.100.77.101' 4 0 l
Using Original Sniffing Mode
interfaces=[any]
filters=[host 10.100.77.101]
2024-11-05 12:06:05.509711 B2toHQ in 10.100.77.101 -> 10.2.0.7: icmp: echo request
2024-11-05 12:06:05.509791 port3 out 10.100.77.101 -> 10.2.0.7: icmp: echo request
2024-11-05 12:06:05.518809 port3 in 10.2.0.7 -> 10.100.77.101: icmp: echo reply
2024-11-05 12:06:05.518899 B2toHQ out 10.2.0.7 -> 10.100.77.101: icmp: echo reply
The ICMP request is received on the B2toHQ tunnel and routed to port3. The ICMP reply is received on port3 and routed back out the B2toHQ.
-
Optionally, run real time IKE debug using appropriate filters for troubleshooting if the IPsec tunnel does not come up:
diagnose debug application ike -1
If the remote FortiGate certificate cannot be validated, the following error is shown in the debug output:
ike 0: to_HQ2:15314: certificate validation failed