
Nutanix SDN connector using server credentials
FortiOS automatically updates dynamic addresses for Nutanix using an Nutanix SDN connector, including mapping the following attributes from Nutanix instances to dynamic address groups in FortiOS:
-
Cluster name
-
Cluster UUID
-
Description
-
Host name
-
Host UUID
-
Hypervisor type
-
Image name
-
Image UUID
-
Subnet name
-
Subnet UUID
-
VM name
-
VM UUID
To configure a Nutanix connector using the GUI:
-
Configure the Nutanix SDN connector:
-
Go to Security Fabric > External Connectors.
-
Select Nutanix.
-
In the IP address field, enter the IP address for your Nutanix environment.
-
In the Port field, enter the desired port.
-
In the Username and Password fields, enter the credentials for your Nutanix environment.
-
Click OK.
-
-
Create a dynamic firewall address for the configured Nutanix SDN connector:
-
Go to Policy & Objects > Addresses and select Address.
-
Click Create new.
-
From the Type dropdown list, select Dynamic.
-
From the Sub Type dropdown list, select Fabric Connector Address.
-
From the SDN Connector dropdown list, select the Nutanix connector.
-
From the Filter dropdown list, select the desired filters.
-
Click OK.
-
-
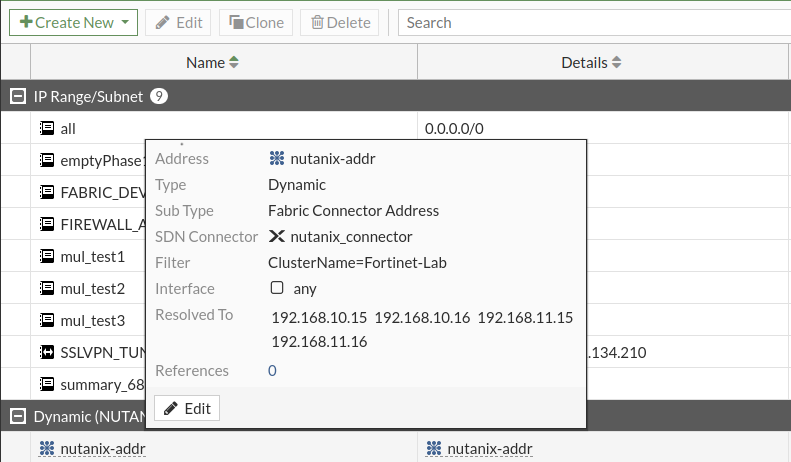
Ensure that the Nutanix SDN connector resolves dynamic firewall IP addresses:
-
Go to Policy & Objects > Addresses.
-
Hover over the address created in step 2 to see a list of IP addresses for instances that satisfy the filter requirements configured in step 2. In this example, the configured filter is "ClusterName=Fortinet-Lab":
-
To configure a Nutanix connector using the CLI:
-
Configure the Nutanix SDN connector:
config system sdn-connector edit "nutanix_connector" set status disable set type nutanix set server "172.18.33.59" set server-port 9440 set username "admin" set password ********** set update-interval 60 next end -
Create a dynamic firewall address for the configured Nutanix SDN connector:
config firewall address edit "nutanix-addr" set uuid 382ceafe-8e72-51eb-7300-0807ee907946 set type dynamic set sdn "nutanix_connector" set color 2 set filter "ClusterName=Fortinet-Lab" next end -
Ensure that the Nutanix SDN connector resolves dynamic firewall IP addresses:
config firewall address
    edit "nutanix-addr"
        set uuid 382ceafe-8e72-51eb-7300-0807ee907946
        set type dynamic
        set sdn "nutanix_connector"
        set color 2
        set filter "ClusterName=Fortinet-Lab"
        config list
            edit "192.168.10.15"
            next
            edit "192.168.10.16"
            next
            edit "192.168.11.15"
            next
            edit "192.168.11.16"
            next
        end
    next
end