Configuring an external feed
An external feed can be configured on the Security Fabric > External Connectors page. After clicking Create New, there are five external feed options available: FortiGuard Category, IP Address, Domain Name, MAC Address, and Malware Hash. When configuring the external feed settings, the Update method can be either a pull method (External Feed) or a push method (PUSH API).
This topic includes example external feed configurations:
|
|
When multi-VDOM mode is enabled, external feed connectors can be defined in the global VDOM or within a VDOM. See External feed connectors per VDOM for example configurations. |
Configuring an external feed with an external feed update
The external feed will periodically fetch entries from the URI using HTTP or HTTPS.
To configure the external feed in the GUI:
-
Go Security Fabric > External Connectors and click Create New.
-
In the External Feeds section, select the required feed type.
-
Configure the connector settings:
Status
Enable/disable the connector.
Name
Enter a name for the external feed connector.
Update method
Select External Feed.
URL of external resource
Enter the link to the external resource file. HTTP, HTTPS, and STIX protocols are supported.
HTTP basic authentication
Enable/disable basic HTTP authentication. When enabled, enter the username and password in the requisite fields. See Configuring external feed authentication for more information.
Refresh Rate
The time interval to refresh the external resource, in minutes (1 - 43200, default = 5).
The applicable external feed will be triggered to refresh between 0 minutes and the configured value. When the refresh is triggered, if another task is being processed be the schedule worker, the refresh task will be added to the queue.
Comments
Optionally, enter a description of the connector.
-
Click OK.
To configure the external feed in the CLI:
config system external-resource
    edit <name>
        set status {enable | disable}
        set type {category | address | domain | malware}
        set update-method {feed | push}
        set category <integer, 192-221>
        set username <string>
        set password <string>
        set client-cert-auth {enable | disable}
        set comments <string>
        *set resource <resource-uri>
        set user-agent <string>
        set server-identity-check {none | basic | full}
        *set refresh-rate <integer>
        set source-ip <ip address>
        set source-ip-interface <string>
        set interface-select-method {auto | sdwan | specify}
    next
end
The parameter marked with an asterisk (*) is mandatory and must be filled in. The category parameter must be set when the type is either category or domain. Other parameters have either default values or are optional.
To improve the security of the connection, it is recommended to enable server certificate validation (server-identity-check) either in basic or full mode.
Configuring external feed authentication
External feed connectors support username and password authentication.
|
|
The HTTP basic authentication field is only visible when the Update method is set to External Feed. |
To enable username and password authentication in an external feed connector:
-
Go Security Fabric > External Connectors.
-
Click Create New, or edit an existing external feed connector.
-
Enable HTTP basic authentication.
-
Enter the Username and Password.

-
Click OK.
HTTP header
Additional headers can be included in the user-agent field. Use \r\n to separate the URL headers, for example:
# set user-agent "Firefox\r\nheader1: test1\r\nheader2: test2"
Sample request:
    HTTP request: http
    GET /filetypes/test.tar.gz HTTP/1.1
    Host: 172.17.219.10
    User-Agent: Firefox
    header1: test1
    header2: test2
    Accept: */*
    Connection: close
External feed connectors use this functionality to support authentication using an API key. The API key authentication can only be configured in the CLI with the set user-agent command. The API key must be appended with user-agent in the following format: “user-agent\r\nAPI-Key:SecretAPIkey”. API keys are typically used for programmatic access to the resource by an authorized requester. See What Is an API Key in the Fortinet Cyber Glossary for more information.
To enable API key authentication in an external feed connector:
-
Configure the external feed. See Configuring an external feed with an external feed update.
-
Configure the user-agent with an API key:
config system external resources
    edit <name>
        set user-agent "Firefox\r\nAPI-Key:abcdef12345"
    next
end
See Using the AusCERT malicious URL feed with an API key for an example.
Configuring an external feed with a push API update
The external feed receives entry updates from webhook requests to the FortiGate REST API. This method provides the code samples needed to perform add, remove, and snapshot operations.
In the following example, a FortiGuard Category external feed is used to show the different API push options. A FortiGuard license is required when using a FortiGuard Category external feed in a web filter profile in a policy in NGFW profile or policy mode.
To configure the external feed in the GUI:
-
Go to Security Fabric > External Connectors and click Create New.
-
In the External Feeds section, click FortiGuard Category.
-
Enter a name.
-
Set the Update method to Push API.
-
Click OK. The External Feed Push API Information pane opens that contains the following fields:
-
URL: the FortiGate's API URL to call in order to perform the update.
-
API admin key: when an API administrator user is configured on the FortiGate, an API admin key will be associated with the API administrator. Input the API key to see the final cURL request.
-
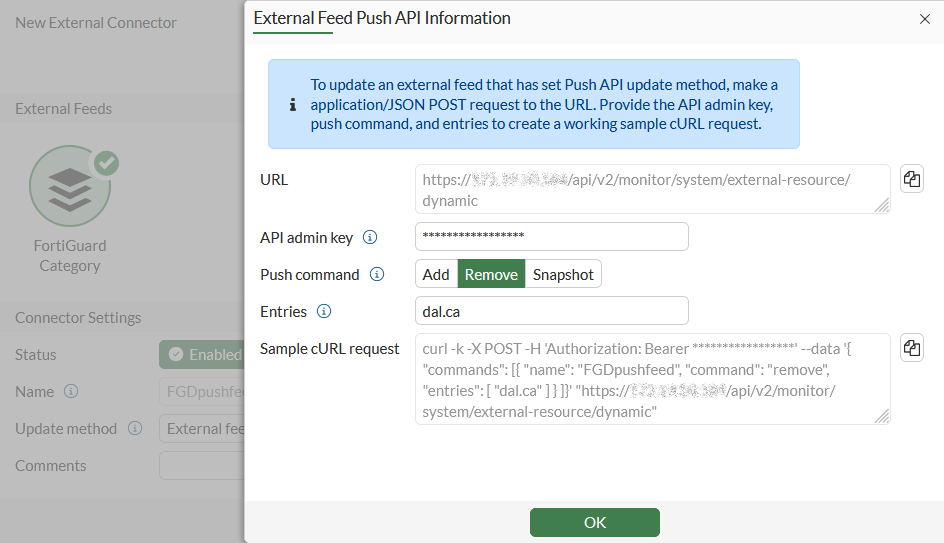
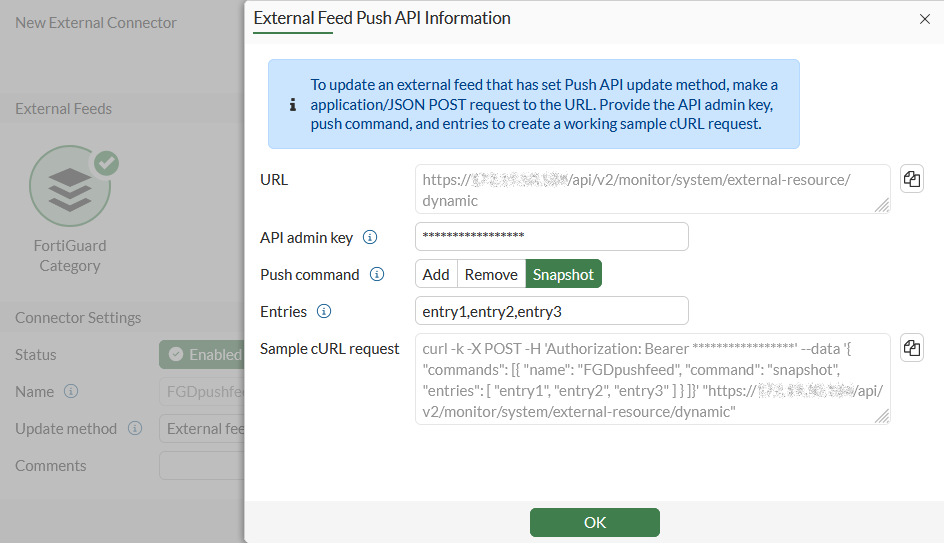
Push command: select one of three push methods.
-
Add: add the specified entries to the external feed.
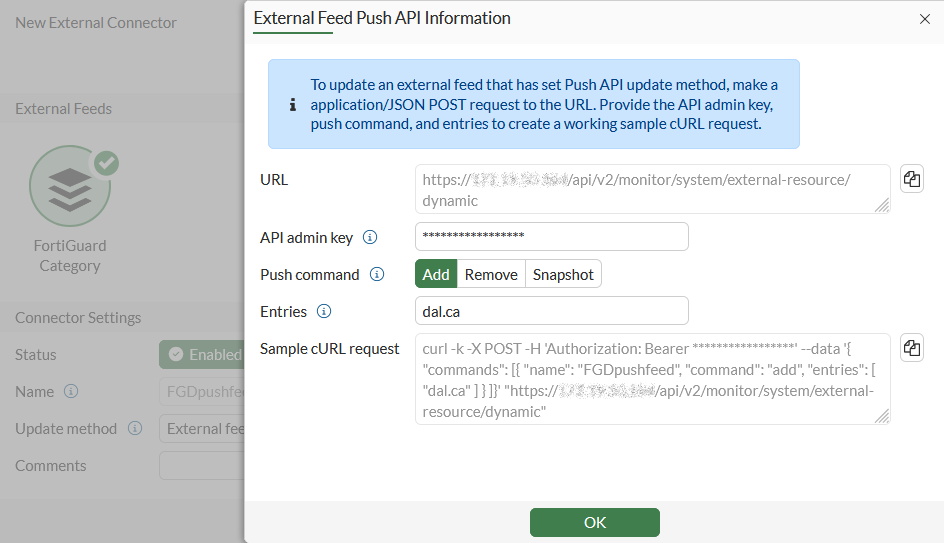
-
Remove: remove the specified entries from the external feed.
-
Snapshot: replace the external feed with all specified entries.
-
-
Entries: enter the entries separated by a comma (,) to be applied to the FortiGuard Category external feed list.
-
Sample cURL request: copy this cURL command to perform the push API update on the FortiGate against the list (cccccccc).
See REST API administrator for more information.
-
-
Copy the content in the Sample cURL request field (Add is used in this example).
-
Click OK.
-
On a client, generate the API request for the external feed.
To configure the external feed in the CLI:
config system external-resource
    edit "cccccccc"
        set update-method push
        set category 201
    next
end
To use the API in the CLI:
# diagnose system external-resource {push-add | push-remove | push-snapshot} <ext_name> <entry>
To use the API with a JSON file:
# diagnose sys external-resource push-api-json-commands
{
  "commands": [ <Array: Mandatory>
    { <Object: Mandatory>
         "name": <String: Mandatory, Example: "AWS_MALWARE_FEED">
      "command": <String: mandatory, Options: "add", "remove", "snapshot">,
      "entries": [ <Array: Mandatory>
        <String: Mandatory, Example: "10.100.1.1">
      ]
    }
  ]
}
Sample:
# diagnose sys external-resource push-api-json-commands '{"commands":[{"name":"test","command":"add","entries":["10.10.10.1","10.10.10.2"]},{"name":"test","command":"whatever","entries":["10.10.10.3","10.10.10.4"]}]}'
command returned: EXT_RESOURCE_PUSH_CMD_RETURN_OK
Returned json:
[
  {
    "name":"test",
    "command":"add",
    "status":"success"
  },
  {
    "name":"test",
    "command":"whatever",
    "error":"Invalid command.",
    "status":"error"
  }
]
To use the API with a Postman REST client:
-
Create an API administrator in FortiOS with write access.
-
Ensure the API token is generated.
-
Configure the external resource list as needed.
-
In the Postman client, create a new request, set the HTTP method to POST, enter the URL.
-
Configure the access token using one of the following methods:
-
To use the bearer token: click the Authorization tab, set the Type to Bearer, and enter the REST API administrator token.
-
To use the access_token parameter: click the Params tab and enter the access_token key-value pair (access_token and <key>).
-
-
Click the Body tab and configure the following:
-
Select raw and set the input type to JSON.
-
Insert the JSON data payload.
-
-
Click Send to send the POST request. If there is a response, the response body appears. For example,
POST https://172.18.52.153/api/v2/monitor/system/external-resource/dynamic?access_token=g1mnfs8bzxk5hf8Qwcz4kx7yn3jHmG&vdom=vd1
Content-Type: application/json
User-Agent: PostmanRuntime/7.29.2
Accept: */*
Postman-Token: 04e10736-190e-4119-92e1-04e91bf99c10
Host: 172.18.52.153
Accept-Encoding: gzip, deflate, br
Connection: keep-alive
Content-Length: 485

{
   "commands":[
      {
         "name":"ip",
         "command":"add",
         "entries":[
            "10.10.10.1",
            "10.10.10.2"
         ]
      },
      {
         "name":"fqdn",
         "command":"remove",
         "entries":[
            "10.10.10.1",
            "10.10.10.2"
         ]
      },
      {
         "name":"fortiguard",
         "command":"snapshot",
         "entries":[
            "10.10.10.1",
            "10.10.10.2"
         ]
      }
   ]
}

HTTP/1.1 200 OK
date: Fri, 22 Jul 2022 21:10:39 GMT
x-frame-options: SAMEORIGIN
content-security-policy: frame-ancestors 'self'
x-xss-protection: 1; mode=block
cache-control: no-cache, must-revalidate
content-length: 480
content-type: application/json
Connection: keep-alive

{
   "http_method":"POST",
   "results":[
      {
         "name":"ip",
         "command":"add",
         "status":"success"
      },
      {
         "name":"fqdn",
         "command":"remove",
         "status":"success"
      },
      {
         "name":"fortiguard",
         "command":"snapshot",
         "status":"success"
      }
   ],
   "vdom":"vd1",
   "path":"system",
   "name":"external-resource",
   "action":"dynamic",
   "status":"success",
   "serial":"FG6H1E5819900000",
   "version":"v7.2.1",
   "build":1254
}
Viewing the update history
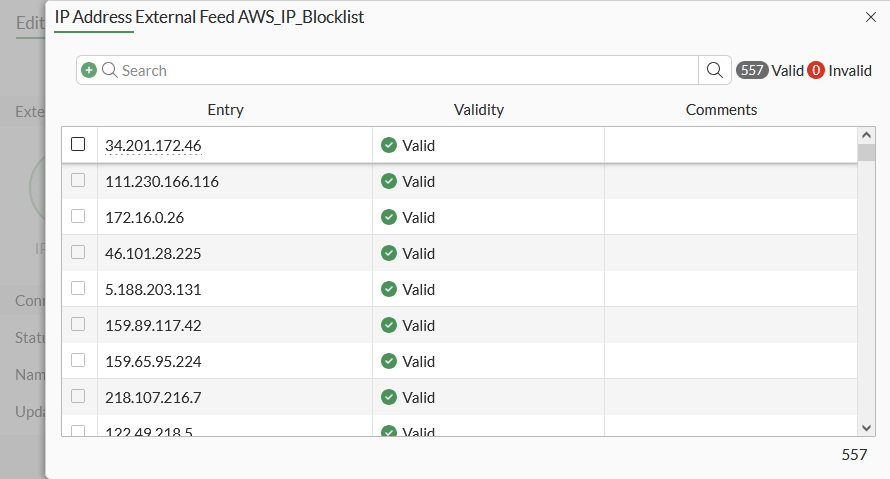
To review the update history of an external feed, go to Security Fabric > External Connectors, select a feed, and click Edit. The Last Update field shows the date and time that the feed was last updated.
Click View Entries to view the current entries in the list.
Configuring mTLS client certification
Administrators can configure and define a trusted client certificate for mutual TLS (mTLS) authentication in the CLI. This enhances security for the external feed server when connecting to an HTTPS external resource.
During configuration of external resources, a client certificate can be configured that is signed and trusted by a remote mTLS server. When the server asks for client certification upon connection, FortiOS will use the configured client certificate in the TLS handshake process and pass the mTLS authentication.
|
|
If FortiOS cannot provide the correct certificate, the server may choose to deny or accept the connection based on its authentication protocol. Therefore, it is crucial to specify client certificate authentication when connecting to an mTLS server. This requirement does not apply if the server is not using mTLS. |
To configure client certification mTLS in the CLI:
config system external-resource
    edit "mTLS"
        set type address
        set client-cert-auth enable
        set client-cert <mTLS_client>
        set resource <HTTPS external resource>
    next
end
To configure client certification mTLS in the GUI:
-
Go to Security Fabric > External Connectors.
-
Click Create New.
-
Select External Feeds > IP Address.
-
Set the Status to Enabled.
-
Enable Client certificate authentication and select the mTLS client certificate from the dropdown list.

If the mTLS client certificate has not yet been created, click Create and proceed with the configuration.
-
Configure other settings, as needed.
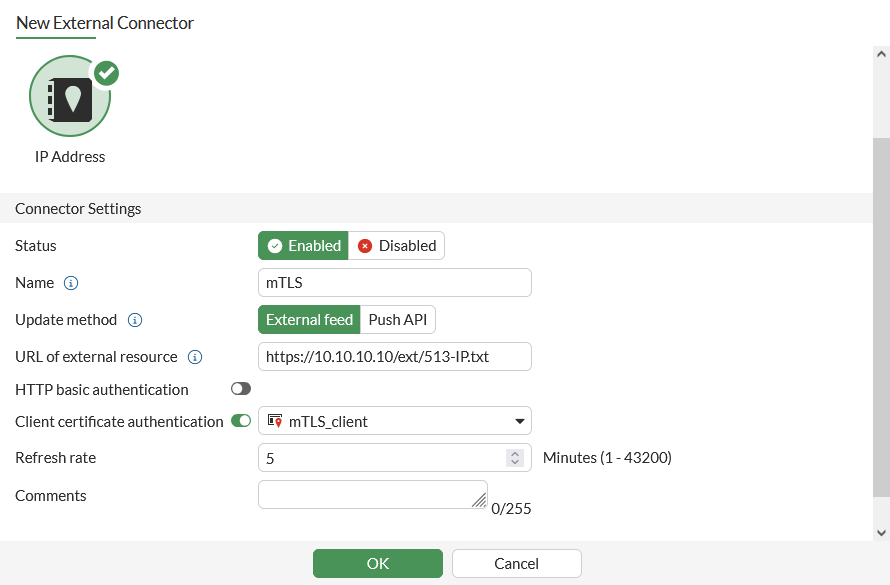
-
Click OK.
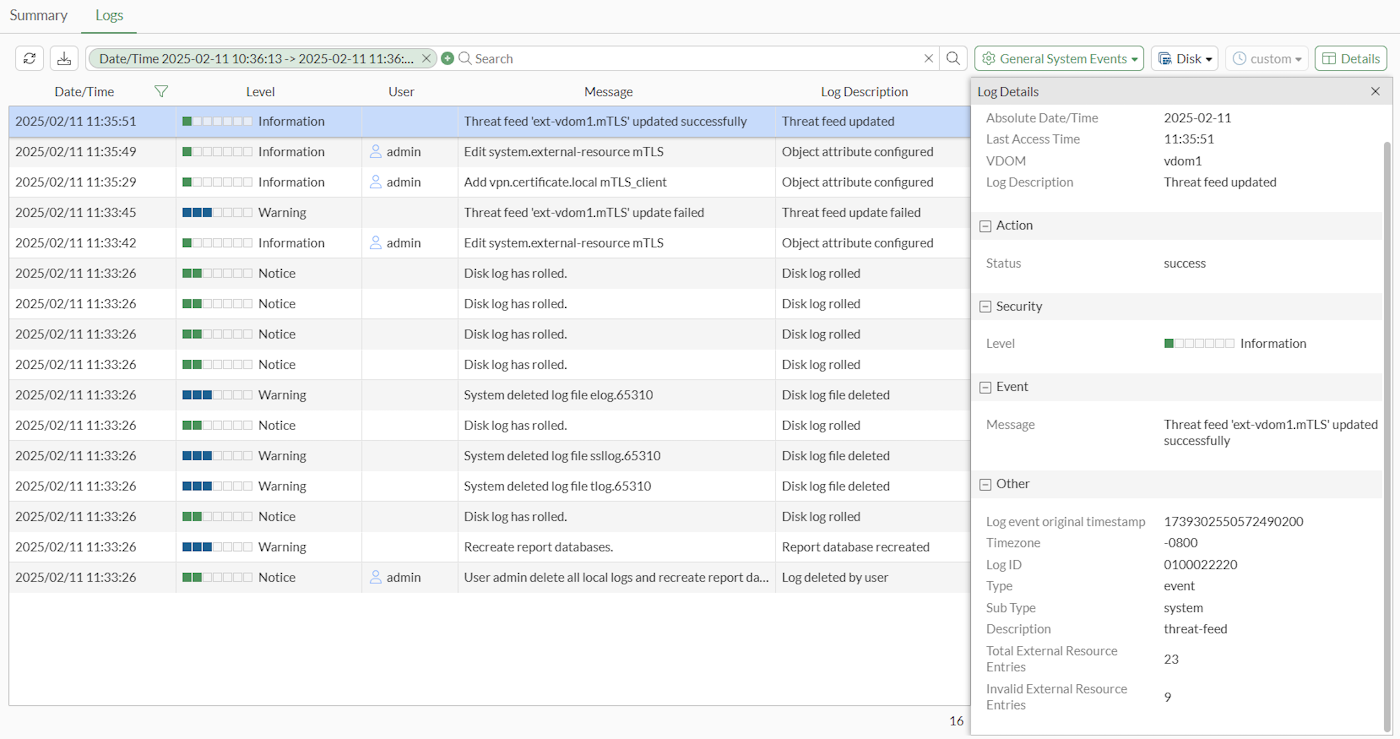
Logs related to the mTLS client certificate authentication can be found in Log & Report > System Events > Logs.