
A FortiGate configured as a dial-up client initiates an IPsec VPN connection to a remote IPsec VPN server or IPsec VPN hub (like another FortiGate or a third-party gateway) while using a dynamically assigned WAN IP address. Unlike traditional site-to-site VPNs that require static public IP addresses on both endpoints, the dial-up client relies on dynamic IP allocation, such as through DHCP, making it useful in networks with no static IP availability. It is also suitable for environments where the client FortiGate is located behind a NAT device.
The dial-up VPN significantly reduces configuration complexity and overhead when deploying new branches. Because the IPsec VPN server or IPsec VPN hub is preconfigured to accept dynamic IPsec connections, there is no need to reconfigure it for each new branch FortiGate deployment. This makes scaling easier, allowing organizations to add new sites without delays.
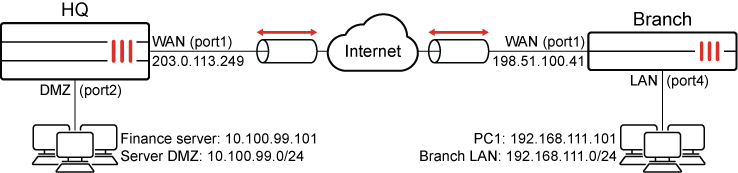
In this example, users in the Branch LAN subnet require connectivity with the HQ DMZ subnet to access servers with IPsec VPN. The IP address of the Branch's Internet (port1) interface is assigned dynamically using DHCP.
The Branch FortiGate is configured as a dialup VPN client to authenticate and connect to the HQ FortiGate. For mutual authentication, a pre-shared key is used.
After the IPsec VPN tunnel is successfully established, PC1 (192.168.111.101) can ping the Finance server (10.100.99.101).
To configure the HQ FortiGate as an IPsec VPN dialup server using the VPN Wizard:
-
Go to VPN > VPN Wizard.
-
Enter a name for the VPN in the Tunnel name field. In this example, vpn-server
-
Set Select a template to Site to Site.
-
Click Begin.
-
Configure the VPN tunnel settings:
Field
Value
Authentication method
Pre-shared key
Pre-shared key
Enter a suitable key.
The same pre-shared key must be configured on the Branch FortiGate.
IKE
Version 1
NAT traversal
Enable
Set Keepalive frequency to 10.
-
Click Next.
-
Configure the Remote site settings:
Field
Value
Remote site device type
FortiGate
Remote site device
Behind NAT or dynamic
Remote site subnets that can access VPN
192.168.111.0/24 (The Branch’s LAN subnet)
-
Click Next.
-
Configure the Local site settings:
Field
Value
Outgoing interface that binds to tunnel
WAN (port1)
Disable Create and add interface to zone.
Local interface
DMZ (port2)
Local subnets that can access VPN
This field automatically uses the IP address related to the selected local interface. In this example, 10.100.99.0/24
Allow remote site's internet traffic through this device
Disabled
-
Click Next.
-
Review the configuration and, if everything is correct, click Submit.
The vpn-server IPsec tunnel is configured by the wizard and is visible under VPN > VPN Tunnels.
To configure Branch FortiGate as IPsec VPN dialup client using the VPN Wizard:
-
Go to VPN > VPN Wizard.
-
Enter a name for the VPN in the Tunnel name field. In this example, vpn-client
-
Set Select a template to Site to Site.
-
Click Begin.
-
Configure the VPN tunnel settings:
Field
Value
Authentication method
Pre-shared key
Pre-shared key
Enter a suitable key.
The same pre-shared key must be configured on the HQ FortiGate.
IKE
Version 1
NAT traversal
Enable
Set Keepalive frequency to 10.
-
Click Next.
-
Configure the Remote site settings:
Field
Value
Remote site device type
FortiGate
Remote site device
Accessible and static
Set IP/FQDN to 203.0.113.249. The WAN interface IP address of the HQ FortiGate, or its FQDN (the FQDN must resolve to the WAN IP address).
Route this device's internet traffic through the remote site.
Disabled
Remote site subnets that can access VPN
10.100.99.0/24 (The HQ’s DMZ subnet).
-
Click Next.
-
Configure the Local site settings:
Field
Value
Outgoing interface that binds to tunnel
WAN (port1)
Disable Create and add interface to zone.
Local interface
LAN (port4)
Local subnets that can access VPN
This field automatically uses the IP address related to the selected local interface. In this example, 192.168.11.0/24
Allow remote site's internet traffic through this device
Disabled
-
Click Next.
-
Review the configuration and, if everything is correct, click Submit.
The vpn-client IPsec tunnel is configured by the wizard and is visible under VPN > VPN Tunnels.
To configure the HQ FortiGate as an IPsec VPN dialup server in the CLI:
-
Configure the WAN interface and default route.
The WAN interface is the interface connected to the ISP and it is recommended to configure it with a static IP address to ensure that the IPsec VPN configuration on the Branch stays unchanged if the WAN IP changes on the HQ. The IPsec tunnel is established over the WAN interface.
config system interface edit "port1" set vdom "root" set ip 203.0.113.249 255.255.255.0 set alias "WAN" next end config router static edit 1 set gateway 203.0.113.250 set device "port1" next end -
Configure address objects for the HQ server DMZ subnet (10.100.99.0/24) and Branch LAN subnet (192.168.111.0/24):
config firewall address edit "HQ Server DMZ" set subnet 10.100.99.0 255.255.255.0 next edit "Branch LAN" set subnet 192.168.111.0 255.255.255.0 next end -
Configure the DMZ interface.
config system interface edit "port2" set vdom "root" set alias "DMZ" set ip 10.100.99.1 255.255.255.0 next end -
Configure the IPsec phase1-interface.
config vpn ipsec phase1-interface edit "vpn-server" set type dynamic set interface "port1" set peertype any set net-device disable set proposal aes128-sha256 aes256-sha256 aes128-sha1 aes256-sha1 set psksecret **** next end -
Configure the IPsec phase2-interface.
config vpn ipsec phase2-interface edit "vpn-server" set phase1name "vpn-server" set proposal aes128-sha1 aes256-sha1 aes128-sha256 aes256-sha256 aes128gcm aes256gcm chacha20poly1305 set src-addr-type name set dst-addr-type name set src-name "HQ Server DMZ" set dst-name "Branch LAN" next end -
Configure two firewall policies to allow the Branch LAN users to access the HQ DMZ subnet over the IPsec tunnel and vice versa:
config firewall policy
    edit 1
        set name "HQ DMZ to Branch LAN"
        set srcintf "port2"
        set dstintf "vpn-server"
        set action accept
        set srcaddr "HQ Server DMZ"
        set dstaddr "Branch LAN"
        set schedule "always"
        set service "ALL"
    next
    edit 2
        set name "Branch LAN to HQ DMZ"
        set srcintf "vpn-server"
        set dstintf "port2"
        set action accept
        set srcaddr "Branch LAN"
        set dstaddr "HQ Server DMZ"
        set schedule "always"
        set service "ALL"
    next
end
To configure Branch FortiGate as IPsec VPN dialup client in the CLI:
-
Configure the WAN interface and default route.
The WAN interface is the interface connected to the ISP. It can work in static mode, DHCP (as in this example), or PPPoE. The IPsec tunnel is established over the WAN interface.
config system interface
    edit "port1"
        set vdom "root"
        set mode dhcp
        set alias "WAN"
        set defaultgw enable
    next
end
Setting
defaultgwtoenableautomatically injects a default route with an administrative distance (AD) of five, using the gateway IP address provided in DHCP Option 3 by the DHCP server. If the DHCP server does not supply this information, administrators will need to manually configure a default route. -
Configure address objects for the HQ server DMZ subnet (10.100.99.0/24) and Branch LAN subnet (192.168.111.0/24):
config firewall address
    edit "HQ Server DMZ"
        set allow-routing enable
        set subnet 10.100.99.0 255.255.255.0
    next
    edit "Branch LAN"
        set subnet 192.168.111.0 255.255.255.0
    next
end
Setting
allow-routingtoenableis optional. It allows address objects to be directly referenced when defining static routes. When this setting is disabled, administrators must manually specify subnets instead of using address objects for static route configuration. Enabling this option streamlines route management and ensures consistency by leveraging predefined address objects. -
Configure the LAN interface.
config system interface edit "port4" set vdom "root" set alias "LAN" set ip 192.168.111.0 255.255.255.0 next end -
Configure the IPsec phase1-interface.
config vpn ipsec phase1-interface edit "vpn-client" set interface "port1" set peertype any set net-device disable set proposal aes128-sha256 aes256-sha256 aes128-sha1 aes256-sha1 set remote-gw 203.0.113.249 set psksecret **** next end -
Configure the IPsec phase2-interface.
config vpn ipsec phase2-interface edit "vpn-client" set phase1name "vpn-client" set proposal aes128-sha1 aes256-sha1 aes128-sha256 aes256-sha256 aes128gcm aes256gcm chacha20poly1305 set src-addr-type name set dst-addr-type name set src-name "Branch LAN" set dst-name "HQ Server DMZ" next end -
Configure the static routes on the Branch to route traffic from the LAN subnet to the DMZ subnet.
The blackhole route is important to ensure that IPsec traffic does not match the default route when the IPsec tunnel is down.
config router static edit 1 set device "vpn-client" set dstaddr "HQ Server DMZ" next edit 2 set distance 254 set blackhole enable set dstaddr "HQ Server DMZ" next end -
Configure two firewall policies to allow the Branch LAN users to access the HQ DMZ subnet over the IPsec tunnel and vice versa:
config firewall policy
    edit 1
        set name "Branch LAN to HQ DMZ"
        set srcintf "port4"
        set dstintf "vpn-client"
        set action accept
        set srcaddr "Branch LAN"
        set dstaddr "HQ Server DMZ"
        set schedule "always"
        set service "ALL"
    next
    edit 2
        set name "HQ DMZ to Branch LAN"
        set srcintf "vpn-client"
        set dstintf "port4"
        set action accept
        set srcaddr "HQ Server DMZ"
        set dstaddr "Branch LAN"
        set schedule "always"
        set service "ALL"
    next
end
To verify the tunnel status in the GUI:
-
On the Branch FortiGate, go to Dashboard > Network and expand the IPsec widget.
-
Find the new tunnel and check the statuses of the Phase 1 and Phase 2 selectors.
-
If the Phase 2 selector is not up, click on the tunnel, and select Bring Up > All Phase 2 Selectors.
To verify the tunnel status in the CLI:
-
Verify the IPsec Phase 1 tunnel status on either the Branch or HQ:
Branch # diagnose vpn ike gateway list name vpn-client
vd: root/0
name: vpn-client
version: 1
interface: port1 3
addr: 198.51.100.41:4500 -> 203.0.113.249:4500
tun_id: 203.0.113.249/::203.0.113.249
remote_location: 0.0.0.0
network-id: 0
transport: UDP
created: 84005s ago
peer-id: 198.51.100.41
peer-id-auth: no
nat: peer
pending-queue: 0
IKE SA: created 1/1  established 1/1  time 10/10/10 ms
IPsec SA: created 1/3  established 1/3  time 10/13/20 ms

  id/spi: 0 1b29fe469e07695f/bb46729f1ce4b621
  direction: initiator
  status: established 84005-84005s ago = 10ms
  proposal: aes128-sha256
  key: 03b3a13938d3691d-b0b74a7a6e480f74
  QKD: no
  PQC-KEM (IKE): no
  PQC-KEM (all IPsec): no
  lifetime/rekey: 86400/2094
  DPD sent/recv: 00000000/00000000
  peer-id: 10.100.66.99
Note that the IPsec tunnel is established using port 4500 due to NAT Traversal (NAT-T) detection, and the Branch FortiGate acts as the initiator, thus functioning as IPsec VPN dialup client.
-
Verify the IPsec Phase 2 tunnel status on either the Branch or HQ:
Branch # diagnose vpn tunnel list name vpn-client
list all ipsec tunnel in vd 0
------------------------------------------------------
name=vpn-client ver=1 serial=1 198.51.100.41:4500->203.0.113.249:4500 nexthop=203.0.113.1 tun_id=203.0.113.249 tun_id6=::203.0.113.249 status=up dst_mtu=1200 weight=1
bound_if=3 real_if=3 lgwy=static/1 tun=intf mode=auto/1 encap=none/552 options[0228]=npu frag-rfc  run_state=0 role=primary accept_traffic=1 overlay_id=0

proxyid_num=1 child_num=0 refcnt=5 ilast=43039795 olast=43039795 ad=/0
stat: rxp=0 txp=0 rxb=0 txb=0
dpd: mode=on-demand on=1 status=ok idle=20000ms retry=3 count=0 seqno=0
natt: mode=keepalive draft=32 interval=10 remote_port=4500
fec: egress=0 ingress=0
proxyid=vpn-client proto=0 sa=1 ref=2 serial=1
  src: 0:192.168.111.0-192.168.111.255:0
  dst: 0:10.100.99.0-10.100.99.255:0
  SA:  ref=3 options=30202 type=00 soft=0 mtu=1134 expire=42272/0B replaywin=2048
       seqno=1 esn=0 replaywin_lastseq=00000000 qat=0 rekey=0 hash_search_len=1
  life: type=01 bytes=0/0 timeout=42903/43200
  dec: spi=91413880 esp=aes key=16 b8e635145e5ce33fa595c4eba51cabec
       ah=sha1 key=20 148ff3db0deeeb9458fabc072d1ba7ea60500af2
  enc: spi=ae79c01d esp=aes key=16 c95b50e5a29e404813ccd947400c89a6
       ah=sha1 key=20 91e76f45e7c1970c9476c886a9d394b4cffdd863
  dec:pkts/bytes=0/0, enc:pkts/bytes=0/0
  npu_flag=00 npu_rgwy=203.0.113.249 npu_lgwy=198.51.100.41 npu_selid=0 dec_npuid=0 enc_npuid=0
Note the decryption, encryption, and authentication keys negotiated in Phase 2 to protect subnets under the
srcanddstfields.
To verify the traffic flow from PC1 to the Finance server:
-
From a PC1 (192.168.111.101), ping the Finance server (10.100.99.101).
The ping should be successful.
C:\>ping 10.100.99.101

Pinging 10.100.99.101 with 32 bytes of data:
Reply from 10.100.99.101: bytes=32 time=5ms TTL=62
Reply from 10.100.99.101: bytes=32 time=2ms TTL=62
Reply from 10.100.99.101: bytes=32 time=9ms TTL=62
Reply from 10.100.99.101: bytes=32 time=2ms TTL=62

Ping statistics for 10.100.99.101:
    Packets: Sent = 4, Received = 4, Lost = 0 (0% loss),
Approximate round trip times in milli-seconds:
    Minimum = 2ms, Maximum = 9ms, Average = 4ms
To verify the traffic flow on the Branch and HQ FortiGate in the GUI:
-
On either FortiGate, go to Log & Report > Forward Traffic.
-
Filter the content using the search bar based on the respective Policy ID.
|
|
To make sure that the logs are collected and shown under Forward Traffic, set Log Allowed Traffic to All Sessions in the corresponding firewall policy configured under Policy & Objects > Firewall Policy. |
To verify the traffic flow on the Branch and HQ FortiGate in the CLI:
-
Verify traffic on the Branch:
Branch # diagnose sniffer packet any 'host 10.100.99.101 and icmp' 4 0 l
Using Original Sniffing Mode
interfaces=[any]
filters=[host 10.100.99.101 and icmp]
2025-01-16 08:37:22.515436 port4 in 192.168.111.101 -> 10.100.99.101: icmp: echo request
2025-01-16 08:37:22.515478 vpn-client out 192.168.111.101 -> 10.100.99.101: icmp: echo request
2025-01-16 08:37:22.520118 vpn-client in 10.100.99.101 -> 192.168.111.101: icmp: echo reply
2025-01-16 08:37:22.520141 port4 out 10.100.99.101 -> 192.168.111.101: icmp: echo reply
-
Verify traffic on the HQ:
HQ # diagnose sniffer packet any 'host 10.100.99.101 and icmp' 4 0 l
Using Original Sniffing Mode
interfaces=[any]
filters=[host 10.100.99.101 and icmp]
2025-01-16 08:37:22.518421 vpn-server in 192.168.111.101 -> 10.100.99.101: icmp: echo request
2025-01-16 08:37:22.518459 port2 out 192.168.111.101 -> 10.100.99.101: icmp: echo request
2025-01-16 08:37:22.518900 port2 in 10.100.99.101 -> 192.168.111.101: icmp: echo reply
2025-01-16 08:37:22.518914 vpn-server out 10.100.99.101 -> 192.168.111.101: icmp: echo reply
For more information, see Performing a sniffer trace or packet capture.
-
Optionally, run real time IKE debug using appropriate filters for troubleshooting if the IPsec tunnel does not come up:
Branch # diagnose vpn ike log filter rem-addr4 203.0.113.249
Branch # diagnose debug application ike -1
Branch # diagnose debug enable
For more information, see VPN IPsec troubleshooting.