
Logging in to FortiOS GUI
You can log in to the FortiOS GUI after completing FortiGate management access setup. See Setting up FortiGate for management access for details.
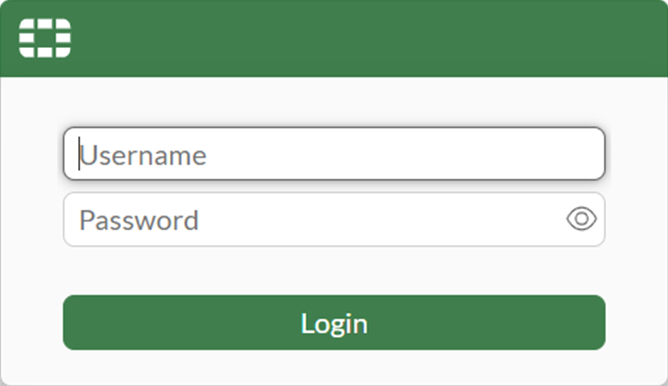
To log in to FortiOS GUI:
-
In a web browser, go to https://192.168.1.99.
By default, the management interface or the internal interface is configured to allow HTTPS access with the IP address 192.168.1.99.
The login page is displayed in your browser.
-
Log in:
-
In the Username field, enter
admin. -
leave the Password field blank.
-
Click Login.
The Change Password dialog box is displayed.
Starting in FortiOS 7.6.5, the password policy is enabled and enforced. You must change the
adminpassword to meet the policy requirements. See also Password policy.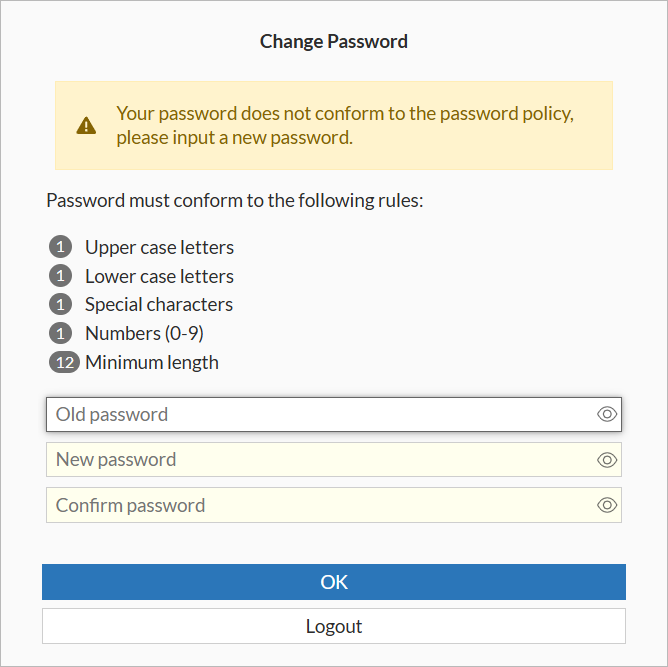
-
-
Change the password and click OK. The login page is displayed again.
-
Log in again:
-
In the Username field, enter
admin. -
In the Password field, enter your new password.
-
Click Login.
-
After you log in, FortiOS checks for an internet connection, and next steps depend on your FortiGate model:
-
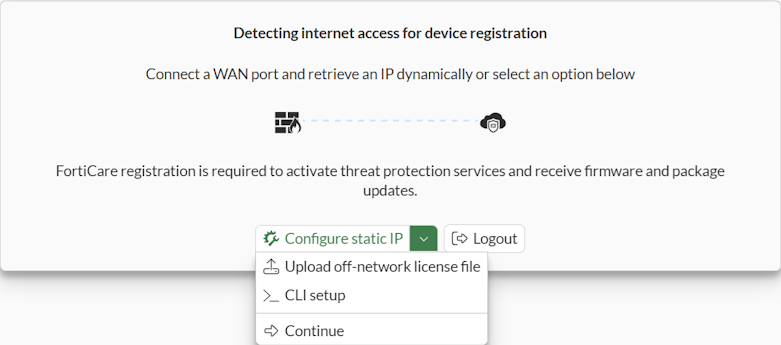
For recent FortiGate models, the Detecting internet access for device registration dialog box is displayed.
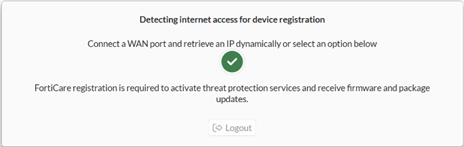
When FortiOS detects internet access, the wizard moves automatically to the next step, and you proceed to device registration. See Registering recent FortiGate models.
When FortiOS does not detect internet access, it remains on the Detecting internet access for device registration dialog box, and you can use it to:
-
Configure internet access. See Configuring internet access for recent FortiGate models.
-
Upload an off-network license file to an air-gapped FortiGate. See Registering recent FortiGate models in an air-gapped environment.
-
-
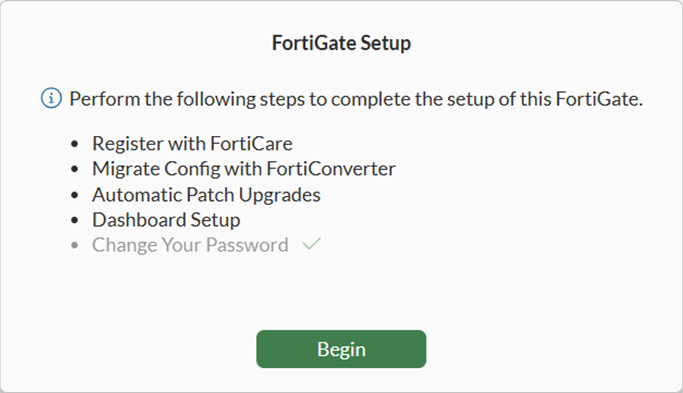
For older FortiGate models, the FortiGate Setup wizard is displayed:
-
When internet access is detected, the FortiGate Setup wizard starts on the Register with FortiCare step. See Registering FortiGate models for next steps.
-
When no internet access is detected, the FortiGate Setup wizard starts on the Migrate Config with FortiConverter step. See Completing the FortiGate Setup wizard for next steps.
-
Configuring internet access for recent FortiGate models
This section applies to FortiGate models with the latest BIOS version. For older FortiGate models, skip this step and go to Registering FortiGate.
The Detecting internet access for device registration dialog box helps you configure internet access for the FortiGate to prepare for device registration to FortiCare.
To configure internet access:
-
While the Detecting internet access for device registration dialog box is displayed, use an Ethernet cable to connect the WAN port on the FortiGate to an upstream router, switch, or modem with access to the internet.
If you have already connected an Ethernet cable, unplug the cable, and plug it in again.
Internet access is available when the FortiGate model has addressing mode set to DHCP by default on the WAN interface, and the WAN interface is connected to a network with a DHCP server assigning the correct IP and gateway for internet access.
-
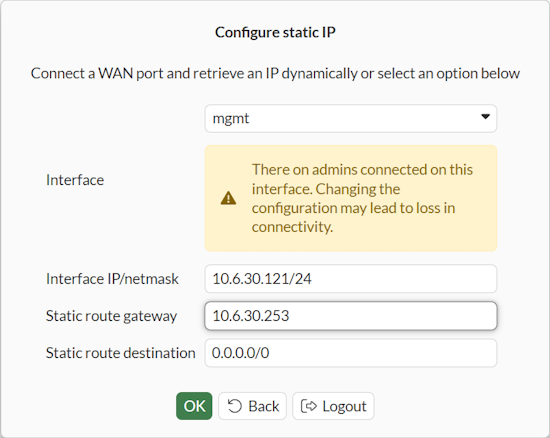
If FortiGate does not connect to the internet, configure the interface IP address and gateway using the GUI or CLI:
-
For the GUI:
-
Select Configure static IP. The Configure static IP dialog box is displayed.
-
Configure the options, and click OK.
-
-
For the CLI, select CLI setup to configure the interface IP address and gateway:
config system interface
    edit <interface>
        set mode static
        set ip <address> <netmask>
    next
end
config router static
    edit 0
        set gateway <gateway IP>
        set device <interface>
    next
end
When FortiGate connects to the internet, the GUI displays the following page:
Your next step is to register the FortiGate to FortiCare. Go to Registering recent FortiGate models.
-