
Agentless VPN with RADIUS password renew on FortiAuthenticator
This is a sample configuration of Agentless VPN for RADIUS users with Force Password Change on next logon. In this example, the RADIUS server is a FortiAuthenticator. A user test1 is configured on FortiAuthenticator with Force password change on next logon.
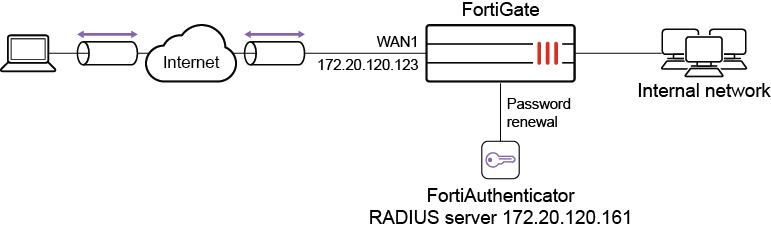
Sample topology
Sample configuration
WAN interface is the interface connected to ISP. This example shows static mode. You can also use DHCP or PPPoE mode. The Agentless VPN connection is established over the WAN interface.
To configure Agentless VPN using the GUI:
-
Configure the interface and firewall address. The port1 interface connects to the internal network.
-
Go to Network > Interfaces and edit the wan1 interface.
-
Set IP/Network Mask to 172.20.120.123/255.255.255.0.
-
Edit port1 interface and set IP/Network Mask to 192.168.1.99/255.255.255.0.
-
Click OK.
-
Go to Policy & Objects > Address and create an address for internet subnet 192.168.1.0.
-
-
Create a RADIUS user.
-
Go to User & Authentication > RADIUS Servers to create a user.
-
Set Authentication method to MS-CHAP-v2.
-
Enter the IP/Name and Secret.
-
Click Create.
Password renewal only works with the MS-CHAP-v2 authentication method.
-
To enable the
password-renewoption, use these CLI commands.config user radius edit "fac" set server "172.20.120.161" set secret <fac radius password> set auth-type ms_chap_v2 set password-renewal enable next end
-
-
Configure user group.
-
Go to User & Authentication > User Groups to create a user group.
-
For the Name, enter fac-group.
-
In Remote Groups, click Add to add Remote Server you just created.
-
-
Configure Agentless VPN portal and predefine RDP bookmark for windows server.
config vpn ssl web portal edit "agentless-portal" set web-mode enable config bookmark-group edit "gui-bookmarks" config bookmarks edit "Windows Server" set apptype rdp set host "192.168.1.114" set port 3389 set logon-user "your-windows-server-user-name" set logon-password your-windows-server-password next end next end next end -
Configure another Agentless VPN portal and disable Agentless VPN on it.
config vpn ssl web portal edit "portal-access-disabled" set web-mode disable next end -
Configure Agentless VPN settings.
-
Go to VPN > Agentless VPN Settings.
-
Set Agentless VPN status to Enable.
-
Set Listen on Interface(s) to wan1.
-
Set Listen on Port to 10443.
-
Choose a certificate for Server Certificate. The default is Fortinet_Factory.
-
In Authentication/Portal Mapping, select All Other Users/Groups, and click Edit.
-
Use Portal dropdown to select portal-access-disabled.
-
Click OK.
-
In Authentication/Portal Mapping, click Create New.
-
Set Users/Groups to fac-group.
-
Set Portal to agentless-portal.
-
Click OK.
-
-
Click Apply to save the Agentless VPN settings.
-
-
Configure Agentless VPN firewall policy.
-
Go to Policy & Objects > Firewall Policy, and click Create New.
-
Set Name to Agentless VPN firewall policy.
-
Set Schedule to always and Action to Accept.
-
Set Incoming interface to Agentless VPN interface (ssl.root).
-
Choose an Outgoing Interface. This example uses port1.
-
Set the Source to all and User/group to fac-group.
-
In this example, the Destination is the internal, protected subnet 192.168.1.0.
-
Set Service to ALL.
-
Click OK.
-
To configure Agentless VPN using the CLI:
-
Configure the interface and firewall address.
config system interface edit "wan1" set vdom "root" set ip 172.20.120.123 255.255.255.0 next end -
Configure internal interface and protected subnet, then connect the port1 interface to the internal network.
config system interface
    edit "port1"
        set vdom "root"
        set ip 192.168.1.99 255.255.255.0
    next
end
config firewall address edit "192.168.1.0" set subnet 192.168.1.0 255.255.255.0 next end -
Configure the RADIUS server.
config user radius edit "fac" set server "172.18.58.107" set secret <fac radius password> set auth-type ms_chap_v2 set password-renewal enable next end -
Configure user group.
config user group edit "fac-group" set member "fac" next end -
Configure Agentless VPN portal and predefine RDP bookmark for windows server.
config vpn ssl web portal edit "agentless-portal" set web-mode enable config bookmark-group edit "gui-bookmarks" config bookmarks edit "Windows Server" set apptype rdp set host "192.168.1.114" set port 3389 set logon-user "your-windows-server-user-name" set logon-password your-windows-server-password next end next end next end -
Configure another Agentless VPN portal and disable Agentless VPN on it.
config vpn ssl web portal edit "portal-access-disabled" set web-mode disable next end -
Configure Agentless VPN settings.
config vpn ssl settings set servercert "server_certificate" set source-interface "wan1" set source-address "all" set default-portal "portal-access-disabled" config authentication-rule edit 1 set groups "fac-group" set portal "agentless-portal" next end end -
Configure one Agentless VPN firewall policy to allow remote users to access the internal network. This policy does not allow traffic initiated from internal network to remote client.
config firewall policy
    edit 1
        set name "Agentless VPN firewall policy"
        set srcintf "ssl.root"
        set dstintf "port1"
        set srcaddr "all"
        set dstaddr "192.168.1.0"
        set action accept
        set schedule "always"
        set service "ALL"
        set nat enable
        set groups “fac-group”
    next
end
To see the results of web portal:
-
From a remote device, use a web browser to log into the Agentless VPN web portal http://172.20.120.123:10443.
-
Log in using the test1 credentials.
Use a user which is configured on FortiAuthenticator with Force password change on next logon.
-
Click Login. You are prompted to enter a new password.
-
On the FortiGate, go to Dashboard > Network and expand the Agentless VPN widget to verify the user’s connection.
To check the Agentless VPN connection using the GUI:
-
On FortiGate, go to Dashboard > Agentless VPN Monitor to verify the list of Agentless VPN users.
If the Agentless VPN Monitor is hidden, click + under the Dashboard, search for Agentless VPN Monitor, and add it to the display.
-
Go to Log & Report > System Events, and use the dropdown to select VPN Events to view VPN logs.
To check the Agentless VPN portal login using the CLI:
get vpn ssl monitor
Agentless VPN Login Users:
 Index   User    Auth Type    Timeout    From           HTTP in/out   HTTPS in/out
 0       test1   1(1)         229        10.1.100.254   0/0           0/0

Agentless VPN sessions:
 Index   User    Source IP      Duration        I/O Bytes       Tunnel/Dest IP