
ZTNA single sign-on with Entra ID
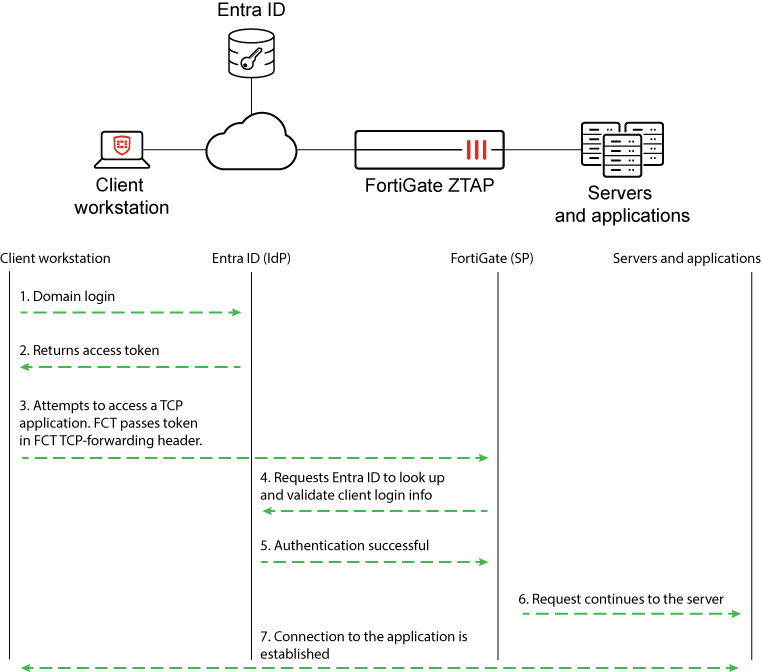
In this enhancement, Windows users signed in to their workstations using Microsoft Entra ID domain are automatically allowed access to ZTNA-protected TCP resources by using the same IdP login information. FortiGate queries Entra ID using the client’s login token to look up and validate the user. This allows single sign-on (SSO) and eliminates the extra step for each user to authenticate when they access a TCP application.
Prerequisites include:
-
FortiClient 7.4.3 and later
-
FortiOS 7.6.1 and later
-
Domain configured on Microsoft Entra ID
-
Enterprise application configured on Microsoft Entra ID
-
Various permissions enabled in Microsoft Entra ID
-
Windows clients that are able to join to the Entra ID domain
Topology and communications
Entra ID configurations
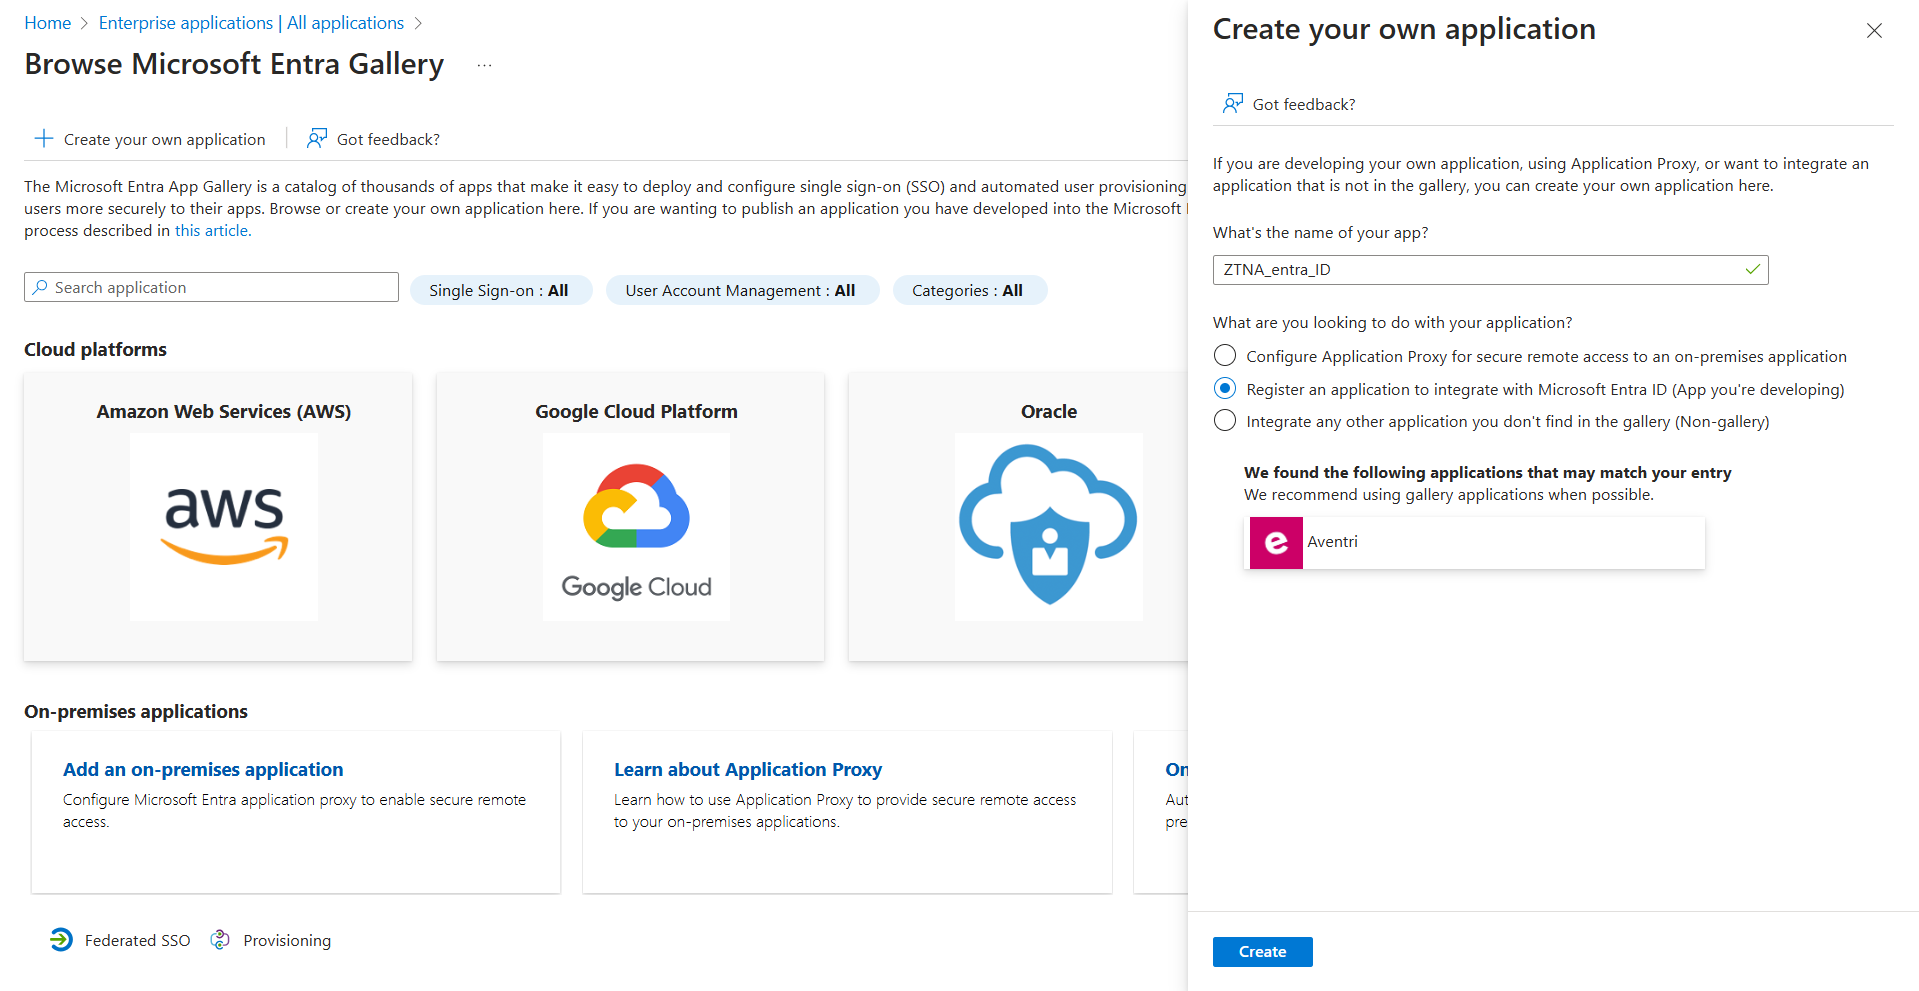
Create an Azure enterprise application to obtain Entra ID values.
To create an Azure enterprise application:
-
Click Create your own application, and select the Register an application to integrate with Microsoft Entra ID (App you're developing) option.
-
Open the App registrations page, and locate your app. On the Overview page, you can obtain the Application (client) ID and the Directory (tenant) ID.
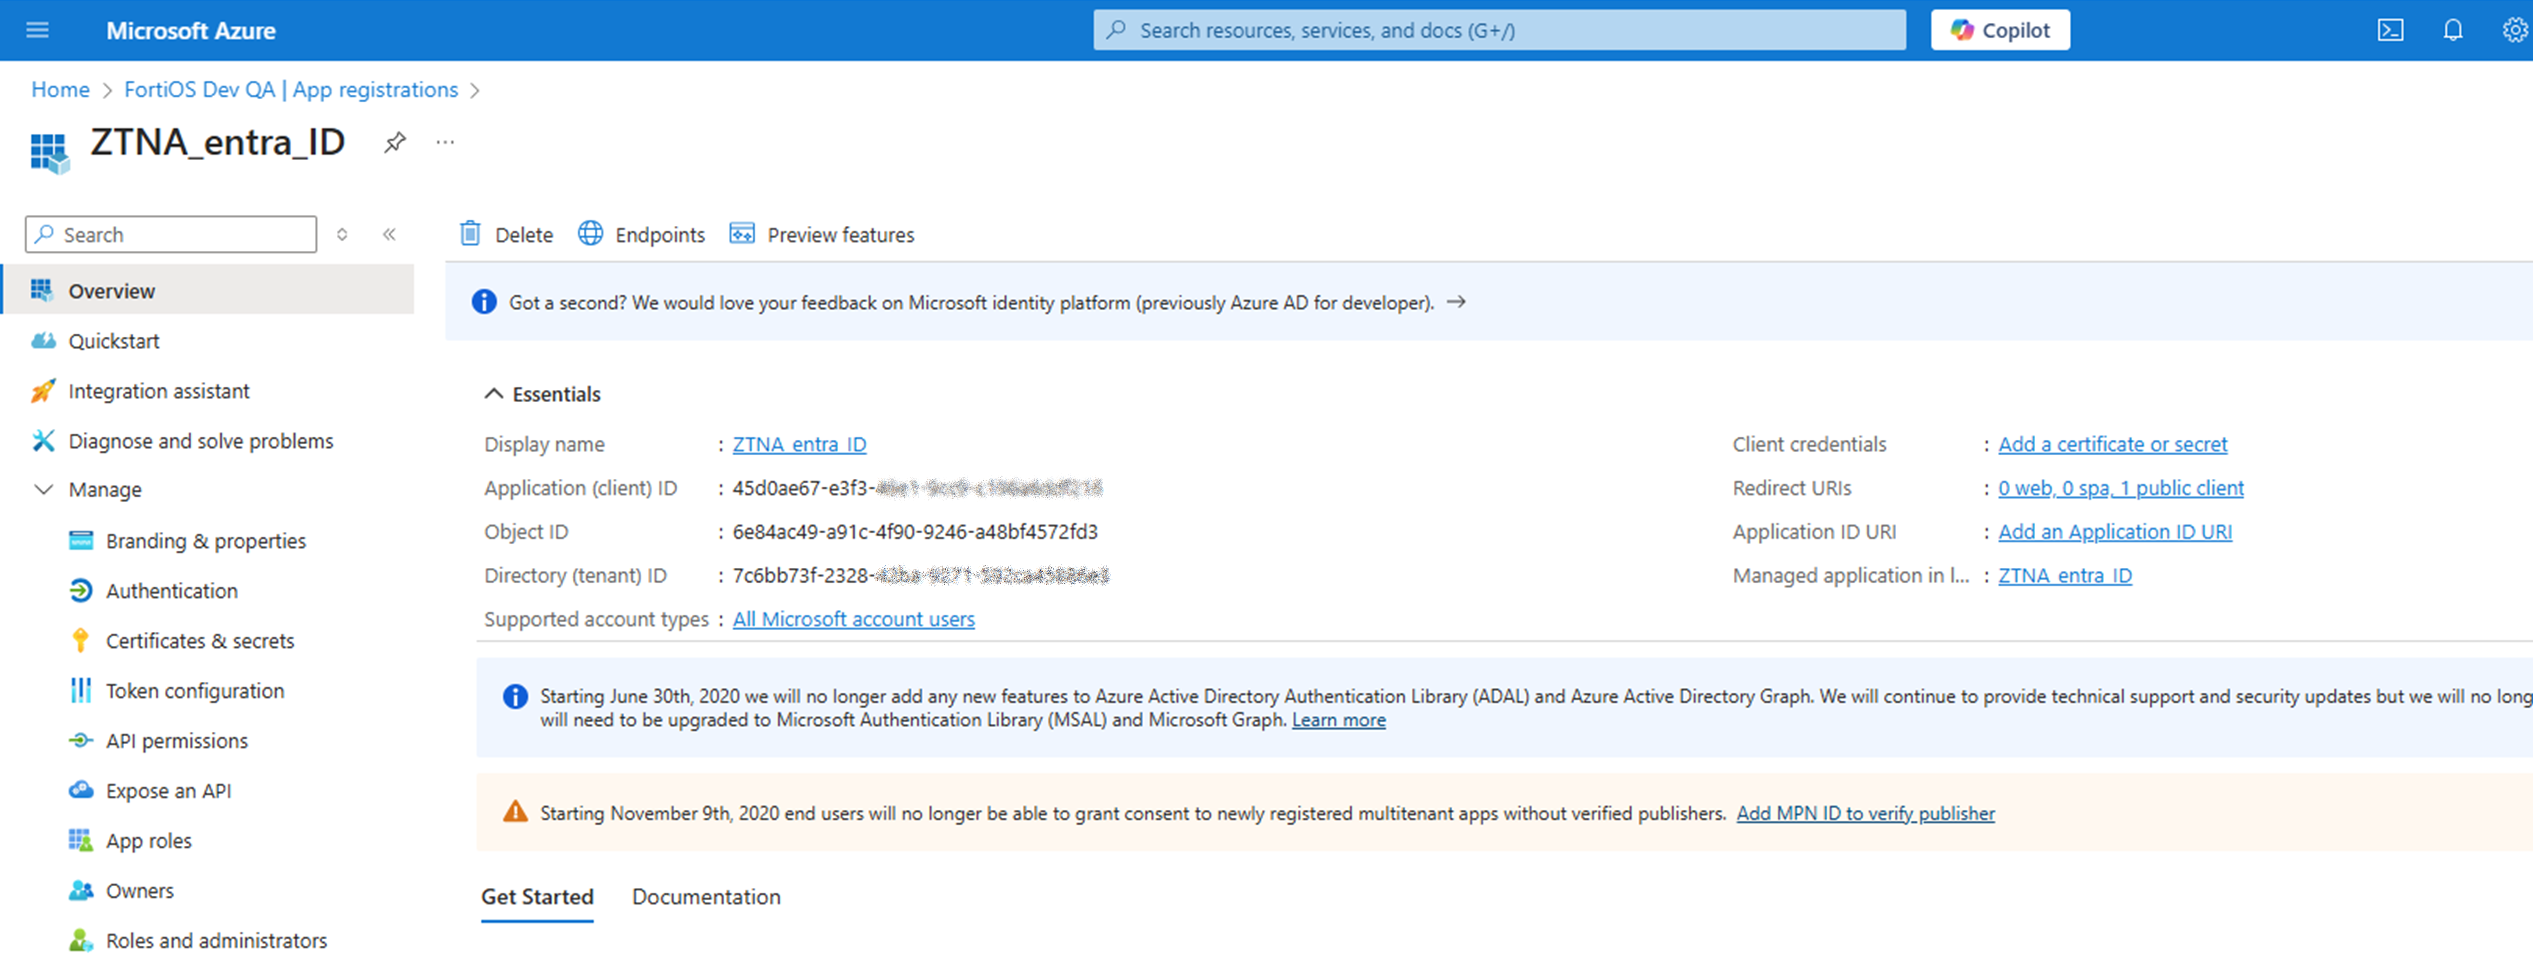
In the this example, the values from the ZTNA_entra_ID app can be applied to the FortiClient EMS ZTNA Destinations profile in later steps:
|
Entra ID portal field |
Corresponding FortiClient XML profile element |
Value |
|---|---|---|
|
Application (client) ID |
<client_id> |
45d0ae67-e3f3-xxxx-xxxx-xxxxxxxxxxxx |
|
Directory (tenant) ID |
<tenant_name> |
7c6bb73f-2328-xxxx-xxxx-xxxxxxxxxxxx |
Users and groups can be assigned to the enterprise application. In this example, the user ztnauser@fosdevqa.onmicrosoft.com belongs to a group assigned to the ZTNA_entra_ID app.
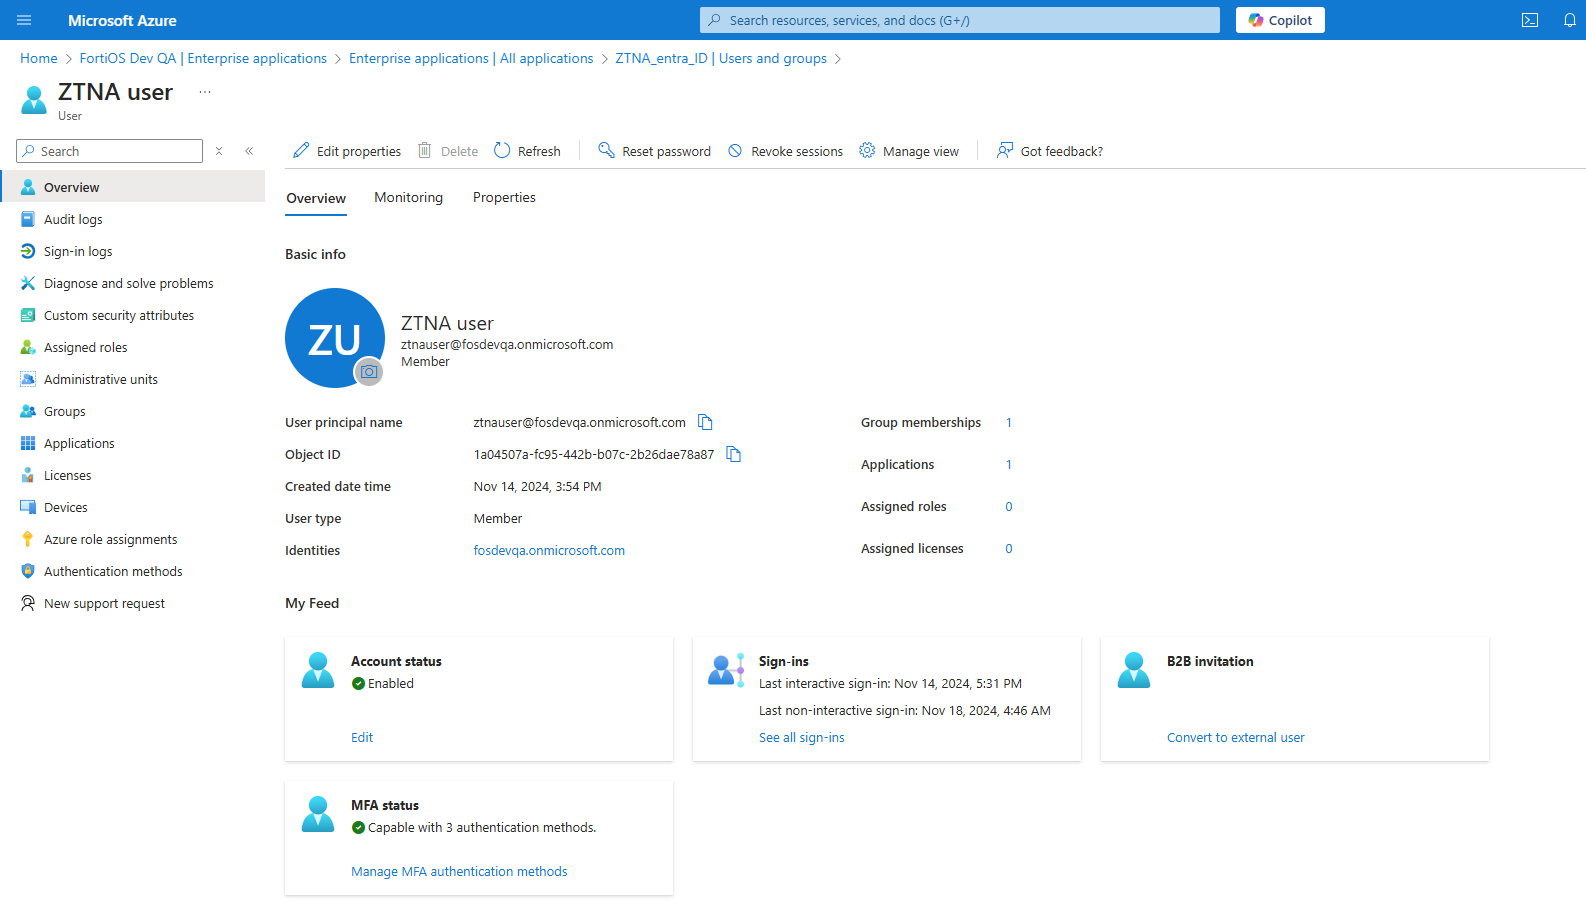
The user belongs to the Entra ID domain that is used by the user workstation to join the domain.
FortiClient EMS configurations
In FortiClient EMS 7.4.3 and later, the client ID and tenant ID can be specified in the azure_app attribute in XML.
To configure FortiClient EMS:
-
Go to Endpoint Profiles > ZTNA Destinations.
-
Create a new profile or edit an existing one.
-
Click XML, and then click Edit.
-
Configure the profile as follows:
Configure
<client_id>and<tenant_name>with the Application (client) ID and Directory (tenant) ID values for the enterprise application in the Entra ID portal.Bold lines in the XML sample highlight key fields to support this feature:
<forticlient_configuration>
    <ztna>
	      …
        <azure_auto_login>
            <enabled>1</enabled>
            <azure_app>
                <client_id>45d0ae67-e3f3-xxxx-xxxx-xxxxxxxxxxxx</client_id>
                <tenant_name>7c6bb73f-2328-xxxx-xxxx-xxxxxxxxxxxx</tenant_name>
            </azure_app>
        </azure_auto_login>
        …
    </ztna>
<forticlient_configuration>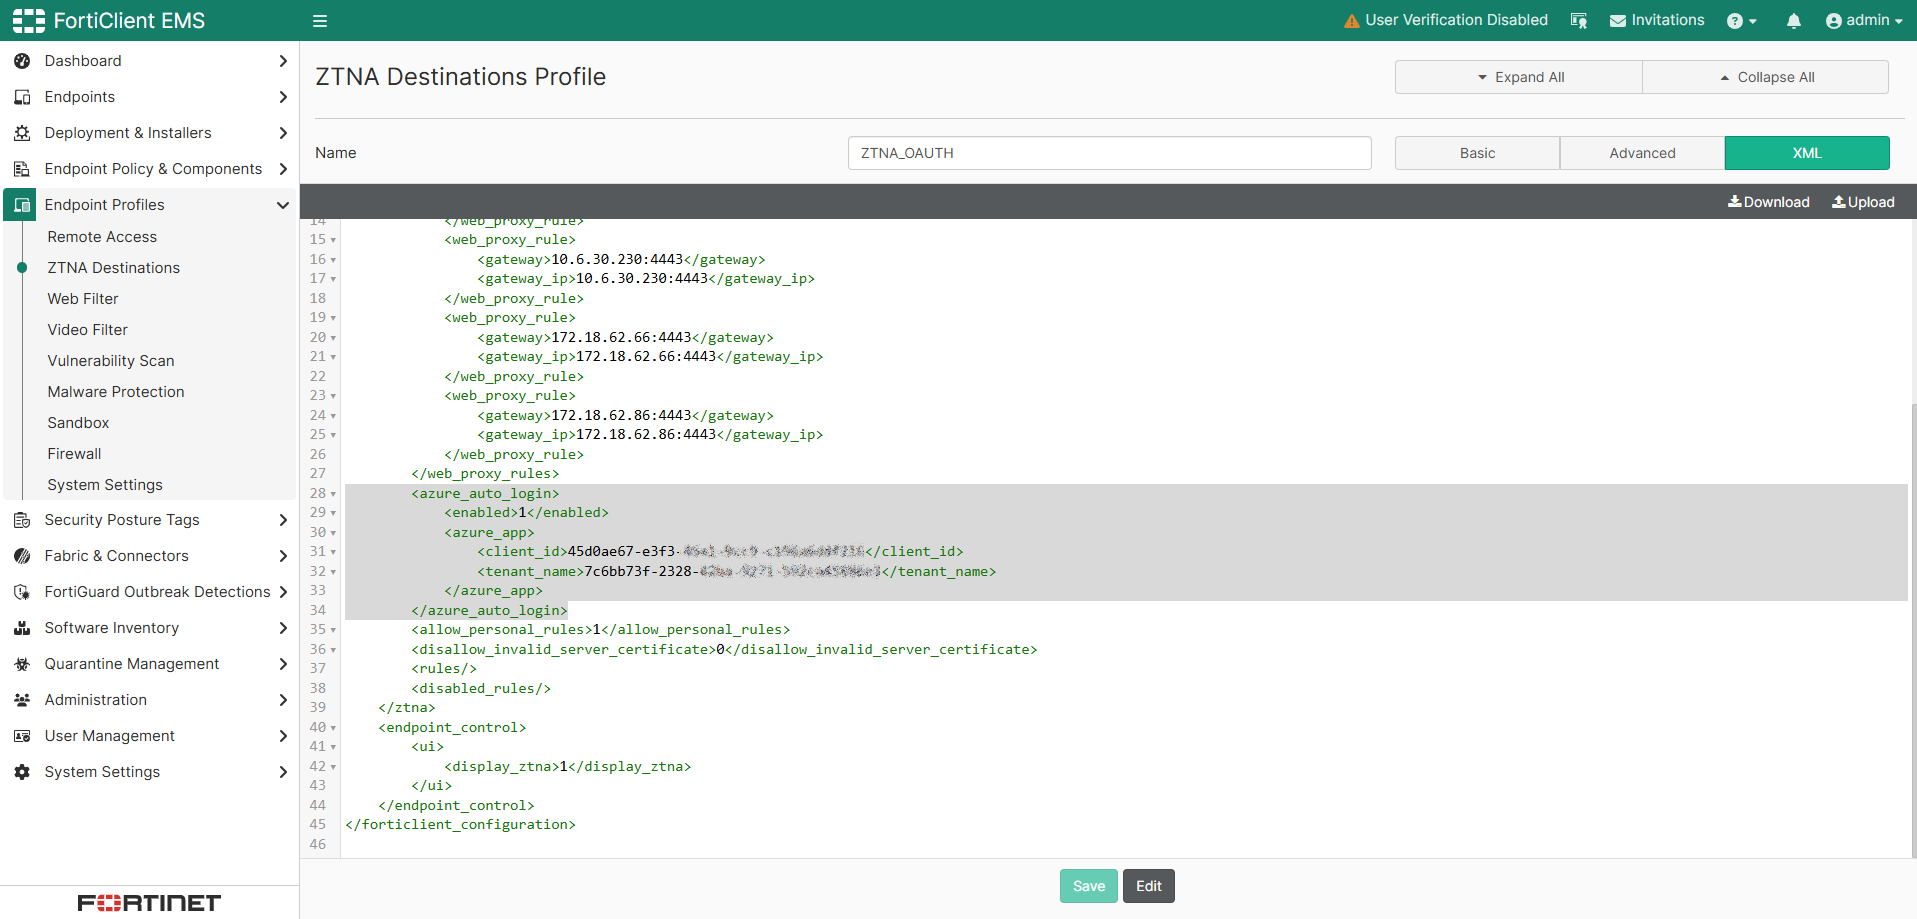
Not shown here, but TCP forwarding destinations are defined in the ZTNA destination profile.
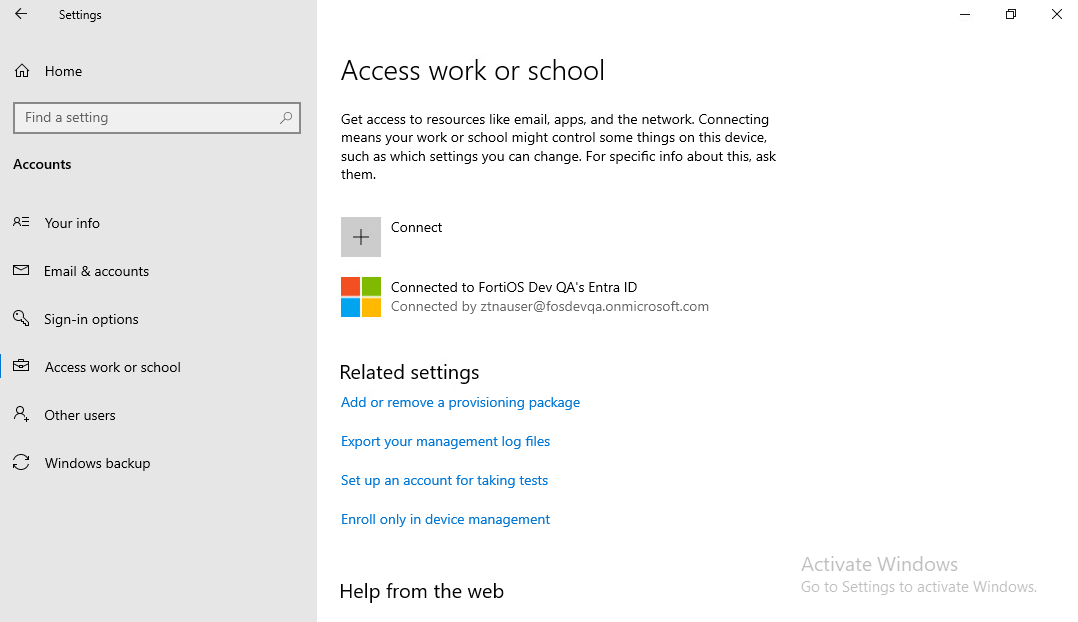
Windows endpoint configuration
The endpoint client should already be joined to the Entra ID domain.
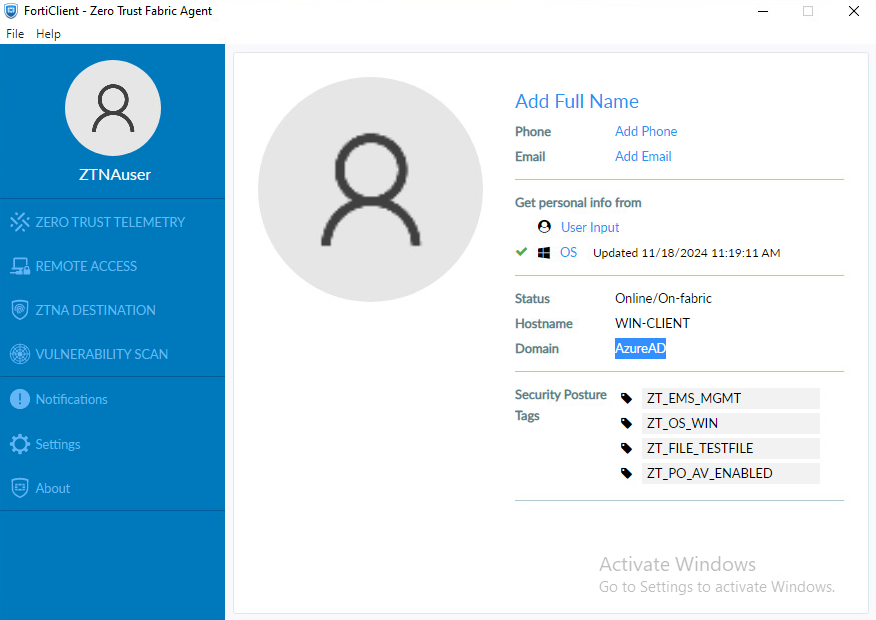
Once logged in and FortiClient is registered to EMS, click the user avatar to display information about the user, including the login domain name.
FortiGate configuration
FortiGate ZTNA server configurations remain the same. EMS connectivity and ZTNA server configurations are not explained in this topic. The major difference in FortiGate configurations is in the authentication scheme, rule, and user group. Therefore, the configuration process starts with authentication scheme and rule.
To configure the authentication scheme and rule:
-
Go to Policy & Objects > Authentication, and click the Authentication Schemes tab.
-
Click Create new.
-
Enter the name.
-
For method, click + and select the method Microsoft Entra Single Sign-On.
-
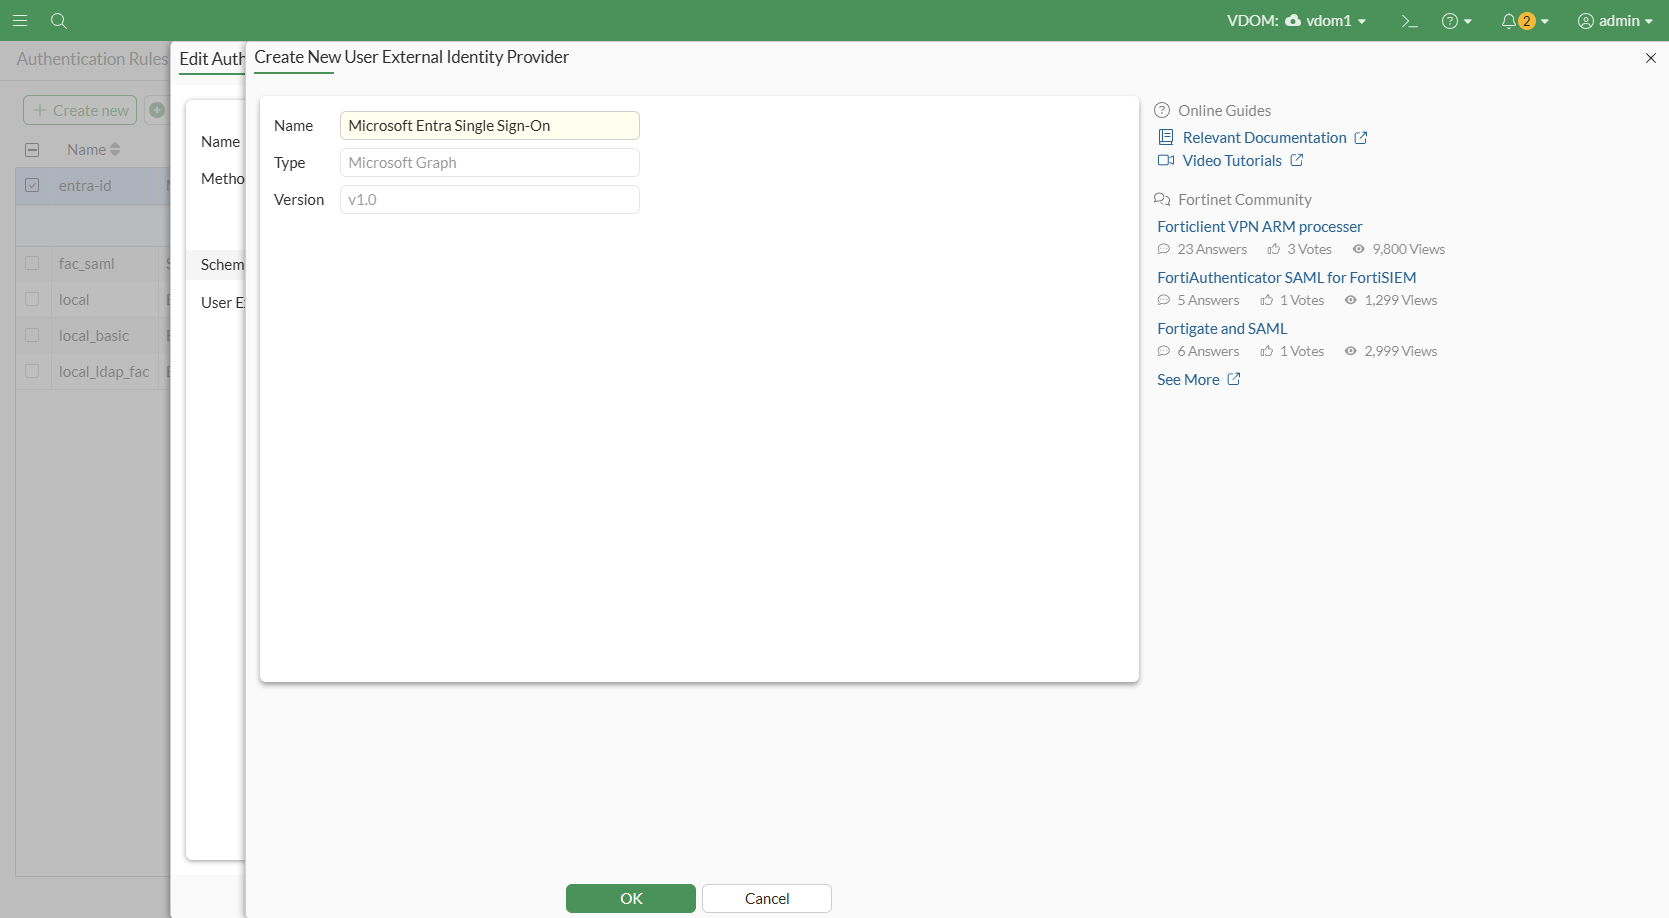
Create a new User External Identity Provider:
-
Click the drop-down and click Create.
-
Enter a name.
-
Leave the default values of Microsoft Graph and v1.0, which are enabled by default.
-
Click OK.
-
-
Select the newly created External Identity Provider.
-
Click OK to save.
-
Click the Authentication Rule tab. Click Create new.
-
Configure the following:
Field
Value
Name
Name of the rule
Source Address
all to apply this rule to all source traffic
Incoming Interface
any to apply this on any interface
Protocol
HTTP
Authentication Scheme
Disabled
IP-based Authentication
Enabled
SSO Authentication Scheme
Enabled. Set to the name of the new authentication scheme
Enable this rule
Enabled
-
Click OK to save.
-
Next, you must configure the user group that is authorized to access the protected TCP application. The user group is queried against Entra ID using Microsoft Graph v1.0.
To configure the user group:
-
Go to User & Authentication > User Groups, and click Create new.
-
Enter a name.
-
Keep type as default (Firewall).
-
Under Remote Groups, click Add.
-
For Remote Server, select the User External Identity Provider that was previously created.
-
Optionally for Groups, specify the group name/ID corresponding to the user group object ID on Entra ID to filter by group.
-
Click OK.
-
-
Click OK to save.
Finally, you must apply the user group to a ZTNA policy. In this example, a full ZTNA policy is configured.
To configure a full ZTNA policy:
-
Go to Policy & Objects > Proxy Policy, and click Create new.
-
Configure the following:
Field
Value
Name
Name of the policy
Type
ZTNA
Incoming Interface
Interface used by FortiGate to listen for the ZTNA connections.
Source
Address: Specify the source, or select all to allow all traffic sources.
User: select the user group that was created in the previous step.
Security Posture Tag
Choose any tags that may be applicable.
Destination
Specify a destination server, or select all for all servers.
ZTNA Server
Specify the ZTNA server to allow access to.
Schedule
always
Action
ACCEPT
-
Configure other optional settings as needed.
-
Click OK to save.
Sample CLI configurations
config user external-identity-provider
    edit "entra_id"
        set type ms-graph
        set version v1.0
    next
end

config authentication scheme
    edit "entra_id"
        set method entra-sso
        set external-idp "entra_id"
    next
end

config authentication rule
    edit "entra_id"
        set srcaddr "all"
        set dstaddr "all"
        set ip-based disable
        set sso-auth-method "entra_id"
        set web-auth-cookie enable
    next
end

config user group
    edit "aad_group"
        set member "entra_id"
        config match
            edit 1
                set server-name "entra_id"
                set group-name "22e10685-49d3-4af8-b75b-57f22cb8aa32"
            next
        end
    next
end

config firewall proxy-policy
    edit 3
        set name "fzt"
        set proxy access-proxy
        set access-proxy "ztna_4"
        set srcintf "port2"
        set srcaddr "all"
        set dstaddr "all"
        set ztna-ems-tag "EMS7_ZTNA_ZT_OS_LINUX" "EMS7_ZTNA_ZT_OS_MAC" "EMS7_ZTNA_ZT_OS_WIN"
        set action accept
        set schedule "always"
        set logtraffic all
        set srcaddr6 "all"
        set dstaddr6 "all"
        set groups "aad_group"
        set ssl-ssh-profile "custom-deep-inspection"
    next
end
Testing and verification
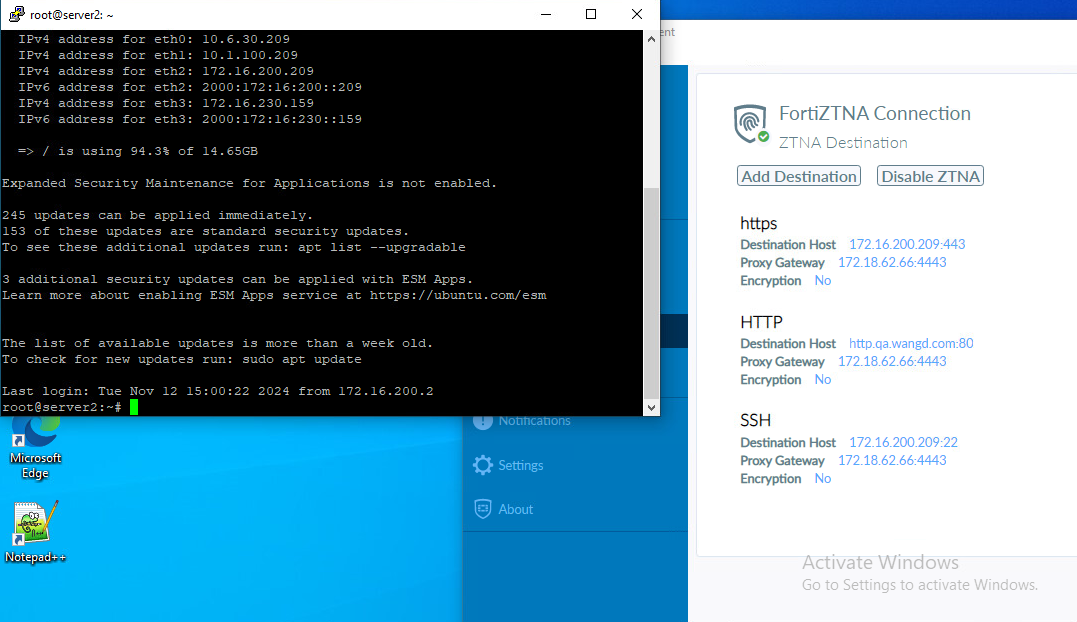
In this example, a user logged in to Windows as ztnauser@fosdevqa.onmicrosoft.com in the AzureAD domain attempts to access a host 172.16.200.209:22 through SSH.
As the screenshot shows, the user can connect to the server through SSH without logging in again.
From the FortiGate, go to Log & Report > ZTNA Traffic to view corresponding traffic logs. Alternatively, use the CLI to run:
# execute log filter field subtype ztna
# execute log display
1: date=2024-11-18 time=14:46:53 eventtime=1731970013042933838 tz="-0800" logid="0005000024" type="traffic" subtype="ztna" level="notice" vd="vdom1" srcip=10.1.100.214 srcport=51765 srcintf="port2" srcintfrole="lan" dstcountry="Reserved" srccountry="Reserved" dstip=172.18.62.66 dstport=4443 dstintf="port1" dstintfrole="lan" sessionid=100630 service="tcp/4443" proxyapptype="ztna-proxy" proto=6 action="accept" policyid=3 policytype="proxy-policy" poluuid="5a72570a-932a-51ef-4e9e-a2d01c654769" policyname="fzt" trandisp="dnat" tranip=172.16.200.209 tranport=22 appcat="unscanned" duration=121 user="ztnauser@fosdevqa.onmicrosoft.com" group="aad_group" gatewayid=2 vip="ztna_4" accessproxy="ztna_4" clientdeviceid="0D48C06390CA42D78158BE90C480A3F0" clientdevicemanageable="manageable" clientdeviceems="FCTEMS8821001322" clientdevicetags="ZT_PO_AV_ENABLED/ZT_OS_WIN/ZT_FILE_TESTFILE/ZT_EMS_MGMT/all_registered_clients" clientcert="yes" emsconnection="online" wanin=1729 rcvdbyte=1729 wanout=1412 lanin=6820 sentbyte=6820 lanout=4279 fctuid="0D48C06390CA42D78158BE90C480A3F0" unauthuser="ZTNAuser" unauthusersource="forticlient" srcdomain="fosdevqa.onmicrosoft.com" srcremote=204.101.161.19