
SCIM servers
System for Cross-domain Identity Management (SCIM) is an open-standard protocol that facilitates the exchange of identity data between platforms. See the following RFCs for more information:
-
See RFC 7642 for information about definitions, overview, concepts, and requirements.
-
See RFC 7643 for information about the core schema.
-
See RFC 7644 for information about the protocol.
SCIM is based on a client-server model where the client is usually an identity provider (IdP) that maintains a directory of user identities, and the server is typically a service provider (SP). The client sends user and group information to the server, enabling automatic provisioning of users and groups between the SP and IdP.
With SCIM servers, FortiGate can communicate with an Identity Provider (IdP) using the SCIM 2.0 protocol, which facilitates the automatic provisioning of users and groups on FortiGate. Once users and groups are provisioned on FortiGate, they can be used with SAML to provide user authentication.
The config system global command includes SCIM settings:
config system global
    set scim-http-port <integer>
    set scim-https-port <integer>
    set scim-server-cert <string>
end
|
scim-http-port <integer> |
Specify the port on which the SCIM server will listen for HTTP requests (default = 44558). |
|
scim-https-port <integer> |
Specify the port on which the SCIM server will listen for HTTPS requests (default = 44559). |
|
scim-server-cert <string> |
Specify the certificate that will be used if the HTTPS protocol is being used to communicate with the SCIM client. The certificate used by FortiGate must be trusted by the SCIM client. |
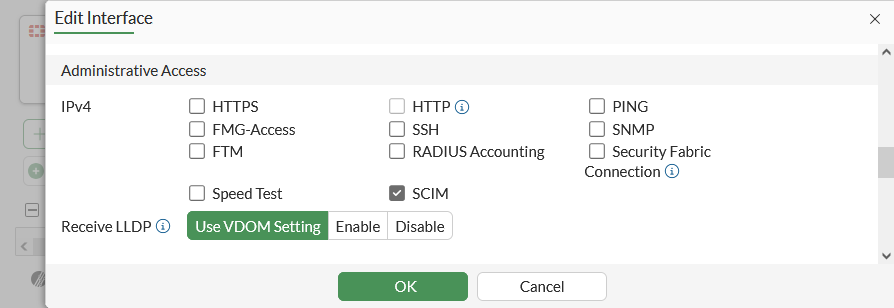
To allow SCIM access in the GUI:
-
Go to Network > Interfaces.
-
Create or edit an interface.
-
In the Administrative Access section, select SCIM.
-
Click OK.
To allow SCIM access in the CLI:
For IPv4:
config system interface
    edit <name>
        append allowaccess scim
    next
end
For IPv6:
config system interface
    edit <name>
        ...
        config ipv6
            append ip6-allowaccess scim
        end
    next
end
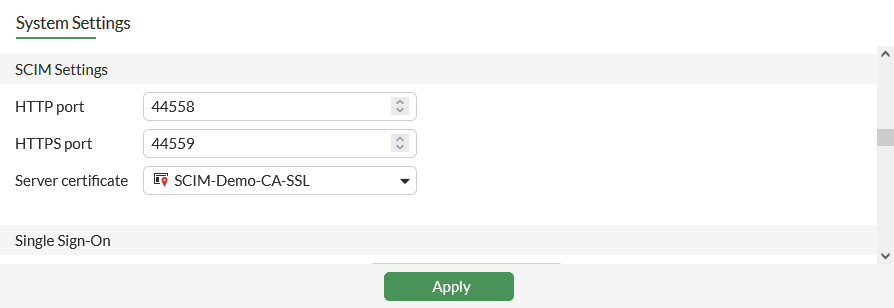
To specify the SCIM server certificate and HTTP(S) port in the GUI:
-
Go to System > Settings.
-
In the SCIM Settings section, configure the HTTP port, HTTPS port, and Server certificate as required.
-
Click Apply.
To specify the SCIM server certificate and HTTP(S) port in the CLI:
config system global
    set scim-http-port <port>
    set scim-https-port <port>
    set scim-server-cert <certificate>
end
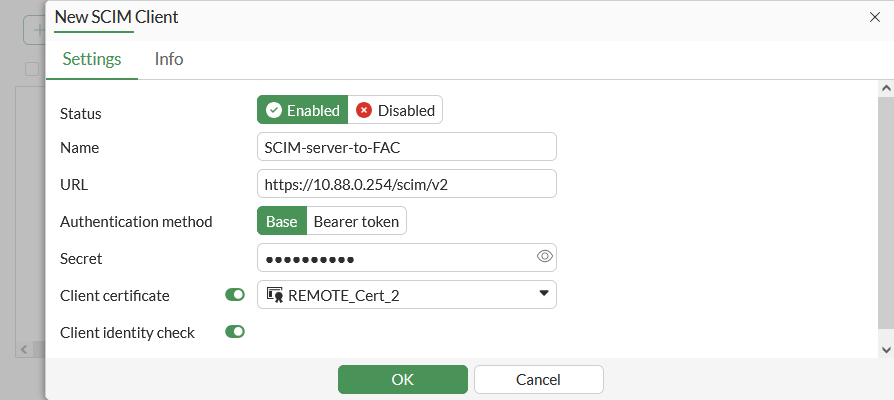
To configure SCIM clients in the GUI:
-
Go to User & Authentication > SCIM Clients, and click Create New.
-
Set Status to Enabled, enter a Name, then configure the remaining settings as needed.
-
Click OK.
To configure SCIM clients in the CLI:
config user scim
    edit <name>
        set status {enable| disable}
        set base-url <string>
        set authe-method {token | base}
        set token-certificate <name>
        set secret <passwd>
        set certificate <name>
        set client-identity-check {enable| disable}
    next
end
|
status {enable| disable} |
Enable/disable System for Cross-domain Identity Management (SCIM). |
|
base-url <string> |
Server URL to receive SCIM create, read, update, delete (CRUD) requests. |
|
auth-method {token | base} |
TLS client authentication methods (default = bearer token). |
|
token-certificate <name> |
Certificate for token verification. |
|
secret <passwd> |
Secret for token verification or base authentication. |
|
certificate <name> |
Certificate for client verification during TLS handshake. |
|
client-identity-check {enable| disable} |
Enable/disable client identity check. |
To add a SCIM client to SAML server configuration in the GUI:
-
Go to User & Authentication > Single Sign-On and edit an existing entry or click Create New to create a new single sign-on.
-
In the Additional SAML Attributes section, enable SCIM client and select a SCIM client.
-
Click OK.
To add a SCIM client to SAML server configuration in the CLI:
config user saml
    edit <name>
        set scim-client <name>
        set scim-group-attr-type {display-name | external-id}
    next
end
Example
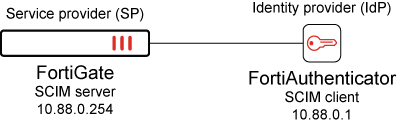
In this example, FortiGate is configured as the SCIM server (SP), and FortiAuthenticator is configured as the SCIM client (IdP). Two groups are configured on FortiAuthenticator: IT and Pochiya clan. The groups contain the following users:
-
The
ITgroup contains three users:admin,sk, andsy. -
The
Pochiya clangroup contains two users:naynayandkiki.
Upon successful configuration, users and groups are provisioned on FortiGate. This setup can leverage SAML to provide access to authenticated users.
To configure FortiGate as an SCIM server in the GUI:
-
Allow SCIM access on an interface:
-
Go to Network > Interfaces and edit the interface.
-
In the Administrative Access section, select SCIM.
-
Click OK.
-
-
Specify the SCIM server certificate:
-
Go to System > Settings.
-
In the SCIM Settings section, set Server certificate.
-
Click Apply.
-
-
Configure SCIM client entries:
-
Go to User & Authentication > SCIM Clients, and click Create New.
-
Set Status to Enabled, enter a Name, then configure the remaining settings as needed.
-
Click OK.
-
To configure FortiGate as an SCIM server in the CLI:
-
Allow SCIM access on an interface:
In IPv4:
config system interface
    edit port2
        append allowaccess scim
    next
end
In IPv6:
config system interface edit port2 ... config ipv6 append ip6-allowaccess scim end next end -
Specify the SCIM server certificate:
config system global set scim-server-cert SCIM-Demo-CA-SSL end -
Configure SCIM client entries:
config user scim
    edit "SCIM-server-to-FAC"
        set status enable
        set base-url https://10.88.0.254/scim/v2
        set auth-method base
        set secret **********
        set certificate REMOTE_Cert_2
        set client-identity-check enable
    next
end
To configure FortiAuthenticator as an SCIM client:
-
On FortiAuthenticator, use your admin account to log in.
-
Click Authentication > SCIM > Service Provider.
-
Click Create New, and configure the following settings:
Name
Test-SCIM
SCIM endpoint
https://10.88.0.254:44559/scim/v2
Access token
**********
-
Configure the remaining settings as required, and click Save.
-
Once the setting is saved, double-click the newly created entry to open the settings pane, and click Sync to automatically add existing users to the SCIM server.
See Service providers for more information
|
|
The SCIM endpoint and access token must match the Furthermore, an initial synchronization is necessary to commence provisioning for the first time. However, when alterations to identities occur in the IdP, including creation, updating, and deletion, these changes are automatically synchronized with SP in accordance with the SCIM protocol. |
To verify whether users and groups are provisioned on FortiGate:
# diagnose test scim list-clients
There are 1 clients in vdom.
id:1 name:SCIM-server-to-FAC
# diagnose test scim list-groups SCIM-server-to-FAC

IT
pochiya clan
total:2
# diagnose test scim list-users SCIM-server-to-FAC

admin
kiki
naynay
sk
sy
To add a SCIM client to SAML server configuration in the GUI:
-
Go to User & Authentication > Single Sign-On and edit an existing entry or click Create New to create a new single sign-on.
-
In the Additional SAML Attributes section, enable SCIM client and select the SCIM client.
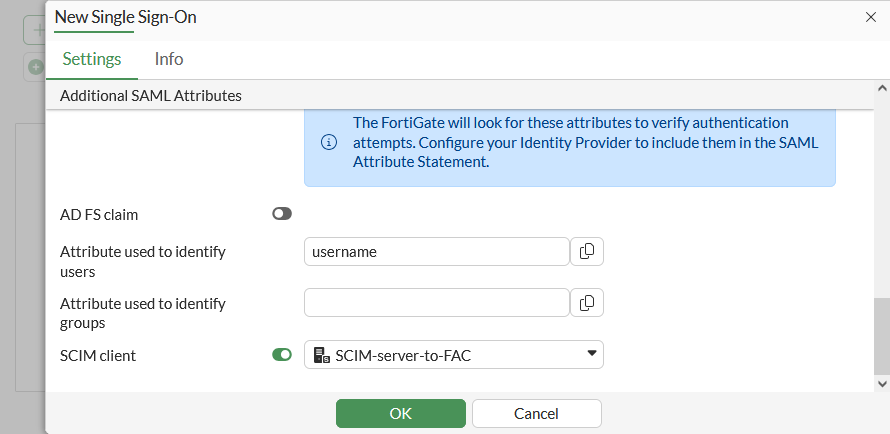
-
Click OK.
To add the SCIM group to a SAML server configuration in the CLI:
config user saml
    edit "SCIM-SAML"
        set scim-client "SCIM-server-to-FAC"
        set scim-group-attr-type {display-name | external-id}
    next
end
Modify the SAML user group used in the firewall policy
The configuration in this topic incorporates all the SCIM groups configured on FortiAuthenticator and enables all users to authenticate. However, if you want to limit authentication to users who belong to specific groups, such as the IT group, the following additional configuration is necessary:
To modify the SAML user group used in the firewall policy in the GUI:
-
Go to User & Authentication > User Groups and click Create New. Firewall is selected as the default Type.
-
Enter the group name, such as saml-scim.
-
In the Remote Groups section, click Add.
-
Set Remote Server to the SAML user, SCIM-SAML.
-
For the Groups, select Specify, then click the text box to see the groups pulled from SCIM client as Suggestions.
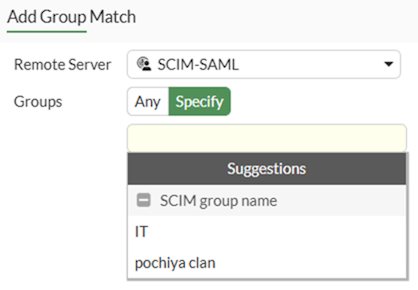
-
Select the required group then click OK.
To modify the SAML user group used in the firewall policy in the CLI:
config user group
    edit saml-scim
        set member "SCIM-SAML"
        config match
            edit 1
                set server-name "SCIM-SAML"
                set group-name "IT"
            next
        end
    next
end
|
|
For brevity, only the commands relevant to this enhancement are included. See SAML for more information about configuring SP and IdP. |