
Single FortiGuard license for FortiGate A-P HA cluster
FortiGate A-P HA cluster supports sharing a single FortiGuard service license for both cluster units for the following models:
-
40F and variants
-
60F and variants
-
70F and variants
-
80F and variants
-
100F and variants
When a customer purchases two units with the HA SKU (such as 2 x FG-40F-HA), they can further purchase a single order of the following subscriptions:
-
Enterprise Protection
-
Unified Threat Protection (UTP)
-
Advanced Threat Protection (ATP)
The two FortiGate serial numbers will be associated together on FortiCare to create one virtual serial number (vSN). If multiple pairs of devices are ordered, each pair will be together in its own box to help identify the associated devices. The aforementioned services will then be registered to the vSN. A la carte SKUs are not supported, and cannot be registered to the vSN.
Deploying the FortiGates in HA to support vSN requires two steps:
For information about RMAing the HA cluster, see RMA the FortiGate virtual HA.
To register the FortiGates and associated contract:
-
Log in to the FortiCloud support portal.
-
In the Dashboard, click Register Now to register a device and contract.
-
In the Registration field, enter the one of the FortiGate's serial numbers. Do not enter the service contract registration code, license certificate number, or asset transfer token.
-
Set the end user type, then click Next.
-
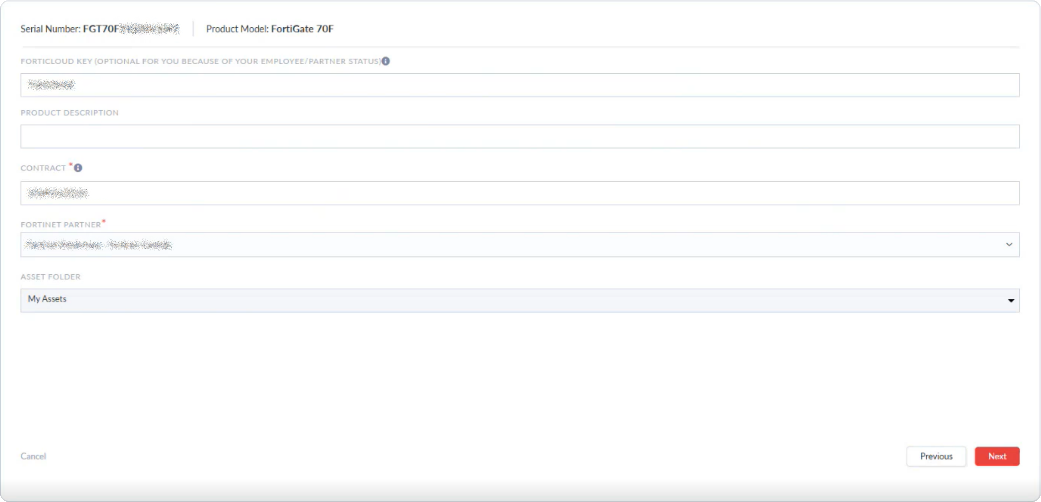
Enter the FortiCloud key from the FortiGate in the FortiCloud Key field, and the Registration Code from the service entitlement document in the Contract field.
-
Configure the remaining settings as needed then click Next.
-
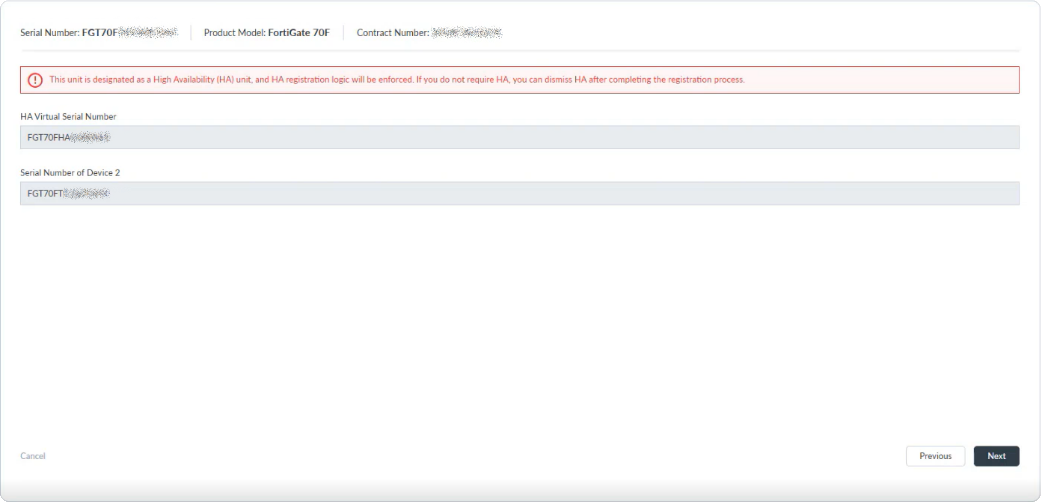
Check the HA vSN and the serial number of the second device, then click Next.
-
Review the configuration, then click Done to complete the registration.
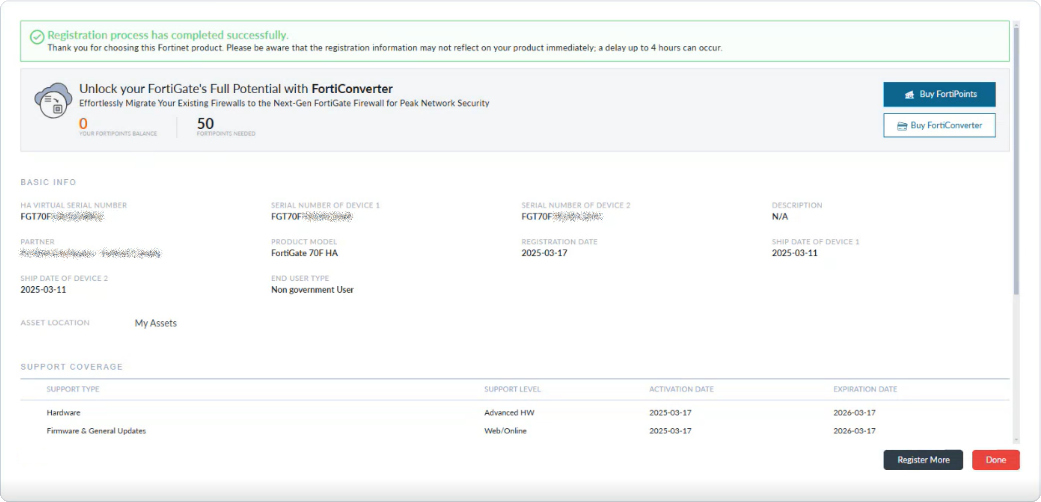
The vSN is registered in Asset Management with service entitlement. The individual FortiGates cannot be managed.
To configure the FortiGates in HA using FortiGate Cloud:
-
In the FortiGate Cloud portal, provision the FortiGate:
-
In the FortiCloud support portal, go to Services > FortiGate Cloud to open the portal.
-
Go to Assets > Asset list and click Add FortiGate.
-
Select the FortiGate vSN from the inventory table and click Provision > Provision to FortiGate Cloud.
-
-
Unpack the boxes and connect the HA interfaces back to back using the highest physical port number that is not a fabric port (portA and portB) as indicated:
Model
HA interface
FortiGate 40F series
port3
FortiGate 60F series
port5
FortiGate 70F series
port4 and/or 5
FortiGate 80F series
port5 and/or 6
FortiGate 100F series
ha1 and/or ha2
Some models have 2 HA interfaces. In these cases, both interfaces will be provisioned by FortiGate Cloud as heartbeat interfaces, but one or both of the interfaces can be connected. It is recommended to connect 2 heartbeat interfaces whenever possible for redundancy.
-
Connect the WAN interface to an upstream gateway that is providing DHCP service.
-
Connect internal interfaces to an internal switch as required.
-
Power on both FortiGates.
Shortly after, the boxes will receive the vSN and their HA configuration from FortiGate Cloud, as follows:
config system ha
    set group-id <id>
    set group-name <group-name>
    set mode a-p
    set password ********
    set hbdev <HA interface 1> <priority 1> [HA interface 2] [priority 2]
    set override disable
    set logical-sn enable
end
To configure the FortiGates in HA manually using the CLI:
-
Unpack the two boxes, and connect to each unit through the CLI or the default management interface.
-
Configure the following basic HA settings on each unit:
config system ha set mode a-p set group-id <id> set group-name <group-name> set password ******** set hbdev <HA interface 1> <priority 1> [HA interface 2] [priority 2] set logical-sn enable end -
Connect the HA interfaces back to back using your preferred interfaces.
-
Power on both FortiGates.
Shortly after, the boxes will receive the vSN.
To verify the HA status and vSN (or Logical Serial) after the HA cluster registration is complete:
-
In the GUI, go to the System > HA page.
-
In the CLI use these commands:
# get system ha status
HA Health Status: OK
Model: FortiGate-80F
Mode: HA A-P
Group Name: Branch1-HA
Group ID: 100
Debug: 0
Cluster Uptime: 0 days 2h:33m:2s
Cluster state change time: 2024-11-19 13:57:31
Primary selected using:
    <2024/11/19 13:57:31> vcluster-1: FGT80FTK22023xxx is selected as the primary because its override priority is larger than peer member FGT80FTK20000xxx.
    <2024/11/19 11:26:06> vcluster-1: FGT80FTK22023xxx is selected as the primary because it's the only member in the cluster.
ses_pickup: enable, ses_pickup_delay=disable
override: enable
Configuration Status:
    FGT80FTK22023xxx(updated 1 seconds ago): in-sync
    FGT80FTK22023xxx chksum dump: 0e 4c b5 56 80 be bf 20 8e e5 ad d5 59 ea 5d b3
    FGT80FTK20000xxx(updated 0 seconds ago): out-of-sync
    FGT80FTK20000xxx chksum dump: d1 31 59 fc 0b 91 12 ca 92 69 62 d2 9f b7 a3 c3
System Usage stats:
    FGT80FTK22023xxx(updated 1 seconds ago):
        sessions=18, average-cpu-user/nice/system/idle=0%/0%/0%/100%, memory=26%
    FGT80FTK20000xxx(updated 0 seconds ago):
        sessions=4, average-cpu-user/nice/system/idle=6%/0%/6%/87%, memory=24%
HBDEV stats:
    FGT80FTK22023xxx(updated 1 seconds ago):
        internal3: physical/1000auto, up, rx-bytes/packets/dropped/errors=1492065/22100/0/0, tx=20442845/47022/0/0
    FGT80FTK20000xxx(updated 0 seconds ago):
        internal3: physical/1000auto, up, rx-bytes/packets/dropped/errors=24954361/57802/0/0, tx=1804396/27277/0/0
number of member: 2
80FASAAA        , FGT80FTK22023xxx, HA cluster index = 0
FGT-D           , FGT80FTK20000xxx, HA cluster index = 1
number of vcluster: 1
vcluster 1: work 169.254.0.1
Primary: FGT80FTK22023xxx, HA operating index = 0
Secondary: FGT80FTK20000xxx, HA operating index = 1
Logical Serial Number: FGT80FHA24090xxx
# diagnose system ha dump-by debug-zone HA information. is_manage_primary=1,manage_vd=root,ip=169.254.0.1,num=2,nvcluster=1,jiffies=938038. logical serial number is FGT80FHA24090xxx, local serial number is FGT80FTK22023xxx, member's serial number is FGT80FTK20000xxx -
Furthermore, the service contract will be associated with the vSN and can be viewed on the System > FortiGuard page.
|
|
Do not change the HA mode from A-P to A-A when |