Dynamic Policy – FortiClient EMS (Connector)
This feature introduces a dynamic policy connector for FortiClient EMS. This allows objects to be defined on the FortiGate which map to tags/groups on EMS. EMS dynamically updates these endpoint groups when host compliance or other events happen. This causes FortiOS to dynamically adjust the security policy based on those group definitions.
EMS can define compliance verification rules based on criteria such as certificates, the logged in domain, files present, OS versions, running processes, and registry keys. When a FortiClient endpoint registers to EMS, EMS dynamically groups the endpoint based on the compliance verification rules. FortiOS can receive the dynamic endpoint groups from EMS via the FSSO protocol, using the new "fortiems" FSSO agent type which supports SSL and imports trusted certificates.
After FortiOS pulls the tags from EMS via the FSSO protocol, you can create user groups based on the tags, then apply dynamic firewall policies to the user groups. When host compliance or other events happen, EMS sends updates to FortiOS to update the dynamic policies.
The following instructions assume that EMS is installed, configured, and has endpoints connected. For information on configuring EMS, see the FortiClient EMS Administration Guide.
This feature is only available when using FortiOS with EMS 6.2.0 or later.
To add a compliance verification rule in EMS:
This example creates a compliance verification rule that applies to endpoints that have Windows 10 installed.
- In EMS, go to Compliance Verification > Compliance Verification Rules, and click Add.
- In the Name field, enter the desired rule name. Note that EMS uses the tag name to dynamically group endpoints, not the rule name configured in this field.
- Toggle Status on or off to enable or disable the rule.
- For Type, select Windows, Mac, or Linux. This affects what rule types are available. In this example, Windows is selected.
- From the Rule dropdown list, select the rule type and configure the related options. Ensure you click the + button after entering each criterion.
Rule type
Description
Certificate
In the Subject and Issuer fields, enter the certificate subject and issuer. You can enter multiple certificates using the + button. You can also use the NOT option to indicate that the rule requires that a certain certificate is not present for the endpoint.
The endpoint must satisfy all conditions to satisfy this rule. For example, if the rule is configured to require certificate A, certificate B, and NOT certificate C, then the endpoint must have both certificates A and B and not certificate C.
Logged in Domain
In the Domain field, enter the domain name. You can enter multiple domain names using the + button. If the rule is configured for multiple domains, the endpoint is considered as satisfying the rule if it belongs to one of the configured domains. This option is not available for Linux endpoints.
File
In the File field, enter the file path. You can enter multiple files using the + button. You can also use the NOT option to indicate that the rule requires that a certain file is not present on the endpoint.
The endpoint must satisfy all conditions to satisfy this rule. For example, if the rule is configured to require file A, file B, and NOT file C, then the endpoint must have both files A and B and not file C.
OS Version
From the OS Version field, select the OS version. You can enter multiple OS versions using the + button. If the rule is configured for multiple OS versions, the endpoint is considered as satisfying the rule if it has one of the configured OS versions installed.
Running Process
In the Running Process field, enter the process name. You can enter multiple processes using the + button. You can also use the NOT option to indicate that the rule requires that a certain process is not running on the endpoint.
The endpoint must satisfy all conditions to satisfy this rule. For example, if the rule is configured to require process A, process B, and NOT process C, then the endpoint must have both processes A and B running and process C not running.
Registry Key
In the Registry Key field, enter the registry key value. You can enter values using the + button. You can also use the NOT option to indicate that the rule requires that a certain registry key is not present on the endpoint.
The endpoint must satisfy all conditions to satisfy this rule. For example, if the rule is configured to require registry key A, registry key B, and NOT registry key C, then the endpoint must have both registry keys A and B and not registry key C.
This option is only available for Windows endpoints.
In this example, OS Version is selected from the Rule dropdown list, and Windows 10 is then selected from the OS Version dropdown list.
- Under Assign to, select All.
- In the Tag endpoint as dropdown list, select an existing tag or enter a new tag. In this example, a new tag, WIN10_EMS134, is created. EMS uses this tag to dynamically group together endpoints that satisfy the rule, as well as any other rules that are configured to use this tag.
- Click Save.
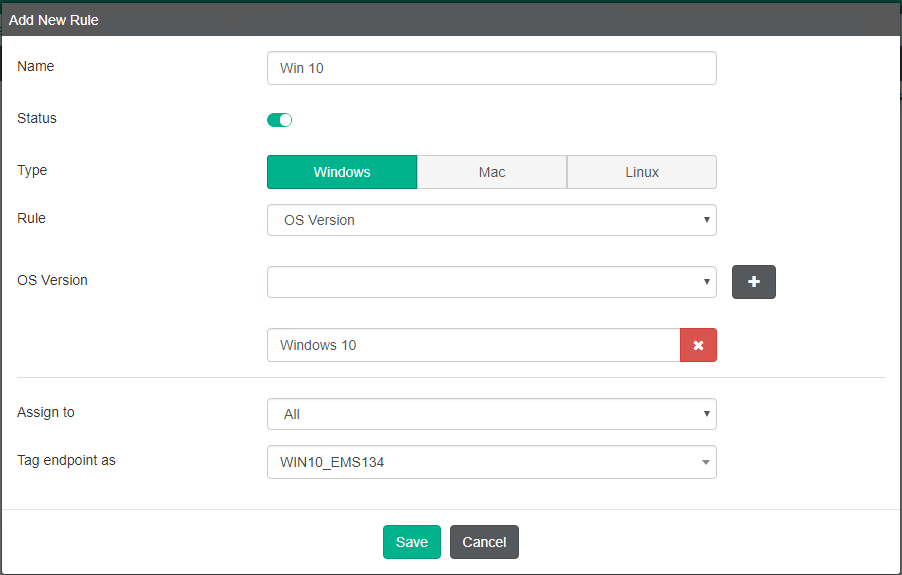
- Go to Compliance Verification > Host Tag Monitor. All endpoints that have Windows 10 installed are shown grouped by the WIN10_EMS134 tag.
To configure the fortiems FSSO agent:
In the FortiOS CLI, run the following commands. In this example, the FSSO agent name is ems_02, and the EMS server is located at 172.16.200.134.
config user fsso
edit "ems_02"
set server "172.16.200.134"
set password 123456
set type fortiems
set ssl enable
set ssl-trusted-cert "Fortinet_CA"
next
end
To configure EMS FSSO groups:
In the FortiOS CLI, run the following commands. In this example, the FSSO groups for two FSSO agents, ems_02 and ems_03, are being configured. The WIN10_EMS134 dynamic endpoint group is added to the ems_02 FSSO group, and the MAC_TEAMVIEWER_EMS135 dynamic endpoint group is added to the ems_03 FSSO group.
config user adgrp
edit "TAG_WIN10_EMS134"
set server-name "ems_02"
next
edit "TAG_MAC_TEAMVIEWER_EMS135"
set server-name "ems_03"
next
end
To configure a user group based on EMS tags:
- In FortiOS, go to User & Device > User Groups. Click Create New.
- In the Name field, enter the desired name.
- For Type, select Fortinet Single Sign-On (FSSO).
- In the Members field, click +. The Select Entries pane appears. You can identify the dynamic endpoint groups pulled from EMS because the names begin with TAG_, followed by the tag name from EMS.
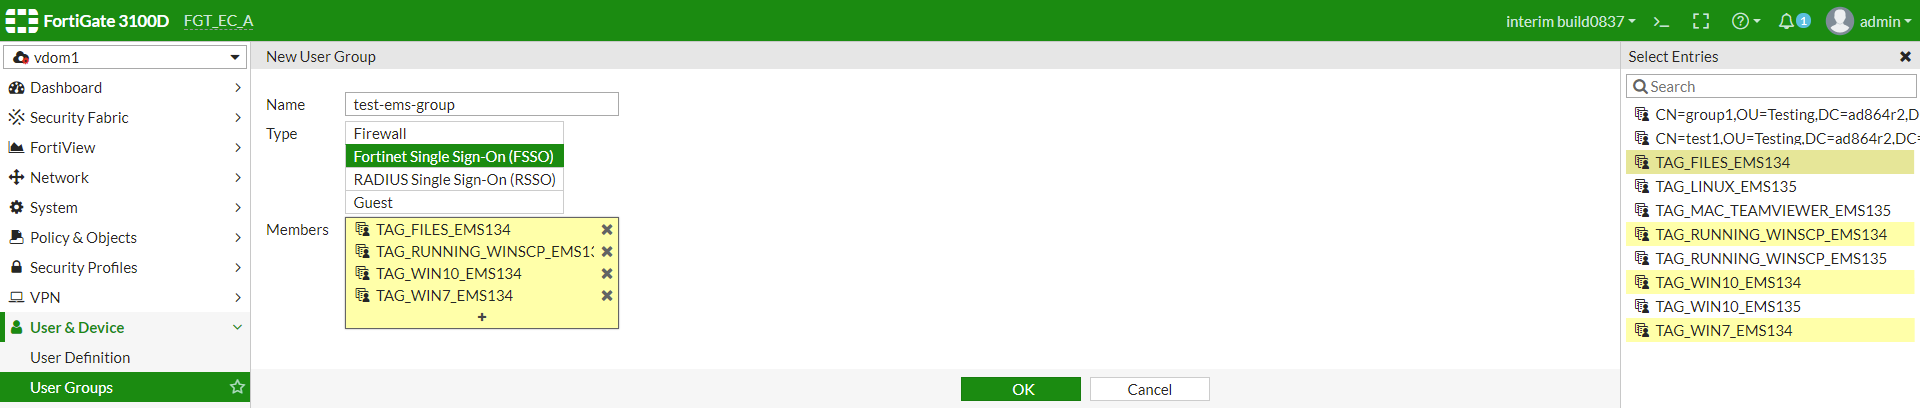
- Select the desired dynamic endpoint groups. Endpoints that currently belong to this dynamic endpoint group in EMS will be members of this FortiOS user group.
- Click OK.
To create a dynamic firewall policy for the user group:
You can now create a dynamic firewall policy for the user group. In this example, an IPv4 policy is created for the user group.
- In FortiOS, go to Policy & Objects > IPv4 Policy. Click Create New.
- In the Source field, click +. The Select Entries pane appears. On the User tab, select the user group configured above.
- Configure other options as desired. Click OK.
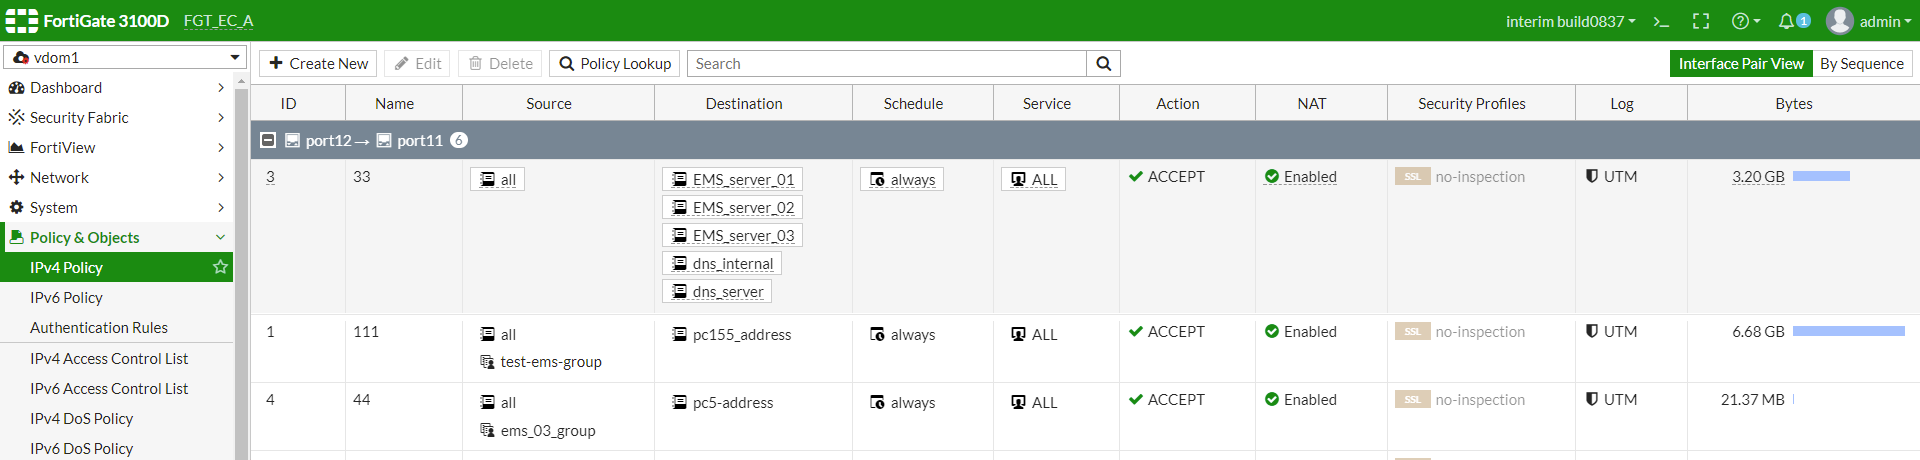
- Go to Policy & Objects > IPv4 Policy to ensure the policy was created and applied to the desired user group.
FortiOS will update this policy when it receives updates from EMS.