Fortinet white logo
Fortinet white logo

Cookbook

Using DHCP interface

Using DHCP interface

This recipe provides a sample configuration for customer using the DHCP interface as SD-WAN members. SD-WAN members can be all static IP interfaces, all DHCP interfaces, or a mix of both IP and DHCP interfaces.

In this example, a customer who has two ISP internet connections: wan1 and wan2. wan1 is a DHCP interface and wan2 is a static IP address interface.

Sample topology
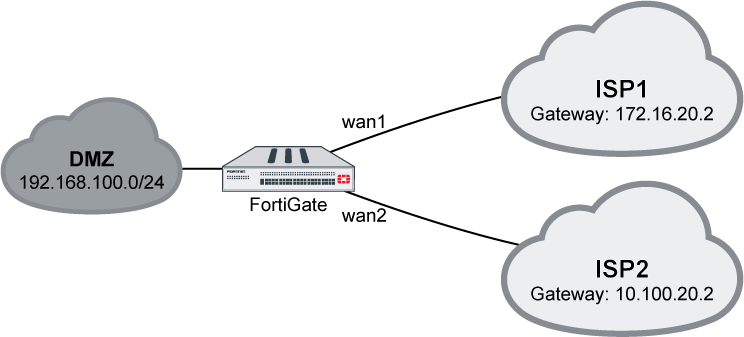
To configure DHCP interface on the GUI:
  1. Enable SD-WAN and add wan1 and wan2 as SD-WAN members.
    1. Go to Network > SD-WAN and ensure Status is Enable.
    2. In the SD-WAN Interface Members section, click the + button and add two members: wan1 and wan2.
      • For the static IP member, enter the Gateway address.
      • For the DHCP member, do not change the Gateway.
    3. Click Apply.
  2. Create static route and enable virtual-wan-link.
    1. Go to Network > Static Routes and click Create New.
    2. Click the Interface dropdown list and select SD-WAN.
    3. Click OK.
  3. Create policy for this traffic.
    1. Go to Policy & Objects > IPv4 Policy and click Create New.
    2. For the Incoming Interface, select dmz.
    3. For the Outgoing Interface, select SD-WAN
    4. Configure other options as needed.
    5. Click OK.

Outgoing traffic is balanced between wan1 and wan2 at about 50% each.

To configure the interface on the CLI:
config system interface 
    edit "wan1"
        set alias to_ISP1
        set mode dhcp
    next
    edit "wan2"
        set alias to_ISP2
        set ip 10.100.20.1 255.255.255.0
    next
end
To configure SD-WAN on the CLI:
config system virtual-wan-link
    set status enable
    config members
        edit 1
            set interface "wan1"
        next
        edit 2
            set interface "wan2"
            set gateway 10.100.20.2
        next
    end
end
To configure static route on the CLI:
config router static
    edit 1
        set distance 1
        set virtual-wan-link enable
    next
end
To configure firewall policy on the CLI:
config firewall policy
    edit 2
        set name "VWL"
        set srcintf "dmz"
        set dstintf "virtual-wan-link"
        set srcaddr "all"
        set dstaddr "all"
        set action accept
        set schedule "always"
        set service "ALL"
        set nat enable
    next
end
To use the diagnose command to check SD-WAN state:
# diagnose sys virtual-wan-link member 
Member(1): interface: wan1, gateway: 172.16.20.2, priority: 0, weight: 0 
Member(2): interface: wan2, gateway: 10.100.20.2, priority: 0, weight: 0

Using DHCP interface

Using DHCP interface

This recipe provides a sample configuration for customer using the DHCP interface as SD-WAN members. SD-WAN members can be all static IP interfaces, all DHCP interfaces, or a mix of both IP and DHCP interfaces.

In this example, a customer who has two ISP internet connections: wan1 and wan2. wan1 is a DHCP interface and wan2 is a static IP address interface.

Sample topology

To configure DHCP interface on the GUI:
  1. Enable SD-WAN and add wan1 and wan2 as SD-WAN members.
    1. Go to Network > SD-WAN and ensure Status is Enable.
    2. In the SD-WAN Interface Members section, click the + button and add two members: wan1 and wan2.
      • For the static IP member, enter the Gateway address.
      • For the DHCP member, do not change the Gateway.
    3. Click Apply.
  2. Create static route and enable virtual-wan-link.
    1. Go to Network > Static Routes and click Create New.
    2. Click the Interface dropdown list and select SD-WAN.
    3. Click OK.
  3. Create policy for this traffic.
    1. Go to Policy & Objects > IPv4 Policy and click Create New.
    2. For the Incoming Interface, select dmz.
    3. For the Outgoing Interface, select SD-WAN
    4. Configure other options as needed.
    5. Click OK.

Outgoing traffic is balanced between wan1 and wan2 at about 50% each.

To configure the interface on the CLI:
config system interface 
    edit "wan1"
        set alias to_ISP1
        set mode dhcp
    next
    edit "wan2"
        set alias to_ISP2
        set ip 10.100.20.1 255.255.255.0
    next
end
To configure SD-WAN on the CLI:
config system virtual-wan-link
    set status enable
    config members
        edit 1
            set interface "wan1"
        next
        edit 2
            set interface "wan2"
            set gateway 10.100.20.2
        next
    end
end
To configure static route on the CLI:
config router static
    edit 1
        set distance 1
        set virtual-wan-link enable
    next
end
To configure firewall policy on the CLI:
config firewall policy
    edit 2
        set name "VWL"
        set srcintf "dmz"
        set dstintf "virtual-wan-link"
        set srcaddr "all"
        set dstaddr "all"
        set action accept
        set schedule "always"
        set service "ALL"
        set nat enable
    next
end
To use the diagnose command to check SD-WAN state:
# diagnose sys virtual-wan-link member 
Member(1): interface: wan1, gateway: 172.16.20.2, priority: 0, weight: 0 
Member(2): interface: wan2, gateway: 10.100.20.2, priority: 0, weight: 0