


Creating the SD-WAN interface
This recipe provides an example of how to start using SD-WAN for load balancing and redundancy.
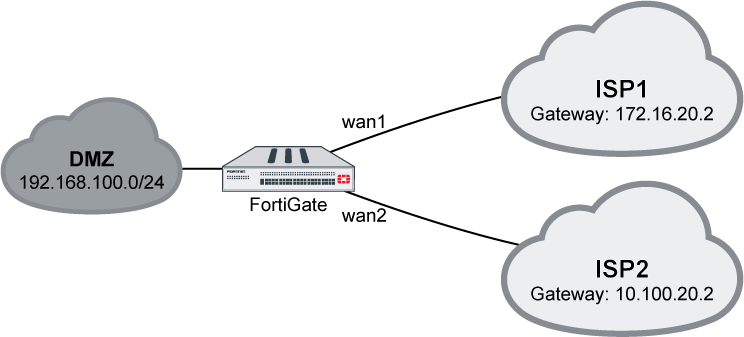
In this example, two ISP internet connections (wan1 and wan2) use SD-WAN to balance traffic between them at 50% each.
To configure SD-WAN using the GUI:
- On the FortiGate, enable SD-WAN and add interfaces wan1 and wan2 as members:
- Go to Network > SD-WAN.
- Set the Status to Enable.
- Click the plus icon to add members, using the ISPs' proper gateways for each member.

If IPv6 visibility is enabled in the GUI, an IPv6 gateway can also be added for each member. See Feature visibility for details.
- Click Apply to save your settings.
- Create a static route with virtual-wan-link enabled:
- Go to Network > Static Routes.
- Click Create New. The New Static Route page opens.
- From the Interface drop-down list, select SD-WAN.
- Click OK to save your changes.
- Create a firewall policy to allow the traffic:
- Go to Policy & Objects > IPv4 Policy.
- Click Create New. The New Policy page opens.
- For the Incoming Interface, select DMZ.
- For the Outgoing Interface, select SD-WAN.
- Configure the remaining settings as needed, then click OK to create the policy.
Outgoing traffic will balance between wan1 and wan2 at a 50:50 ratio.
To configure SD-WAN using the CLI:
- On the FortiGate, configure the wan1 and wan2 interfaces:
config system interface edit "wan1" set alias to_ISP1 set ip 172.16.20.1 255.255.255.0 next edit "wan2" set alias to_ISP2 set ip 10.100.20.1 255.255.255.0 next end - Enable SD-WAN and add the interfaces as members:
config system virtual-wan-link set status enable config members edit 1 set interface "wan1" set gateway 172.16.20.2 next edit 2 set interface "wan2" set gateway 10.100.20.2 next end end - Configure a static route:
config router static edit 1 set distance 1 set virtual-wan-link enable next end - Configure a firewall policy:
config firewall policy edit 2 set name "VWL" set srcintf "dmz" set dstintf "virtual-wan-link" set srcaddr "all" set dstaddr "all" set action accept set schedule "always" set service "ALL" set nat enable next end - Use a diagnose command to check the state of the SD-WAN:
# diagnose sys virtual-wan-link member
Member(1): interface: wan1, gateway: 172.16.20.2, priority: 0, weight: 0
Member(2): interface: wan2, gateway: 10.100.20.2, priority: 0, weight: 0