
Global Server Load Balancing in Hybrid Environments
In hybrid IT architectures, balancing workloads across multiple data centers and cloud environments is critical for maintaining high availability and ensuring optimal performance. This use case examines the deployment of Global Server Load Balancing (GSLB) using FortiADC for HybridShop, a global e-commerce platform with infrastructure spanning both on-premises data centers and public cloud services. FortiADC's GSLB configuration enables dynamic traffic routing by leveraging real-time health checks, load conditions, and geographic proximity to direct user requests to the most responsive and available data centers. By integrating FortiADC for GSLB, HybridShop aims to achieve enhanced performance, disaster recovery readiness, and improved user experience through intelligent traffic management that adapts to changing conditions and mitigates the risk of service disruptions.
User Scenario: Implementing GSLB with FortiADC for a Hybrid E-Commerce Environment
HybridShop, a global e-commerce platform, utilizes a hybrid IT architecture that integrates on-premises data centers with multiple cloud providers to support its high-performance, geographically distributed operations. To optimize service availability, reduce latency, and ensure robust disaster recovery, HybridShop deploys FortiADC's Global Server Load Balancing (GSLB) solution. GSLB dynamically distributes client requests based on real-time metrics such as server health, response time, network latency, and geographic proximity. It uses DNS-based redirection and advanced traffic steering policies to direct traffic to the most suitable data center or cloud environment.
In this use case, FortiADC serves as the central control point for managing traffic across HybridShop's hybrid environment. It is strategically positioned to maintain high-bandwidth, low-latency connections to both on-premises data centers and cloud environments, ensuring seamless communication and comprehensive visibility into backend infrastructure. With active health checks and automated failover mechanisms, FortiADC effectively mitigates the risk of server overload and regional outages, enhancing overall fault tolerance and resource efficiency across HybridShop’s infrastructure.
Step 1: Health Monitor Configuration
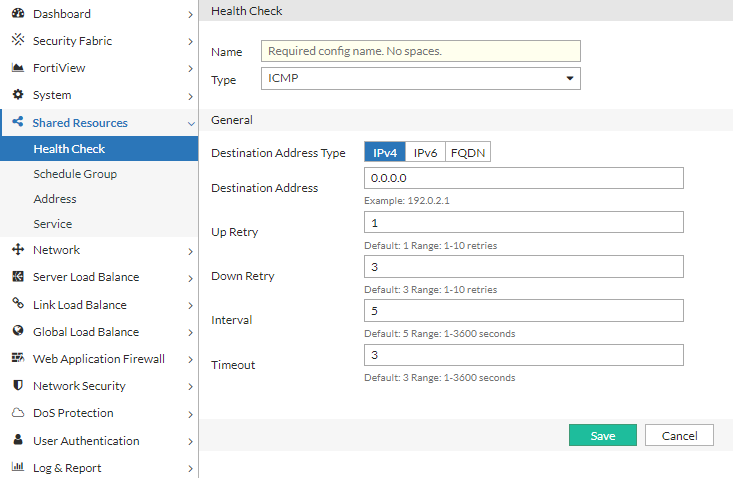
The first step in setting up GSLB with FortiADC is configuring robust health checks for all backend data centers and cloud environments. Health checks are crucial for monitoring the availability and performance of servers in real-time. FortiADC supports multiple protocols, such as HTTP(S), TCP, and ICMP, to ensure that only healthy and responsive data centers participate in load balancing. Setting appropriate thresholds for failed health checks and retries allows FortiADC to detect issues quickly and reroute traffic, ensuring continuous availability across the hybrid infrastructure.
To configure Health Check:
-
Navigate to Shared Resources > Health Check.
The configuration page displays the Health Check tab. -
Click Create New to display the configuration editor and configure the required settings for the selected Type.
For configuration details, see Configuring health checks. -
Save the configuration.
Alternatively, predefined Health Check profiles can also be applied.
Step 2: Global Balancing Servers and Locations Settings
After completing the health check configurations, the next step involves defining the backend servers and their locations within the GSLB framework. This process includes configuring address groups to organize IP ranges, mapping physical and cloud-based data centers, and setting up remote DNS servers for traffic forwarding. Hosts are identified within each data center to participate in GSLB, and servers are defined using these hosts with associated IPs, ports, and health-check criteria. The virtual server pool is configured to establish load balancing and failover behaviors, while the Global DNS Policy governs traffic routing based on factors such as location and performance. Finally, general settings are fine-tuned to ensure the GSLB architecture operates efficiently within HybridShop's hybrid infrastructure.
Step 2.1: Configure Address Groups
Define address groups to categorize IP ranges that represent various client locations or data center endpoints. Address groups play a critical role in HybridShop’s GSLB policy by enabling DNS-based traffic steering decisions based on client proximity, network zones, or geographic distribution. FortiADC uses these groups to apply policy-based rules that ensure clients are directed to the optimal data center—whether on-premises or cloud-based—thereby enhancing response times and user experience across global markets. FortiADC provides two predefined groups: any for unrestricted matching and none for exclusions.
To configure an Address Group:
-
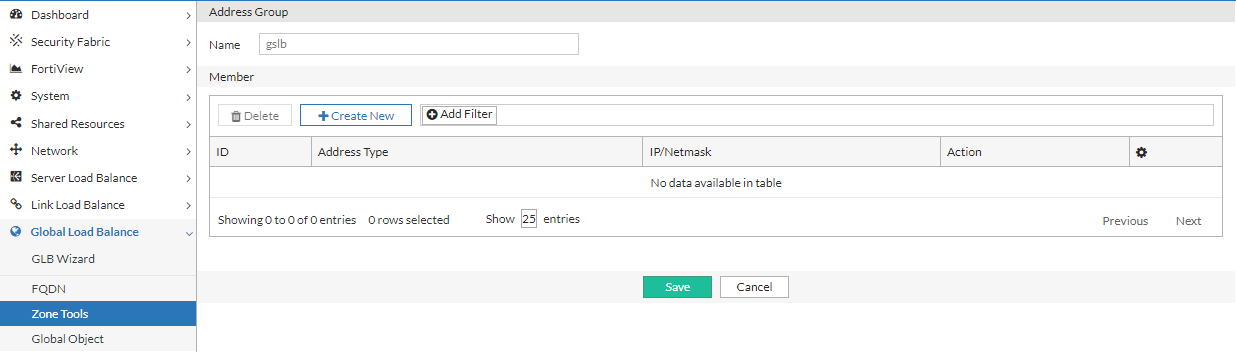
Navigate to Global Load Balance > Zone Tools. Click the Address Group tab.
-
Click Create New to display the configuration editor. Enter a name for the Address Group and click Save to enable configuration for the Member section.
-
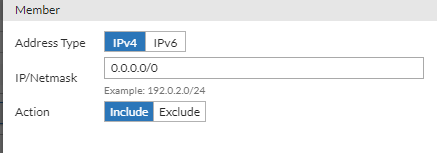
Under the Member section, click Create New to add IP addresses. Save the configuration and repeat to create as many address objects as needed to include in the Address Group.
-
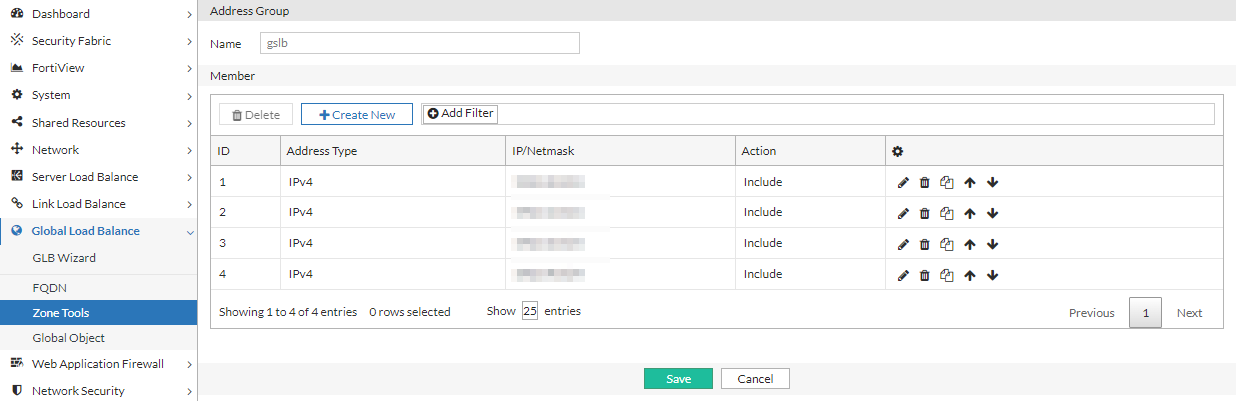
After you have added the desired number of IP addresses to the Address Group, click Save to commit the changes.
For configuration details, see Configuring an address group.
Step 2.2: Configure Data Centers
In HybridShop’s architecture, data centers consist of on-premises facilities as well as cloud regions hosted by multiple providers. Define these data centers in FortiADC’s GSLB configuration to establish strategic traffic distribution points. FortiADC monitors and manages traffic across all of these locations based on real-time metrics like latency and server load. By categorizing data centers geographically and functionally, HybridShop optimizes traffic flow, ensuring clients are routed to the nearest or most efficient center, improving service continuity and reducing latency.
To configure Data Center objects:
-
Navigate to Global Load Balance > Global Object. Click the Data Center tab.
-
Click Create New to display the configuration editor. Configure the required settings:
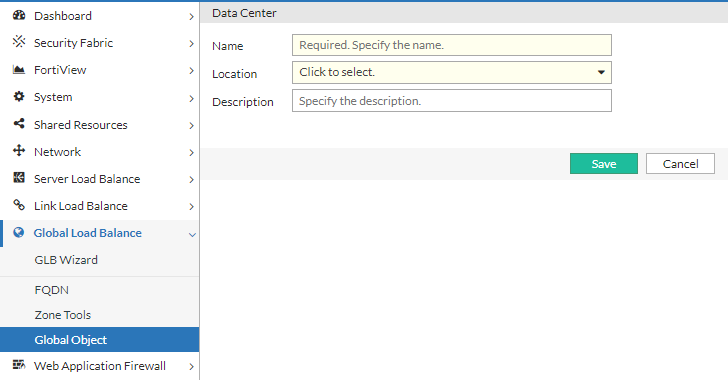
For configuration details, see Configuring data centers. -
Save the configuration.
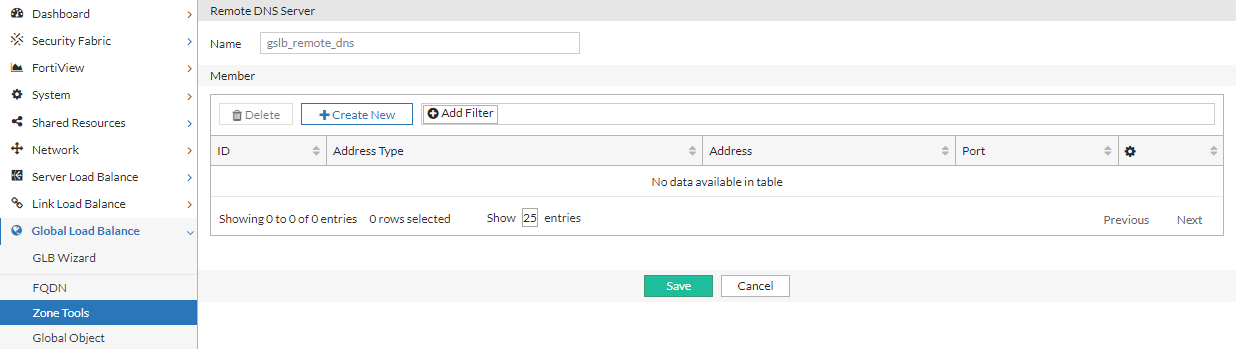
Step 2.3: Configure Remote DNS Servers
Set up remote DNS servers (also known as forwarders) to handle DNS queries that HybridShop’s distributed architecture relies on. FortiADC uses these servers to redirect requests to the appropriate virtual servers, considering cloud regions and on-premises environments. This step is critical in ensuring that DNS resolution remains swift and accurate, enabling dynamic redirection based on real-time traffic conditions or network health. In addition, the DSSET list is configured to further secure the DNS traffic and authenticate the zones in HybridShop's architecture.
To configure a Remote DNS Server:
-
Navigate to Global Load Balance > Zone Tools. Click the Remote DNS Server tab.
-
Click Create New to display the configuration editor. Enter a name for the remote DNS Server and click Save to enable configuration for the Member section.
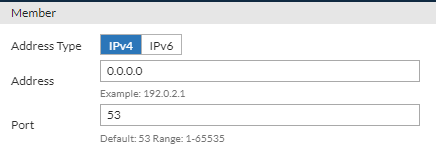
-
Under the Member section, click Create New to add the IP address of the remote DNS server. Save the configuration and repeat to create as many IP address objects as needed to include in the Remote DNS Server configuration.
-
After you have added the desired number of IP addresses to the Remote DNS Server configuration, click Save to commit the changes.
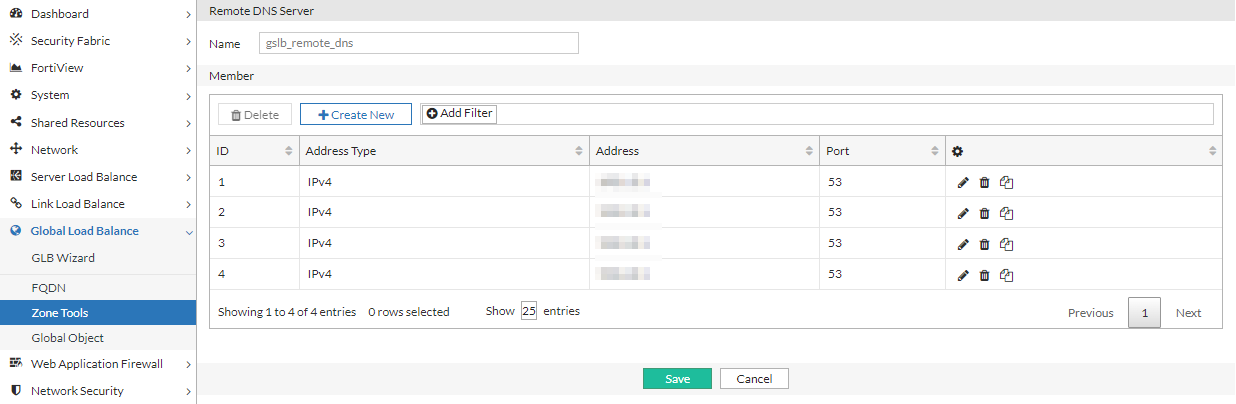
For configuration details, see Configuring remote DNS servers.
To configure a DSSET List:
-
Navigate to Global Load Balance > Zone Tools. Click the DSSET List tab.
-
Click Create New to display the configuration editor. Configure the required settings:
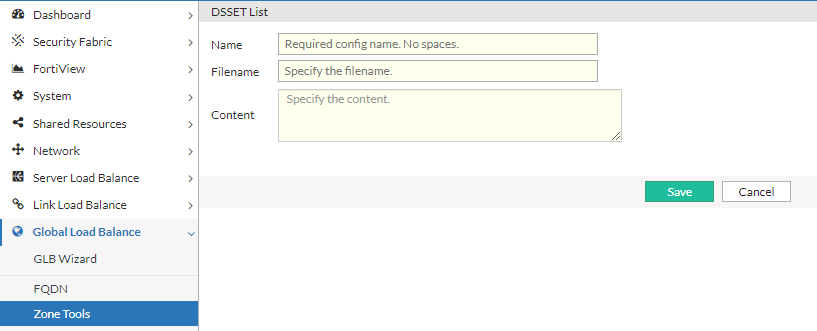
Settings Guidelines Name
Configuration name. Valid characters are
A-Z,a-z,0-9,_, and-. No spaces. You reference the name in the zone configuration (if you enable DNSSEC).After you initially save the configuration, you cannot edit the name.
Filename
Type the filename. The convention is dsset-<domain>, for example,
dsset-example.com.Content
Paste the DSset file content. The content of DSset files is similar to the following:
dns.example.com. IN DS 13447 5 1 A5AD9EFB6840F58CF817F3CC7C24A7ED2DD5559CFor configuration details, see Configuring the DSSET list.
-
Save the configuration.
Step 2.4: Configure Servers and Server Pools
Hosts are grouped into server pools within FortiADC, which form the basis for load balancing decisions. Prior to configuring Hosts, configure the servers and server pools. For HybridShop, these server pools consist of resources from both on-premises and cloud infrastructures, ensuring that traffic can be balanced across different environments seamlessly. FortiADC allows HybridShop to define load balancing methods—such as round-robin or least connections—to distribute client requests evenly or based on specific performance metrics. Failover response settings ensure that when a server becomes unreachable, the system automatically redirects traffic to an alternative pool.
To configure a GLB Server:
-
Navigate to Global Load Balance > Global Object.
The configuration page displays the Server tab. -
Click Create New to display the configuration editor. Configure the required settings:
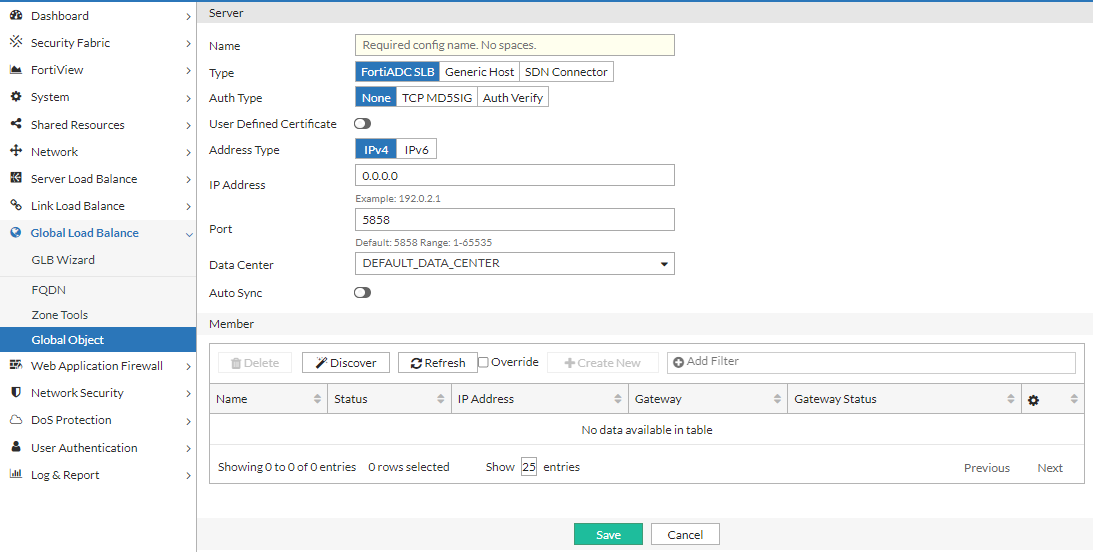
Setting Description Name
Configuration name. Valid characters are
A-Z,a-z,0-9,_, and-. No spaces. You reference this name in the virtual server pool configuration.Note: After you initially save the configuration, you cannot edit the name.
Type
Select the remote server to use for global server load balancing:
- FortiADC SLB — use a FortiADC instance.
- Generic Host — use a third party ADC or server.
- SDN Connector — use an existing external connector that is connected to the FortiADC Security Fabric.
Note: Currently, the SDN Connector option only supports AWS Connectors.
Auth Type The Auth Type option is available if Type is FortiADC SLB.
Select the authentication type:
- None — No password.
- TCP MD5SIG — With password, but cannot be used if NAT is in between the client and server. This is because, when using the TCP MD5SIG authentication in a network with NAT in between, the IP layer is encrypted. So is every packet. Because the IP address will be changed, the encryption check will always fail.
- Auth Verify — The authentication key is sent to the server after a three-way handshake. The key is encrypted and NAT in between will not affect the authentication.
Password The Password option is available if Type is FortiADC SLB and Auth Type is TCP MD5SIG.
Enter the password to authenticate the key.
The password you enter here must match the password configured on the FortiADC appliance in a global sever load-balancing configuration.
User Defined Certificate
The User Defined Certificate option is available if Type is FortiADC SLB.
Enable to use a self-defined certificate for authentication.
Certificate
The Certificate option is available if Type is FortiADC SLB and User Defined Certificate is enabled.
Select the local certificate object to use for the GSLB server.
Address Type
The Address Type option is available if Type is FortiADC SLB.
IPv4 or IPv6.
IP Address/IPv6 Address
The IP Address or IPv6 Address option is available if Type is FortiADC SLB.
Specify the IPv4 or IPv6 address for the FortiADC management interface. This IP address is used for synchronization and also status checks. If the management interface is unreachable, the virtual servers for that FortiADC are excluded from DNS responses.
Port
The Port option is available if Type is FortiADC SLB.
Specify the port. Default: 5858 Range: 1-65535.
SDN Connector
The SDN Connector option is available if Type is SDN Connector.
Select the SDN Connector to synchronize to the GSLB server.
For public SDN type servers, GSLB can update the public IP dynamically.
Note: Currently, only AWS connectors are supported.Use SDN Private IP
The Use SDN Private IP option is available if Type is SDN Connector.
Enable to use the SDN Private IP address.
Data Center
Select a data center configuration object. The data center configuration object properties are used to establish the proximity of the servers and the client requests.
Auto-sync
Enable/disable automatic synchronization with the remote server. When enabled, Global load balancing will synchronize automatically with the server member.
If auto-sync is enabled for SDN Connector type servers, all instances from the SDN connector will be added as server members.
Note: When disabling auto-sync, the server member will be cleared and re-synced.
Health Check Control
The Health Check Control option is available if Type is Generic Host or SDN Connector.
Enable/disable health checks for the virtual server list. The health check settings at this configuration level are the parent configuration. When you configure the list, you can specify whether to inherit or override the parent configuration.
Note: Health checking is built-in, and you can optionally configure a gateway health check.
Health Check Relationship
The Health Check Relationship option is available if Type is Generic Host and Health Check Control is enabled.
- AND—All of the specified health checks must pass for the server to be considered available.
- OR—One of the specified health checks must pass for the server to be considered available.
Health Check List
The Health Check List option is available if Type is Generic Host and Health Check Control is enabled.
Select one or more health check configuration objects.
For configuration details, see Configuring servers.
-
Click Save to enable configuration for the Member section.
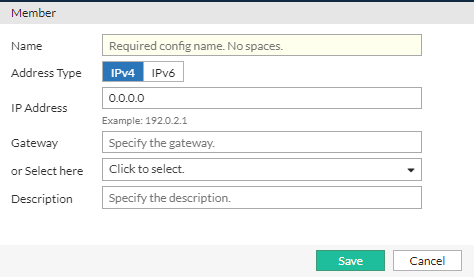
- Under the Member section, configure the Member list configuration according to the GLB server type.
Setting
Description
FortiADC SLB Discover
Populate the member list with virtual servers from the local FortiADC configuration. After the list had been populated, you can edit the configuration to add a gateway health check.
Override
Select this option if you want to update the discovered virtual server configuration with the latest configuration information whenever you use the Discover utility (for example, additions or changes to previously discovered configurations).
Unselect this option if you want to preserve the previously discovered configuration and not have it overwritten by the Discover operation.
Name
Must match the virtual server configuration name on the local FortiADC.
Address Type
IPv4 or IPv6.
IP Address/IPv6 Address
Virtual server IPv4 or IPv6 address.
Gateway
Enable an additional health check: is the gateway beyond the FortiADC reachable?
The list of gateway configuration objects is populated by discovery, but you must select the appropriate one from the list.
Generic Host
Health Check Inherit
Enable to inherit the health check settings from the parent configuration. The Health Check Inherit option is enabled by default. Disable to specify health check settings in this member configuration.
Health Check Control
The Health Check Control option is available if Health Check Inherit is disabled.
Enable health checking for the virtual server.
Health Check Relationship
The Health Check Relationship option is available if Health Check Inherit is disabled and Health Check Control is enabled.
- AND—All of the specified health checks must pass for the server to be considered available.
- OR—One of the specified health checks must pass for the server to be considered available.
Health Check List
The Health Check List option is available if Health Check Inherit is disabled and Health Check Control is enabled
Specify one or more health check configuration objects.
SDN Connector
SDN Instance
Select an instance from the SDN's instance list.
Health Check Inherit
Enable to inherit the health check settings from the parent configuration. The Health Check Inherit option is enabled by default. Disable to specify health check settings in this member configuration.
Health Check Control
The Health Check Control option is available if Health Check Inherit is disabled.
Enable health checking for the virtual server.
Health Check Relationship
The Health Check Relationship option is available if Health Check Inherit is disabled and Health Check Control is enabled.
- AND—All of the specified health checks must pass for the server to be considered available.
- OR—One of the specified health checks must pass for the server to be considered available.
Health Check List
The Health Check List option is available if Health Check Inherit is disabled and Health Check Control is enabled
Specify one or more health check configuration objects.
Note:
If Health Check is disabled for SDN connector server members, their health check status will always appear as available since the status cannot be verified through health check.
If the SDN instance is changed in the SDN connector, the SDN connector server member status will not be affected. For example, if the EC2 instance is terminated in AWS, that instance will still remain a server member in the SDN connector GLB server.
- After you have added the desired number of Members to the Server configuration, click Save to commit the changes.
To configure a Virtual Server Pool:
-
Navigate to Global Load Balance > FQDN. Click the Virtual Server Pool tab.
-
Click Create New to display the configuration editor. Configure the required settings:
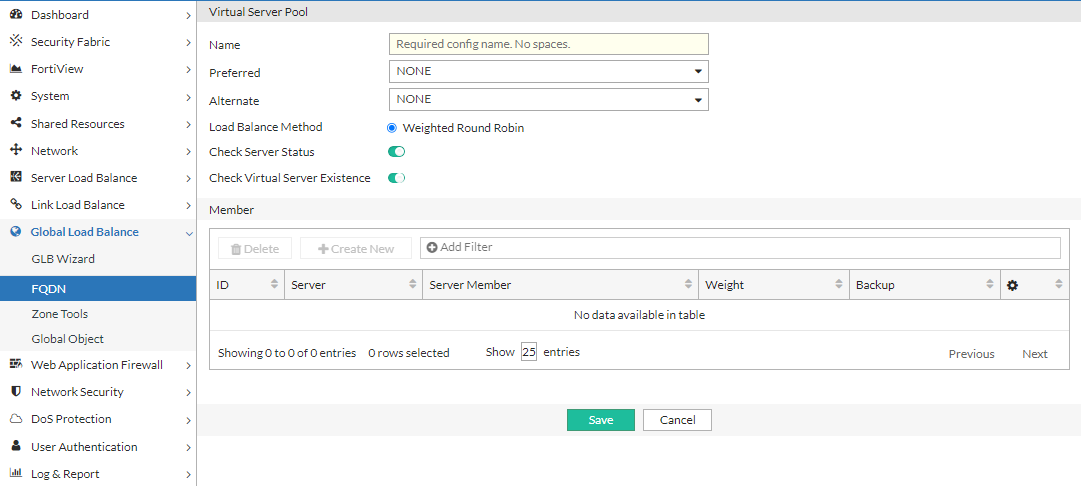
Settings Guidelines Name
Specify a unique name for the virtual server pool configuration. Valid characters are
A-Z,a-z,0-9,_, and-. No spaces. You reference this name in the host configuration.Note: After you initially save the configuration, you cannot edit the name.
Preferred
- None—No preference.
- Geo—If selected, virtual servers with the same GEO information as the local DNS address will respond.
- Geo-ISP—If selected, virtual servers with the same ISP information as the local DNS address will respond first, and virtual servers with the same GEO information as the local DNS address will respond second.
- RTT—Virtual servers with the shortest latency link or closest to the data center will respond.
- Least-Connnections—Virtual servers with the least connections will respond.
- Connection-Limit—Virtual servers will be responded by their connection limit determined by virtual servers' weight: the greater the weight of a virtual server, the more responses it will get.
- Bytes-Per-Second—Virtual servers with the lowest traffic will respond.
- Server-Performance—Virtual servers with better server-performancec in the CPU or Memory (whichever one you give more weight to) will respond.
Alternate
- None—No preference.
- Geo—If selected, virtual servers with the same GEO information as the local DNS address will respond.
- Geo-ISP—If selected, virtual servers with the same ISP information as the local DNS address will respond first, and virtual servers with the same GEO information as the local DNS address will respond second.
- RTT—Virtual servers with the shortest latency link or closest to the data center will respond.
- Least-Connnections—Virtual servers with the least connections will respond.
- Connection-Limit—Virtual servers will be responded by their connection limit determined by virtual servers' weight: the greater the weight of a virtual server, the more responses it will get.
- Bytes-Per-Second—Virtual servers with the lowest traffic will respond.
- Server-Performance—Virtual servers with better server-performancec in the CPU or Memory (whichever one you give more weight to) will respond.
Load Balance Method
Weighted Round Robin
Check Server Status
Enable/disable polling of the local FortiADC SLB. If the server is unresponsive, its virtual servers are not selected for DNS answers.
Check Virtual Server Existence
Enable/disable checks on whether the status of the virtual servers in the virtual server list is known. Virtual servers with unknown status are not selected for DNS answers.
For configuration details, see Configuring virtual server pools.
-
Save the configuration to enable configuration for the Member section.
-
Under the Member section, click Create New to display the configuration editor. Configure the required settings and save the configuration.
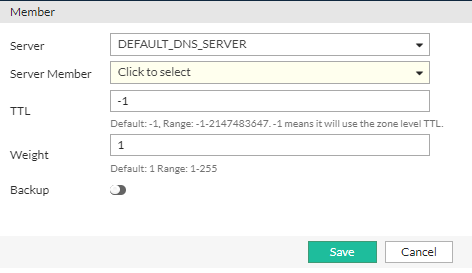
Settings Guidelines Server
Select a GLB Servers configuration object.
Server Member
Select the name of the virtual server that is in the servers virtual server list configuration.
Weight
Assigns relative preference among members—higher values are more preferred and are assigned connections more frequently.
The default is 1. The valid range is 1-255.
Backup
Enable to designate the member as a backup. Backup members are inactive until all main members are down.
-
After you have added the desired number of Members to the Virtual Server Pool configuration, click Save to commit the changes.
Step 2.5: Define Hosts (Physical and Cloud-Based Data Centers)
Hosts are the servers or virtual machines that handle incoming traffic within HybridShop’s infrastructure. These hosts can reside either in local on-premises data centers or across cloud environments such as AWS or Azure. In this step, administrators must define each host by specifying its IP address, operational role, and health-check configuration. FortiADC’s GSLB framework constantly monitors these hosts, ensuring that only healthy and responsive servers receive traffic, thus preventing client requests from reaching degraded or unavailable servers.
To configure a host:
-
Navigate to Global Load Balance > FQDN.
The configuration page displays the Host tab. -
Click Create New to display the configuration editor. Configure the required settings:
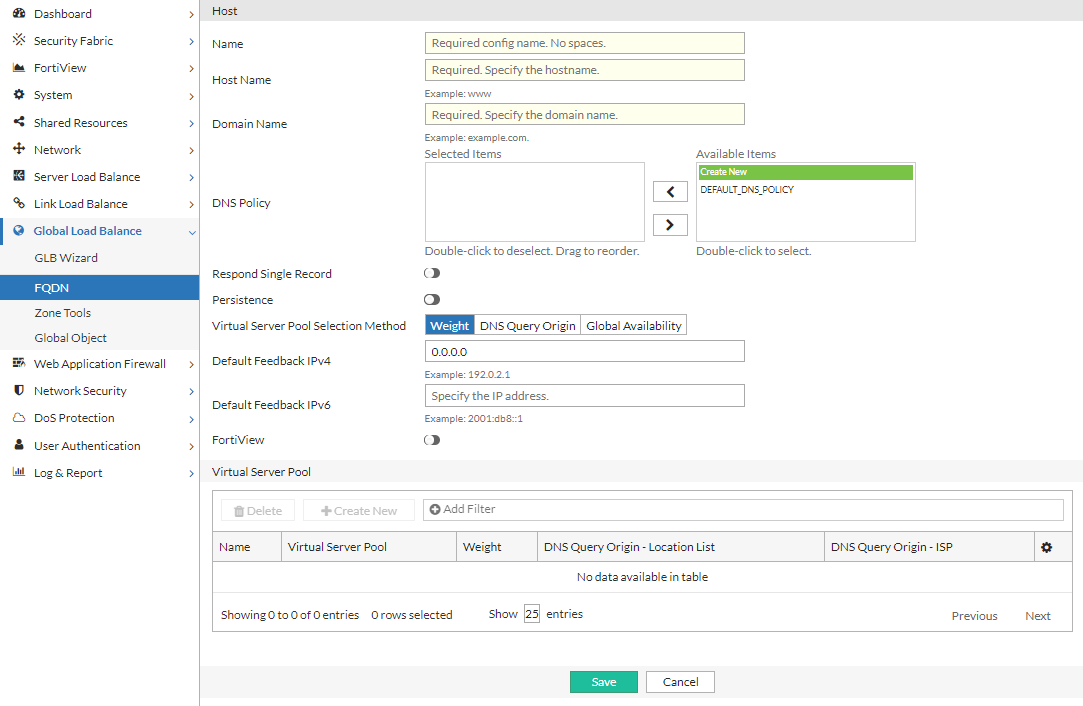
Settings Guidelines Name
Configuration name. Valid characters are
A-Z,a-z,0-9,_, and-. No spaces.Note: After you initially save the configuration, you cannot edit the name.
Host Name
The hostname part of the FQDN, such as
www.Note: You can specify the @ symbol to denote the zone root. The value substituted for @ is the preceding $ORIGIN directive.
Domain Name
The domain name must end with a period. For example:
example.com.DNS Policy
Select one or more DNS policies you want the host to use.
Respond Single Record
Enable/disable an option to send a single record in response to a query. Disabled by default. By default, the response is an ordered list of records.
Persistence
Enable/disable the persistence table. Disabled by default.
If you enable persistence, the client source address is recorded in the persistence table, and subsequent requests from the same network or the same host or domain are sent an answer with the virtual servers listed in the same order (unless a server becomes unavailable and is therefore omitted from the answer).
Virtual Server Pool Selection Method
- Weight—If selected, virtual server pool will be responded by weight.
- DNS Query Origin—If selected, virtual server pool with the same topology information as the local DNS address will be responded.
- Global Availability—If selected, virtual servers will be responded by their global availability: the first virtual server in queue will always be responded if it is globally available, and the next virtual server in queue will be responded if the preceding virtual server is unavailable.
Default Feedback IPv4
Specify an IP address to return in the DNS answer if no virtual servers are available.
Default Feedback IPv6
Specify an IPv6 address to return in the DNS answer if no virtual servers are available.
For configuration details, see Configuring hosts.
-
Save the configuration to enable configuration for the Virtual Server Pool section.
-
Under the Virtual Server Pool section, click Create New to display the configuration editor. Configure the required settings and save the configuration.
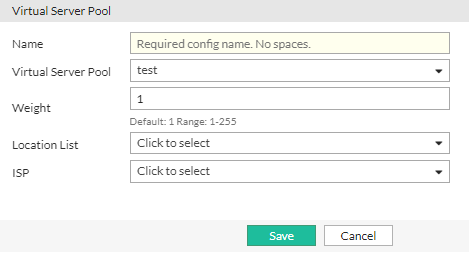
Settings Guidelines Name Enter the mkey.
Virtual Server Pool Select a virtual server pool from the list, or create a new one.
Weight Assign a weight. Valid values range from 1 to 255.
Topology Select a topology from the list, or create a new one.
ISP Select an ISP from the list or create a new one.
Step 2.6: Configure Global DNS Policy
The Global DNS Policy is where HybridShop’s traffic steering strategies are implemented. By mapping address groups to specific data centers or cloud regions, FortiADC’s DNS policies enable precise control over how and where requests are routed. HybridShop leverages advanced traffic routing rules, such as geographic proximity and performance-based steering, to ensure that customers from different regions are directed to the data center best suited to handle their requests, optimizing both speed and resource utilization.
To the Global DNS Policy:
-
Navigate to Global Load Balance > Zone Tools. Click the Global DNS Policy tab.
-
Click Create New to display the configuration editor. Configure the required settings:

Settings Guidelines Name
Configuration name. Valid characters are
A-Z,a-z,0-9,_, and-. No spaces.After you initially save the configuration, you cannot edit the name.
Source
Select an address object to specify the source match criteria. See Configuring an address group.
Destination
Select an address object to specify the destination match criteria. See Configuring an address group.
Zone List
Select one or more zone configurations to serve DNS requests from matching traffic. See Configuring DNS zones.
DNS64 List
Select one or more DNS64 configurations to use when resolving IPv6 requests. See Configuring DNS64.
Recursion
Enables/disables recursion. If enabled, the DNS server attempts to do all the work required to answer the query. If not enabled, the server returns a referral response when it does not already know the answer.
DNSSEC Validation
Enables/disables DNSSEC validation.
Forward
- First—The DNS server queries the forwarders list before performing its own DNS lookup.
- Only—Only queries the forwarders list. Does not perform its own DNS lookups.
Note: The internal server caches the results it learns from the forwarders, which optimizes subsequent lookups.
Forwarders
If the DNS server zone has been configured as a forwarder, select the remote DNS server to which it forwards requests. See Configuring remote DNS servers.
Response Rate Limit
Select a rate limit configuration object. See Configuring the response rate limit.
Reordering

After you have saved a rule, reorder rules as necessary. The rules table is consulted from top to bottom. The first rule that matches is applied and subsequent rules are not evaluated.
For configuration details, see Configuring a Global DNS policy.
-
Save the configuration.
Step 2.7: Configure General Settings
Configure general DNS settings that apply when no specific policy match is found. For HybridShop, this ensures default behavior that directs client traffic to the nearest available data center, maintaining optimal performance even when more complex policies are not triggered. Additionally, DNSSEC settings may be configured to ensure the integrity and security of DNS queries within HybridShop’s globally distributed environment, mitigating potential threats and ensuring data authenticity.
To configure general DNS settings:
-
Navigate to Global Load Balance > Zone Tools. Click the General Settings tab.
-
Configure the settings:
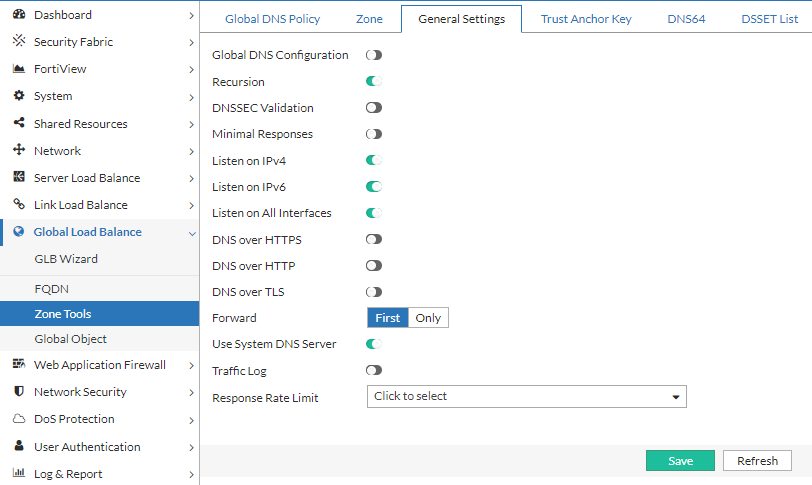
Settings Guidelines Global DNS Configuration
Enables/disables this configuration.
Recursion
Enables/disables recursion. If enabled, the DNS server attempts to do all the work required to answer the query. If not enabled, the server returns a referral response when it does not already know the answer.
DNSSEC Validation
Enables/disables DNSSEC validation.
Minimal Responses
Enables/disables Minimal Responses to hide the Authority Section and Additional Section of DNS queries.
When the DNS query only shows the minimal response, it can significantly increase the performance of the FortiADC DNS service by increasing the QPS.Listen on IPv6
Enables/disables listening for DNS requests on the interface IPv6 address.
Listen on IPv4
Enables/disables listening for DNS requests on the interface IPv4 address.
Traffic Log
Enables/disables traffic log.
Listen on All Interface
Enables listening on all interfaces.
Interface List
The Interface List option is available if Listen on All Interface is disabled.
If not listening to all interfaces, select one or more ports to listen on.
DNS over HTTPS
Enables/disables DNS over HTTPS to encrypt DNS queries using the HTTPS protocol.
DNS over HTTPS Port
The DNS over HTTPS Port option is available if DNS over HTTPS is enabled.
Specify the port to listen on DNS over HTTPS. Default: 443 Range: 1-65535.
DNS over HTTPS Interface List
The DNS over HTTPS Interface List option is available if DNS over HTTPS is enabled.
Select the interface(s) to listen on for DNS over HTTPS.
DNS over HTTP
Enables/disables DNS over HTTP to encrypt DNS queries using the HTTP protocol.
DNS over HTTP Port
The DNS over HTTP Port option is available if DNS over HTTP is enabled.
Specify the port to listen on DNS over HTTP. Default: 80 Range: 1-65535.
DNS over HTTP Interface List
The DNS over HTTP Interface List option is available if DNS over HTTP is enabled.
Select the interface(s) to listen on for DNS over HTTP.
DNS over TLS
Enables/disables DNS over TLS to encrypt DNS queries using the TLS protocol.
DNS over TLS Port
The DNS over TLS Port option is available if DNS over TLS is enabled.
Specify the port to listen on DNS over TLS. Default: 853 Range: 1-65535.
DNS over TLS Interface List
The DNS over TLS Interface List option is available if DNS over TLS is enabled.
Select the interface(s) to listen on for DNS queries for DNS over TLS.
Certificate
The Certificate option is available if DNS over HTTPS or DNS over TLS is enabled.
Select the certificate object to apply for DNS over HTTPS or DNS over TLS. This certificate must refer to the DNS server domain or IP address. For details, see Configuring DNS over HTTPS and DNS over TLS.
Forward
- First—The DNS server queries the forwarder before doing its own DNS lookup.
- Only—Only queries the forwarder. Does not perform its own DNS lookups.
Note: The internal server caches the results it learns from forwarders, which optimizes subsequent lookups.
Use System DNS Server
Forwards DNS requests to the system DNS server instead of the forwarders list.
Response Rate Limit
Selects a rate limit configuration object. See Configuring the response rate limit.
For configuration details, see Configuring general settings.
-
Save the configuration.
Step 3: Monitoring Traffic and Testing Failover
Once the configuration is complete, it is vital to monitor the traffic flow and test failover mechanisms. FortiADC's monitoring tools provide real-time insights into traffic distribution, server health, and load balancing performance. Simulating failover scenarios, such as data center outages or high traffic loads, helps verify that traffic is correctly rerouted to backup servers or data centers, ensuring the reliability and resilience of the GSLB setup. Testing these failover policies regularly guarantees that FortiADC can handle disaster recovery scenarios seamlessly, maintaining high availability for your hybrid environment.
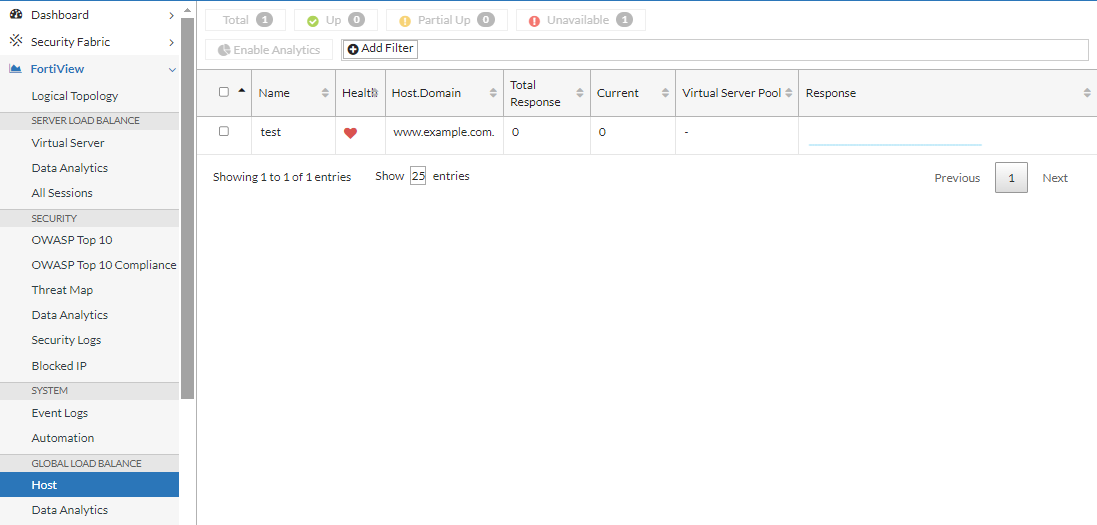
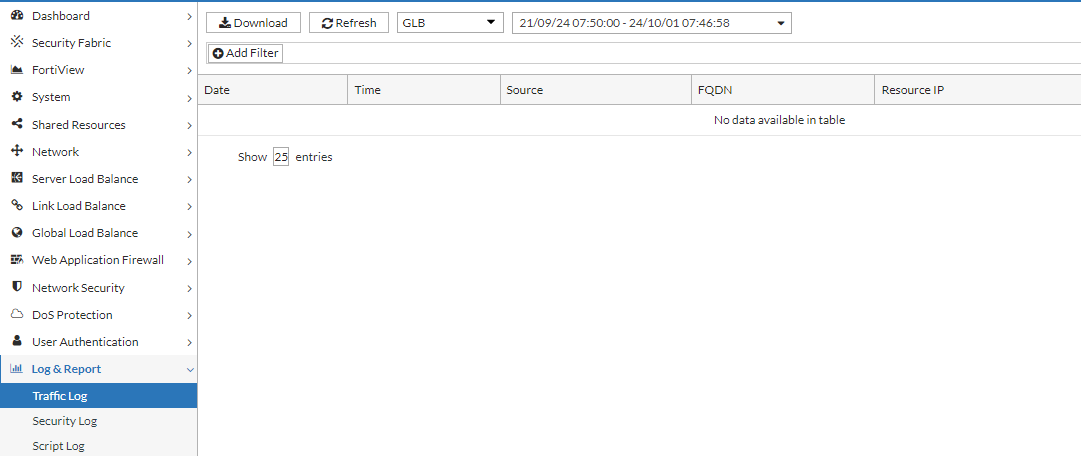
Monitor GSLB traffic flow via FortiView and Traffic Log
FortiView:
Traffic Log:
Testing the Failover Mechanism
To verify the GSLB failover configuration, simulate a failover by causing a virtual server pool member to fail its health check. This should trigger the traffic to be seamlessly redirected to another pool member, ensuring proper failover functionality. Using tools such as "nslookup" or "dig", you can send a DNS query, and then collect and view its packet data using PCAP tools such as "wireshark".
In this example, we will use "nslookup".
-
Initiate a DNS query and record the IP address returned by the GSLB service.
-
Adjust the health check configuration for the designated virtual server pool member, setting its status to "down".
-
Inspect traffic logs to confirm that the virtual server pool member is marked as "down" and that the health check status reflects a failure.
-
Issue a subsequent DNS query and verify that the response returns a different IP address, indicating successful failover to another pool member.