
Leveraging DevOps Tools (Ansible/Terraform) to Manage FortiADC
In today’s fast-paced digital landscape, organizations are increasingly adopting DevOps practices to enhance operational efficiency, reduce deployment times, and minimize configuration errors. FortiADC, with its robust capabilities in application delivery and load balancing, integrates seamlessly with popular DevOps tools such as Ansible and Terraform. This section explores how these tools can be leveraged to automate the management and deployment of FortiADC configurations, ensuring consistent performance across multi-environment infrastructures while facilitating rapid and reliable changes.
User Scenario: Automating FortiADC Management with Ansible and Terraform
This user scenario focuses on "FinSecure," a financial services company that operates a complex multi-environment infrastructure featuring multiple FortiADC instances across development, staging, and production environments. To streamline operations and enhance efficiency while minimizing the risk of configuration errors, FinSecure seeks to automate the management and deployment of its FortiADC configurations using Ansible and Terraform. By implementing these DevOps tools, FinSecure aims to ensure consistent, rapid configuration changes that align with its operational requirements across all environments.
Role of Ansible
Ansible is an advanced automation framework designed for streamlined configuration management and application deployment. When applied to FortiADC, Ansible enables the automation of critical tasks such as the addition, modification, and deletion of FortiADC configurations. Leveraging the FortiADC Ansible Collection, which includes a set of purpose-built Ansible modules for managing FortiADC appliances, FinSecure can efficiently execute playbooks to enforce consistent configurations across its development, staging, and production environments. This automation framework minimizes manual intervention, ensuring rapid deployment and strict adherence to best practices and compliance policies, while enhancing operational reliability and configuration accuracy.
Step 1: Install FortiADC Ansible Collection
The first step in automating FortiADC management with Ansible is to install the FortiADC Ansible Collection. This collection provides a comprehensive suite of modules specifically tailored for configuring and managing FortiADC instances. By installing this collection, administrators can automate tasks such as adding, modifying, and deleting FortiADC configurations, streamlining operations across FinSecure's environments.
To install the FortiADC Ansible Collection, use the following command:
ansible-galaxy collection install fortinet.fortiadc
This command installs the latest version of the collection, enabling access to the necessary modules for FortiADC management. Before proceeding, ensure that the Ansible core version and Python environment meet the collection’s version requirements to avoid compatibility issues. This setup establishes the foundation for automating configuration tasks efficiently within the infrastructure.
Step 2: Prepare Host Inventory
After installing the FortiADC Ansible Collection, the next step is to prepare the host inventory, a crucial component that defines the FortiADC instances Ansible will manage. The host inventory file specifies the target devices, allowing administrators to ensure that playbooks are executed on the correct FortiADC instances. Accurate host inventory preparation is essential for precise and consistent configuration management across multiple environments.
To prepare the host inventory, create or modify the inventory file located in the default path:
/etc/ansible/hosts
In this example, we create a host group named [ADC1] and provide the IP address of the FortiADC instance:
[ADC1]
44.215.84.44
By correctly defining the target hosts in the inventory file, you ensure that Ansible playbooks are applied to the designated FortiADC instances, enabling controlled and reliable automation across FinSecure's infrastructure.
Step 3: Prepare FortiADC Ansible Playbook
With the host inventory established, the next step is to create the FortiADC Ansible playbook. The playbook defines the specific tasks and configurations to be applied to FortiADC instances, allowing administrators to automate complex operations such as adding new servers, modifying existing configurations, or enforcing policy updates. A well-structured playbook ensures that configuration changes adhere to best practices, enhancing both the consistency and reliability of FortiADC management across multiple environments.
In this example, we will prepare a playbook to add a new real server to FortiADC. This is achieved using the fadcos_real_server module, which allows you to define and manage real server configurations.
---
- name:
  hosts: ADC1
  vars:
	ansible_network_os: fortinet.fortiadc.fadcos
	ansible_user: ansible
	ansible_passowrd: aa
	ansible_httpapi_use-ssl: yes
	ansible_httpapi_validate_certs: no
	ansible_httpapi_port: 443
  connection: httpapi
  gather_facts: false
  tasks:
    - name: add real server 1
      fadcos_real_server:
       action: add
       name: rs1
       ip: 6.6.6.1
       status: enable
       vdom: root

    - name: add real server 1
      fadcos_real_server:
       action: add
       name: rs2
       ip: 6.6.6.2
       status: enable
       vdom: root
For more complex configurations, consult the usage examples provided in the FortiADC Ansible Collection documentation for specific module options. By referencing the correct modules, you can automate various FortiADC configuration tasks, ensuring scalable, error-free management across your infrastructure.
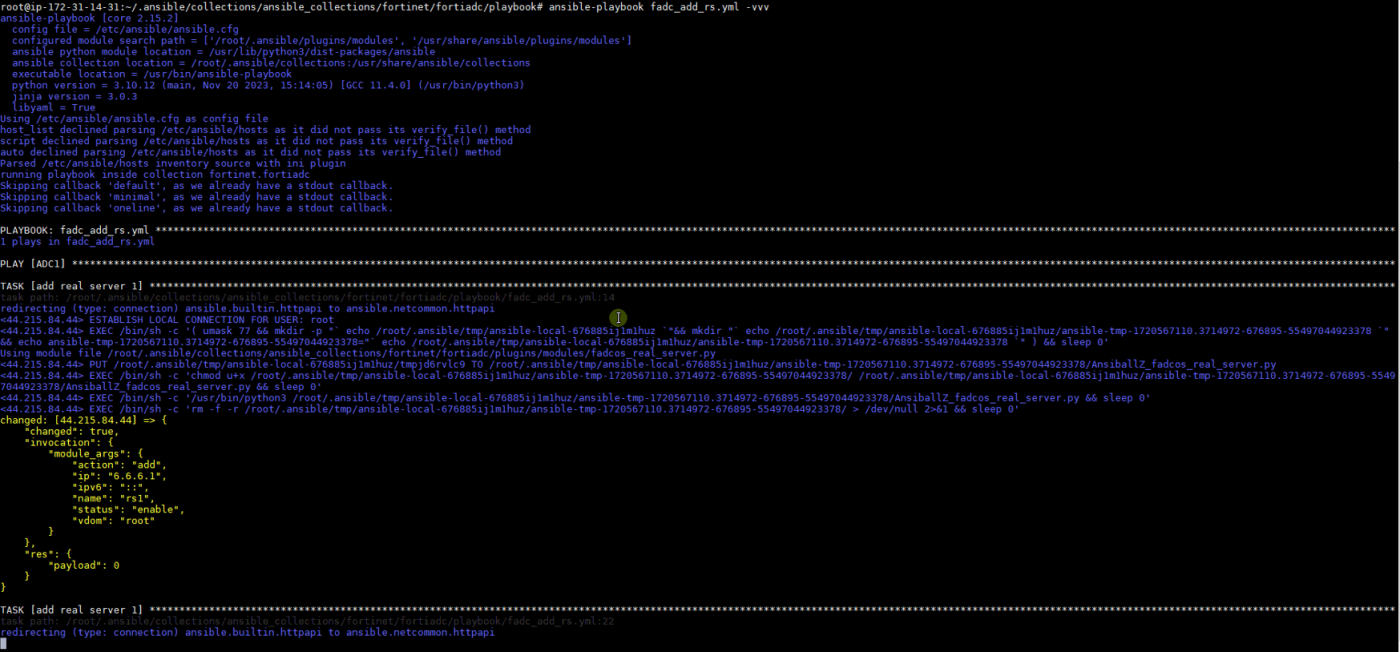
Step 4: Run the Playbook
The final step in the Ansible workflow is to execute the prepared playbook, applying the defined configurations and tasks to the specified FortiADC instances. This critical action marks the transition from preparation to implementation, allowing administrators to execute configuration changes swiftly and efficiently while minimizing the potential for human error.
To run the playbook, execute the following command in the terminal:
ansible-playbook xxxx.yml -vvv
Replace xxxx.yml with the name of your specific playbook file. The -vvv option enables verbose output, providing detailed feedback on the playbook execution process, including task completion statuses and any encountered issues. This level of detail aids in troubleshooting and ensures that administrators can monitor the successful application of configurations to FortiADC instances, enhancing operational visibility and control over the automation process.
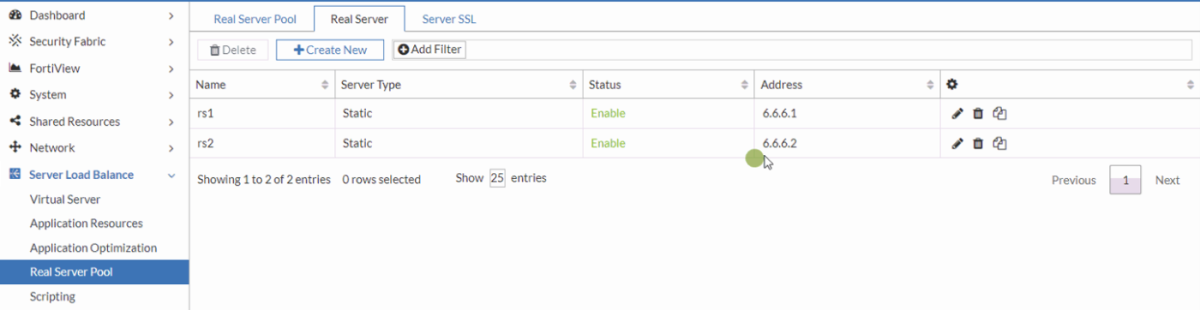
Access the FortiADC instance to confirm that the automated actions executed by Ansible have been successfully applied. In this example, two new real servers have been created with the IP addresses 6.6.6.1 (rs1) and 6.6.6.2 (rs2).
Role of Terraform
Terraform is an Infrastructure as Code (IaC) tool engineered for provisioning and managing cloud infrastructure, providing an efficient framework for orchestrating the lifecycle of FortiADC instances within FinSecure's multi-environment architecture. Utilizing the FortiADC Terraform provider, FinSecure can declaratively specify infrastructure resources, enabling automated provisioning, modification, and decommissioning of FortiADC configurations. This approach ensures that the infrastructure adheres to predefined desired states, enhancing consistency and facilitating robust version control and change management practices. In this use case, the FortiADC Terraform provider is employed to interact with FortiADC-supported resources, allowing users to effectively manage and alter configurations using the requisite authentication credentials.
Step 1: Install FortiADC Terraform Provider
The initial step in utilizing Terraform to manage FortiADC is to install the FortiADC Terraform provider. This provider serves as a crucial bridge between Terraform and FortiADC, enabling administrators to programmatically interact with and manage FortiADC resources. By completing this installation, FinSecure establishes the capability to define and provision FortiADC configurations through Infrastructure as Code (IaC).
To install the FortiADC Terraform provider, incorporate the following configuration block into your Terraform configuration file:
terraform {
  required_providers {
    fortiadc = {
      source = "fortinetdev/fortiadc"
      version = "1.2.0"
    }
  }
}

provider "fortiadc" {
  # Configuration options
}
After adding the configuration, run the following command to initialize the Terraform workspace:
terraform init
This command downloads the necessary provider binaries and prepares the environment for managing FortiADC resources, ensuring FinSecure is equipped for efficient infrastructure management.
Step 2: Generate an API Token for FortiADC
After installing the Terraform provider, the next critical step is to generate an API token for FortiADC. This token facilitates secure authentication and communication between Terraform and the FortiADC instances. Proper configuration of this token is essential to ensure that Terraform has the necessary permissions to manage resources effectively while adhering to security protocols.
To generate an API token, create a new REST API administrator in FortiADC. Once the administrator account is created, the system will generate an API token that is displayed only once. It is crucial to record this token, as it cannot be retrieved later. This token will be required for subsequent configuration and operation within the tutorial. Ensure that the FortiADC provider is configured with the correct credentials, including the generated API token, before proceeding with any Terraform commands.
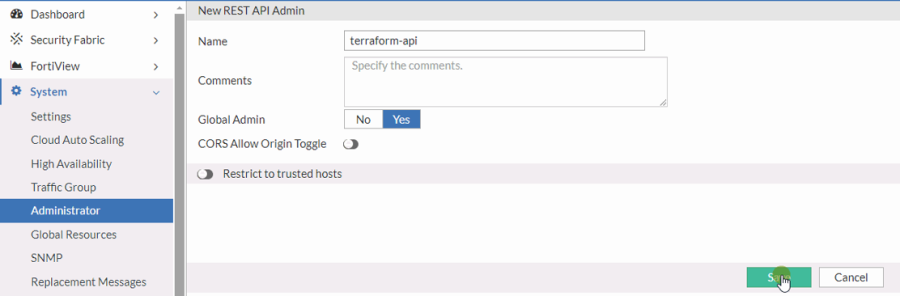
To create a REST API Administrator and obtain the API token:
-
In FortiADC, navigate to System > Administrator.
The configuration page displays the Admin tab. -
Click Create New > REST API Admin to display the configuration editor. Configure the required settings:
-
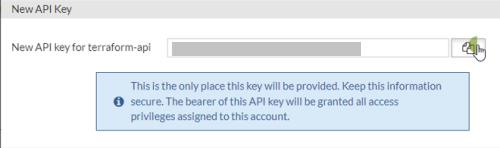
Once you successfully save the configuration, the New API Key dialog appears to display the newly generated API token. Record this API token for use later.
Step 3: Configure and Apply the Terraform Provider for FortiADC
With the API token in place, the next step involves configuring and applying the Terraform provider for FortiADC. This process includes defining the desired state of FortiADC instances within Terraform configuration files, which allows for automated provisioning and management of configurations.
To configure the FortiADC provider, include the API token obtained in Step 2 within the provider block. The configuration should resemble the following:
provider "fortiadc" {
  api_token = "YOUR_API_TOKEN"  # Replace with the API token from Step 2
}
After configuring the provider, you can utilize various FortiADC resources to define specific configurations. For instance, to add a new static router entry, use the following resource block:
resource "fortiadc_router_static" "example" {
  name = "ExampleRouter"
  # Additional configuration parameters go here
}
Refer to the FortiADC Terraform provider documentation for comprehensive examples and usage details related to different resource types. By executing the Terraform commands, FinSecure can provision and manage its FortiADC configurations efficiently, ensuring consistency and alignment with organizational requirements while leveraging the benefits of IaC.