
SAML authentication in a proxy policy using SCIM
The existing SCIM client support extends to authentication scheme using SAML, allowing scim-client to be used as user-database.
config authentication scheme
    edit <name>
        set method saml
        set saml-server <string>
        set user-database <Authentication server name>
    next
end
Example
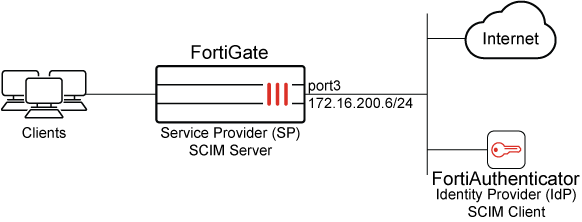
In this example, FortiGate is configured as the SCIM server Service Provider (SP), and FortiAuthenticator is configured as the SCIM client Identity Provider (IdP). Two groups are configured on FortiAuthenticator: scim_group and scim_group2. The scim_group contains one user: example@fortinet-us.com.
Upon successful configuration, users and groups are provisioned on FortiGate. This setup can leverage SAML to provide access to authenticated users when using explicit web proxy policy.
|
|
Ensure the IdP root CA is imported into the FortiGate. Without this, the FortiGate will be unable to verify the IdP server certificate during the synchronization of SCIM client user information. In this example, we are using FortiAuthenticator as the IdP, and after importing, the FortiAuthenticator root certificate is referred to as |
To configure SAML authentication using SCIM with an explicit web proxy in the GUI:
-
Configure FortiGate as an SCIM server:
-
Allow SCIM access on an interface:
-
Go to Network > Interfaces and edit the interface.
-
In the Administrative Access section, select SCIM.
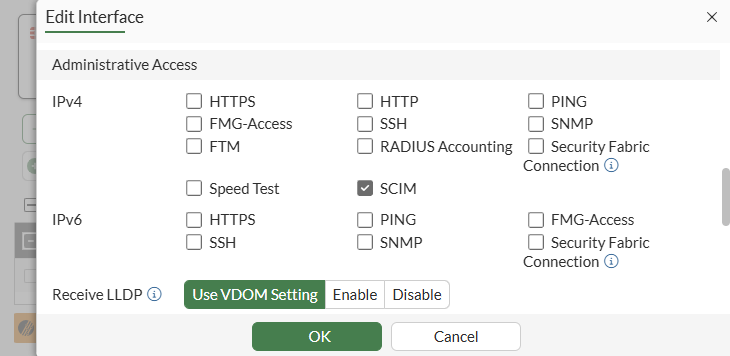
-
Click OK.
-
-
Configure SCIM client entries:
-
Go to User & Authentication > SCIM Clients.
-
Click Create New.
-
Set Status to Enabled, enter a Name, then configure the remaining settings as needed.

-
Click OK.
-
-
-
Configure FortiAuthenticator as an SCIM client:
-
On FortiAuthenticator, use your admin account to log in.
-
Click Authentication > SCIM > Service Provider.
-
Click Create New.
-
Configure the following settings:
Field
Value
Name
Test-SCIM
SCIM endpoint
https://172.16.200.6:44559/fac-scim/scim/v2
Access token
********
-
Configure the remaining settings as required.
-
Click Save.
-
Once the setting is saved, double-click the newly created entry to open the settings pane, and click Sync to automatically add existing users to the SCIM server.
See Service providers for more information.

The SCIM endpoint and access token must match the
base-urlandsecretrespectively, as configured on the FortiGate.Furthermore, an initial synchronization is necessary to commence provisioning for the first time. However, when alterations to identities occur in the IdP, including creation, updating, and deletion, these changes are automatically synchronized with SP in accordance with the SCIM protocol.
-
-
In the CLI, verify whether users and groups are provisioned on the FortiGate:
# diagnose test scim list-users fac-scim
example@fortinet-us.com
total:1
# diagnose test scim list-groups fac-scim
displayName     externalId
scim_group      1
scim_group2     2
total:2

# diagnose test scim get-user fac-scim example@fortinet-us.com
schemas num: 1
        [0]:schema: 1
id: user_2
userName: example@fortinet-us.com
externalId: local3
name:
meta: resourceType:User, created:2025-05-27T22:54:15Z, lastModified:2025-05-29T18:11:20Z, location:https://172.16.200.6/fac-scim/scim/v2//Users/user_2,version: 1.0
emails num: 0
groups num:1
        groups[0]: value:group_3, $ref:https://172.16.200.6/fac-scim/scim/v2//Groups/group_3, display:scim_group
Active: 1
index: 0
For brevity, only the commands relevant to this enhancement are included. See SAML for more information about configuring SP and IdP.
-
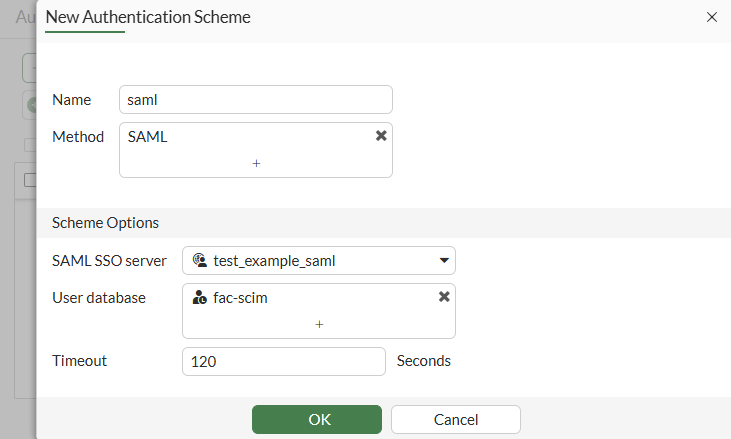
Configure an authentication scheme and authentication rule to use
scim-clientas auser-database:-
Go to Policy & Objects > Authentication and select Authentication Schemes.
-
Click Create New > Authentication Scheme.
-
Configure the following settings:
Field
Value
Name
saml
Method
SAML
SAML SSO server
test_example_saml
User database
fac-scim
-
Click OK.
-
Click Create New > Authentication Rule.
-
Configure the following settings:
Field
Value
Name
saml
Source Address
all
Authentication Scheme
Enabled; saml
-
Click OK.
-
-
Configure the user group:
-
Go to User & Authentication > User Groups.
-
Click Create New.
-
Enter the name
saml. -
Set Type to Firewall.
-
Under Remote groups, click Add.
-
Select
test_example_samlfrom the drop-down menu -
Click OK to save the Remote Group.
-
Click OK to save the User Group.
-
-
Enable the web proxy:
-
Go to Network > Explicit Proxy.
-
Enable Explicit Web Proxy.
-
Click Apply to save the setting.
-
-
Apply SAML authentication using SCIM with an explicit web proxy:
-
Go to Policy & Objects > Proxy Policy.
-
Click Create new.
-
Configure the following settings:
Field
Value
Name
saml
Type
Explicit Web
Outgoing Interface
port3
Source
Address: all
User: saml
Destination
all
Schedule
Always
Service
webproxy
Action
Accept
Log Allowed Traffic
Enabled; All Sessions
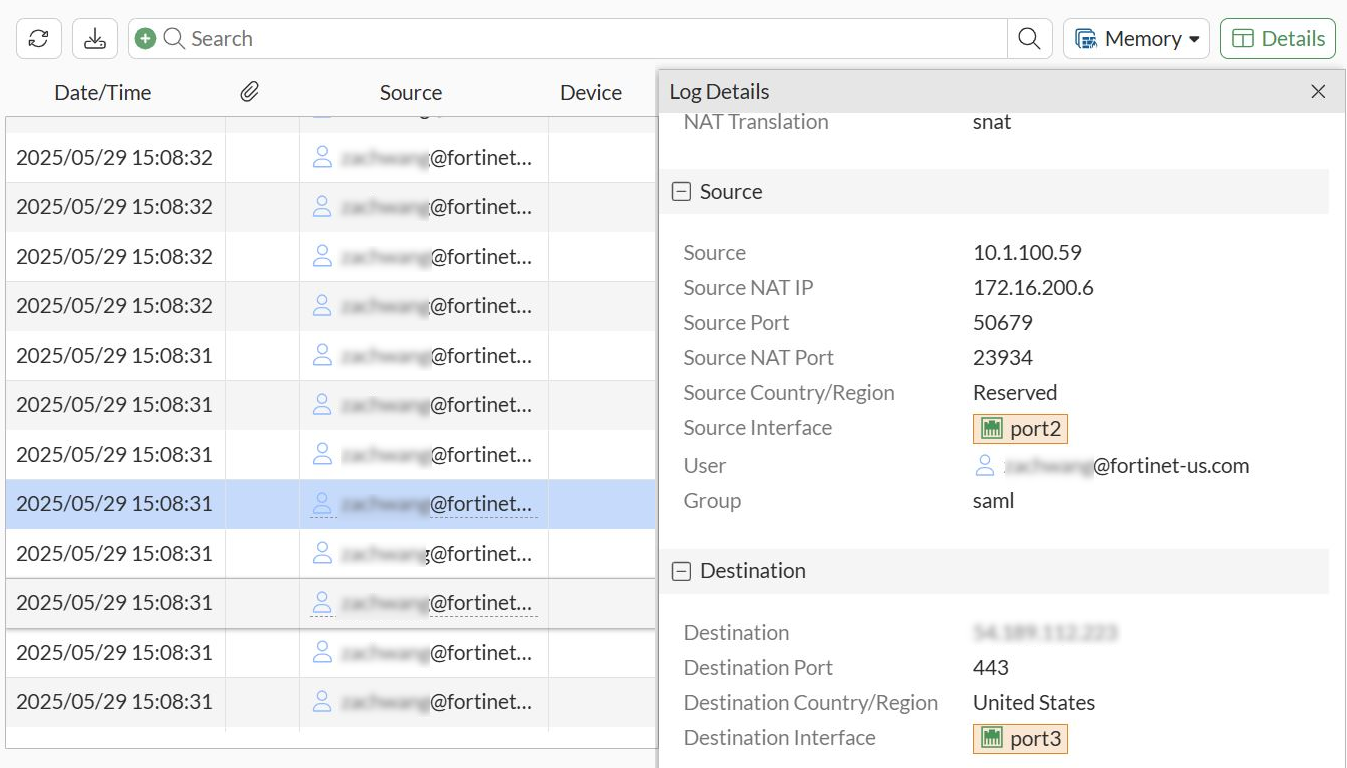
When a user goes to www.fortinet.com in a browser that is configured to use the FortiGate as a proxy, the authentication window will pop-up in the browser.

After entering user credentials and successfully passing authentication, the Fortinet page opens successfully.

Log are displayed in Log & Report.
-
To configure SAML authentication using SCIM with an explicit web proxy in the CLI:
-
Configure FortiGate as an SCIM server:
-
Allow SCIM access on an interface:
config system interface edit port3 append allowaccess scim next end -
Configure SCIM client entries:
config user scim
    edit "fac-scim"
        set status enable
        set base-url "https://172.16.200.6/fac-scim/scim/v2/"
        set auth-method base
        set secret **********
        set certificate REMOTE_Cert_2
        set client-identity-check disable
    next
end
-
-
Configure FortiAuthenticator as an SCIM client:
-
On FortiAuthenticator, use your admin account to log in.
-
Click Authentication > SCIM > Service Provider.
-
Click Create New.
-
Configure the following settings:
Field
Value
Name
Test-SCIM
SCIM endpoint
https://172.16.200.6:44559/fac-scim/scim/v2
Access token
********
-
Configure the remaining settings as required.
-
Click Save.
-
Once the setting is saved, double-click the newly created entry to open the settings pane, and click Sync to automatically add existing users to the SCIM server.
See Service providers for more information.
The SCIM endpoint and access token must match the
base-urlandsecretrespectively, as configured on the FortiGate.Furthermore, an initial synchronization is necessary to commence provisioning for the first time. However, when alterations to identities occur in the IdP, including creation, updating, and deletion, these changes are automatically synchronized with SP in accordance with the SCIM protocol.
-
-
Verify whether users and groups are provisioned on the FortiGate:
# diagnose test scim list-users fac-scim
example@fortinet-us.com
total:1
# diagnose test scim list-groups fac-scim
displayName     externalId
scim_group      1
scim_group2     2
total:2

# diagnose test scim get-user fac-scim example@fortinet-us.com
schemas num: 1
        [0]:schema: 1
id: user_2
userName: example@fortinet-us.com
externalId: local3
name:
meta: resourceType:User, created:2025-05-27T22:54:15Z, lastModified:2025-05-29T18:11:20Z, location:https://172.16.200.6/fac-scim/scim/v2//Users/user_2,version: 1.0
emails num: 0
groups num:1
        groups[0]: value:group_3, $ref:https://172.16.200.6/fac-scim/scim/v2//Groups/group_3, display:scim_group
Active: 1
index: 0
For brevity, only the commands relevant to this enhancement are included. See SAML for more information about configuring SP and IdP.
-
Configure an authentication scheme and authentication rule to use
scim-clientas auser-database:config authentication scheme edit "saml" set method saml set saml-server "test_example_saml" set user-database "fac-scim" next end config authentication rule edit "saml" set srcaddr "all" set active-auth-method "saml" next end -
Configure the user group:
config user group edit "ldap-group-saml" set member "ldap-10.1.100.198" next end -
Enable the web proxy:
config web-proxy explicit set status enable set http-incoming-port 8080 end -
Apply SAML authentication using SCIM with an explicit web proxy:
config firewall proxy-policy
   edit 1
        set name "saml"
        set proxy explicit-web
        set dstintf "port3"
        set srcaddr "all"
        set dstaddr "all"
        set service "webproxy"
        set action accept
        set schedule "always"
        set logtraffic all
        set groups "saml"
    next
end
When a user goes to www.fortinet.com in a browser that is configured to use the FortiGate as a proxy, the authentication window will pop-up in the browser.
After entering user credentials and successfully passing authentication, the Fortinet page opens successfully.
Log are displayed in Log & Report.