
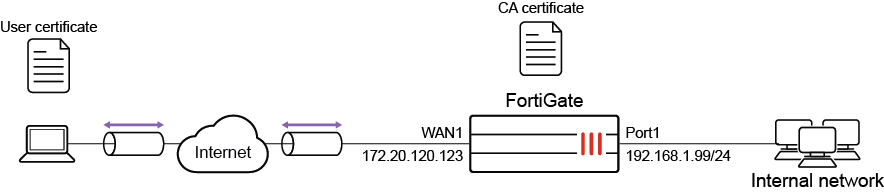
Agentless VPN with certificate authentication
There are two ways to configure certificate authentication:
In this example, the server and client certificates are signed by the same Certificate Authority (CA).
|
|
Self-signed certificates are provided by default to simplify initial installation and testing. It is HIGHLY recommended that you acquire a signed certificate for your installation. Continuing to use these certificates can result in your connection being compromised, allowing attackers to steal your information, such as credit card details. For more information, please review the Use a non-factory SSL certificate for the Agentless VPN portal and learn how to Procuring and importing a signed SSL certificate. |
Using PKI users
When using PKI users, the FortiGate authenticates the user based on there identity in the subject or the common name on the certificate. The certificate must be signed by a CA that is known by the FortiGate, either through the default CA certificates or through importing a CA certificate.
The user can either match a static subject or common name defined in the PKI user settings, or match an LDAP user in the LDAP server defined in the PKI user settings. Multi-factor authentication can also be enabled with the password as the second factor.
Configuring Agentless VPN settings to require a client certificate
Using this method, the user is authenticated based on their regular username and password, but Agentless VPN will still require an additional certificate check. The client certificate only needs to be signed by a known CA in order to pass authentication.
This method can be configured by enabling Require Client Certificate (reqclientcert) in the Agentless VPN settings.
Configuration
In the following example, Agentless VPN users are authenticated using the first method. A PKI user is configured with multi-factor authentication
Pre-requisites:
-
The CA has already issued a client certificate to the user.
-
The CA has issued a server certificate for the FortiGate’s Agentless VPN portal.
-
The CA certificate is available to be imported on the FortiGate.
To configure Agentless VPN in the GUI:
-
Install the server certificate. The server certificate allows the clients to authenticate the server and to encrypt the Agentless VPN traffic.
-
Go to System > Feature Visibility and ensure Certificates is enabled.
-
Go to System > Certificates and select Import > Local Certificate.
-
Set Type to Certificate.
-
Choose the Certificate file and the Key file for your certificate, and enter the Password.
-
If required, you can change the Certificate Name.
-
The server certificate now appears in the list of Certificates.
-
-
Install the CA certificate.
The CA certificate is the certificate that signed both the server certificate and the user certificate. In this example, it is used to authenticate Agentless VPN users.
-
Go to System > Certificates and select Import > CA Certificate.
-
Select Local PC and then select the certificate file.
The CA certificate now appears in the list of External CA Certificates. In this example, it is called CA_Cert_1.
-
-
Configure PKI users and a user group.
To use certificate authentication, use the CLI to create PKI users.
config user peer
    edit pki01
        set ca CA_Cert_1
        set subject "CN=User01"
    next
end
Ensure that the subject matches the name of the user certificate. In this example, User01.
-
After you have create a PKI user, a new menu is added to the GUI:
-
Go to User & Authentication > PKI to see the new user.
-
Edit the user account.
-
Enable Two-factor authentication and set a password for the account.
-
Go to User & Authentication > User Groups and create a group called agentlessvpngroup.
-
Add the PKI user pki01 to the group.
-
-
Configure Agentless VPN portals.
-
Go to VPN > Agentless VPN Portals, and click Create New.
-
Enter a name, such as agentless-portal.
-
Under Predefined Bookmarks, click Create New, and enter the following details:
Field
Value
Name
Windows Server
Type
RDP
Host
192.168.1.114
Port
3389
Single Sign-On
Disable
Username
Set the username to log in to Windows Server.
Password
Set the password to log in to Windows Server.
Port
3389
-
Click OK to save the predefined bookmark.
-
Click OK to save the portal settings.
-
Create another Agentless VPN portal and name it portal-access-disabled.
-
Click OK to save the portal settings.
-
Disable Agentless VPN for the newly created portal (that is, portal-access-disabled) using CLI:
config vpn ssl web portal
    edit "portal-access-disabled"
        set web-mode disable
    next
end
-
-
Configure Agentless VPN settings.
-
Go to VPN > Agentless VPN Settings and enable Agentless VPN.
-
Set the Listen on Interface(s) to wan1.
-
Set Listen on Port to 10443.
-
Set Server Certificate to the local certificate that was imported.
-
Enable Require Client Certificate.
-
Under Authentication/Portal Mapping, set select All Other Users/Groups, and click Edit.
-
Use Portal dropdown to select portal-access-disabled.
-
Click OK.
-
In Authentication/Portal Mapping, click Create New.
-
Set Users/Groups to agentlessvpngroup.
-
Set Portal to agentless-portal.
-
Click OK.
-
-
Click Apply to save the Agentless VPN settings.
-
-
Configure Agentless VPN firewall policy.
-
Go to Policy & Objects > Firewall Policy, and click Create New.
-
Set Name to Agentless VPN firewall policy.
-
Set Schedule to always and Action to Accept.
-
Set Incoming interface to Agentless VPN interface (ssl.root).
-
Choose an Outgoing Interface. This example uses port1.
-
Set the Source to all and User/group to agentlessvpngroup.
-
In this example, the Destination is the internal, protected subnet 192.168.1.0.
-
Set Service to ALL.
-
Click OK.
-
To configure Agentless VPN in the CLI:
-
Configure the protected subnet:
config firewall address edit "192.168.1.0" set subnet 192.168.1.0 255.255.255.0 next end -
Install the server certificate:
The server certificate allows the clients to authenticate the server and to encrypt the Agentless VPN traffic. While it is easier to install the server certificate in the GUI, the CLI can be used to import a p12 certificate from a TFTP server.
To import a p12 certificate, put the certificate server_certificate.p12 on your TFTP server, then run following command on the FortiGate:
execute vpn certificate local import tftp server_certificate.p12 <your tftp_server> p12 <your password for PKCS12 file>
To check that the server certificate is installed:
show vpn certificate local server_certificate
-
Install the CA certificate:
The CA certificate is the certificate that signed both the server certificate and the user certificate. In this example, it is used to authenticate Agentless VPN users. While it is easier to install the CA certificate from GUI, the CLI can be used to import a CA certificates from a TFTP server.
To import a CA certificate, put the CA certificate on your TFTP server, then run following command on the FortiGate:
execute vpn certificate ca import tftp <your CA certificate name> <your tftp server>
To check that a new CA certificate is installed:
show vpn certificate ca
-
Configure PKI users and a user group:
config user peer
    edit pki01
        set ca CA_Cert_1
        set subject "CN=User01"
        set two-factor enable
        set passwd **********
    next
end
config user group edit "agentlessvpngroup" set member "pki01" next end -
Configure Agentless VPN portal and predefine RDP bookmark for windows server.
config vpn ssl web portal edit "agentless-portal" set web-mode enable config bookmark-group edit "gui-bookmarks" config bookmarks edit "Windows Server" set apptype rdp set host "192.168.1.114" set port 3389 set logon-user "your-windows-server-user-name" set logon-password your-windows-server-password next end next end next end -
Configure another Agentless VPN portal and disable Agentless VPN on it.
config vpn ssl web portal edit "portal-access-disabled" set web-mode disable next end -
Configure Agentless VPN settings:
config vpn ssl settings set reqclientcert enable set banned-cipher SHA1 SHA256 SHA384 set servercert "server_certificate" set source-interface "wan1" set source-address "all" set default-portal "portal-access-disabled" config authentication-rule edit 1 set groups "agentlessvpngroup" set portal "agentless-portal" next end end -
Configure one Agentless VPN firewall policy to allow remote user to access the internal network. This policy does not allow traffic initiated from internal network to remote client.
config firewall policy
    edit 1
        set name "Agentless VPN firewall policy"
        set srcintf "ssl.root"
        set dstintf "port1"
        set srcaddr "all"
        set dstaddr "192.168.1.0"
        set action accept
        set schedule "always"
        set service "ALL"
        set nat enable
        set groups "agentlessvpngroup"
    next
end
Installation
To use the user certificate, you must first install it on the user’s PC. When the user tries to authenticate, the user certificate is checked against the CA certificate to verify that they match.
Every user should have a unique user certificate. This allows you to distinguish each user and revoke a specific user’s certificate, such as if a user no longer has VPN access.
To install the user certificate on Windows 7, 8, and 10:
-
Double-click the certificate file to open the Import Wizard.
-
Use the Import Wizard to import the certificate into the Personal store of the current user.
To install the user certificate on Mac OS X:
-
Open the certificate file, to open Keychain Access.
-
Double-click the certificate.
-
Expand Trust and select Always Trust.
To see the results of Agentless VPN web portal:
-
In a web browser, log into the portal http://172.20.120.123:10443.
A message requests a certificate for authentication.
-
Select the user certificate.
-
Enter your user credentials.
If the certificate is correct, you can connect to the Agentless VPN web portal.
To check the Agentless VPN connection using the GUI:
-
On FortiGate, go to Dashboard > Agentless VPN Monitor to verify the list of Agentless VPN users.
If the Agentless VPN Monitor is hidden, click + under the Dashboard, search for Agentless VPN Monitor, and add it to the display.
-
Go to Log & Report > System Events, and use the dropdown to select VPN Events to view VPN logs.
To check the Agentless VPN connection using the CLI:
get vpn ssl monitor
Agentless VPN Login Users:
 Index   User    Auth Type      Timeout         From     HTTP in/out    HTTPS in/out
 0       pki01,cn=User01          1(1)            229     10.1.100.254   0/0     0/0
 1       pki01,cn=User01          1(1)            291     10.1.100.254   0/0     0/0

Agentless VPN sessions:
 Index   User    Source IP      Duration        I/O Bytes       Tunnel/Dest IP
 0       pki01,cn=User01          10.1.100.254    9       22099/43228    10.212.134.200