Configuring address objects on Branch
Configuring address objects on Branch
- To create address objects you will utilize in a later step, navigate to Policy & Objects > Addresses and select Create New > Address.
- Enter Branch-original for the Name, the original LAN subnet of Branch for Subnet (in the example, 192.168.1.0/24), and select the LAN-side interface for Interface (in the example, lan).

- Repeat the process to create an additional new address object.
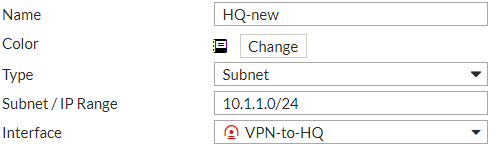
- Enter HQ-new for the Name, the new LAN subnet of HQ for Subnet (in the example, 10.1.1.0/24), and select the VPN interface for Interface (in the example, VPN-to-HQ).
- To create an IP Pool, navigate to Policy & Objects > IP Pools and select Create New.
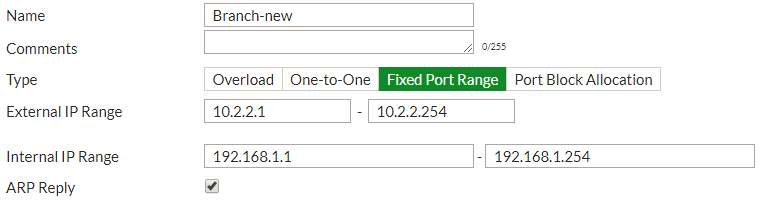
- Enter Branch-new for the Name and select Fixed Port Range for Type. For the External IP Range enter the new subnet for Branch (in the example, 10.2.2.1 – 10.2.2.254), and enter the original subnet for Branch in the Internal IP Range (in the example, 192.168.1.1 – 192.168.1.254).
- Finally, to create a Virtual IP, navigate to Policy & Objects > Virtual IPs and select Create New > Virtual IP.
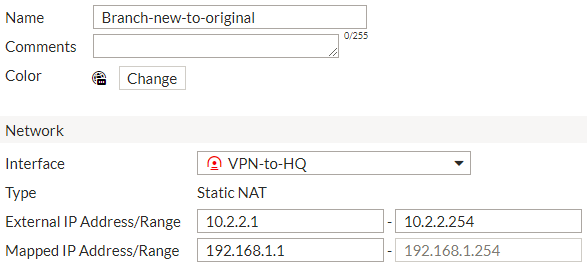
- Enter Branch-new-to-original for the Name and select the VPN interface for Interface (in the example, VPN-to-HQ). For the External IP Range enter the new subnet for Branch (in the example, 10.2.2.1 – 10.2.2.254), and enter the original subnet for Branch in the Internal IP Range (in the example, 192.168.1.1 – 192.168.1.254).
Configuring address objects on Branch
Configuring address objects on Branch
- To create address objects you will utilize in a later step, navigate to Policy & Objects > Addresses and select Create New > Address.
- Enter Branch-original for the Name, the original LAN subnet of Branch for Subnet (in the example, 192.168.1.0/24), and select the LAN-side interface for Interface (in the example, lan).
- Repeat the process to create an additional new address object.
- Enter HQ-new for the Name, the new LAN subnet of HQ for Subnet (in the example, 10.1.1.0/24), and select the VPN interface for Interface (in the example, VPN-to-HQ).
- To create an IP Pool, navigate to Policy & Objects > IP Pools and select Create New.
- Enter Branch-new for the Name and select Fixed Port Range for Type. For the External IP Range enter the new subnet for Branch (in the example, 10.2.2.1 – 10.2.2.254), and enter the original subnet for Branch in the Internal IP Range (in the example, 192.168.1.1 – 192.168.1.254).
- Finally, to create a Virtual IP, navigate to Policy & Objects > Virtual IPs and select Create New > Virtual IP.
- Enter Branch-new-to-original for the Name and select the VPN interface for Interface (in the example, VPN-to-HQ). For the External IP Range enter the new subnet for Branch (in the example, 10.2.2.1 – 10.2.2.254), and enter the original subnet for Branch in the Internal IP Range (in the example, 192.168.1.1 – 192.168.1.254).
