
Transparent proxy
In a transparent proxy deployment, the user's client software, such as a browser, is unaware that it is communicating with a proxy.
Users request internet content as usual, without any special client configuration, and the proxy serves their requests. FortiGate also allows users to configure in transparent proxy mode.
To redirect HTTPS traffic, SSL deep inspection is required.
|
|
HTTP and HTTPS traffic that is successfully redirected to a proxy policy is subject to security profiles configured on the proxy policy, not the base firewall policy. Security profiles configured on the base firewall policy still apply to other traffic, such as FTP. |
|
|
Isolator servers can be applied in transparent proxy policies to distinguish isolated traffic from normal traffic in logs. See Isolator servers in proxy policies. |
To configure transparent proxy in the GUI:
-
Configure a regular firewall policy with HTTP redirect:
-
Go to Policy & Objects > Firewall Policy.
-
Click Create New.
-
Name the policy appropriately, set the Incoming interface to port2, and set the Outgoing interface to port1.
-
Also set Source and Destination to all, Schedule to always, Service to ALL, and Action to ACCEPT.
-
Set Inspection Mode to Proxy-based and SSL Inspection to deep-inspection.
-
Configure the remaining settings as needed.
-
Click OK.

By default, HTTP redirect can only be enabled in the CLI. Enable Policy Advanced Options in Feature Visibility to configure it in the GUI. See Feature visibility on page 1 for more information.
-
-
Configure a transparent proxy policy:
-
Go to Policy & Objects > Proxy Policy.
-
Click Create New.
-
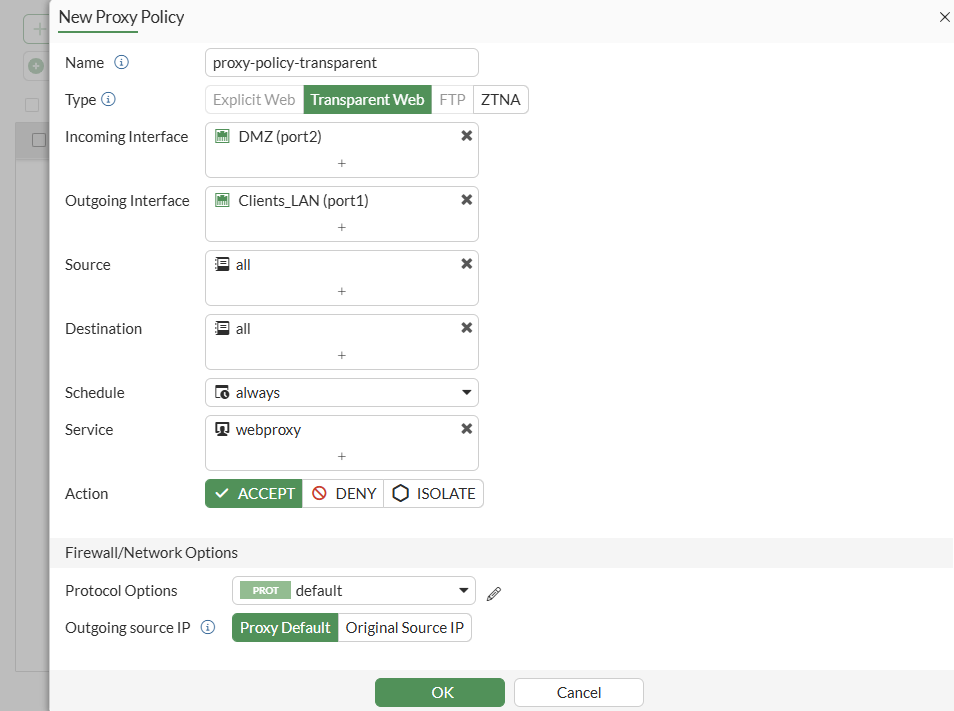
Set Proxy Type to Transparent Web, set the Incoming Interface to port2, and set the Outgoing Interface to port1.
-
Also set Source and Destination to all, Scheduleto always, Service to webproxy, and Action to ACCEPT.
-
Configure the remaining settings as needed.
-
Click OK to create the policy.
This example creates a basic policy. If required, security profiles can be enabled, and deep SSL inspection can be selected to inspect HTTPS traffic.
-
-
No special configuration is required on the client to use FortiGate transparent proxy. As the client is using the FortiGate as its default gateway, requests will first hit the regular firewall policy, and then be redirected to the transparent proxy policy.
To configure transparent proxy in the CLI:
-
Configure a regular firewall policy with HTTP redirect:
config firewall policy edit 1 set name "LAN To WAN" set srcintf "port2" set dstintf "port1" set srcaddr "all" set dstaddr "all" set action accept set schedule "always" set service "ALL" set inspection-mode proxy set http-policy-redirect enable set fsso disable set ssl-ssh-profile "deep-inspection" set nat enable next end -
Configure a transparent proxy policy:
config firewall proxy-policy
    edit 5
        set name "proxy-policy-transparent"
        set proxy transparent-web
        set srcintf "port2"
        set dstintf "port1"
        set srcaddr "all"
        set dstaddr "all"
        set service "webproxy"
        set action accept
        set schedule "always"
    next
end
This example creates a basic policy. If required, security profiles can be enabled, and deep SSL inspection can be selected to inspect HTTPS traffic.
-
No special configuration is required on the client to use FortiGate transparent proxy. As the client is using the FortiGate as its default gateway, requests will first hit the regular firewall policy, and then be redirected to the transparent proxy policy.