Trigger RADIUS authentication with DNS and ICMP queries
DNS and ICMP queries can trigger RADIUS authentication. In some situations, a RADIUS client cannot trigger authentication with only HTTP, HTTPS, or Telnet traffic, such as VoIP gateways or servers. Without RADIUS authentication there is no RADIUS accounting, which can be required in some circumstances.
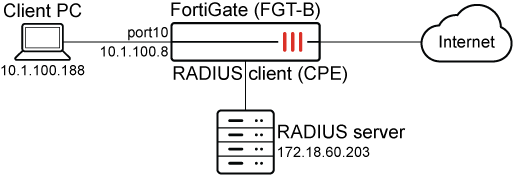
In this example, a Client PC is used as a VoIP gateway.
To configure FGT-B:
-
Configure a RADIUS user:
config user radius edit "FreeRADIUS" set server "172.18.60.203" set secret ********** set acct-interim-interval 600 set auth-type pap set password-renewal disable config accounting-server edit 1 set status enable set server "172.18.60.203" set secret ********** next end next end -
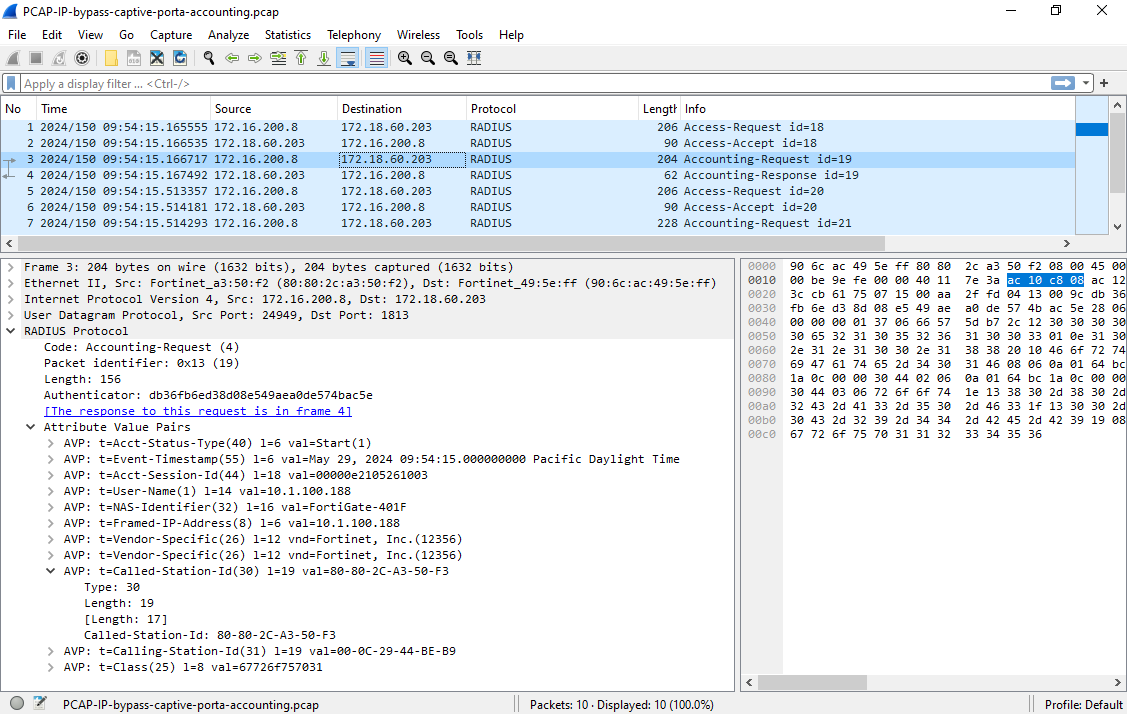
Find the MAC address on the interface. In the RADIUS accounting start message it will be the Called-Station-Id.
# get hardware nic port10 | grep HW
Current_HWaddr   80:80:2c:a3:50:f3
Permanent_HWaddr 80:80:2c:a3:50:f3
-
Add the RADIUS user to a group:
config user group edit "remote-radius" set member "FreeRADIUS" next end -
Configure the interface:
config system interface edit "port10" set vdom "root" set ip 10.1.100.8 255.255.255.0 set allowaccess ping https ssh http telnet set type physical set security-mode captive-portal set security-ip-auth-bypass enable set security-groups "remote-radius" set device-identification enable set snmp-index 12 config ipv6 set ip6-address 2008::8/64 set ip6-allowaccess ping https http end next end -
Configure a policy:
config firewall policy
    edit 1
        set name "pol1"
        set srcintf "port10"
        set dstintf "port9"
        set action accept
        set srcaddr "all"
        set dstaddr "all"
        set schedule "always"
        set service "ALL"
        set utm-status enable
        set ssl-ssh-profile "custom-deep-inspection"
        set av-profile "default"
        set logtraffic all
        set nat enable
        set groups "remote-radius"
        set radius-ip-auth-bypass enable
    next
end
To test the configuration:
-
Trigger RADIUS authentication on the Client PC using the
ip-auth-bypassfeature configured on the FortiGate. This can be done by either:-
Pinging any external resource (ICMP query).
-
Connecting to an external webpage using an FQDN URL in a browser with an empty cache, which requires a new DNS query.
The FortiGate will use the Client PC IP address as the credentials for authentication. If successful, this will be followed by a RADIUS accounting start message.
-
-
On FGT-B, check the local firewall authentication list.
The RADIUS user that is used for
ip-auth-bypassis the IP address of the Client PC. The source MAC address is the MAC address of the Client PC.# diagnose firewall auth list 10.1.100.188, 10.1.100.188 src_mac: 00:0c:29:44:be:b9 type: fw, id: 0, duration: 16, idled: 10 expire: 284, allow-idle: 300, max-life: 2384 flag(14): hard radius server: FreeRADIUS packets: in 4 out 5, bytes: in 1105 out 1044 group_id: 5 group_name: remote-radius ----- 1 listed, 0 filtered ------ -
Check the RADIUS accounting start messages in the traffic between FGT-B and the RADIUS server. The MAC address of FGT-B is the Called-Station-Id, and the IP address of the Client PC is the User-Name.