
FortiExtender deployment improvements 6.4.2
FortiExtender is now easier to deploy when managed by FortiGate, and FortiGate is managed by FortiManager. The deployment uses Fortinet zero-touch provisioning.
Example

In this example, FortiManager manages FortiGate, and FortiExtender is connected to FortiGate over wan1 interface.
After factory reset, FortiExtender is in cloud discovery and can retrieve the LTE IP/gateway address from the wireless carrier. FortiExtender works in NAT mode. Its client (FGT wan1) can receive a DHCP IP address from the FortiExtender LAN interface, and the client (FGT wan1) can access the Internet through FortiExtender.
After factory reset, FGT can use Fortinet zero-touch provisioning and FortiGate Cloud server to be deployed to FortiManager. See Zero touch provisioning with FortiManager for more information.
In FortiManager, authorize FGT to enable the discovery of the FortiExtender connected to FGT over wan1. Authorize FortiExtender to enable FGT to receive a new interface based on FortiExtender and complete the FortiExtender deployment.
See also Zero-touch and low-touch provisioning in the FortiManager Administration Guide.
To deploy FortiExtender in the GUI:
-
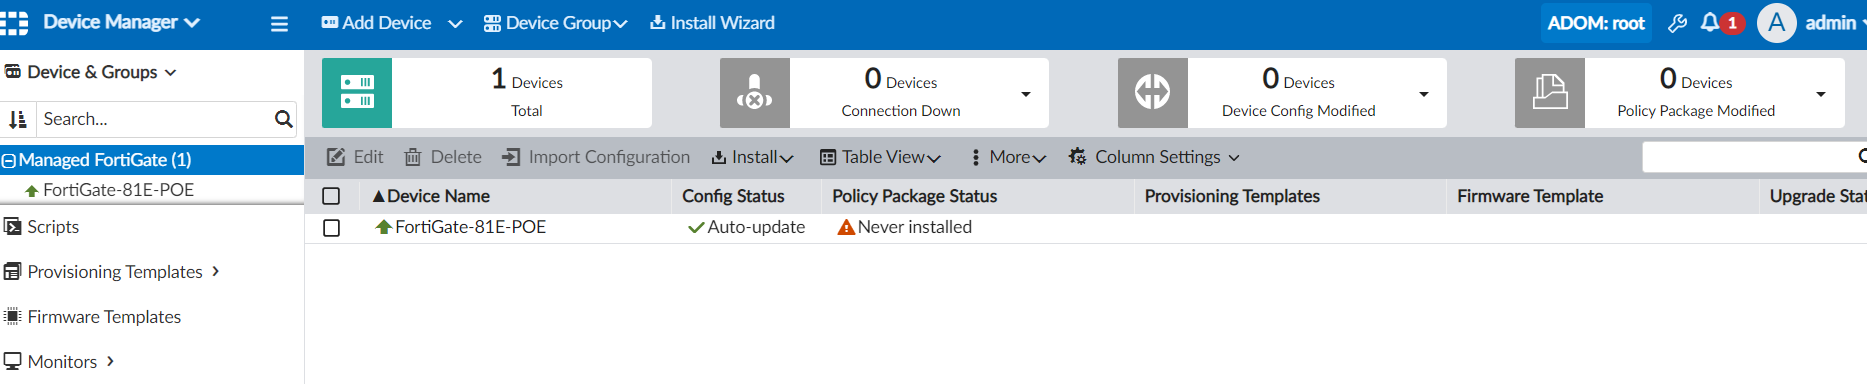
In FortiManager, go to Device Manager > Device & Groups to view the managed FortiGate-81E-POE.
-
Go to Extender Manager, and select FortiGate-81E-POE.
FortiExtender connected to the wan1 interface on FortiGate is discovered.

-
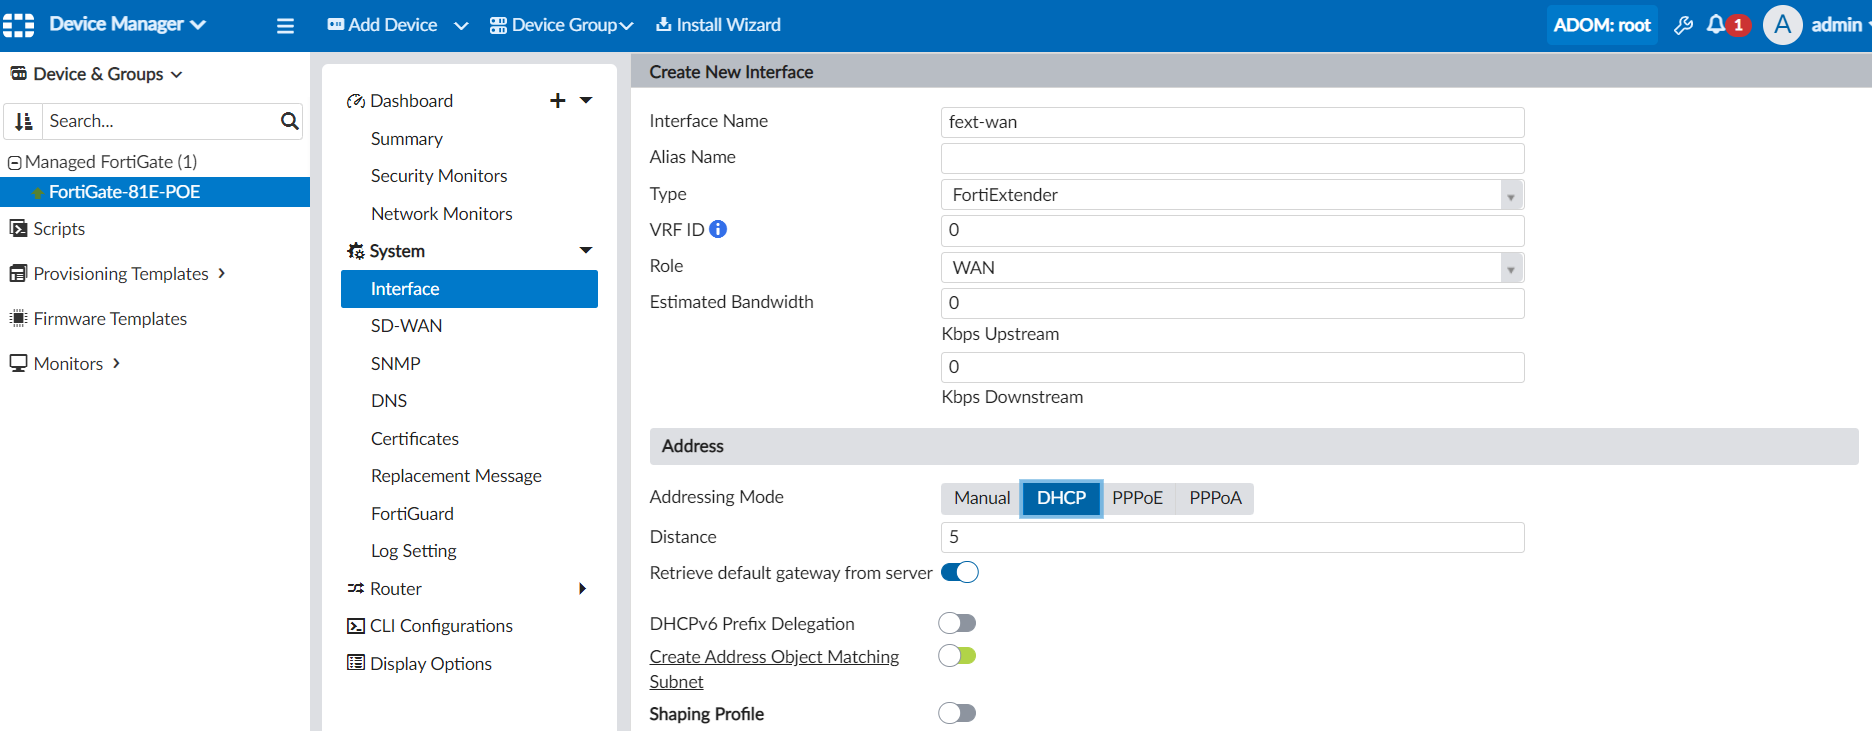
Create a FortiExtender type of interface, and install the interface to FGT.
-
Authorize FortiExtender:
-
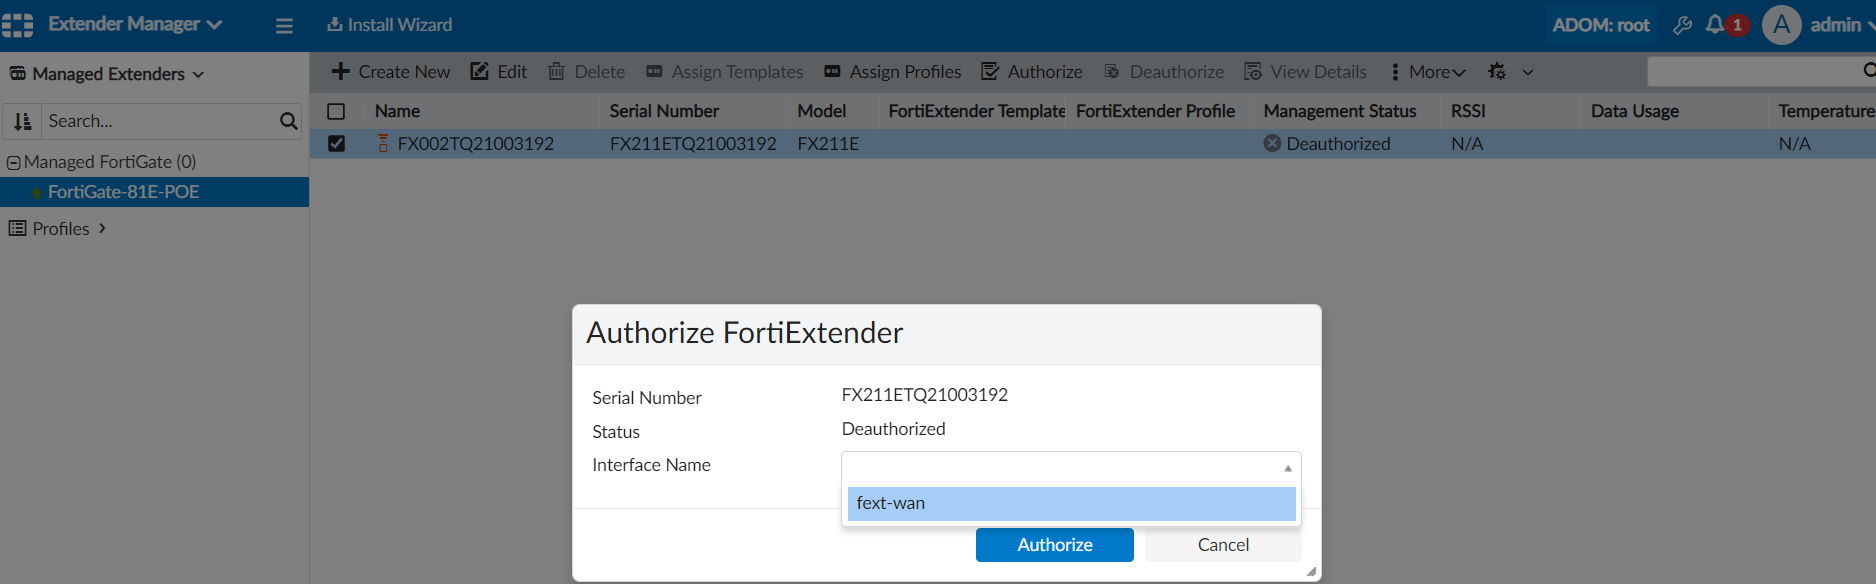
Select FortiExtender and click Authorize. The Authorize FortiExtender dialog box is displayed.
-
Select the interface, and click Authorize. The interface is created by FortiGate.
After a few minutes, FortiExtender is displayed as authorized in FortiManager.

-
-
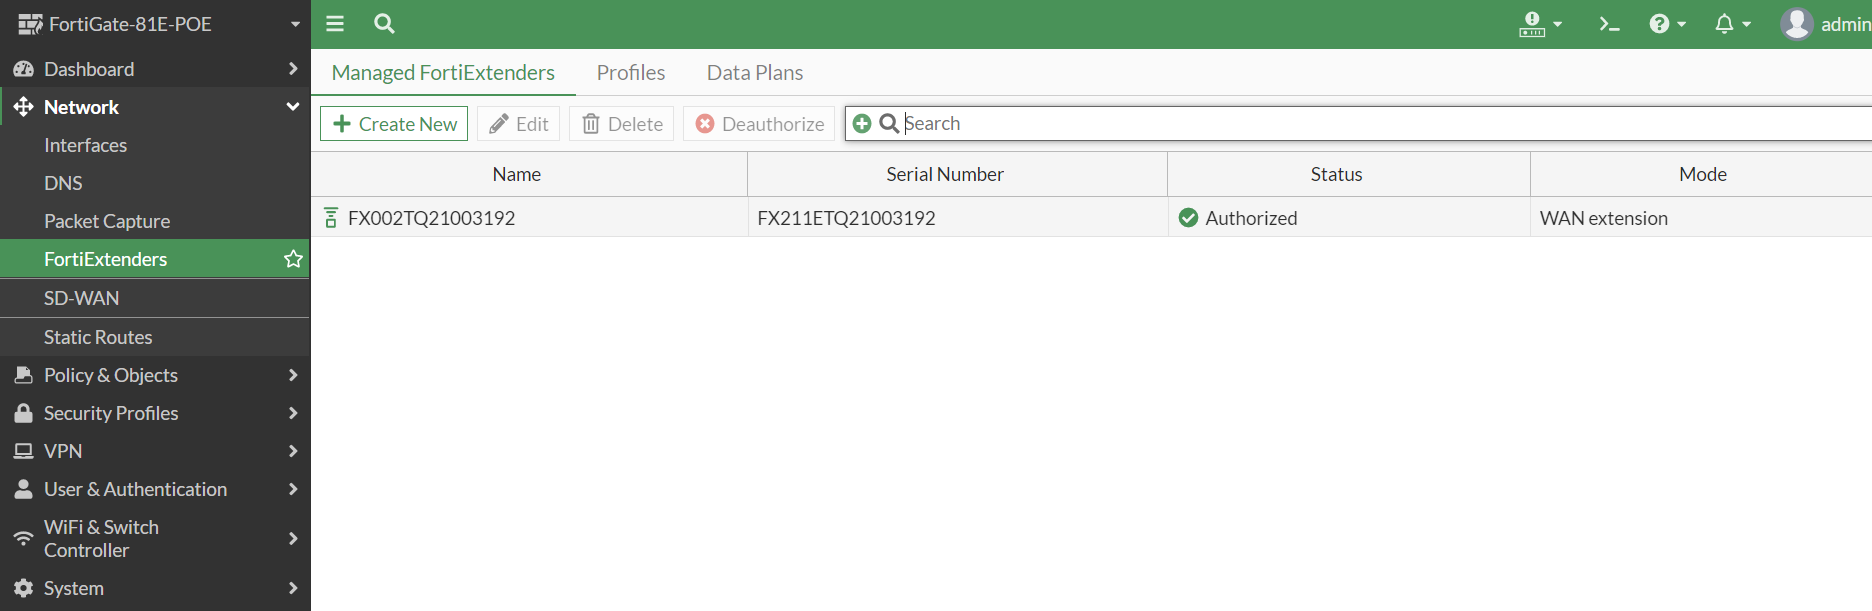
In FortiOS, go to Network > FortiExtenders to view the authorized device. The FortiExtender deployment is complete.
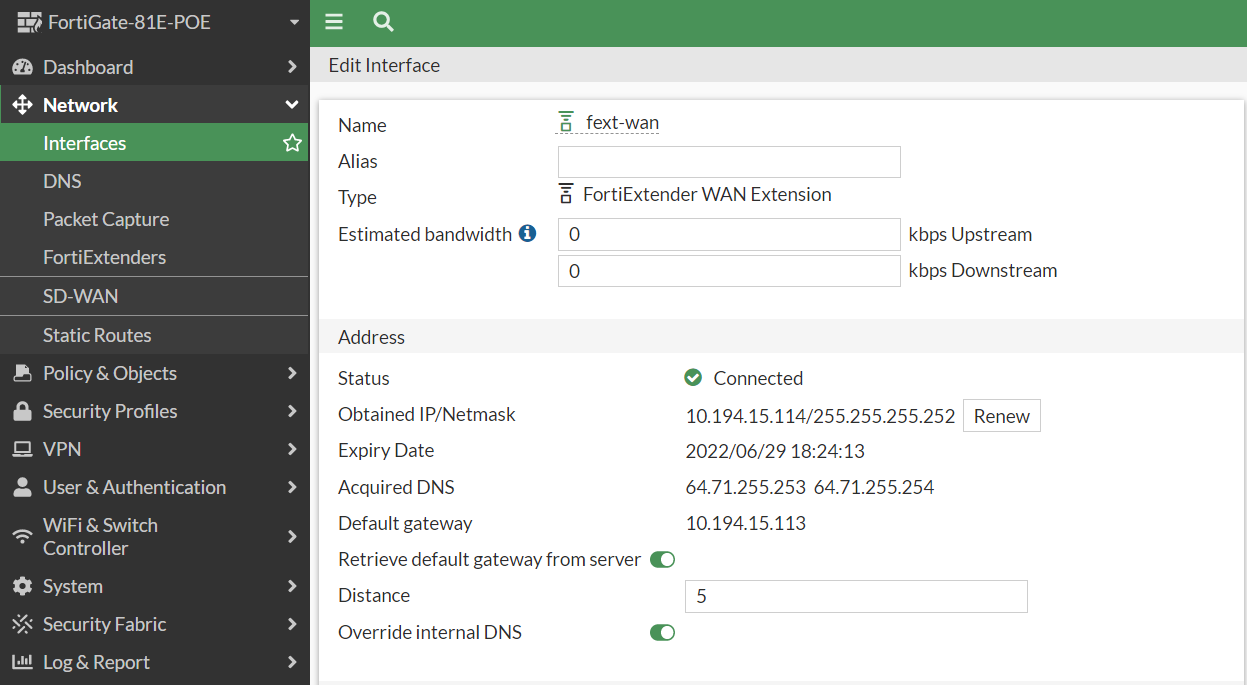
After successful FortiExtender deployment, FortiGate can retrieve the gateway IP address from the wireless carrier through FortiExtender.
-
Go to Network > Interfaces to view the default gateway IP address.
To deploy FortiExtender in the CLI:
-
FortiGate will receive the IP/gateway address from FortiExtender in NAT mode with access to the Internet.
# get router info routing-table all

Routing table for VRF=0
S*      0.0.0.0/0 [50/0] via 192.168.200.99, wan1, [1/0]
C       192.168.200.0/24 is directly connected, wan1

# get sys inter | grep wan1
== [ wan1 ]
name: wan1   mode: dhcp    ip: 192.168.200.110 255.255.255.0   status: up
-
Using the zero touch technique, FortiGate connects to FortiManager.
You can view the settings on FortiGate.
config system central-management set type fortimanager set fmg "204.101.161.79" end -
After FortiGate connects to FortiManager, the FortiExtender connected to the wan1 interface on FortiGate is discovered.
You can view the settings on FortiGate.
config extender-controller extender edit "FX002TQ21003192" set id "FX211ETQ21003192" set device-id 0 set extension-type wan-extension set profile "FX211E-wanext-default" next end -
In FortiManager, create a FortiExtender type of interface, and install the interface to FGT.
You can view the settings on FortiGate.
config system interface edit "fext-wan" set vdom "root" set mode dhcp set status down set type fext-wan set role wan set snmp-index 125 set macaddr fa:ba:70:88:cd:37 next end -
In FortiManager, authorize FortiExtender by assigning the FEXT type interface (created in FGT).
You can view the settings on FortiGate.
config extender-controller extender
    edit "FX002TQ21003192"
        set id "FX211ETQ21003192"
        set authorized enable
        set device-id 0
        set extension-type wan-extension
        config wan-extension
            set modem1-extension "fext-wan"
        end
        set profile "FX211E-wanext-default"
    next
end
After successful FortiExtender deployment, FortiGate can retrieve the gateway IP address from the wireless carrier through FortiExtender.
-
In FortiGate, view the gateway address.
# get router info routing-table all

Routing table for VRF=0
S*      0.0.0.0/0 [5/0] via 10.194.15.113, fext-wan, [1/0]
C       10.194.15.112/30 is directly connected, fext-wan

# get sys inter | grep fext
== [ fext-wan ]
name: fext-wan   mode: dhcp    ip: 10.194.15.114 255.255.255.252   status: up    netbios-forward: disable    type: fext-wan
-
Pre-authorize FortiExtender by using a wild serial number (SN).
A wild SN is the FortiExtender model name (for example, FX211E) plus 10 asterisks (*), such as
FX211E**********.config extender-controller extender edit "FEXT-211" set id "FX211E**********" set authorized enable set device-id 0 set extension-type wan-extension config wan-extension set modem1-extension "fext" end set profile "FX211E-wanext-default" next endModel name must match the model name used in the extender-profile, for example:
config extender-controller extender-profile
    edit "FX211E-wanext-default"
        set id 0
        set model FX211E
        config cellular
            config sms-notification
            end
            config modem1
            end
        end
    next
end
-
After the matching FortExtender model is plugged in, the wild SN is consumed by real SN. After this step, no other FX211E can be automatically authorized.
config extender-controller extender
    edit "FEXT-211"
        set id "FX211ETQ21003192"
        set authorized enable
        set device-id 0
        set extension-type wan-extension
        config wan-extension
            set modem1-extension "fext"
        end
        set profile "FX211E-wanext-default"
    next
end