
SAML
SAML authentication allows a user to complete authentication and authorization between a Service Provider (SP) and an Identity Provider (IdP). It enables Single Sign-On (SSO) by allowing users who have been authenticated against an IdP to be allowed access to different applications (the SPs providing a service such as a web application).
A FortiGate (SP) can provide a web service, such as an Agentless VPN connection, that requires users to be authenticated through SAML. The user identities for the company can be stored remotely in an IdP, such as Microsoft Entra ID. Other applications might also require authentication from the same IdP, so after a user is authenticated once, the same SAML assertion carrying user and group information can be used to authorize the user access to the FortiGate Agentless VPN, as well as other applications.
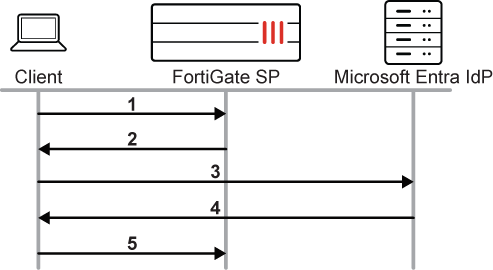
To illustrate the communication between the user or browser, SP, and IdP:
-
The user initiates an Agentless VPN connection to the FortiGate.
-
The FortiGate SP redirects the user to the SAML IdP.
-
The user connects to the Microsoft log in page for the SAML authentication request.
-
The SAML IdP authenticates the user and sends the SAML assertion containing the user and group.
-
The browser forwards the SAML assertion to the FortiGate SP. If the user and group are allowed by the FortiGate, the user is allowed to access the application, in this case, connecting to Agentless VPN.
Usage
There are many practical uses and applications for SAML authentication on the FortiGate. For example:
-
Authentication for Agentless VPN
-
Authentication for IPsec VPN (with compatible FortiClient endpoint 7.2.4 and above)
-
Firewall authentication for firewall policy access
-
Authentication for ZTNA
-
Authentication for Explicit Proxy
-
Authentication for Administrative Access
Identity providers
FortiGate’s SAML SSO configurations can be integrated with any common Identity providers, such as Microsoft Entra ID, Okta, Google Workspace, Onelogin, and others. You can also use FortiAuthenticator as an identity provider with local or remote user integration, or as an IdP Proxy to other IdP providers.
For more information on using FortiAuthenticator, see the FortiAuthenticator Administration Guide and FortiAuthenticator Examples Guide.
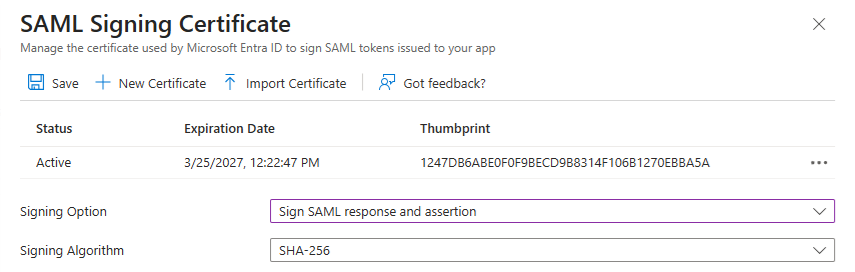
In 7.6.4 and later, FortiGate requires a signature verification for all SAML response messages. To ensure seamless authentication, it is essential to enable Sign SAML response and assertion, or its equivalent settings, in the Identity Provider (IDP) configuration. Failing to sign these messages or assertions may lead to authentication failure.
Example
To enable Sign SAML response and assertion in Microsoft Entra ID:
-
Go to the Microsoft Entra admin center.
-
Navigate to Enterprise Applications.
-
Select your application.
-
Go to Single sign-on > SAML.
-
Scroll to SAML Signing Certificate and click Edit (the pencil icon).
-
For Signing Option, choose Sign SAML response and assertion.
-
Click Save.
For details, see Certificate signing options in a SAML token - Microsoft Entra ID | Microsoft Learn.
For other SAML IdP vendors, check the setting to enable signing both the SAML response and assertion.