
Virtual wire pair
A virtual wire pair consists of two interfaces that do not have IP addressing and are treated like a transparent mode VDOM. All traffic received by one interface in the virtual wire pair can only be forwarded to the other interface, provided a virtual wire pair firewall policy allows this traffic. Traffic from other interfaces cannot be routed to the interfaces in a virtual wire pair. Redundant and 802.3ad aggregate (LACP) interfaces can be included in a virtual wire pair.
Virtual wire pairs are useful for a typical topology where MAC addresses do not behave normally. For example, port pairing can be used in a Direct Server Return (DSR) topology where the response MAC address pair may not match the request’s MAC address pair.
Example
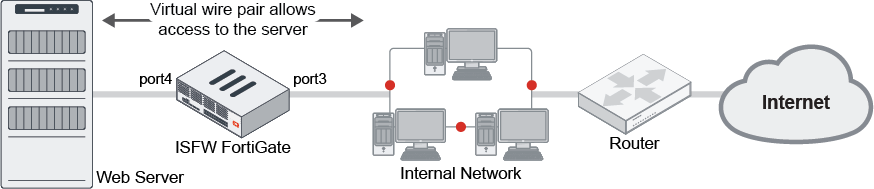
In this example, a virtual wire pair (port3 and port4) makes it easier to protect a web server that is behind a FortiGate operating as an Internal Segmentation Firewall (ISFW). Users on the internal network access the web server through the ISFW over the virtual wire pair.
|
|
Interfaces used in a virtual wire pair cannot be used to access the ISFW FortiGate. Before creating a virtual wire pair, make sure you have a different port configured to allow admin access using your preferred protocol. |
To add a virtual wire pair using the GUI:
- Go to Network > Interfaces.
- Click Create New > Virtual Wire Pair.
- Enter a name for the virtual wire pair.
- Select the Interface Members to add to the virtual wire pair (port3 and port 4).
These interfaces cannot be part of a switch, such as the default LAN/internal interface.
- If required, enable Wildcard VLAN and set the VLAN Filter.
- Click OK.
To add a virtual wire pair using the CLI:
config system virtual-wire-pair
    edit "VWP-name"
        set member "port3" "port4"
        set wildcard-vlan disable
    next
end
To create a virtual wire pair policy using the GUI:
- Go to Policy & Objects > Firewall Virtual Wire Pair Policy.
- Click Create New.
- In the Virtual Wire Pair field, click the + to add the virtual wire pair.
- Select the direction (arrows) that traffic is allowed to flow.
- Configure the other settings as needed.
- Click OK.
To create a virtual wire pair policy using the CLI:
config firewall policy
    edit 1
        set name "VWP-Policy"
        set srcintf "port3" "port4"
        set dstintf "port3" "port4"
        set srcaddr "all"
        set dstaddr "all"
        set action accept
        set schedule "always"
        set service "ALL"
        set utm-status enable
        set fsso disable
    next
end
Configuring multiple virtual wire pairs in a virtual wire pair policy
You can create a virtual wire pair policy that includes different virtual wire pairs in NGFW profile and policy mode. This reduces overhead to create multiple similar policies for each VWP. In NGFW policy mode, multiple virtual wire pairs can be configured in a Security Virtual Wire Pair Policy and Virtual Wire Pair SSL Inspection & Authentication policy.
The virtual wire pair settings must have wildcard VLAN enabled. When configuring a policy in the CLI, the virtual wire pair members must be entered in srcintf and dstintf as pairs.
To configure multiple virtual wire pairs in a policy in the GUI:
-
Configure the virtual wire pairs:
-
Go to Network > Interfaces and click Create New > Virtual Wire Pair.
-
Create a pair with the following settings:
Name
test-vwp-1
Interface members
wan1, wan2
Wildcard VLAN
Enable
-
Click OK.
-
Click Create New > Virtual Wire Pair and create another pair with the following settings:
Name
test-vwp-2
Interface members
port19, port20
Wildcard VLAN
Enable
-
Click OK.
-
-
Configure the policy:
-
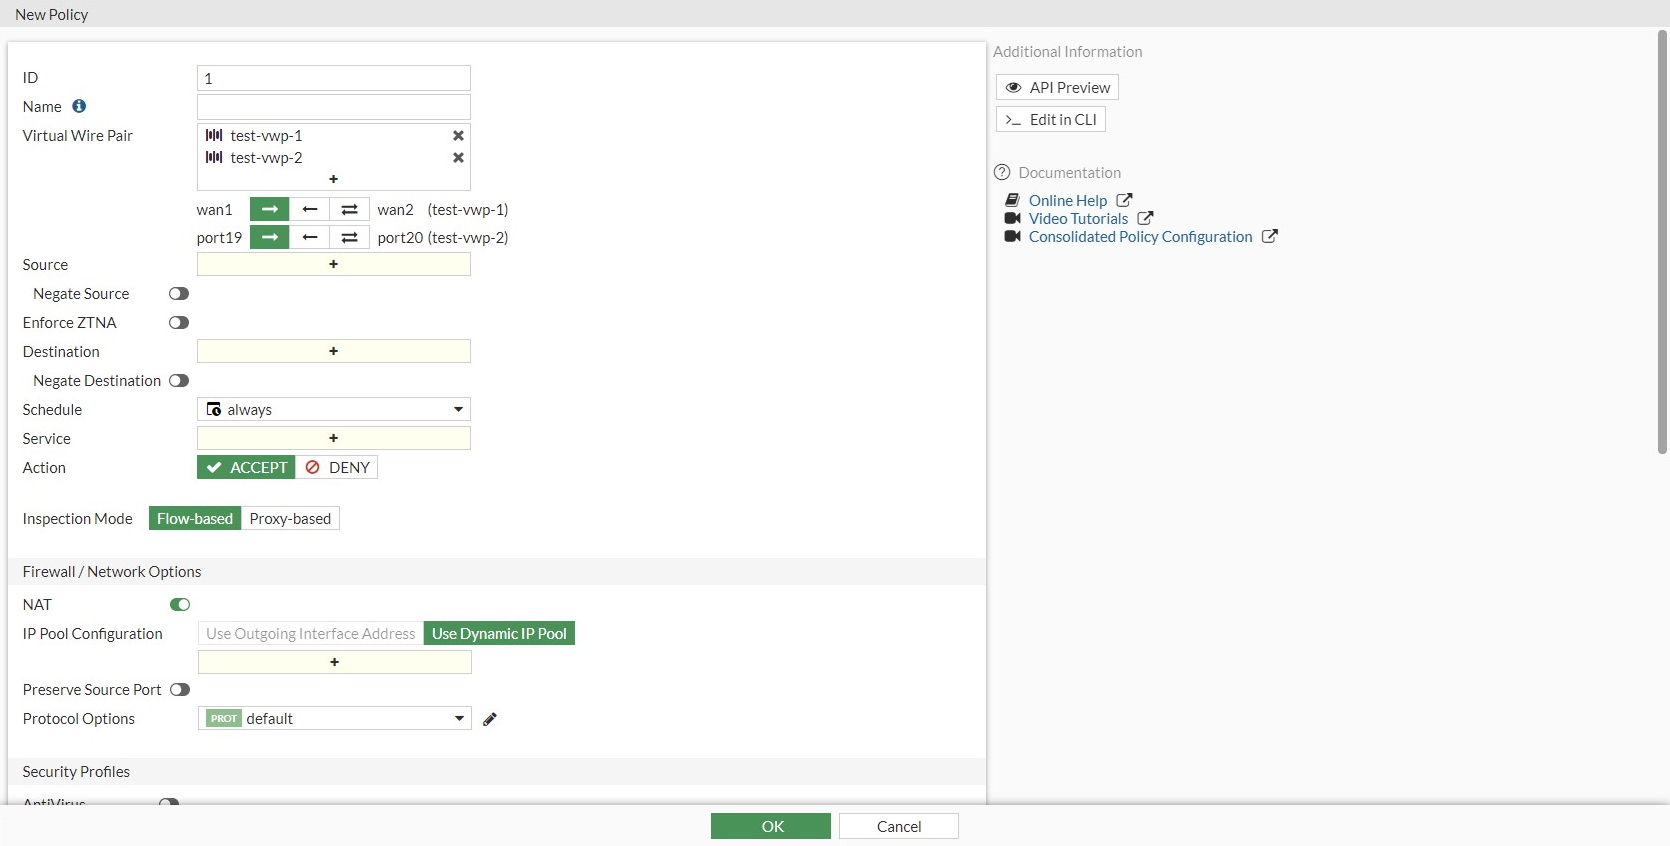
Go to Policy & Objects > Firewall Virtual Wire Pair Policy and click Create New.
-
In the Virtual Wire Pair field, click the + to add test-vwp-1 and test-vwp-2. Select the direction for each of the selected virtual wire pairs.
-
Configure the other settings as needed.
-
Click OK.
-
To configure multiple virtual wire pairs in a policy in the CLI:
- Configure the virtual wire pairs:
config system virtual-wire-pair edit "test-vwp-1" set member "wan1" "wan2" set wildcard-vlan enable next edit "test-vwp-2" set member "port19" "port20" set wildcard-vlan enable next end - Configure the policy:
config firewall policy
    edit 1
        set name "vwp1&2-policy"
        set srcintf "port19" "wan1"
        set dstintf "port20" "wan2"
        set srcaddr "all"
        set dstaddr "all"
        set action accept
        set schedule "always"
        set service "ALL"
        set logtraffic all
    next
end