
ZTNA HTTPS access proxy example
In this example, an HTTPS access proxy is configured to demonstrate its function as a reverse proxy on behalf of the web server it is protecting. It verifies user identity, device identity, and trust context, before granting access to the protected source.

This example shows access control that allows or denies traffic based on ZTNA tags. Traffic is allowed when the FortiClient endpoint is tagged as Low risk, and denied when the endpoint is tagged with Malicious-File-Detected.
This example assumes that the FortiGate EMS fabric connector is already successfully connected.
|
|
To configure ZTNA in the GUI, go to System > Feature Visibility and enable Zero Trust Network Access. |
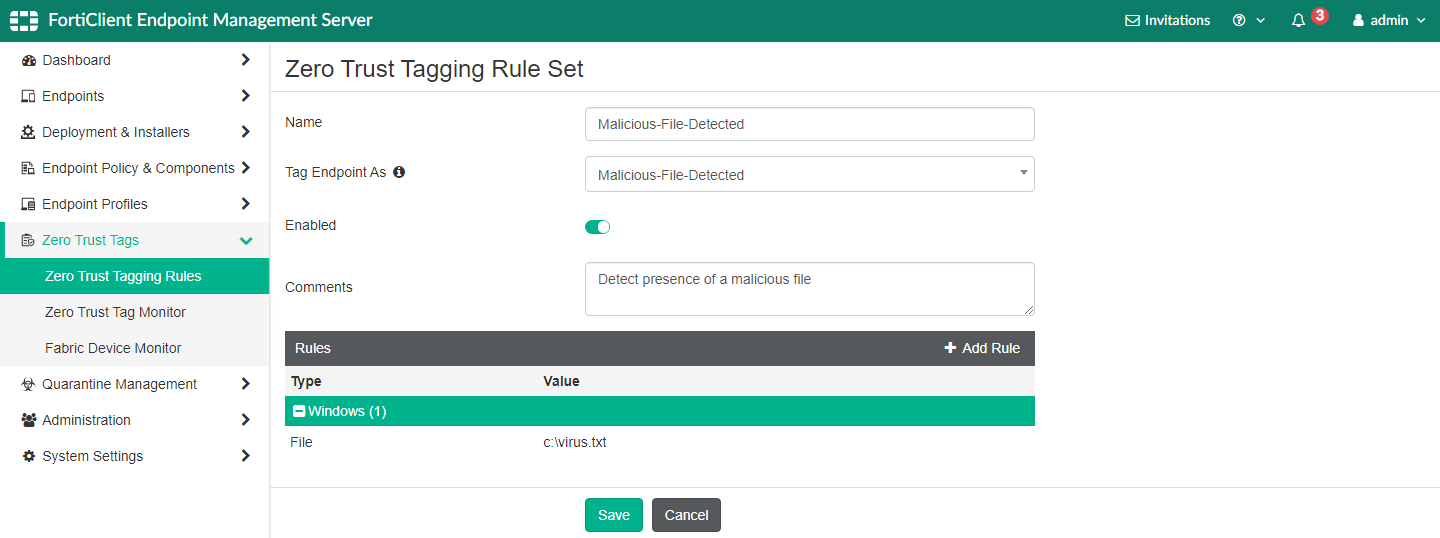
To configure a Zero Trust tagging rule on the FortiClient EMS:
-
Log in to the FortiClient EMS.
-
Go to Zero Trust Tags > Zero Trust Tagging Rules, and click Add.
-
In the Name field, enter Malicious-File-Detected.
-
In the Tag Endpoint As dropdown list, select Malicious-File-Detected.
EMS uses this tag to dynamically group together endpoints that satisfy the rule, as well as any other rules that are configured to use this tag.
-
Click Add Rule then configure the rule:
-
For OS, select Windows.
-
From the Rule Type dropdown list, select File and click the + button.
-
Enter a file name, such as C:\virus.txt.
-
Click Save.
-
-
Click Save.
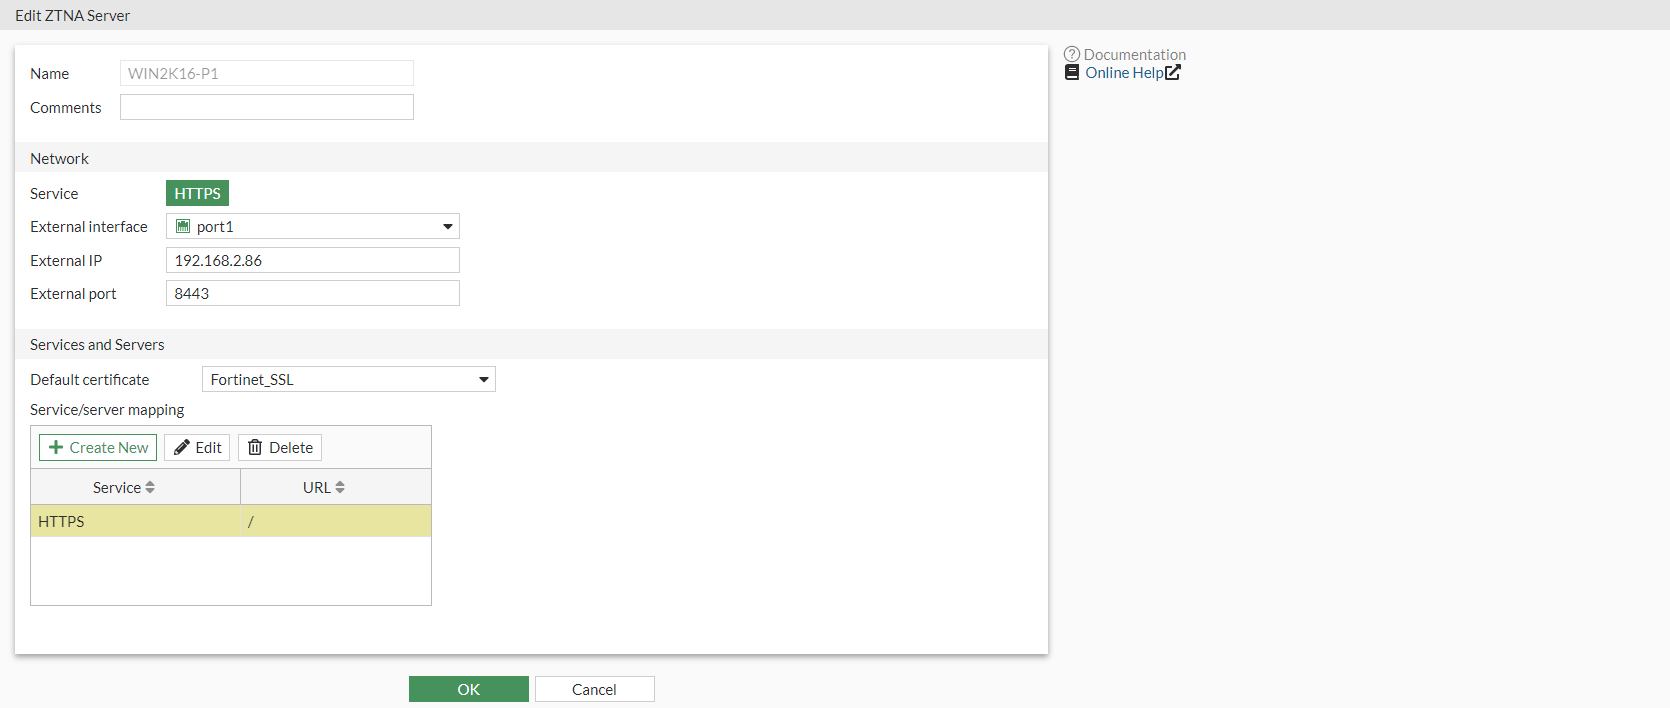
To configure HTTPS access proxy VIP in the GUI:
-
Go to Policy & Objects > ZTNA and select the ZTNA Servers tab.
-
Click Create New.
-
Set Name to WIN2K16-P1.
-
Configure the network settings:
-
Set External interface to port1.
-
Set External IP to 192.168.2.86.
-
Set External port to 8443.
-
-
Select the Default certificate. Clients will be presented with this certificate when they connect to the access proxy VIP.
-
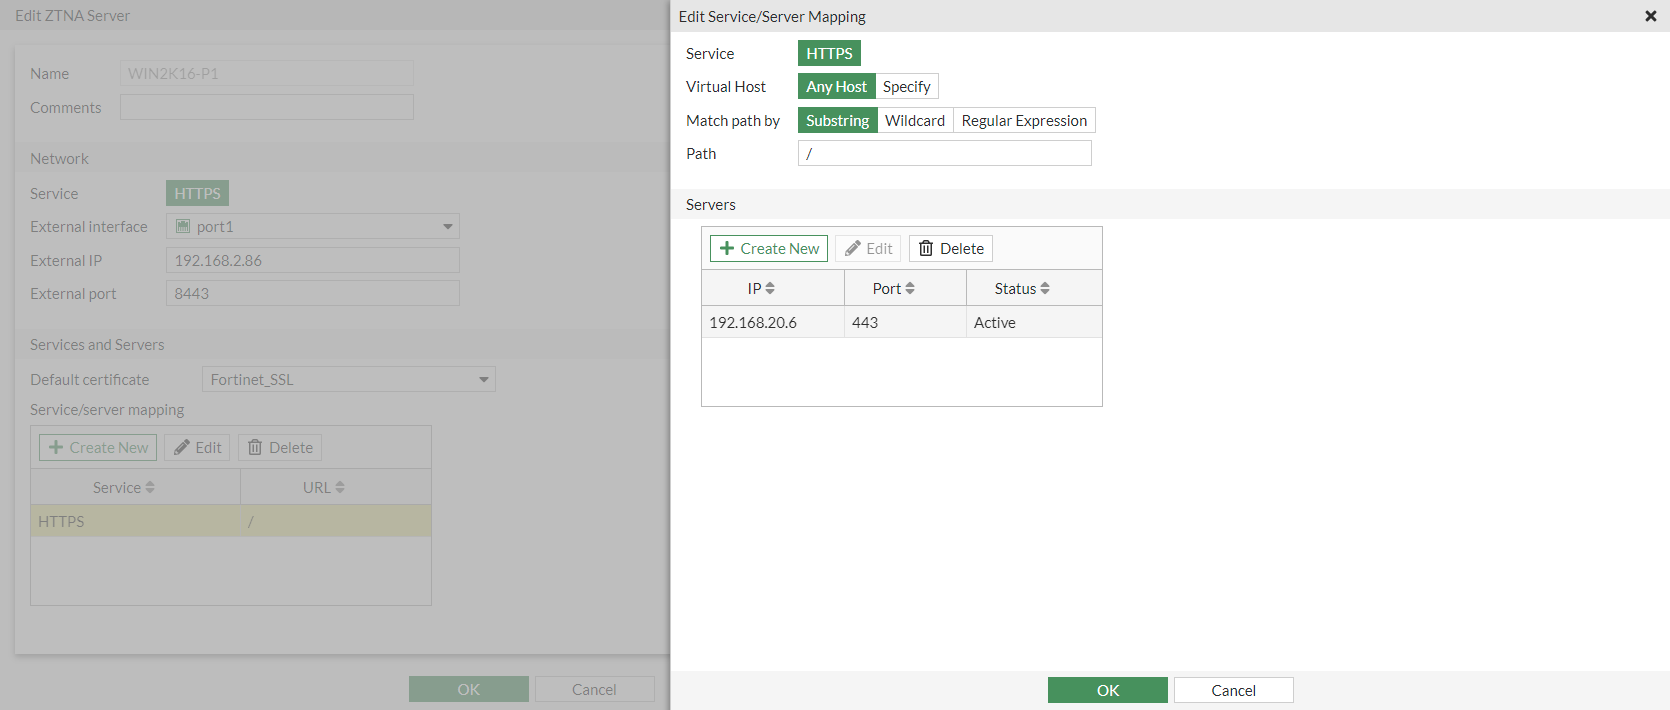
Add server mapping:
-
In the Service/server mapping table, click Create New.
-
Set Virtual Host to Any Host.
-
Configure the path as needed. For example, to map to winserver.fgdocs.com/fortigate, enter /fortigate.
-
Add a server:
-
In the Servers table, click Create New.
-
Set IP to 192.168.20.6.
-
Set Port to 443.
-
Click OK.
-
-
Click OK.
-
-
Click OK.
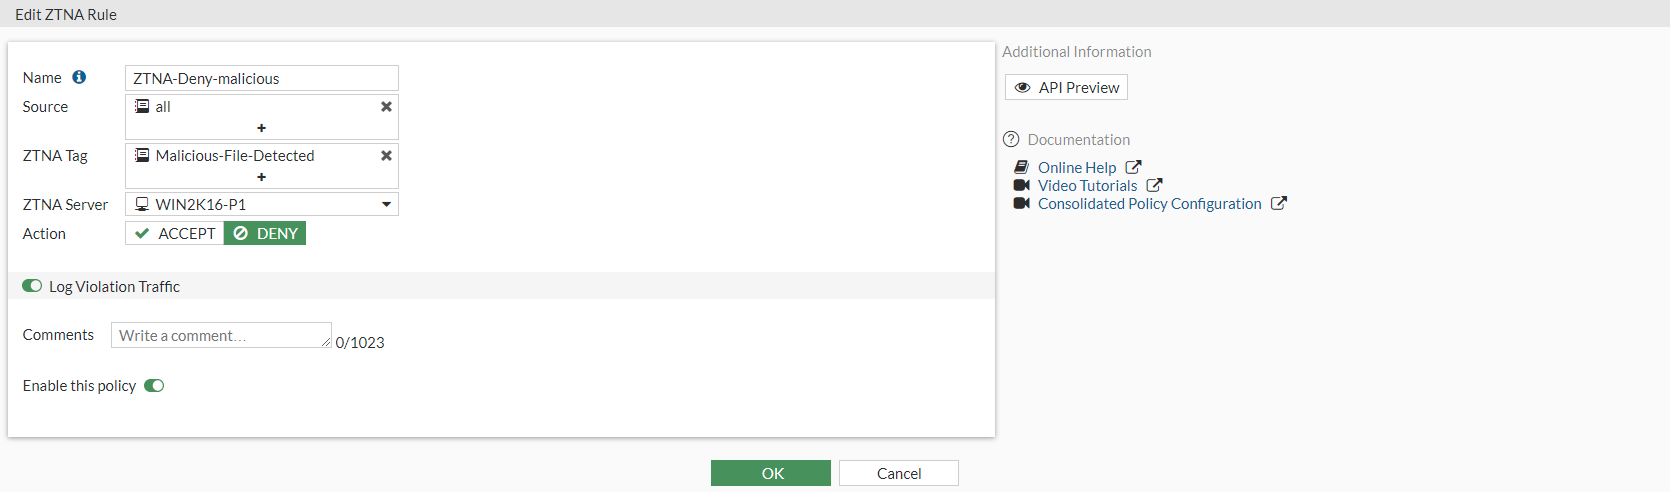
To configure ZTNA rules to allow and deny traffic based on ZTNA tags in the GUI:
-
Go to Policy & Objects > ZTNA and select the ZTNA Rules tab.
-
Create a rule to deny traffic:
-
Click Create New again to create another rule.
-
Set Name to ZTNA-Deny-malicious.
-
Add the ZTNA tag Malicious-File-Detected.
This tag is dynamically retrieved from EMS when you first created the Zero Trust Tagging Rule.
-
Select the ZTNA server WIN2K16-P1.
-
Set Action to DENY.
-
Enable Log Violation Traffic.
-
Click OK.
-
-
Create a rule to allow traffic:
-
Click Create New.
-
Set Name to proxy-WIN2K16-P1.
-
Add the ZTNA tag Low.
-
Select the ZTNA server WIN2K16-P1.
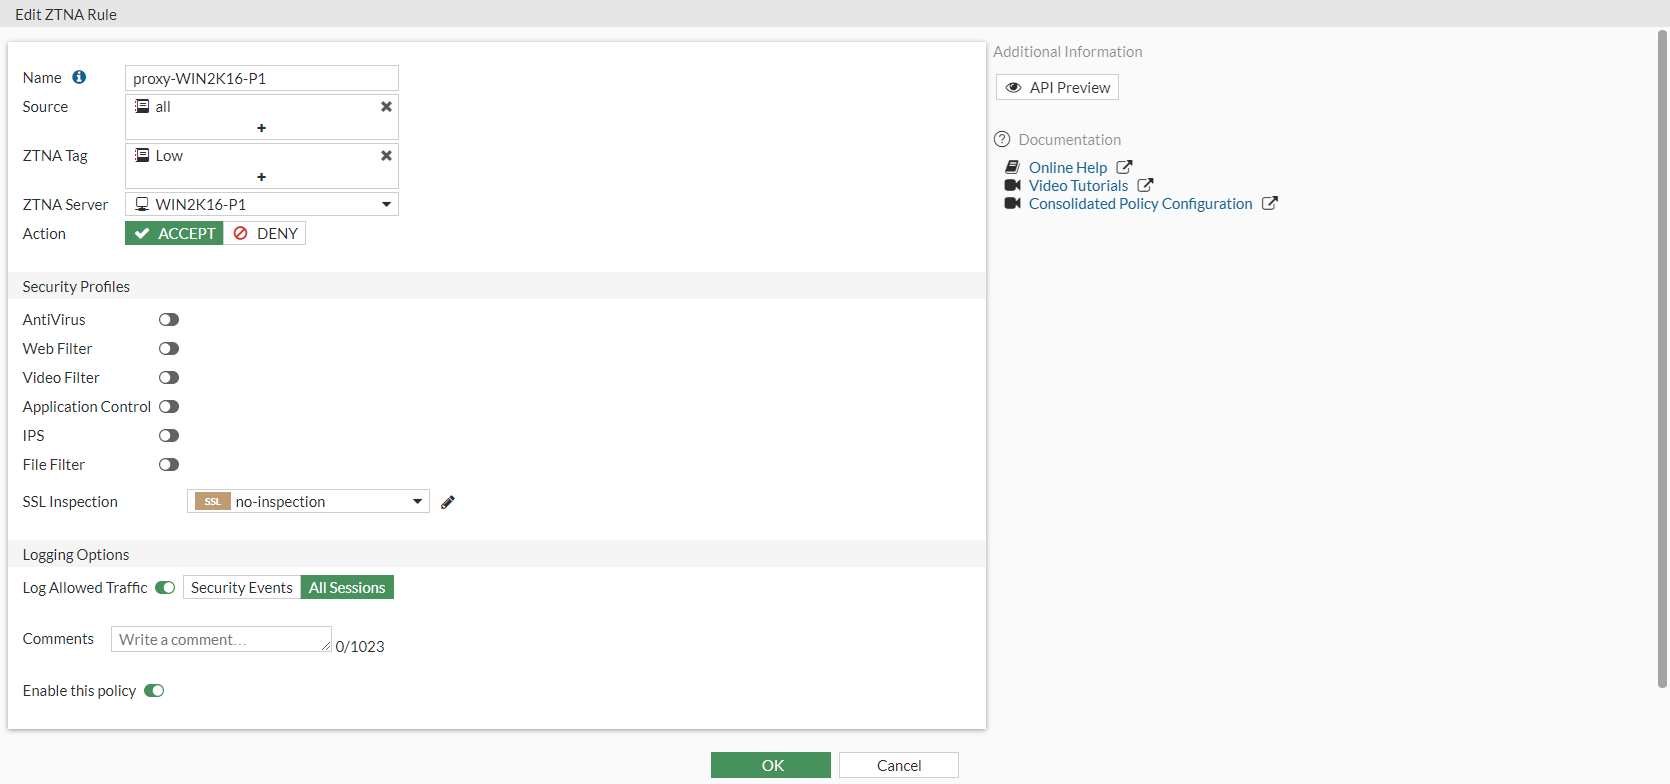
-
Configure the remaining options as needed.
-
Click OK.
-
-
On the ZTNA rules list, make sure that the deny rule (ZTNA-Deny-malicious) is above the allow rule (proxy-WIN2K16-P1).
To configure a firewall policy for full ZTNA in the GUI:
-
Go to Policy & Objects > Firewall Policy and click Create New.
-
Set Name to ZTNA-P1.
-
Enable ZTNA and select Full ZTNA.
-
Set Incoming Interface to port1.
-
Set ZTNA Server to WIN2K16-P1.
-
Configure the remaining settings as needed.
UTM processing of the traffic happens at the ZTNA rule.
-
Click OK.
To configure HTTPS access in the CLI:
-
Configure the access proxy VIP:
config firewall vip edit "WIN2K16-P1" set type access-proxy set extip 192.168.2.86 set extintf "port1" set server-type https set extport 8443 set ssl-certificate "Fortinet_SSL" next end -
Configure the server and path mapping:
config firewall access-proxy edit "WIN2K16-P1" set vip "WIN2K16-P1" set client-cert enable config api-gateway edit 1 set service https config realservers edit 1 set ip 192.168.20.6 set port 443 next end next end next end -
Configure ZTNA rules:
config firewall proxy-policy edit 3 set name "ZTNA-Deny-malicious" set proxy access-proxy set access-proxy "WIN2K16-P1" set srcaddr "all" set dstaddr "all" set ztna-ems-tag "FCTEMS0000109188_Malicious-File-Detected" set schedule "always" set logtraffic all next edit 2 set name "proxy-WIN2K16-P1" set proxy access-proxy set access-proxy "WIN2K16-P1" set srcaddr "all" set dstaddr "all" set ztna-ems-tag "FCTEMS0000109188_Low" set action accept set schedule "always" set logtraffic all next end -
Configure a firewall policy for full ZTNA:
config firewall policy
    edit 24
        set name "ZTNA-P1"
        set srcintf "port1"
        set dstintf "any"
        set srcaddr "all"
        set dstaddr "WIN2K16-P1"
        set action accept
        set schedule "always"
        set service "ALL"
        set inspection-mode proxy
        set logtraffic all
        set nat enable
    next
end
Testing the remote access to the HTTPS access proxy
After FortiClient EMS and FortiGate are configured, the HTTPS access proxy remote connection can be tested.
Access allowed:
-
On the remote Windows PC, open FortiClient.
-
On the Zero Trust Telemetry tab, make sure that you are connected to the EMS server.
-
Open a browser and enter the address of the server and the access port. When entering the FQDN, make sure that the DNS can resolve the address to the IP address of the FortiGate. In this example, winserver.fgdocs.com resolves to 192.168.2.86.
-
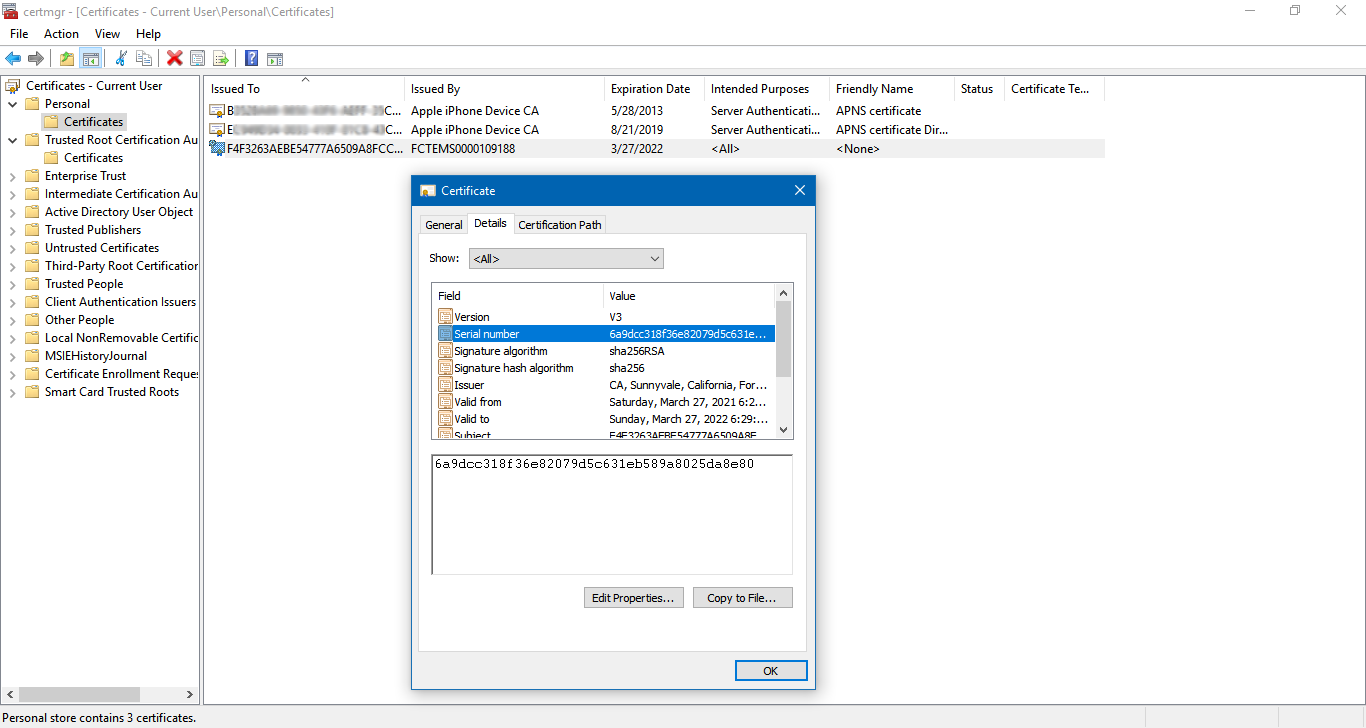
The browser prompts for the client certificate to use. Select the EMS signed certificate, then click OK.
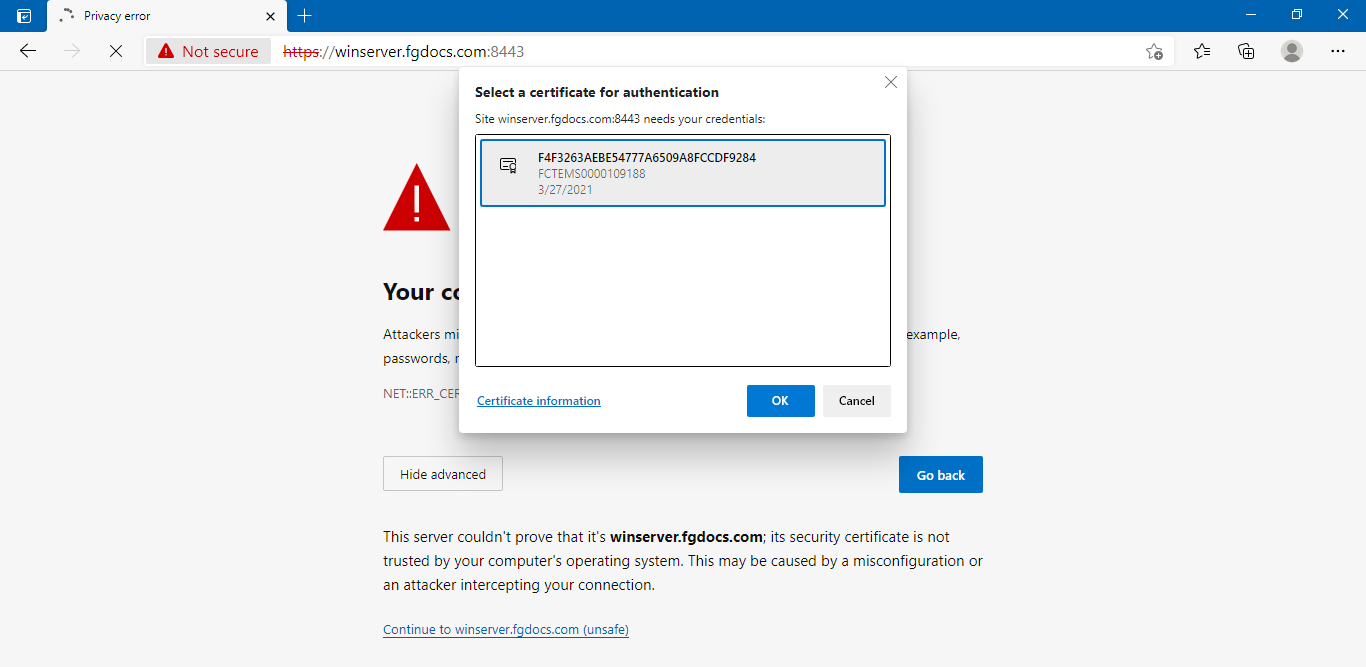
The certificate is in the User Configuration store, under Personal > Certificates. The details show the SN of the certificate, which matches the record on the FortiClient EMS and the FortiGate.
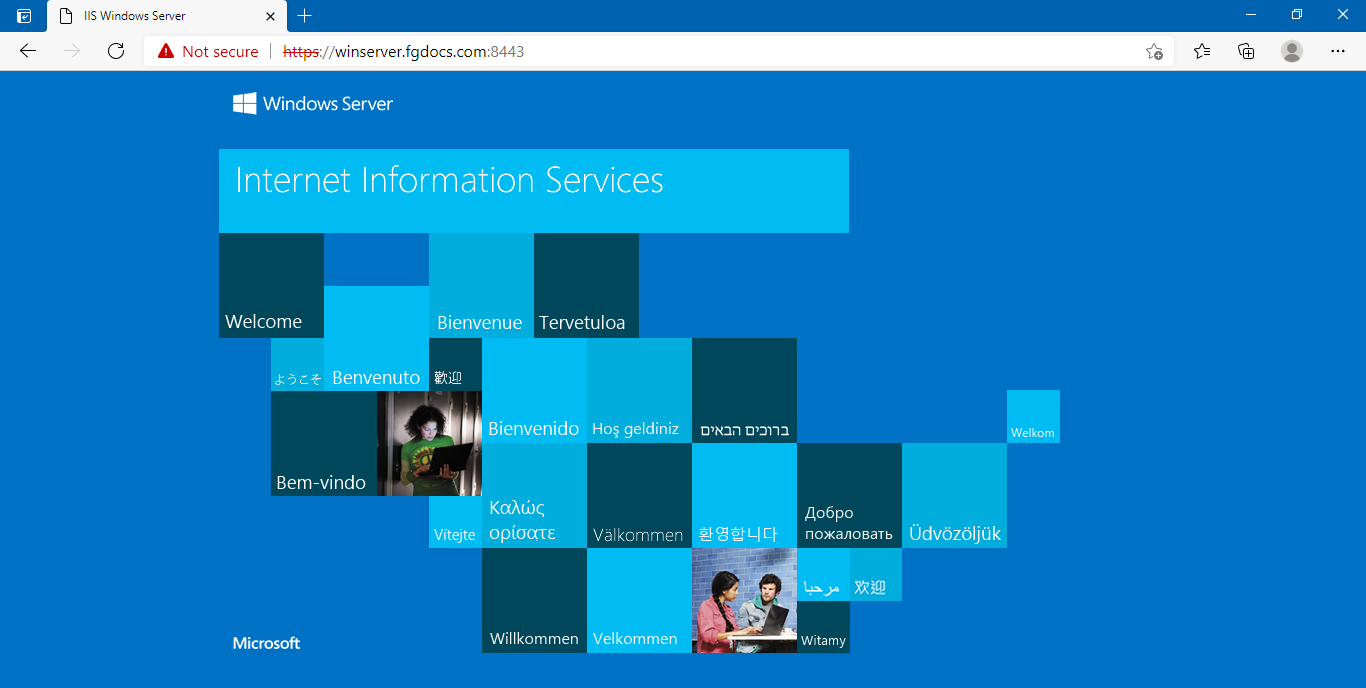
-
The client is verified by the FortiGate to authenticate your identity.
-
The FortiGate matches your security posture by verifying your ZTNA tag and matching the corresponding ZTNA rule, and you are allowed access to the web server.
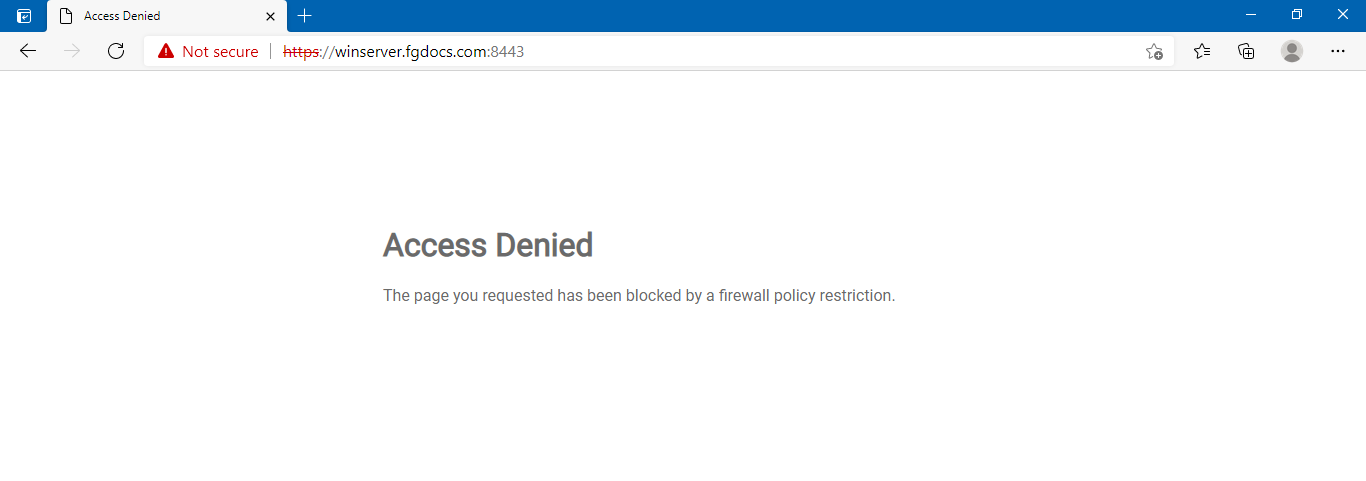
Access denied:
-
On the remote Windows PC, trigger the Zero Trust Tagging Rule by creating the file in C:\virus.txt.
-
Open a browser and enter the address http://winserver.fgdocs.com:8443.
-
The client is verified by the FortiGate to authenticate your identity.
-
FortiGate checks your security posture. Because EMS has tagged the PC with the Malicious-File-Detected tag, it matches the ZTNA-Deny-malicious rule.
-
You are denied access to the web server.
Logs and debugs
Access allowed:
# diagnose endpoint record list
Record #1:
                IP Address = 10.10.10.20
                MAC Address = 9c:b7:0d:2d:5c:d1
                MAC list = 24:b6:fd:fa:54:c1;06:15:cd:45:f1:2e;9c:b7:0d:2d:5c:d1;
                VDOM =  (-1)
                EMS serial number: FCTEMS0000109188
                Client cert SN: 6A9DCC318F36E82079D5C631EB589A8025DA8E80
                Public IP address: 192.157.105.35
                Quarantined: no
                Online status: online
                Registration status: registered
                On-net status: on-net
                Gateway Interface:
                FortiClient version: 7.0.0
                AVDB version: 0.0
                FortiClient app signature version: 0.0
                FortiClient vulnerability scan engine version: 2.30
                FortiClient UID: F4F3263AEBE54777A6509A8FCCDF9284
                Host Name: Fortinet-KeithL
                OS Type: WIN64
….
                Number of Routes: (0)
online records: 1; offline records: 0; quarantined records: 0
# diagnose test application fcnacd 7
ZTNA Cache:
-uid F4F3263AEBE54777A6509A8FCCDF9284: { "tags": [ "all_registered_clients", "Low" ], "user_name": "keithli", "client_cert_sn": "6A9DCC318F36E82079D5C631EB589A8025DA8E80", "ems_sn": "FCTEMS0000109188" }
# diagnose endpoint wad-comm find-by uid F4F3263AEBE54777A6509A8FCCDF9284
UID: F4F3263AEBE54777A6509A8FCCDF9284
        status code:ok
        Domain:
        User: keithli
        Cert SN:6A9DCC318F36E82079D5C631EB589A8025DA8E80
        EMS SN: FCTEMS0000109188
        Routes(0):
        Tags(2):
         - tag[0]: name=all_registered_clients
         - tag[1]: name=Low
# execute log display
1: date=2021-03-28 time=00:46:39 eventtime=1616917599923614599 tz="-0700" logid="0000000010" type="traffic" subtype="forward" level="notice" vd="root" srcip=10.10.10.20 srcport=60185 srcintf="port1" srcintfrole="wan" dstcountry="Reserved" srccountry="Reserved" dstip=192.168.20.6 dstport=443 dstintf="root" dstintfrole="undefined" sessionid=29515 srcuuid="2d8e1736-8ec6-51eb-885c-009bdf9c31d7" dstuuid="5445be2e-5d7b-51ea-e2c3-ae6b7855c52f" service="HTTPS" wanoptapptype="web-proxy" proto=6 action="accept" policyid=2 policytype="proxy-policy" poluuid="5aba29de-8ec6-51eb-698f-25b59d5bf852" duration=6 wanin=104573 rcvdbyte=104573 wanout=2274 lanin=3370 sentbyte=3370 lanout=104445 srchwvendor="Fortinet" devtype="Network" srcfamily="Firewall" osname="Windows" srchwversion="FortiWiFi-30E" appcat="unscanned"
Access denied:
# diagnose test application fcnacd 7
ZTNA Cache:
-uid F4F3263AEBE54777A6509A8FCCDF9284: { "user_name": "keithli", "client_cert_sn": "6A9DCC318F36E82079D5C631EB589A8025DA8E80", "ems_sn": "FCTEMS0000109188", "tags": [ "Malicious-File-Detected", "all_registered_clients", "Low" ] }
# diagnose endpoint wad-comm find-by uid F4F3263AEBE54777A6509A8FCCDF9284
UID: F4F3263AEBE54777A6509A8FCCDF9284
        status code:ok
        Domain:
        User: keithli
        Cert SN:6A9DCC318F36E82079D5C631EB589A8025DA8E80
        EMS SN: FCTEMS0000109188
        Routes(0):
        Tags(3):
         - tag[0]: name=Malicious-File-Detected
         - tag[1]: name=all_registered_clients
         - tag[2]: name=Low
# execute log display 1: date=2021-03-28 time=01:21:55 eventtime=1616919715444980633 tz="-0700" logid="0000000013" type="traffic" subtype="forward" level="notice" vd="root" srcip=10.10.10.20 srcport=60784 srcintf="port1" srcintfrole="wan" dstip=192.168.20.6 dstport=443 dstintf="root" dstintfrole="undefined" srcuuid="2d8e1736-8ec6-51eb-885c-009bdf9c31d7" dstuuid="5445be2e-5d7b-51ea-e2c3-ae6b7855c52f" srccountry="Reserved" dstcountry="Reserved" sessionid=33933 proto=6 action="deny" policyid=3 policytype="proxy-policy" poluuid="762ca074-8f9e-51eb-7614-03a8801c6477" service="HTTPS" trandisp="noop" url="https://winserver.fgdocs.com/" agent="Chrome/89.0.4389.90" duration=0 sentbyte=0 rcvdbyte=0 sentpkt=0 rcvdpkt=0 appcat="unscanned" crscore=30 craction=131072 crlevel="high" msg="Traffic denied because of explicit proxy policy"