
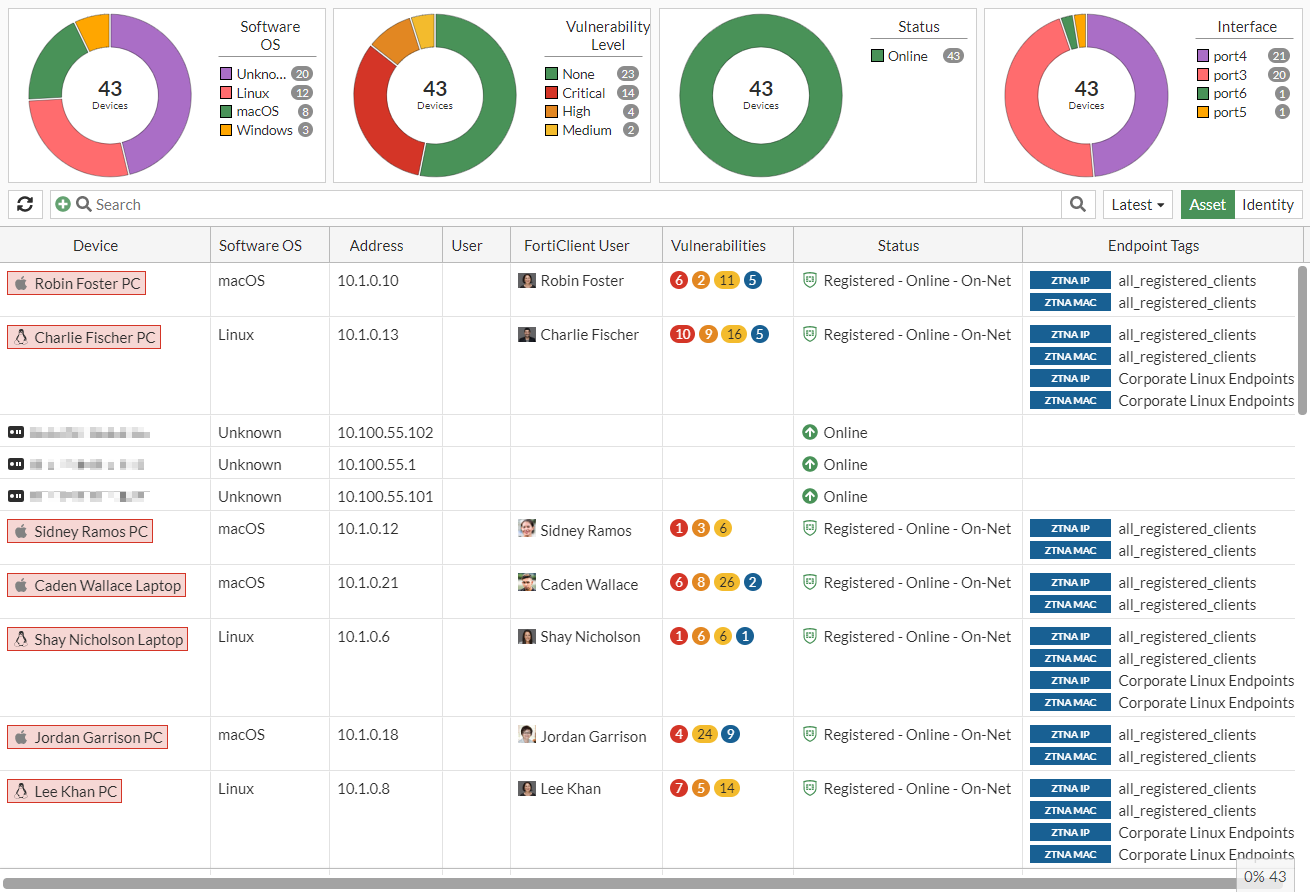
Asset Identity Center page
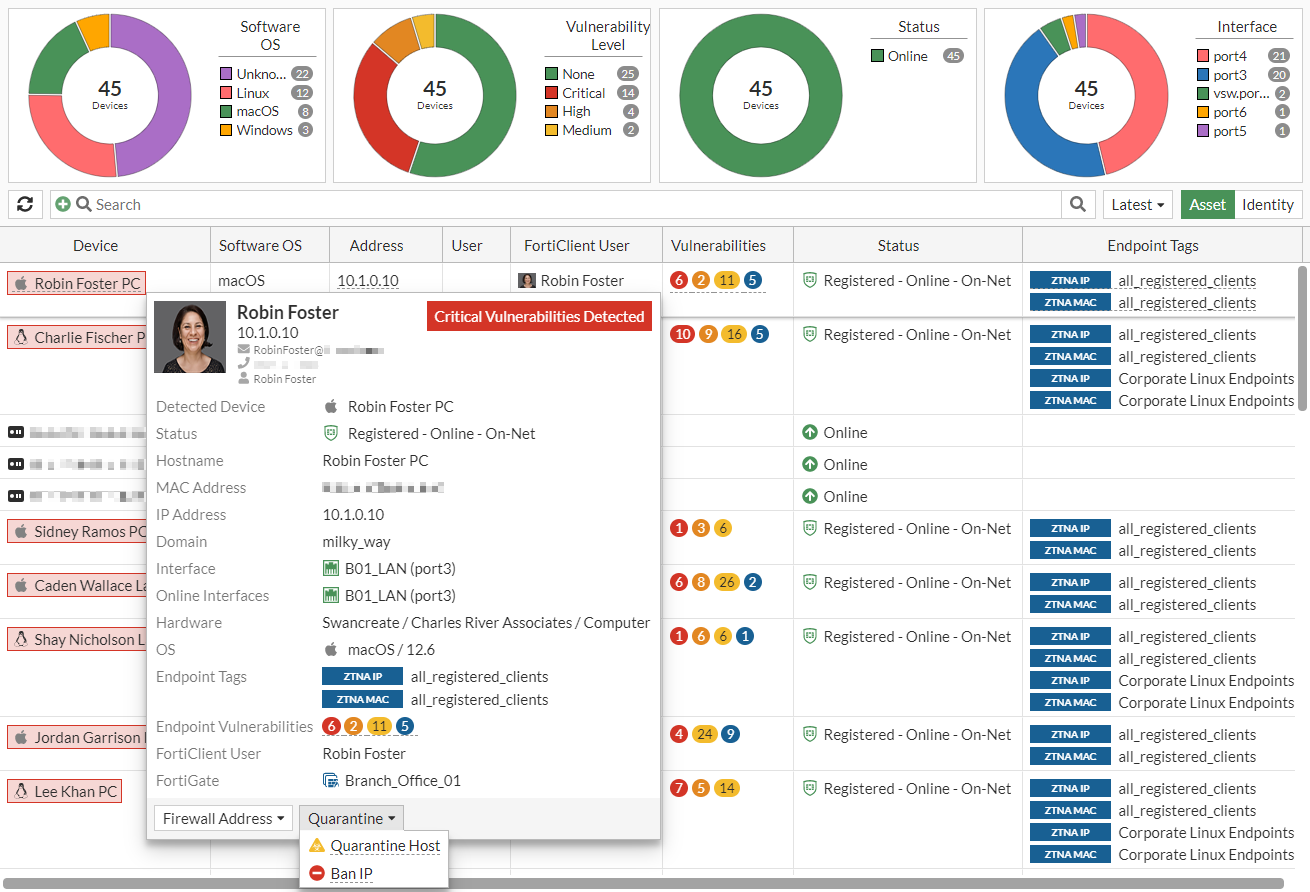
The Asset Identity Center page unifies information from detected addresses, devices, and users into a single page, while building a data structure to store the user and device information in the backend. The Asset view groups information by Device, while the Identity view groups information by User. Hover over a device or a user in the GUI to perform different actions relevant to the object, such as adding a firewall device address, adding an IP address, banning the IP, quarantining the host, and more.
To view the Asset Identity Center page:
-
Go to Security Fabric > Asset Identity Center.
-
Click Asset to view information by device.
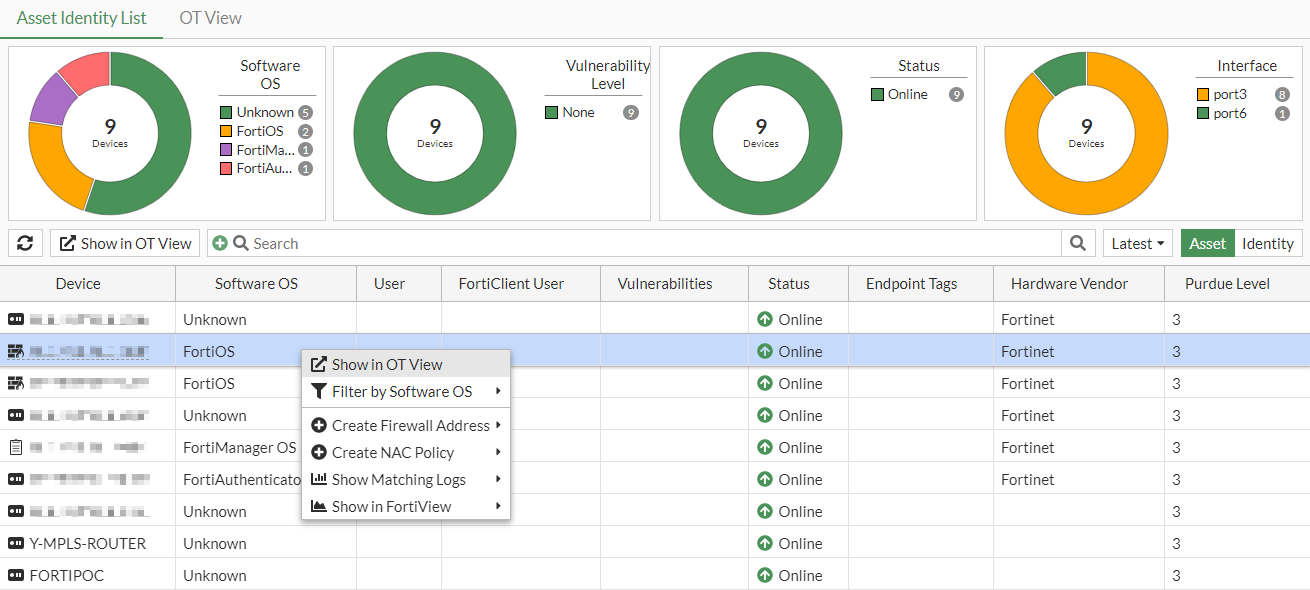
There are four donut charts with device related information: Software OS, Vulnerability Level, Status, and Interface.
The default table columns are Device, Software OS, Address, User, FortiClient User, Vulnerabilities, Status, and Endpoint Tags. The optional columns are Device Family, Device Type, EMS Serial, EMS Tenant ID, Firewall Address, FortiSwitch, Hardware Vendor, Hardware Version, Hostname, Interface, IP Address, Last Seen, Port, Server, VLAN, and Vulnerability Level.
Devices with vulnerabilities are highlighted in red.
-
Click Identity to view information by user. The default table columns are User, Device, and Properties. The optional columns are IP Address, Logoff Time, and Logon Time.

Each view has a dropdown option to view the information within different time frames (Latest, 1 hour, 24 hours, and 7 days). The page displays user and device relationships, such as which users are logged in to multiple devices or if multiple users are logged in to single devices.
-
Hover over a device in the list to view the tooltip and possible actions. The options under the Firewall Address dropdown are Create Firewall Device Address and Create Firewall IP Address. The options under the Quarantine dropdown are Quarantine Host and Ban IP.
Diagnostics
The following options are available for diagnose user-device-store unified <option>:
|
Option |
Description |
|---|---|
|
device-memory-query |
Get device records and associated user records from memory. |
|
device-query |
Get device records and associated user records from memory and disk. |
|
user-memory-query |
Get user records and associated device records from memory. |
|
user-query |
Get user records and associated device records from memory and disk. |
|
re-query |
Retrieve query by |
|
list |
List unified queries. |
|
clear |
Delete all unified queries. |
|
dump |
Dump unified query stats by |
|
delete |
Delete unified query by |
|
stats |
Get statistics for unified queries. |
|
debug |
Enable/disable debug logs for unified queries. |
IoT vulnerabilities
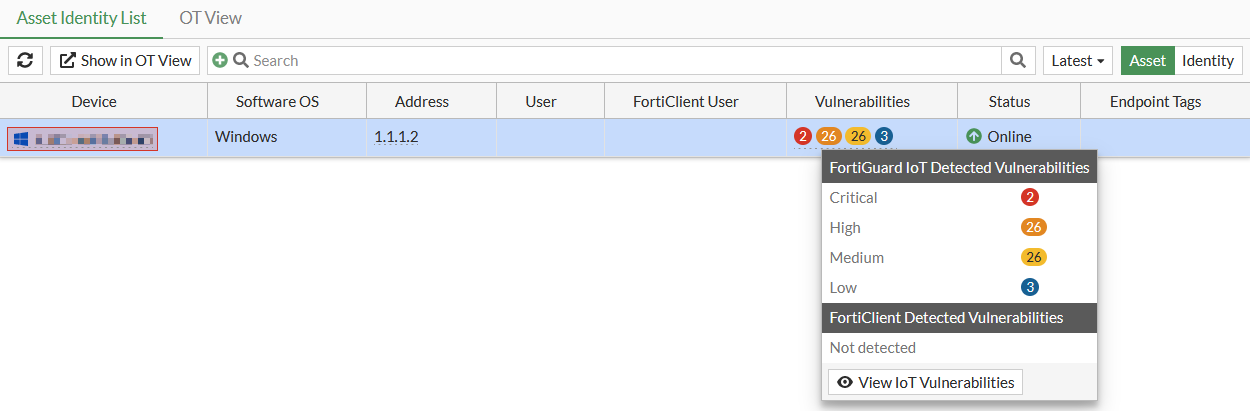
Hovering over the data in the Vulnerabilities column displays a list of FortiGuard IoT Detected Vulnerabilities and FortiClient Detected Vulnerabilities. Clicking the View IoT Vulnerabilities button in the tooltip opens the View IoT Vulnerabilities table that includes the Vulnerability ID, Type, Severity, Reference, Description, and Patch Signature ID. Each entry in the Reference column includes the CVE number and a link to the CVE details.
The following settings are required to display IoT devices:
-
The FortiGate must have a valid Attack Surface Security Rating service license.
-
Device detection must be configured on a LAN interface used by IoT devices.
To configure device detection in the GUI:
- Go to Network > Interfaces and edit a LAN interface.
- Enable Device detection.
- Click OK.
To configure device detection in the CLI:
config system interface edit <name> set device-identification enable next end -
Configure a firewall policy with an application control sensor.
To view IoT asset vulnerabilities in the GUI:
-
Go to Security Fabric > Asset Identity Center. Ensure the Asset list view is selected.
-
Select a device with IoT vulnerabilities.
-
Hover over the IoT Vulnerabilities count to view the tooltip and click View IoT Vulnerabilities.
A table with the list of vulnerabilities and related information for the device is displayed, including the CVE references and descriptions.
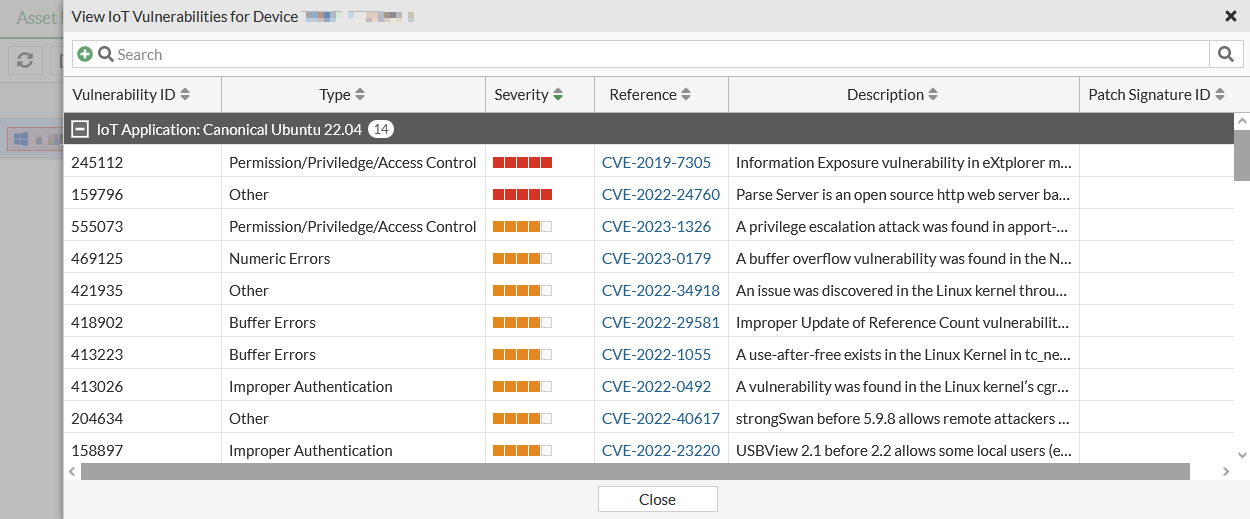
-
Click a hyperlink in the Reference column to view more information about the CVE, or click Close.
To view IoT asset vulnerabilities in the CLI:
# diagnose user-device-store device memory list
...

        device_info
                'ipv4_address' = '1.1.1.2'
                'mac' = '**:**:**:**:**:**'
                'hardware_vendor' = 'Samsung'
                'hardware_type' = 'Home & Office'
                'hardware_family' = 'Computer'
				...
                'purdue_level' = '3'
                'iot_vuln_count' = '57'
                'max_vuln_level' = 'Critical'
                'total_vuln_count' = '100'
        ...
        iot_info
                'vendor' = 'Mozilla'
                'product' = 'Firefox'
                'version-min' = '113.0'
                'validity' = 'true'
        iot_vulnerability
                'vulnerability_id' = '551873'
                'severity' = '2'
                'type' = 'Improper Authentication'
                'description' = 'The SSL protocol, as used in certain configurations in Microsoft Windows and Microsoft Internet Explorer, Mozilla Firefox, Google Chrome, Opera, and other products, encrypts data by using CBC mode with chained initialization vectors, which allows man-in-the-middle attackers to obtain plaintext HTTP headers via a blockwise chosen-boundary attack (BCBA) on an HTTPS session, in conjunction with JavaScript code that uses (1) the HTML5 WebSocket API, (2) the Java URLConnection API, or (3) the Silverlight WebClient API, aka a "BEAST" attack.'
                'references' = 'CVE-2011-3389'
                'date_added' = '2023-04-19T12:12:32'
                'date_updated' = '2023-04-19T12:12:32'
        iot_vulnerability
                'vulnerability_id' = '534577'
                'severity' = '2'
                'type' = 'Other'
                'description' = 'The hb_buffer_ensure function in hb-buffer.c in HarfBuzz, as used in Pango 1.28.3, Firefox, and other products, does not verify that memory reallocations succeed, which allows remote attackers to cause a denial of service (NULL pointer dereference and application crash) or possibly execute arbitrary code via crafted OpenType font data that triggers use of an incorrect index.'
                'references' = 'CVE-2011-0064'
                'date_added' = '2023-04-19T11:59:20'
                'date_updated' = '2023-04-19T11:59:20'
        iot_vulnerability
                'vulnerability_id' = '525700'
                'severity' = '1'
                'type' = 'Other'
                'description' = 'The SPDY protocol 3 and earlier, as used in Mozilla Firefox, Google Chrome, and other products, can perform TLS encryption of compressed data without properly obfuscating the length of the unencrypted data, which allows man-in-the-middle attackers to obtain plaintext HTTP headers by observing length differences during a series of guesses in which a string in an HTTP request potentially matches an unknown string in an HTTP header, aka a "CRIME" attack.'
                'references' = 'CVE-2012-4930'
                'date_added' = '2023-04-18T12:56:10'
                'date_updated' = '2023-04-18T12:56:10'
        ...
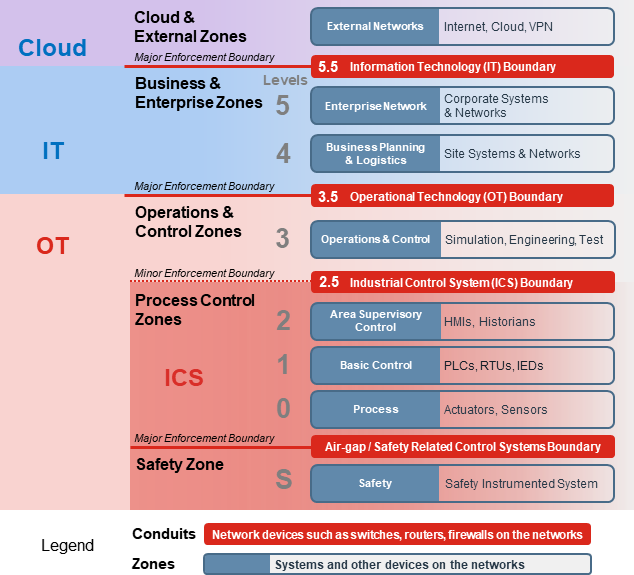
OT asset visibility and network topology
When the Operational Technology (OT) feature is enabled, tabs are added in the Asset Identity Center page to view the OT asset list and OT network topology using Purdue Levels. This feature is available regardless of whether a Security Fabric is enabled.
To enable the OT features in the GUI:
- Go to System > Feature Visibility.
- In the Additional Features section, enable Operational Technology (OT).
- Click Apply.
To enable the OT features in the CLI:
config system settings
    set gui-ot enable
end
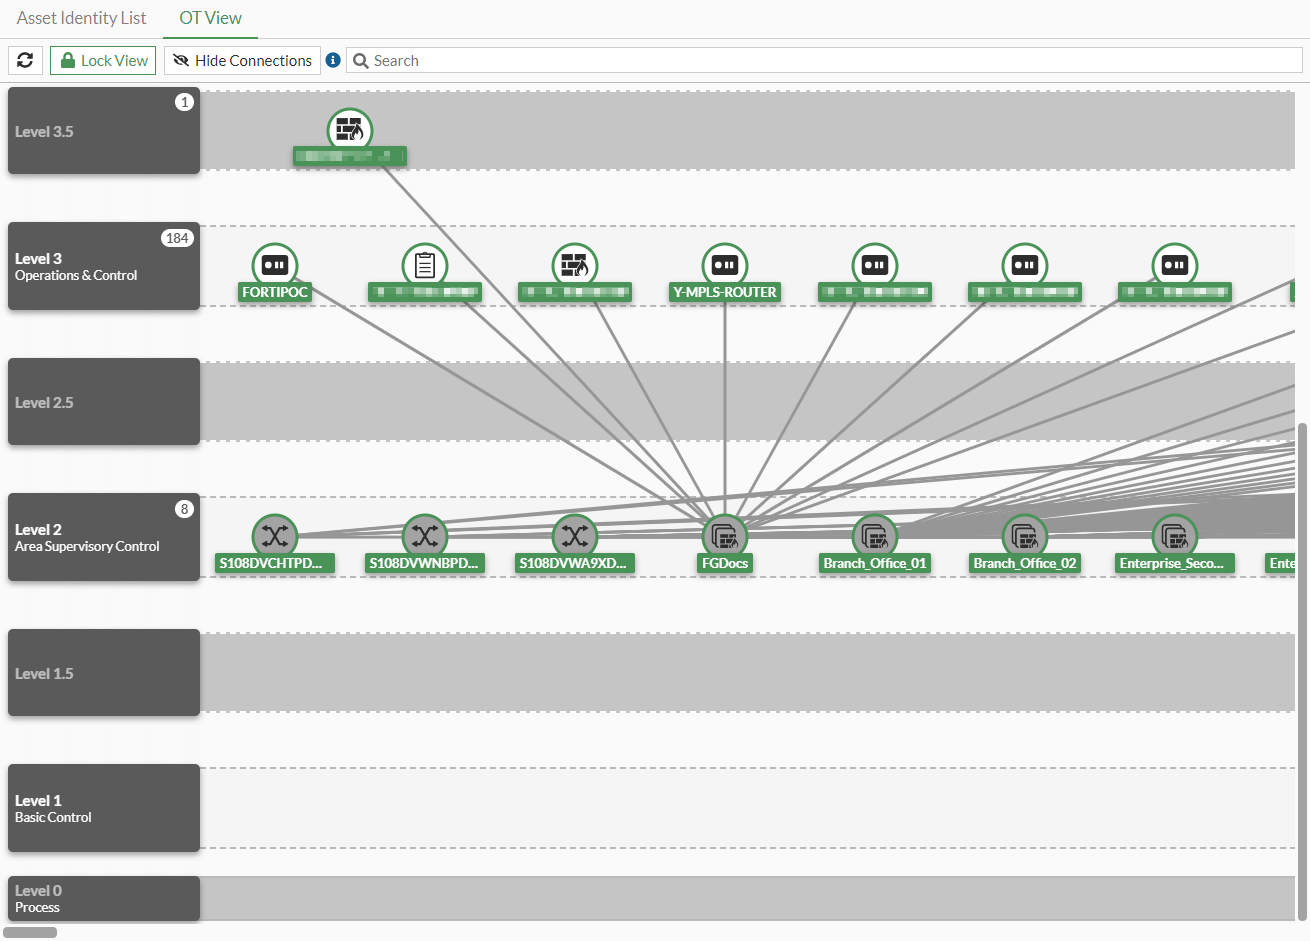
Once enabled, the Security Fabric > Asset Identity Center page displays an Asset Identity List tab and an OT View tab.
- The Asset Identity List tab includes a configurable Purdue Level column and a Show in OT View option for selected devices in the table.
- The OT View tab shows a topology of detected components and connections mapped to Purdue Levels. The default view is locked, but devices can be dragged and dropped to other Purdue Levels if the view is unlocked.
FortiGates and managed FortiSwitches are statically assigned Purdue Level 2 and cannot be changed. Other detected devices are assigned Purdue Level 3 by default and can be changed (except to level S, 0, or external).
The following diagram lists the Purdue Levels based on OT network topologies:
To change the Purdue Level in the Asset Identity List tab:
- Go to Security Fabric > Asset Identity Center and select the Asset Identity List tab.
- Add the Purdue Level column to the table:
- Hover over the table header and click the gear icon (Configure Table).
- Select Purdue Level.
- Click Apply.
- Select a device and hover over the Purdue Level value.
- Click the pencil icon to edit the level.
- Select a value from the dropdown.
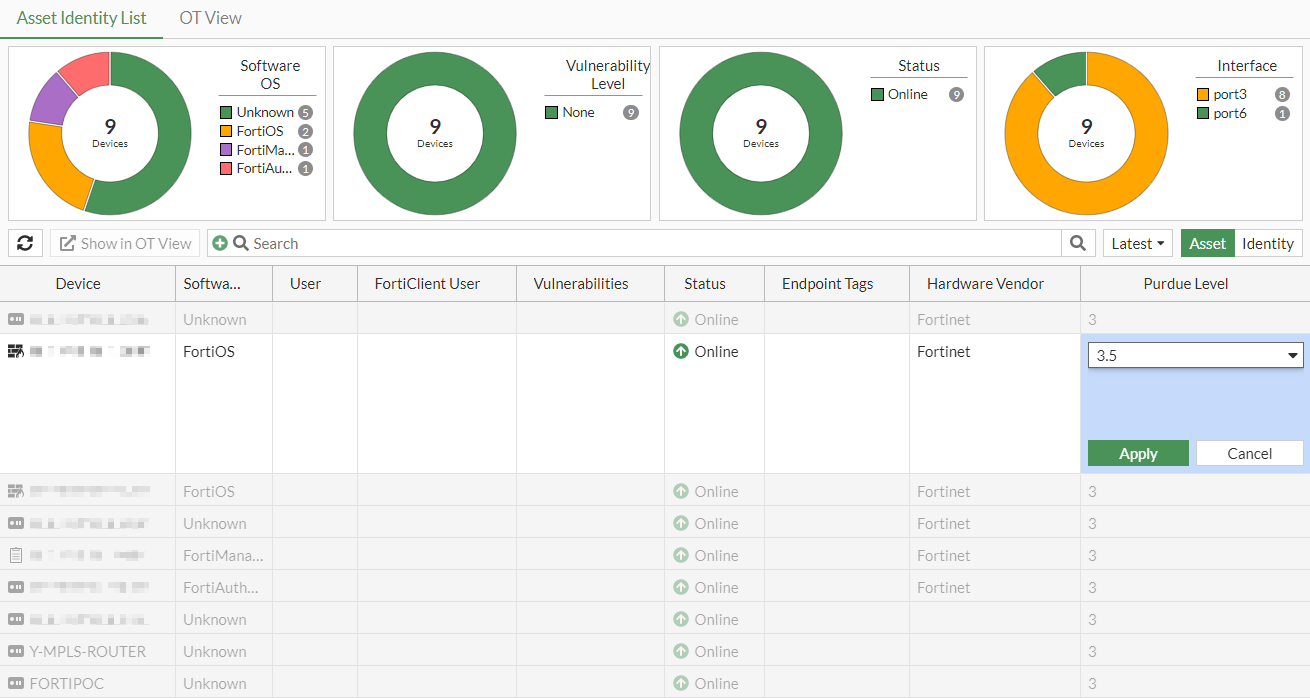
- Click Apply.
To change the Purdue Level in the OT View tab:
- Go to Security Fabric > Asset Identity Center and select the OT View tab.
- Click Unlock View.
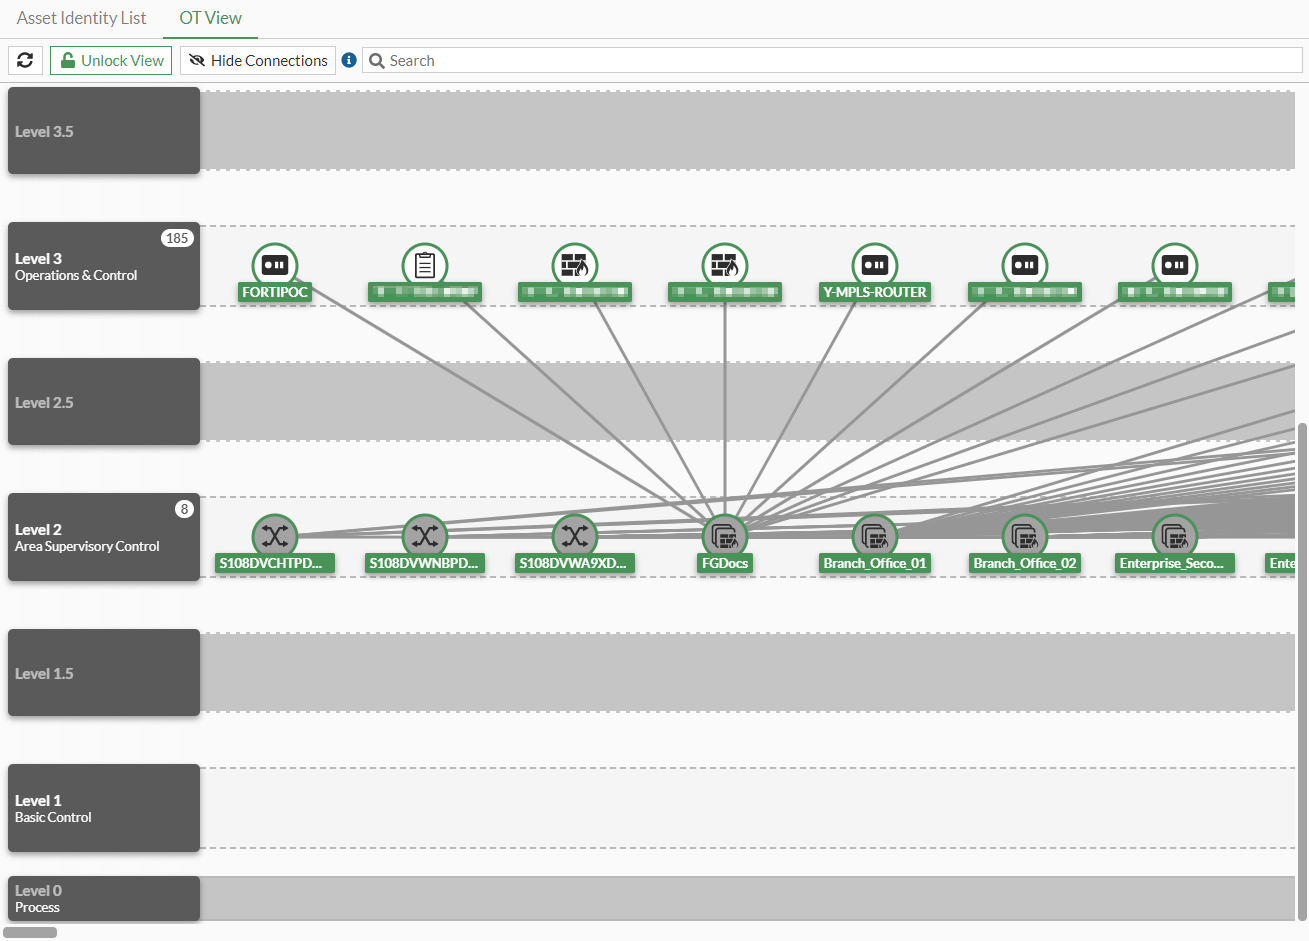
- Select a device.
- Drag the device icon to another level row.
- Optionally, click Lock View to revert to the locked view.
To change the Purdue Level in the CLI:
# diagnose user-device-store device memory ot-purdue-set <mac> <ip> <level>
|
mac |
Enter the MAC address of the device. |
|
ip |
Enter the IPv4 address of the device. |
|
level |
Enter the Purdue Level: 1, 1.5, 2, 2.5, 3, 3.5, 4, 5, 5.5. |
Configuring the Purdue Level for discovered assets based on detected interface
The default Purdue Level can be set or unset in the CLI (default-purdue-level) within the system interface configuration. The default Purdue Level can be applied to discovered assets based on the interface with which they were detected. This feature requires a FortiGuard Industrial Security Service (ISS) license on the FortiGate so the Industrial Database (ISDB) can be used. Device identification must be enabled on interfaces connected to OT devices.
config system interface
    edit <name>
        set device-identification enable
        set default-purdue-level {1 | 1.5| 2 | 2.5| 3 | 3.5 | 4 | 5 | 5.5}
    next
end
By default, the default-purdue-level value is 3. If the asset's Purdue Level is manually overridden, then it takes precedence over this default value set in the interface.
For example, if the default Purdue Level on port1 is changed to 3.5, subsequently, the Purdue Level of a detected device on port1 is manually changed to 4 on the Asset Identity Center page. After the manual change on the device, the Purdue Level remains at 4.
To configure the default Purdue Level:
-
Configure the interface settings:
config system interface edit "port1" set device-identification enable set default-purdue-level 3.5 next end -
Verify that the Purdue Level as been updated in the user device store list:
# diagnose user-device-store device memory list Record #1: device_info 'ipv4_address' = '192.168.1.64' 'mac' = '**:**:**:**:**:**' 'hardware_vendor' = 'Dell' 'hardware_type' = 'Home & Office' 'hardware_family' = 'Computer' 'vdom' = 'root' 'os_name' = 'Windows' 'os_version' = '10 / 2016' 'last_seen' = '1680115135' 'host_src' = 'mwbs' 'unjoined_forticlient_endpoint' = 'false' 'is_online' = 'true' 'active_start_time' = '1680113976' 'dhcp_lease_status' = 'leased' 'dhcp_lease_expire' = '1680651757' 'dhcp_lease_reserved' = 'false' 'dhcp_server_id' = '2' 'is_fortiguard_src' = 'true' 'purdue_level' = '3.5' ... -
Go to Security Fabric > Asset Identity Center and select the Asset Identity List tab. The device's Purdue Level is currently 3.5.

-
Manually change the device's Purdue Level:
-
Select the device and hover over the Purdue Level value.
-
Click the pencil icon to edit the level.
-
Select 4 and click Apply.

-
-
Verify that the Purdue Level as been updated in the user device store list:
# diagnose user-device-store device memory list

Record #1:

        device_info
                'ipv4_address' = '192.168.1.64'
                'mac' = '**:**:**:**:**:**'
                'hardware_vendor' = 'Dell'
                'hardware_type' = 'Home & Office'
                'hardware_family' = 'Computer'
                'vdom' = 'root'
                'os_name' = 'Windows'
                'os_version' = '10 / 2016'
                'last_seen' = '1680115467'
                'host_src' = 'mwbs'
                'unjoined_forticlient_endpoint' = 'false'
                'is_online' = 'true'
                'active_start_time' = '1680113976'
                'dhcp_lease_status' = 'leased'
                'dhcp_lease_expire' = '1680651757'
                'dhcp_lease_reserved' = 'false'
                'dhcp_server_id' = '2'
                'is_fortiguard_src' = 'true'
                'purdue_level' = '4'
                ...