
Agent-based FSSO
FortiOS can provide single sign-on capabilities to Windows AD, Citrix, VMware Horizon, Novell eDirectory, or, as of FortiOS 5.4, Microsoft Exchange users with the help of agent software installed on these networks. The agent software sends information about user logons to the FortiGate unit. With user information such as IP address and user group memberships from the network, FortiGate security policies can allow authenticated network access to users who belong to the appropriate user groups without requesting their credentials again.
For Windows AD networks, FortiGate units can provide SSO capability without agent software by directly polling the Windows AD domain controllers. For information about this type of SSO, see Single sign-on to Windows AD.
The following topics are included:
- Introduction to agent-based FSSO
- FSSO NTLM authentication support
- Agent installation
- Configuring the FSSO collector agent for Windows AD
- Configuring the FSSO TS agent for Citrix
- Configuring FSSO with Novell networks
- Configuring FSSO advanced settings
- Configuring FSSO on FortiGate units
- FortiOS FSSO log messages
- Testing FSSO
- Troubleshooting FSSO
Introduction to agent-based FSSO
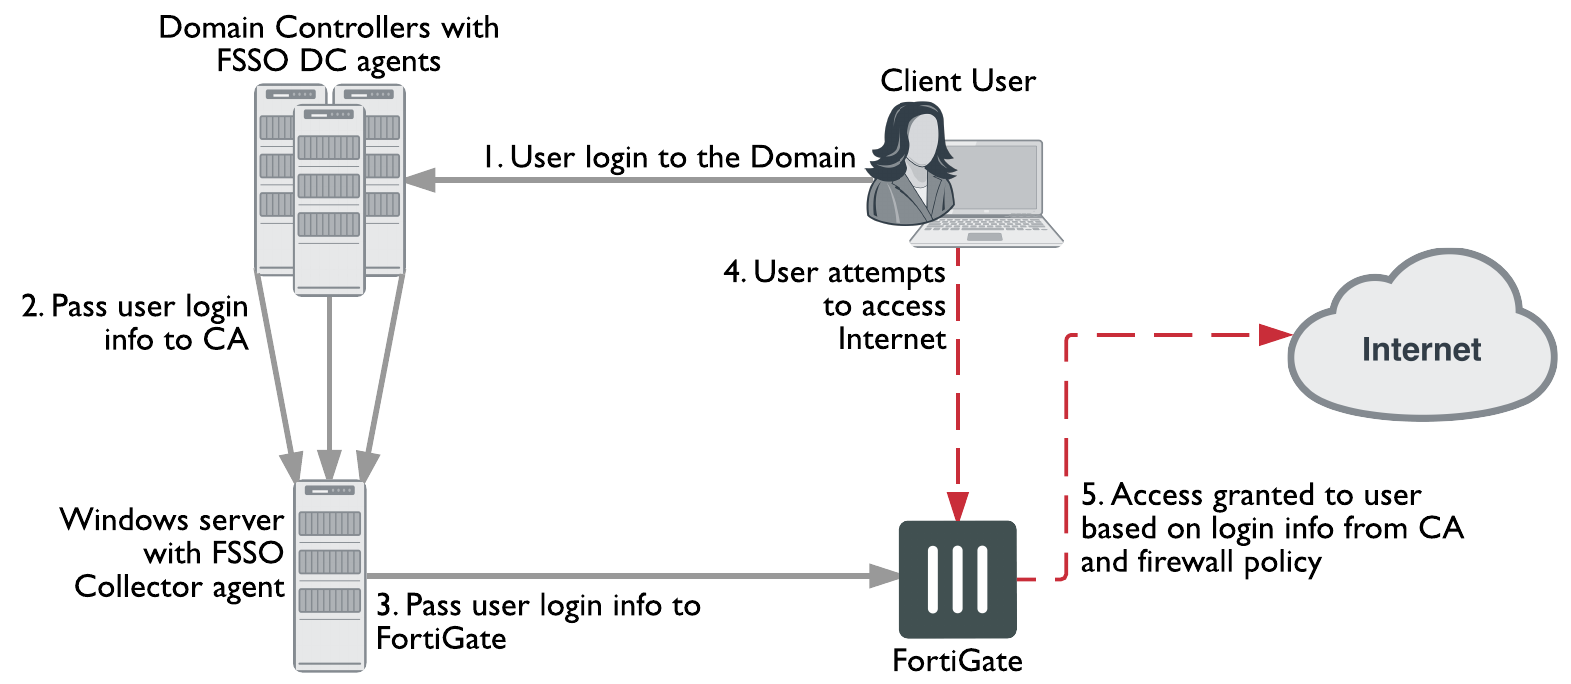
Fortinet Single Sign-On (FSSO), through agents installed on the network, monitors user logons and passes that information to the FortiGate unit. When a user logs on at a workstation in a monitored domain, FSSO:
- detects the logon event and records the workstation name, domain, and user,
- resolves the workstation name to an IP address,
- determines which user groups the user belongs to,
- sends the user logon information, including IP address and groups list, to the FortiGate unit,
- and creates one or more log entries on the FortiGate unit for this logon event as appropriate.
When the user tries to access network resources, the FortiGate unit selects the appropriate security policy for the destination. If the user belongs to one of the permitted user groups associated with that policy, the connection is allowed. Otherwise the connection is denied.
|
|
FSSO can also provide NTLM authentication service for requests coming from FortiGate. SSO is very convenient for users, but may not be supported across all platforms. NTLM is not as convenient, but it enjoys wider support. See FSSO NTLM authentication support. |
Introduction to FSSO agents
There are several different FSSO agents that can be used in an FSSO implementation:
- Domain Controller (DC) agent
- eDirectory agent
- Citrix/Terminal Server (TS) agent
- Collector agent
Consult the latest FortiOS and FSSO Release Notes for operating system compatibility information.
Domain Controller (DC) agent
The Domain Controller (DC) agent must be installed on every domain controller if you will use DC Agent mode, but is not required if you use Polling mode. See FSSO for Windows AD.
eDirectory agent
The eDirectory agent is installed on a Novell network to monitor user logons and send the required information to the FortiGate unit. It functions much like the Collector agent on a Windows AD domain controller. The agent can obtain information from the Novell eDirectory using either the Novell API or LDAP.
Terminal Server (TS) agent
Terminal Server (TS) agent can be installed on Citrix, VMware Horizon 7.4, or Windows Terminal Server to monitor user logons in real time. It functions much like the DC Agent on a Windows AD domain controller.
Collector agent
This agent is installed as a service on a server in the Windows AD network to monitor user logons and send the required information to the FortiGate unit. The Collector agent can collect information from
- Domain Controller agent (Windows AD)
- TS agent (Citrix or VMware Horizon Terminal Server)
In a Windows AD network, the Collector agent can optionally obtain logon information by polling the AD domain controllers. In this case, DC agents are not needed.
The Collector can obtain user group information from the DC agent or optionally, a FortiGate unit can obtain group information directly from AD using Lightweight Directory Access Protocol (LDAP).
On a Windows AD network, the FSSO software can also serve NT LAN Manager (NTLM) requests coming from client browsers (forwarded by the FortiGate unit) with only one or more Collector agents installed. See FSSO NTLM authentication support.
The CA is responsible for DNS lookups, group verification, workstation checks, and as mentioned FortiGate updates of logon records. The FSSO Collector Agent sends Domain Local Security Group and Global Security Group information to FortiGate units. The CA communicates with the FortiGate over TCP port 8000 and it listens on UDP port 8002 for updates from the DC agents.
The FortiGate unit can have up to five CAs configured for redundancy. If the first on the list is unreachable, the next is attempted, and so on down the list until one is contacted. See Configuring FSSO on FortiGate units.
All DC agents must point to the correct Collector agent port number and IP address on domains with multiple DCs.
|
|
A FortiAuthenticator unit can act much like a Collector agent, collecting Windows AD user logon information and sending it to the FortiGate unit. It is particularly useful in large installations with several FortiGate units. For more information, see the FortiAuthenticator Administration Guide. |
FSSO for Microsoft Exchange Server
As of FortiOS 5.4, FSSO supports monitoring Microsoft Exchange Server. This is useful for situations when the user accesses the domain account to view their email, even when the client device might not be in the domain.
Support for the Exchange server is configured on the Back-end FSSO collector agent. For more information on the collector agent, see Collector agent installation:
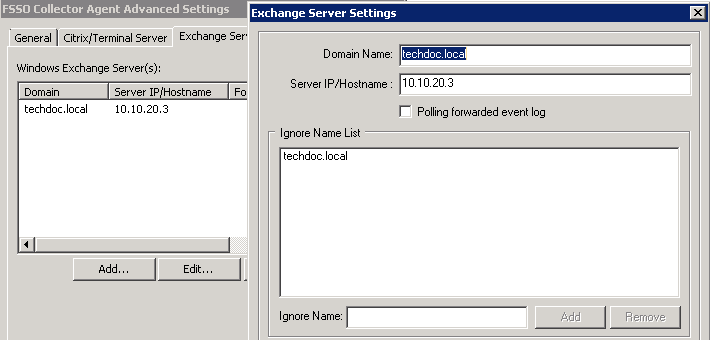
- On the FSSO collector agent, go to Advanced Settings > Exchange Server.
- Select Add and enter the following information and select OK:
| Domain Name | Enter your domain name. |
| Server IP/Hostname | Enter the IP address or the hostname of your exchange server. |
| Polling forwarded event log | This option for scenarios when you do not want that CA polls the Exchange Server logs directly. In this case you need to configure event log forwarding on the Exchange server. Exchange event logs can be forwarded to any member server. If you enable this, instead of the IP of the Exchange server configured in the previous step, you must then configure the IP of this member server. CA will then contact the member server. |
| Ignore Name |
Because CA will also check Windows log files for logon events and when a user authenticates to Exchange Server there is also a logon event in Windows event log, which CA will read and this will overwrite the Exchange Server logon event (ESEventLog) on CA. So it is recommended to set the ignore list to the domain the user belongs to. To do so, enter the domain name in the Ignore Name field and select Add. |
FSSO for Windows AD
FSSO for Windows AD requires at least one Collector agent. Domain Controller agents may also be required depending on the Collector agent working mode. There are two working modes to monitor user logon activity: DC Agent mode or Polling mode.
Collector agent DC Agent mode versus Polling mode
| DC Agent mode | Polling Mode | |
|---|---|---|
| Installation | Complex — Multiple installations: one agent per DC plus Collector agent, requires a reboot | Easy — Only Collector agent installation, no reboot required |
| Resources | Shares resources with DC system | Has own resources |
| Network load | Each DC agent requires minimum 64kpbs bandwidth, adding to network load | Increase polling period during busy period to reduce network load |
| Level of Confidence | Captures all logons | Potential to miss a login if polling period is too great |
DC Agent mode
DC Agent mode is the standard mode for FSSO. In DC Agent mode, a Fortinet authentication agent is installed on each domain controller. These DC agents monitor user logon events and pass the information to the Collector agent, which stores the information and sends it to the FortiGate unit.
The DC agent installed on the domain controllers is not a service like the Collector agent — it is a DLL file called dcagent.dll and is installed in the Windows\system32 directory. It must be installed on all domain controllers of the domains that are being monitored.
FSSO in DC agent mode
DC Agent mode provides reliable user logon information, however you must install a DC agent on every domain controller. A reboot is needed after the agent is installed. Each installation requires some maintenance as well. For these reasons it may not be possible to use the DC Agent mode.
Each domain controller connection needs a minimum guaranteed 64kpbs bandwidth to ensure proper FSSO functionality. You can optionally configure traffic shapers on the FortiGate unit to ensure this minimum bandwidth is guaranteed for the domain controller connections.
Polling mode
In Polling mode there are three options — NetAPI polling, Event log polling, and Event log using WMI. All share the advantages of being transparent and agentless. There are no DC Agents installed, so the Collector agent polls the domain controllers directly.
NetAPI polling is used to retrieve user logon information using legacy NetBIOS/SMB. This includes the logon event information for the Controller agent. NetAPI runs faster than Event log polling but it may miss some user logon events under heavy system load. It requires a query round trip time of less than 10 seconds.
Event log polling retrieves logon information directly from the Windows security eventlog using RPC/DCOM/SMB over TCP/445. Every few seconds, it polls each domain controller for user logon information and forwards it to the FortiGate. It might run a bit slower, but will not miss events, even when the installation site has many users that require authentication. It does not have the 10 second limit on NetAPI polling. Event log polling requires fast network links. Event log polling is required if there are Mac OS users logging into Windows AD.
Event log polling can also use WMI queries, which are based on Distributed Component Object Model (DCOM), using TCP/135 RPC endpoint mapper to randomly select TCP ports between 49152 and 65535 for communications. The Collector Agent (CA) is a WMI client, and sends WMI queries for user logon events to the Domain Controller (DC), which is a WMI server in this case. The main advantage in this mode is that the CA does not need to search security event logs on the DC for user logon events, instead, the DC returns all requested logon events through WMI. This also reduces network load between the CA and DC.
FSSO in polling mode

A major benefit of Polling mode is that no FSSO DC Agents are required. If it is not possible to install FSSO DC Agents on your domain controllers, this is the alternate configuration available to you. Polling mode results in a less complex install, and reduces ongoing maintenance.
The minimum permissions required in Polling mode are:
-
Read privileges for the event log.
-
Permission to call NetAPI.
-
DCOM access rights for the CA process.
Collector agent AD access mode - standard versus advanced
The Collector agent has two ways to access Active Directory user information. The main difference between standard and advanced mode is the naming convention used when referring to username information.
Standard mode uses regular Windows convention: Domain\Username. Advanced mode uses LDAP convention: CN=User, OU=Name, DC=Domain.
If there is no special requirement to use LDAP— best practices suggest you set up FSSO in standard mode. This mode is easier to set up, and is usually easier to maintain and troubleshoot.
Standard and advanced modes have the same level of functionality with the following exceptions:
- Users have to create Group filters on the Collector agent. This differs from advanced mode where Group filters are configured from the FortiGate unit. Fortinet strongly encourages users to create filters from CA.
- Advanced mode supports nested or inherited groups. This means that users may be a member of multiple monitored groups. Standard mode does not support nested groups so a user must be a direct member of the group being monitored.
FSSO for Citrix
Citrix users can enjoy a similar Single Sign-On experience as Windows AD users. The FSSO TS agent installed on each Citrix server provides user logon information to the FSSO Collector agent on the network. The FortiGate unit uses this information to authenticate the user in security policies.
Citrix users do not have unique IP addresses. When a Citrix user logs on, the TS agent assigns that user a range of ports. By default each user has a range of 200 ports.
Citrix SSO topology

- A user opens a terminal session over ICAP and authenticates with Active Directory.
- The Fortinet TS Agent on the Citrix servers captures the log in and sends it to the FSSO agent.
- The FSSO agent forwards the log in information to the FortiGate.
- The user starts a native client application on the Citrix server (such as SAP Client, RDP, or SSH) and is seamlessly authenticated against the AD user group.
- The FortiGate allows the client connection if the user group is allowed by the Identity-based security policy.
FSSO for Novell eDirectory
FSSO in a Novell eDirectory environment works similar to the FSSO Polling mode in the Windows AD environment. The eDirectory agent polls the eDirectory servers for user logon information and forwards the information to the FortiGate unit. There is no need for the Collector agent.
When a user logs on at a workstation, FSSO:
- detects the logon event by polling the eDirectory server and records the IP address and user ID,
- looks up in the eDirectory which groups this user belongs to,
- sends the IP address and user groups information to the FortiGate unit.
When the user tries to access network resources, the FortiGate unit selects the appropriate security policy for the destination. If the user belongs to one of the permitted user groups, the connection is allowed.
FSSO is supported on the Novell E-Directory 8.8 operating system.
For a Novell network, there is only one FSSO component to install — the eDirectory agent. In some cases, you also need to install the Novell Client.
FSSO security issues
When the different components of FSSO are communicating there are some inherent security features.
FSSO installation requires an account with network admin privileges. The security inherent in these types of accounts helps ensure access to FSSO configurations is not tampered with.
User passwords are never sent between FSSO components. The information that is sent is information to identify a user including the username, group or groups, and IP address.
NTLM uses base-64 encoded packets, and uses a unique randomly generated challenge nonce to avoid sending user information and password between the client and the server.
FSSO NTLM authentication support
In a Windows AD network, FSSO can also provide NTLM authentication service to the FortiGate unit. When the user makes a request that requires authentication, the FortiGate unit initiates NTLM negotiation with the client browser. The FortiGate unit does not process the NTLM packets itself. Instead, it forwards all the NTLM packets to the FSSO service to process.
NTLM has the benefit of not requiring an FSSO agent, but it is not transparent to users, and the user’s web browser must support NTLM.
The NTLM protocol protects the user’s password by not sending it over the network. Instead, the server sends the client a random number that the client must encrypt with the hash value of the user's password. The server compares the result of the client's encryption with the result of its own encryption. The two will match only if both parties used the same password.
NTLM authentication

If the NTLM authentication with the Windows AD network is successful, and the user belongs to one of the groups permitted in the applicable security policy, the FortiGate unit allows the connection but will require authentication again in the future when the current authentication expires.
Fortinet has tested NTLM authentication with Internet Explorer and Firefox browsers.
NTLM in a multiple domain environment
In a multiple domain environment for NTLM, the important factor is that there is a trust relation between the domains. In a forest, this relation is automatically created. So you can install FSSO agent on one of the domain controllers without worry.
But in case of multiple domains that are not in a forest, you need to create a trust relation between the domains. If you do not want to have a trust relation between your multiple domains, you need to use FSAE 4.0 MR1 and the DC agent needs to be installed once on each domain. Then you can use security policies to configure server access.
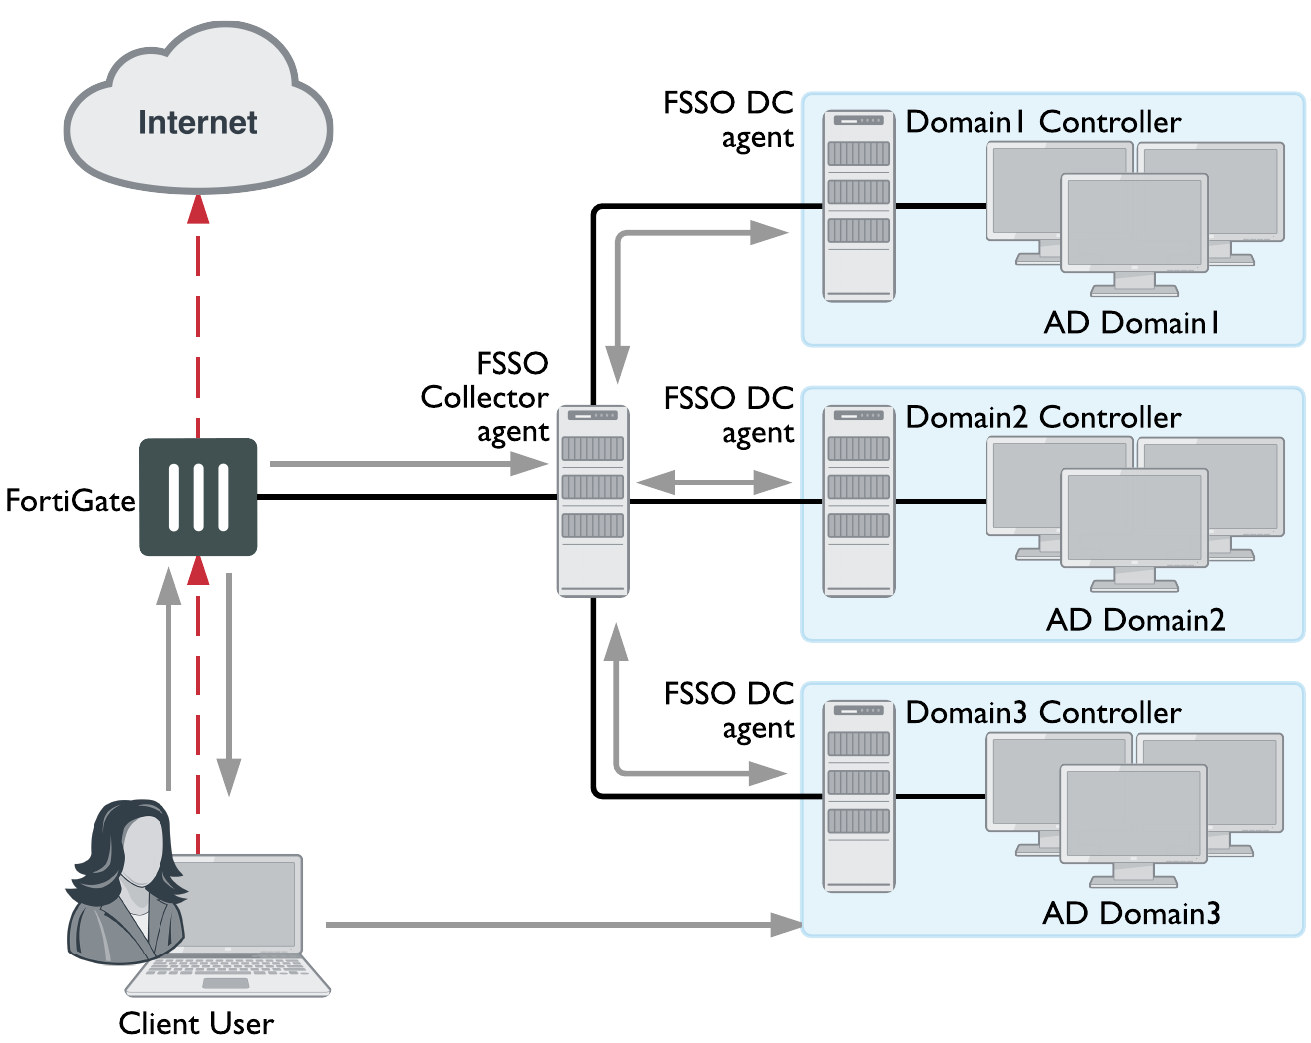
In the figure below, three domains are shown connected to the FSSO Collector agent server. The Client logs on to their local Domain Controller, which then sends the user logon event information to the Collector Agent. When the Client attempts to access the Internet, the FortiGate unit contacts the Collector Agent for the logon information, sees the Client is authenticated, and allows access to the Internet. There are multiple domains each with a domain controller agent (DCagent) that sends logon information to the Collector agent. If the multiple domains have a trust relationship, only one DCagent is required instead of one per domain.
FSSO NTLM with multiple domains not in a forest
Understanding the NTLM authentication process
- The user attempts to connect to an external (internet) HTTP resource. The client application (browser) on the user’s computer issues an unauthenticated request through the FortiGate unit.
- The FortiGate is aware that this client has not authenticated previously, so responds with a
401 Unauthenticatedstatus code, and tells the client which authentication method to reply with in the header:Proxy‑Authenticated: NTLM. Then the initial session is dismantled. - The client application connects again to the FortiGate, and issues a GET-request, with a
Proxy‑Authorization: NTLM <negotiate string>header.<negotiate‑string>is a base64-encoded NTLM Type 1 negotiation packet. - The FortiGate unit replies with a
401 “proxy auth required”status code, and aProxy‑Authenticate: NTLM <challenge string>(a base 64-encoded NTLM Type 2 challenge packet). In this packet is the challenge nonce, a random number chosen for this negotiation that is used once and prevents replay attacks. - The client sends a new GET-request with a header:
Proxy‑Authenticate: NTLM <authenticate string>, where<authenticate string>is a NTLM Type 3 Authentication packet that contains:- username and domain
- the challenge nonce encoded with the client password (it may contain the challenge nonce twice using different algorithms).
- If the negotiation is successful and the user belongs to one of the groups permitted in the security policy, the connection is allowed, Otherwise, the FortiGate unit denies the authentication by issuing a 401 return code and prompts for a username and password. Unless the TCP connection is broken, no further credentials are sent from the client to the proxy.
|
|
The TCP connection must be kept alive, as all subsequent authentication-related information is tied to the TCP connection. If it is dropped, the authentication process must start again from the beginning. |
|
|
If the authentication policy reaches the authentication timeout period, a new NTLM handshake occurs. |
Agentless NTLM support
Agentless NTLM authentication can be configured directly from the FortiGate to the Domain Controller via SMB protocol (no agent is required).
Note that this authentication method is only supported for proxy policies.
Syntax
Note that domain-controller is only available when method is set to ntlm and/or negotiate-ntlm is set to enable.
config authentication scheme
edit <name>
set method ntlm
set domain-controller <dc-setting>
next
end
config user domain-controller
edit <name>
set ip-address <dc-ip>
set port <port> - default = 445
set domain-name <dns-name>
set ldap-server <name>
next
end
Agent installation
After reading the appropriate sections of Introduction to agent-based FSSO to determine which FSSO agents you need, you can proceed to perform the necessary installations.
Ensure you have administrative rights on the servers where you are installing FSSO agents. It is best practice to install FSSO agents using the built-in local administrator account. Optionally, you can install FSSO without an admin account. See Installing FSSO without using an administrator account.
|
|
In Windows 2008 by default, you do not have administrative user rights if you are logged on as a user other than as the built-in administrator, even if you were added to the local Administrators group on the computer. |
The FSSO installer first installs the Collector agent. You can then continue with installation of the DC agent, or you can install it later by going to Start > Programs > Fortinet > Fortinet Single Sign On Agent > Install DC Agent. The installer will install a DC agent on the domain controllers of all of the trusted domains in your network.
|
|
Each domain controller connection needs a minimum guaranteed 64kpbs bandwidth to ensure proper FSSO functionality.Traffic shapers configured on the FortiGate can help guarantee these minimum bandwidths. |
Collector agent installation
To install FSSO, you must obtain the FSSO_Setup file from the Fortinet Support web site. This is available as either an executable (.exe) or a Microsoft Installer (.msi) file. Then you follow these two installation procedures on the server that will run the Collector agent. This can be any server or domain controller that is part of your network. These procedures also installs the DC Agent on all of the domain controllers in your network.
|
|
IPv6 source addresses can be configured for connecting to an FSSO agent. |
To install the Collector agent:
- Create an account with administrator privileges and a password that does not expire. See Microsoft Advanced Server documentation for help with this task.
To use a non-admin read only account, see Installing FSSO without using an administrator account. - Log on to the account that you created in Step 1.
- Double-click the
FSSOSetup.exefile. - Select Next.
- Read and accept the license agreement. Select Next.
- Optionally, you can change the installation location. Select Next.
- Optionally, change the User Name.
- By default, the agent is installed using the currently running account. If you want FSSO to use another existing admin account, change the User Name using the format DomainName \ UserName. For example if the account is
jsmithand the domain is example_corp you would enterexample_corp\jsmith. - In the Password field, enter the password for the account listed in the User Name field.
- Select Next.
- Enable as needed:
- Monitor user logon events and send the information to the FortiGate unit
- Serve NTLM authentication requests coming from FortiGate
By default, both methods are enabled. You can change these options after installation.
- Select the access method to use for Windows Directory:
- Select Standard to use Windows domain and username credentials.
- Select Advanced if you will set up LDAP access to Windows Directory.
See Collector agent AD access mode - standard versus advanced. - Select Next and then select Install.
If you want to use DC Agent mode, ensure that Launch DC Agent Install Wizard is selected. This will start DC agent installation immediately after you select Finish. - Select Finish.
The Fortinet SSO Collector Agent Setup Wizard starts.
|
|
If you see an error such as Service Fortinet Single Sign On agent (service_FSAE) failed to start, there are two possible reasons for this. Verify the user account you selected has sufficient privileges to run the FSSO service. Also verify the computer system you are attempting to install on is a supported operating system and version. |
DC agent installation
The FSSO_Setup file contains both the Collector agent and DC Agent installers, but the DC Agent installer is also available separately as either a .exe or .msi file named DCAgent_Setup.
To install the DC Agent
- If you have just installed the Collector agent, the FSSO - Install DC Agent wizard starts automatically. Otherwise, go to Start > Programs > Fortinet > Fortinet Single Sign On Agent > Install DC Agent.
- Select Next.
- Read and accept the license agreement. Select Next.
- Optionally, you can change the installation location. Select Next.
- Enter the Collector agent IP address.
- If the Collector agent computer has multiple network interfaces, ensure that the one that is listed is on your network. The listed Collector agent listening port is the default. Only change this if the port is already used by another service.
- Select Next.
- Select the domains to monitor and select Next.
- If any of your required domains are not listed, cancel the wizard and set up the proper trusted relationship with the domain controller. Then run the wizard again by going to Start > Programs > Fortinet > Fortinet Single Sign On Agent > Install DC Agent.
- Optionally, select users that you do not want monitored. These users will not be able to authenticate to FortiGate units using FSSO. You can also do this later. See Configuring the FSSO collector agent for Windows AD.
- Select Next.
- Optionally, clear the check boxes of domain controllers on which you do not want to install the DC Agent.
- Select the Working Mode as DC Agent Mode. While you can select Polling Mode here, in that situation you would not be installing a DC Agent. For more information, see DC Agent mode and Polling mode.
- Select Next.
- Select Yes when the wizard requests that you reboot the computer.
|
|
If you reinstall the FSSO software on this computer, your FSSO configuration is replaced with default settings. |
If you want to create a redundant configuration, repeat the Collector agent installation procedure on at least one other Windows AD server.
|
|
When you start to install a second Collector agent, cancel the Install Wizard dialog appears the second time. From the configuration GUI, the monitored domain controller list will show your domain controllers un-selected. Select the ones you wish to monitor with this Collector agent, and select Apply. |
Before you can use FSSO, you need to configure it on both Windows AD and on the FortiGate units. Configuring FSSO on FortiGate units will help you accomplish these two tasks.
Installing FSSO without using an administrator account
Normally when installing services in Windows, it is best to use the Domain Admin account, as stated earlier. This ensures installation goes smoothly and uninterrupted, and when using the FSSO agent there will be no permissions issues. However, it is possible to install FSSO with a non-admin account in Windows 2003 or 2008 AD.
|
|
The following instructions for Windows 2003 are specific to the event log polling mode only. Do not use this procedure with other FSSO configurations. |
Windows 2003
There are two methods in Windows 2003 AD for installing FSSO without an admin account — add the non-admin user to the security log list, and use a non-admin account with read-only permissions. A problem with the first method is that full rights (read, write, and clear) are provided to the event log. This can be a problem when audits require limited or no write access to logs. In those situations, the non-admin account with read-only permissions is the solution.
To add the non-admin user account to the Windows 2003 security log list :
- Go to Default Domain Controller Security Settings > Security Settings > User Rights Assignment > Manage auditing and security log.
- Add the user account to this list.
- Repeat these steps on every domain controller in Windows 2003 AD.
A reboot is required.
To use a non-admin account with read-only permissions to install FSSO on Windows 2003:
The following procedure provides the user account specified with read only access to the Windows 2003 AD Domain Controller Security Event Log which allows FSSO to function.
- Find out the SID of the account you intend to use.
Tools for this can be downloaded for free from http://technet.microsoft.com/en-us/sysinternals/bb897417. - Then create the permission string. For example:
(A;;0x1;;;S-1-5-21-4136056096-764329382-1249792191-1107)Ameans Allow,0x1means Read, andS-1-5-21-4136056096-764329382-1249792191-1107is the SID.
- Then, append it to the registry key:
HKEY_LOCAL_MACHINE\System\CurrentControlSet\Services\Eventlog\Security\CustomSD - Repeat these steps on every domain controller in Windows 2003 AD.
A reboot is required.
Windows 2008
In Windows 2008 AD, if you do not want to use the Domain Admin account then the user account that starts the FSSO agent needs to be added to the Event Log Readers group.
When the user is added to the Event Log Readers group, that user is now allowed to have read only access to the event log and this is the minimal rights required for FSSO to work.
Citrix TS agent installation
To install the Citrix TS agent, you must obtain the TSAgent_Setup file from the Fortinet Support web site. Perform the following installation procedure on the Citrix server.
To install the FSSO TS agent:
- On the Citrix server, create an account with administrator privileges and a password that does not expire. See Citrix documentation for more information.
- Log on to the account that you created in step 1.
- Double-click the TSAgent_Setup installation file.
The Fortinet SSO Terminal Server Agent Setup Wizard starts. - Select Next.
- Read and accept the license agreement. Select Next.
- Optionally, you can change the installation location. Select Next.
- Verify that This Host IP Address is correct.
- In the FSSO Collector Agent List, enter the IP address(es) of your Collector Agents.
- Select Next and then select Install.
The TS agent is installed. - Select Finish.
Novell eDirectory agent installation
To install the eDirectory agent, you must obtain the FSSO_Setup_eDirectory file from the Fortinet Support web site. Perform the following installation procedure on the computer that will run the eDirectory agent. This can be any server or domain controller that is part of your network. You will need to provide some setup information.
To install the FSSO eDirectory agent:
- Create an account with administrator privileges and a password that does not expire. See Novell documentation for more information.
- Log on to the account that you created in step 1.
- Double-click the FSSO_Setup_edirectory file to start the installation wizard.
- Select Next.
- Read and accept the license agreement. Select Next.
- Optionally, change the installation location. Select Next.
- Enter:
- Select Next.
- Select Install. When the installation completes, select Finish.
| eDirectory Server | |
|---|---|
| Server Address | Enter the IP address of the eDirectory server. |
| Use secure connection (SSL) | Select to connect to the eDirectory server using SSL security. |
| Search Base DN | Enter the base Distinguished Name for the user search. |
| eDirectory Authentication | |
|---|---|
| Username | Enter a username that has access to the eDirectory, using LDAP format. |
| User password | Enter the password. |
Updating FSSO agents on Windows AD
After FSSO is installed on your network, you may want to upgrade to a newer version. The following procedure helps ensure you have a trouble free upgrade. How you update FSSO depends on if you are using polling mode or DCAgent mode.
For polling mode, since there are no DC agents you only need to upgrade the Collector. However in DCAgent mode, each DC Agent must be updated as well.
To update FSSO in DC Agent mode:
- Go to the system32 directory on all DC's and rename the
dcagent.dllfile todcagent.dll.old.
This ensures the when the upgrade is pushed to the DC it does not overwrite the old file. If there are any problems this makes it easy to revert to the old version. - Run the FSSO setup .exe file to update the collector. When this is completed, ignore any reboot message.
- Go to Programs > Fortinet > Fortinet Single Sign On Agent > Install DC Agent and push the DC agent out to all servers. All DC's will now need to be rebooted so that the new DLL file is loaded.
- After the reboot, go to all DC’s and delete the
dcagent.dll.oldfiles.
Configuring the FSSO collector agent for Windows AD
On the FortiGate unit, security policies control access to network resources based on user groups. With Fortinet Single Sign On, this is also true but each FortiGate user group is associated with one or more Windows AD user groups. This is how Windows AD user groups get authenticated in the FortiGate security policy.
Fortinet Single Sign On sends information about Windows user logons to FortiGate units. If there are many users on your Windows AD domains, the large amount of information might affect the performance of the FortiGate units.
To avoid this problem, you can configure the Fortinet Single Sign On Collector agent to send logon information only for groups named in the FortiGate unit’s security policies. See Configuring FortiGate group filters.
On each server with a Collector agent, you will be
- Configuring Windows AD server user groups
- Configuring collector agent settings, including the domain controllers to be monitored
- Selecting Domain Controllers and working mode for monitoring
- Configuring directory access settings
- Configuring the ignore user list
- Configuring FortiGate group filters for each FortiGate unit
- Configuring FSSO ports
- Viewing FSSO component status
Configuring Windows AD server user groups
FortiGate units control network resource access at the group level. All members of a user group have the same network access as defined in FortiGate security policies.
You can use existing Windows AD user groups for authentication to FortiGate units if you intend that all members within each group have the same network access privileges.
Otherwise, you need to create new user groups for this purpose.
|
|
If you change a user’s group membership, the change does not take effect until the user logs off and then logs on again. |
|
|
The FSSO Agent sends only Domain Local Security Group and Global Security Group information to FortiGate units. You cannot use Distribution group types for FortiGate access. No information is sent for empty groups. |
Refer to Microsoft documentation for information about creating and managing Windows AD user groups.
Configuring collector agent settings
You need to configure which domain controllers the Collector agent will use and which domains to monitor for user logons. You can also alter default settings and settings you made during installation. These tasks are accomplished by configuring the FSSO Collector Agent, and selecting either Apply to enable the changes.
At any time to refresh the FSSO Agent settings, select Apply.
To configure the collector agent:
- From the Start menu, select Programs > Fortinet > Fortinet Single Sign-On Agent > Configure Fortinet Single Sign-On Agent.
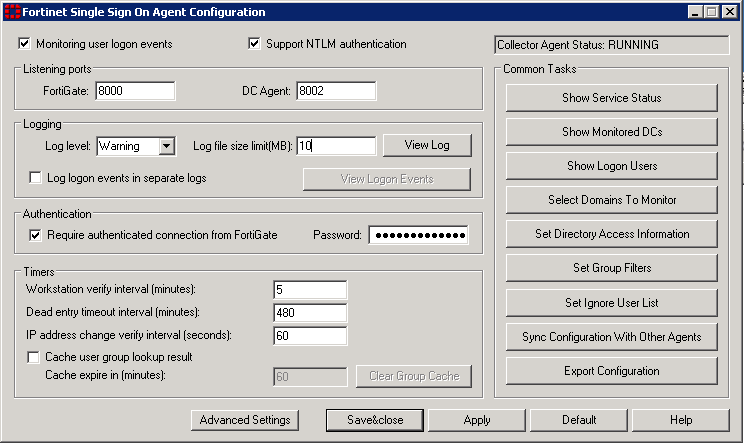
- Enter the following information.
- data received from DC agents
- user logon/logoff information
- workstation IP change information
- data sent to FortiGate units
- You can select Save & close now or leave the agent configuration window open to complete additional configuration in the following sections.
| Monitoring user logon events | By default, this is enabled to automatically authenticate users as they log on to the Windows domain. Disable the Monitor feature only if you have a large network where this feature will slow responses too much. | |
| Support NTLM authentication | By default, this is enabled to facilitate logon of users who are connected to a domain that does not have the FSSO DC Agent installed. Disable NTLM authentication only if your network does not support NTLM authentication for security or other reasons. | |
| Collector Agent Status | Shows RUNNING when Collector agent is active. | |
| Listening ports | You can change FSSO Collector Agent related port numbers if necessary. | |
| FortiGate | TCP port for FortiGate units. Default 8000. | |
| DC Agent | UDP port for DC Agents. Default 8002. | |
| Logging | ||
| Log level | Select the minimum severity level of logged messages. | |
| Log file size limit (MB) | Enter the maximum size for the log file in MB. Default is 10. | |
| View Log | View all Fortinet Single Sign On agent logs. | |
| Log logon events in separate logs |
Record user login-related information separately from other logs. The information in this log includes: |
|
| View Logon Events | If Log logon events in separate logs is enabled, you can view user login-related information. | |
| Authentication | ||
| Require authenticated connection from FortiGate | Select to require the FortiGate unit to authenticate before connecting to the Collector agent. | |
| Password | Enter the password that FortiGate units must use to authenticate. The maximum password length is 15 characters. The default password is “fortinetcanada”. It is highly recommended to modify this password. | |
| Timers | ||
| Workstation verify interval (minutes) |
Enter the interval in minutes at which the Fortinet Single Sign On Collector agent connects to client computers to determine whether the user is still logged on. The default is every 5 minutes. The interval may be increased if your network has too much traffic. Note: This verification process creates security log entries on the client computer. If ports 139 or 445 cannot be opened on your network, set the interval to 0 to prevent checking. See Configuring FSSO ports. |
|
| Dead entry timeout interval |
Enter the interval in minutes after which Fortinet Single Sign On Agent purges information for user logons that it cannot verify. The default is 480 minutes (8 hours). Dead entries usually occur because the computer is unreachable (such as in standby mode or disconnected) but the user has not logged off. A common reason for this is when users forget to logoff before leaving the office for the day. You can also prevent dead entry checking by setting the interval to 0. |
|
| IP address change verify interval |
Fortinet Single Sign On Agent periodically checks the IP addresses of logged-in users and updates the FortiGate unit when user IP addresses change. IP address verification prevents users from being locked out if they change IP addresses, as may happen with DHCP assigned addresses. Enter the verification interval in seconds. The default is 60 seconds. You can enter 0 to prevent IP address checking if you use static IP addresses. This does not apply to users authenticated through NTLM. |
|
| Cache user group lookup result |
Enable caching. Caching can reduce group lookups and increase performance. |
|
| Cache expire in (minutes) |
Fortinet Single Sign On Agent caches group information for logged-in users. Enter the duration in minutes after which the cache entry expires. If you enter 0, the cache never expires. A long cache expire interval may result in more stale user group information. This can be an issue when a user’s group information is changed. |
|
| Clear Group Cache |
Clear group information of logged-in users. This affects all logged-in users, and may force them to re-logon. |
|
|
|
To view the version and build number information for your FSSO Collector Agent configuration, selecting the Fortinet icon in the upper left corner of the Collector agent Configuration screen and select About Fortinet Single Sign On Agent configuration. |
Selecting Domain Controllers and working mode for monitoring
You can change which DC agents are monitored or change the working mode for logon event monitoring between DC agent mode and polling mode.
When polling mode is selected, it will poll port 445 of the domain controller every few seconds to see who is logged on.
- From the Start menu select Programs > Fortinet Fortinet Single Sign-On Agent > Configure Fortinet Single Sign On Agent.
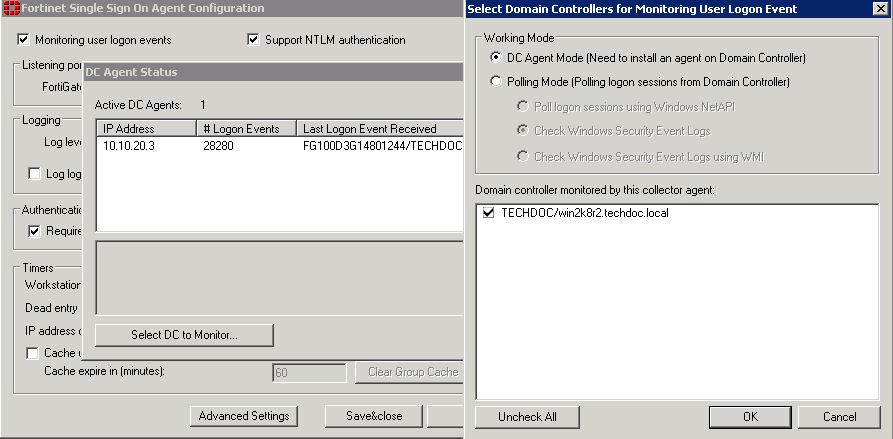
- In the Common Tasks section, select Show Monitored DCs.
- Select Select DC to Monitor.
- Choose the Working Mode:
- DC Agent mode — a Domain Controller agent monitors user logon events and passes the information to the Collector agent. This provides reliable user logon information, however you must install a DC agent on every domain controller in the domain.
- Polling mode — the Collector agent polls each domain controller for user logon information. Under heavy system load this might provide information less reliably. However installing a DC agent on each domain controller is not required in this mode.
- You also need to choose the method used to retrieve logon information:
- Poll logon sessions using Windows NetAPI
- Check Windows Security Event Logs
- Check Windows Security Event Logs using WMI
- Select OK.
- Select Close.
- Select Save & Close.
For more information about these options, see Polling mode.
Configuring directory access settings
The FSSO Collector Agent can access Windows Active Directory in one of two modes:
- Standard — the FSSO Collector Agent receives group information from the Collector agent in the domain\user format. This option is available on FortiOS 3.0 and later.
- Advanced — the FSSO Collector Agent obtains user group information using LDAP. The benefit of this method is that it is possible to nest groups within groups. This is option is available on FortiOS 3.0 MR6 and later. The group information is in standard LDAP format.
|
|
If you change AD access mode, you must reconfigure your group filters to ensure that the group information is in the correct format. |
To configure Directory Access settings:
- From the Start menu select Programs > Fortinet > Fortinet Single Sign On Agent > Configure Fortinet Single Sign On Agent.
- In the Common Tasks section, select Set Directory Access Information.
The Set Directory Access Information dialog box opens. - From the AD access mode list, select either Standard or Advanced.
- If you selected Advanced AD access mode, select Advanced Setting and configure the following settings and then select OK:
| AD server address | Enter the address of your network’s global catalog server. |
| AD server port | The default AD server port is 3268. This must match your server port. |
| BaseDN | Enter the Base distinguished name for the global catalog. This is the point in the tree that will be considered the starting point by default-See following example. |
| Username | If the global catalog accepts your Fortinet Single Sign On Agent agent’s credentials, you can leave these fields blank. Otherwise, enter credentials for an account that can access the global catalog. |
| Password |
BaseDN example
An example DN for Training Fortinet Canada is ou=training, ou=canada, dc=fortinet, dc=com. If you set the BaseDN to ou=canada, dc=fortinet, dc=com then when Fortinet Single Sign On Agent is looking up user credentials, it will only search the Canada organizational unit, instead of all the possible countries in the company. Its a short cut to entering less information and faster searches.
However, you may have problems if you narrow the BaseDN too much when you have international employees from the company visiting different offices. If someone from Fortinet Japan is visiting the Canada office in the example above, their account credentials will not be matched because they are in ou=japan, dc=fortinet, dc=com instead of the BaseDN ou=canada, dc=fortinet, dc=com. The easy solution is to change the BaseDN to simply be dc=fortinet, dc=com. Then any search will check all the users in the company.
Configuring the ignore user list
The ignore user list excludes users that do not authenticate to any FortiGate unit, such as system accounts. The logons of these users are not reported to FortiGate units. This reduces the amount of required resources on the FortiGate unit especially when logging logon events to memory.
To configure the ignore user list:
- From the Start menu select Programs > Fortinet > Fortinet Single Sign On Agent > Configure Fortinet Single Sign On Agent.
- In the Common Tasks section, select Set ignore user list.
The current list of ignored users is displayed: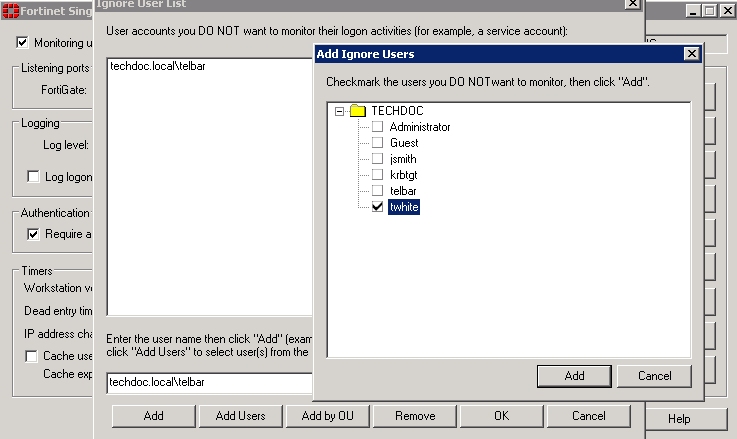
- Do any of the following:
- To remove a user from the list, select the the username and then select Remove. The user’s login is no longer ignored.
- To add users to be ignored,
- enter the username in the format domain\username and select Add or
- select Add Users, an Add Ignore Users window is displayed, checkmark the users you do not want to monitor, then select Add or
- select Add by OU, an Add Ignore Users by OU window is displayed, select an OU from the directory tree, then select Add. All users under the selected OU will be added to the ignore user list.
- Select OK.
Configuring FortiGate group filters
FortiGate group filters actively control which user logon information is sent to each FortiGate unit. You need to configure the group filter list so that each FortiGate unit receives the correct user logon information for the user groups that are named in its security policies. These group filters help limit the traffic sent to the FortiGate unit, and help limit the logon events logged.
The maximum number of Windows AD user groups allowed on a FortiGate depends on the model. Low end models support 256 Windows AD user groups, where mid and high end models support 1024 groups. This is per VDOM if VDOMs are enabled on the FortiGate unit.
You do not need to configure a group filter on the Collector agent if the FortiGate unit retrieves group information from Windows AD using LDAP. In that case, the Collector agent uses the list of groups you selected on the FortiGate unit as its group filter.
The filter list is initially empty. You need to configure filters for your FortiGate units using the Add function. At a minimum, create a default filter that applies to all FortiGate units without a defined filter.
|
|
If no filter is defined for a FortiGate unit and there is no default filter, the Collector agent sends all Windows AD group and user logon events to the FortiGate unit. While this normally is not a problem, limiting the amount of data sent to the FortiGate unit improves performance by reducing the amount of memory the unit uses to store the group list and resulting logs. |
To configure a FortiGate group filter:
- From the Start menu select Programs > Fortinet > Fortinet Single Sign On Agent > Configure Fortinet Single Sign On Agent.
- In the Common Tasks section, select Set Group Filters.
The FortiGate Filter List opens. It has the following columns: - Select Add to create a new filter. If you want to modify an existing filter, select it in the list and then select Edit.
- Enter the following information and then select OK.
| FortiGate SN | The serial number of the FortiGate unit to which this filter applies. |
| Description | An optional description of the role of this FortiGate unit. |
| Monitored Groups | The Windows AD user groups that are relevant to the security policies on this FortiGate unit. |
| Add | Create a new filter. |
| Edit | Modify the filter selected in the list. |
| Remove | Remove the filter selected in the list. |
| OK | Save the filter list and exit. |
| Cancel | Cancel changes and exit. |
| Default filter | Select to create the default filter. The default filter applies to any FortiGate unit that does not have a specific filter defined in the list. |
| FortiGate Serial Number | Enter the serial number of the FortiGate unit to which this filter applies. This field is not available if Default is selected. |
| Description | Enter a description of this FortiGate unit’s role in your network. For example, you could list the resources accessed through this unit. This field is not available if Default is selected. |
| Monitor the following groups | The Collector agent sends to the FortiGate unit the user logon information for the Windows AD user groups in this list. Edit this list using the Add, Advanced and Remove buttons. |
| Add |
In the preceding single-line field, enter the Windows AD domain name and user group name, and then select Add. If you don’t know the exact name, use the Advanced button instead. The format of the entry depends on the AD access mode (see Configuring directory access settings): Standard: Domain\Group Advanced: cn=group, ou=corp, dc=domain |
| Advanced | Select Advanced, select the user groups from the list, and then select Add. |
| Remove | Remove the user groups selected in the monitor list. |
Configuring FSSO ports
For FSSO to function properly a small number of TCP and UDP ports must be open through all firewalls on the network. There ports listed in this section assume the default FSSO ports are used.
TCP ports for FSSO agent with client computers
Windows AD records when users log on but not when they log off. For best performance, Fortinet Single Sign On Agent monitors when users log off. To do this, Fortinet Single Sign On Agent needs read-only access to each client computer’s registry over TCP port 139 or 445. Open at least one of these ports — ensure it is not blocked by firewalls.
If it is not feasible or acceptable to open TCP port 139 or 445, you can turn off Fortinet Single Sign On Agent logoff detection. To do this, set the Collector agent workstation verify interval to 0. The FSSO Collector Agent assumes that the logged on computer remains logged on for the duration of the Collector agent dead entry timeout interval — by default this is eight hours.
Configuring ports on the collector agent computer
On the computer where you install the Collector agent, you must make sure that the firewall does not block the listening ports for the FortiGate unit and the DC Agent. By default, these are TCP port 8000 and UDP port 8002. For more information about setting these ports, see Configuring FSSO advanced settings.
Viewing FSSO component status
It is important to know the status of both your Collector agents and DC agents.
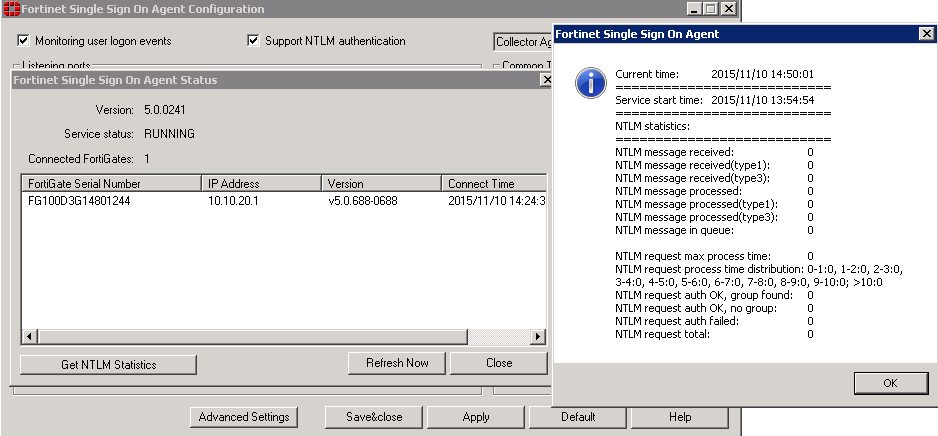
Viewing collector agent status
Use the Show Service Status to view your Collector agent information in the Status window. The Status window displays:
- the version of the software
- the status of the service
- the number of connected FortiGate units
- connected FortiGate information such as serial number, IP address, and connect time
To view Collector agent status:
- From the Start menu select Programs > Fortinet > Fortinet Single Sign On Agent > Configure Fortinet Single Sign On Agent.
- In the Common Tasks section, select Show Service Status.
The Fortinet Single Sign On Collector agent Status window opens. - Optionally select Get NTLM statistics in the Status window to display NTLM information such as number of messages received, processed, failed, in the queue.
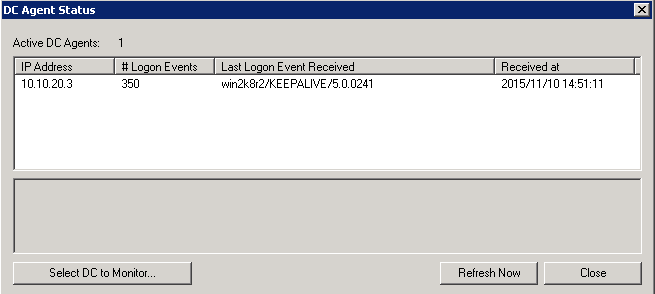
Viewing DC agent status
Use the Show Monitored DCs to view the status of DC agents.
To view domain controller agent status:
- From the Start menu select Programs > Fortinet > Fortinet Single Sign On Agent > Configure Fortinet Single Sign On Agent.
- In the Common Tasks section, select Show Monitored DCs.
For each DC Agent, the following information is displayed:
- IP address
- number of logon events received
- the last logon event
- when last logon was received
To change which DC agents are monitored or change the working mode for logon event monitoring, select Select DC to Monitor
Configuring the FSSO TS agent for Citrix
The FSSO TS agent works with the same FSSO Collector agent that is used for integration with Windows Active Directory. Install the Collector agent first. Follow the Collector agent installation procedure in Collector agent installation.
|
|
FortiOS 5.6 supports FSSO DC/TS Agent v.5.x. |
Configuration steps include:
- Install the Fortinet Citrix FSSO agent on the Citrix server.
- Install the Fortinet FSSO collector on a server on the network.
- Add the Citrix FSSO agent to the FortiGate single-sign-On configuration.
- Add Citrix FSSO groups and users to an FSSO user group.
- Add an FSSO identity-based security policy that includes the Citrix FSSO user groups.
To change the TS agent configuration, select from the Start menu Programs > Fortinet > Fortinet Single Sign-On Agent > TSAgent Config. In addition to the host and Collector agent IP addresses that you set during installation, you can adjust port allocations for Citrix users. When a Citrix user logs on, the TS agent assigns that user a range of ports. By default each user has a range of 200 ports.
|
|
Fortinet SSO Collector Agent IP and Port needs to point to the current configured listening port on the collector which is port 8002 by default. Though it may be configured to a custom port. |
Configuring the TS agent

Configuring FSSO with Novell networks
You need to configure the eDirectory agent for it to communicate with eDirectory servers. You may have provided some of this information during installation.
This section includes:
Configuring the eDirectory agent
You need to configure the eDirectory agent for it to communicate with eDirectory servers.
To configure the eDirectory agent:
- From the Start menu select Programs > Fortinet > eDirectory Agent > eDirectory Config Utility.
- The eDirectory Agent Configuration Utility dialog opens. Enter the following information and select OK.
| eDirectory Authentication | |
|---|---|
| Username | Enter a username that has access to the eDirectory, using LDAP format. |
| Password | Enter the password. |
| Listening port | Enter the TCP port on which Fortinet Single Sign On Agent listens for connections from FortiGate units. The default is 8000. You can change the port if necessary. |
| Refresh interval | Enter the interval in seconds between polls of the eDirectory server to check for new logons. The default is 30 seconds. |
| FortiGate Connection Authentication | |
|---|---|
| Require authenticated connection from FortiGate | Select to require the FortiGate unit to authenticate before connecting to the eDirectory Agent. |
| Password | Enter the password that FortiGate units must use to authenticate. The maximum password length is 15 characters. The default password is “FortinetCanada”. |
| User logon Info Search Method |
Select how the eDirectory agent accesses user logon information: LDAP or Native (Novell API). LDAP is the default.
If you select Native, you must also have the Novell Client installed on the PC. |
| Logging | |
|---|---|
| Log file size limit (MB) | Enter the maximum size for the log file in MB. |
| View Log | View the current log file. |
| Dump Session | List the currently logged-on users in the log file. This can be useful for troubleshooting. |
| Log level | Select Debug, Info, Warning or Error as the minimum severity level of message to log or select None to disable logging. |
| eDirectory Server List | |
|---|---|
| Add | Add an eDirectory server. See Adding an eDirectory server. |
| Delete | Delete the selected eDirectory server. |
| Edit | Modify the settings for the selected server. |
| Set Group Filters... | Select the user groups whose user logons will be reported to the FortiGate unit. This is used only if user groups are not selected on the FortiGate unit. |
Adding an eDirectory server
Once the eDirectory agent is configured, you add one or more eDirectory servers.
To add an eDirectory server:
- In the eDirectory Agent Configuration Utility dialog box (see the preceding procedure, Configuring the eDirectory agent), select Add.
- The eDirectory Setup dialog box opens. Enter the following information and select OK:
| eDirectory Server Address | Enter the IP address of the eDirectory server. | |
| Port | If the eDirectory server does not use the default port 389, clear the Default check box and enter the port number. | |
| Use default credential | Select to use the credentials specified in the eDirectory Configuration Utility. See Configuring the eDirectory agent. Otherwise, leave the check box clear and enter a username and Password below. | |
| User name | Enter a username that has access to the eDirectory, using LDAP format. | |
| User password | Enter the password. | |
| Use secure connection (SSL) | Select to connect to the eDirectory server using SSL security. | |
| Search Base DN | Enter the base Distinguished Name for the user search. | |
Configuring a group filter
The eDirectory agent sends user logon information to the FortiGate unit for all user groups unless you either configure an LDAP server entry for the eDirectory on the FortiGate unit and select the groups that you want to monitor or configure the group filter on the eDirectory agent.
If both the FortiGate LDAP configuration and the eDirectory agent group filter are present, the FortiGate user group selections are used.
To configure the group filter:
- From the Start menu select Programs > Fortinet > eDirectory Agent > eDirectory Config Utility.
- Select Set Group Filters.
- Do one of the following:
- Enter group names, then select Add.
- Select Advanced, select groups, and then select Add.
- Select OK.
Configuring FSSO advanced settings
Depending on your network topologies and requirement, you may need to configure advanced settings in the FSSO Colloctor agent.To do so, from the Start menu, select Programs > Fortinet > Fortinet Single Sign-On Agent > Configure Fortinet Single Sign-On Agent, then from the Common Tasks section, select Advanced Settings.
This section include :
General settings
In the General tab, enter the following information and select OK.
| Worker thread count | Number of threads started in the CA process. Default is 128 on CA version 5.0.0241. | |
| Maximum FortiGate connections | Number of FortiGates can be connected to the CA. Default is 64. | |
| Group look-up interval | The interval in seconds to lookup users/groups. If an AD group membership of currently logged on user, CA can detect this and update information on the FortiGate. Enter 0 for no checking. | |
| Windows security Event logs | Choose the event logs to poll. | |
| Event IDs to poll |
The default set (0) includes Kerberos authentication event logs : 672 for Windows server 2003, 4768 for Windows server 2008 and 2012 and NTLM authentication event logs : 680 for Windows server 2003, 4776 for Windows server 2008 and 2012. The extended set (1) includes Kerberos service ticket event logs : 673 for Windows server 2003, 4769 for Windows server 2008 and 2012. Service tickets are obtained whenever a user or computer accesses a server on the network. List the event ids separated by ";". For information about event IDs that can be manually added, see Windows Event IDs used by FSSO in WinSec polling mode. |
|
| Workstation Check | Optionally enable Use WMI to check user logoff for the collector agent to query whether users is still logged on. | |
| Workstation Name Resolution Advance Options | ||
| Alternative DNS server(s) | Collector Agent uses the DNS server configured on the machine it is running on by default. If CA should use another DNS server then one or more alternative DNS server can be configured here. | |
| Alternative workstation suffix(es) | If only host name is available CA uses the default domain suffix to build a FQDN for DNS queries. In case CA should use a different suffix, it can be configured as well. | |

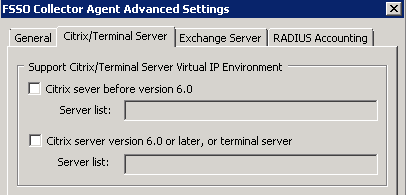
Citrix/Terminal server
In the Citrix/Terminal server tab, enter the following information and select OK.
| Support Citrix/Terminal Server Virtual IP Environment | When Citrix server are configured with VIP, CA can get user logon events from theses server. Citrix changed their interface and data format so version of Citrix server is important. | |
| Citrix server before version 6.0 |
Enable this option if you Citrix server version is before 6.0. | |
| Server list | Enter the list of servers separated by colon. | |
| Citrix server version 6.0 or later, or Terminal Server | Enable this option if you Citrix server version is 6.0 or later. | |
| Server list | Enter the list of servers separated by colon. | |
Exchange server
FSSO supports monitoring Microsoft Exchange server. This is useful for situation that the user use the domain account to access their email, but client device might or might not be in the domain. Support for Exchange server is configured on the Back-end FSSO collector agent under Advanced Settings > Exchange Server.
Select Add and enter the following information and select OK.
| Domain Name | Enter your domain name. |
| Server IP/Hostname | Enter the IP address or the hostname of your exchange server. |
| Polling forwarded event log | This option for scenarios when you do not
want that CA polls the Exchange Server logs directly. In this case you need to configure event log forwarding on the Exchange server.
Exchange event logs can be forwarded to any member server. If you enable this, instead of the IP of the Exchange server configured in the previous step, you must then configure the IP of this member server. CA will then contact the member server. |
| Ignore Name |
Because CA will also check Windows log files for logon events and when a user authenticates to Exchange Server there is also a logon event in Windows event log, which CA will read and this will overwrite the Exchange Server logon event (ES-EventLog) on CA. So it is recommended to set the ignore list to the domain the user belongs to. To do so, enter the domain name in the Ignore Name field and select Add. |
RADIUS accounting
A RADIUS server must be configured in your network to send accounting messages to the Collector Agent which can be configured to work with most RADIUS-based accounting systems. In most cases, you only need to do the following to your RADIUS accounting system:
- Add a user group name field to customer accounts on the RADIUS server so that the name is added to the RADIUS Start record sent by the accounting system to the Collector Agent. User group names do not need to be added for all users, only to the accounts of users who will use RADIUS Accounting feature on the Collector Agent.
- Configure your accounting system to send RADIUS Start records to the Collector Agent.
The Collocter Agent should be configured to listen for RADIUS accounting messages as following.
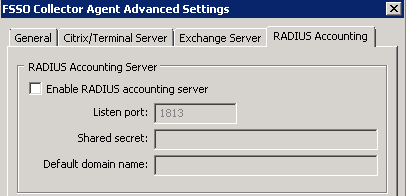
| RADIUS Accounting Server | ||
| Enable RADIUS Accounting Server |
Enable this option to allow the CA to gather information about authenticated users via a RADIUS server and send these information to the FortiGate unit for monitoring. | |
| Listen port | The port on which CA listens for RADIUS accounting messages. Default RADIUS accounting is 1813, but if RADIUS server sends accounting messages on different port, value can be configured here. | |
| Shared secret | Common secret between CA and RADIUS server. | |
| Default domain name |
This should be the AD domain for which this CA is configured. In this case user name in RADIUS accounting message can be in simple format like If this value is empty, then user name in RADIUS accounting message must be in one of these formats CA will use user name and domain to query group membership of user. Client IP address (Framed IP) should also be in RADIUS accounting message, so that CA can forward user name, IP address and groups to the FortiGate. |
|
Configuring FSSO on FortiGate units
To configure your FortiGate unit to operate with agent-based FSSO, you
- Configure any access to LDAP servers that might be necessary. Skip this step if you are using FSSO Standard mode. See Configuring LDAP server access.
- Specify the Collector agent or Novell eDirectory agent that will provide user logon information. See Specifying your collector agents or Novell eDirectory agents.
- Add Active Directory user groups to FortiGate user groups. See Creating FSSO user groups.
- Create security policies for FSSO-authenticated groups. See Creating security policies.
- Optionally, specify a guest security policy to allow guest access. See Enabling guest access through FSSO security policies.
Configuring LDAP server access
LDAP access is required if your network has a Novell eDirectory agent or a Collector agent using Windows Advanced AD access mode. If you are using FSSO Standard mode, go to Specifying your collector agents or Novell eDirectory agents.
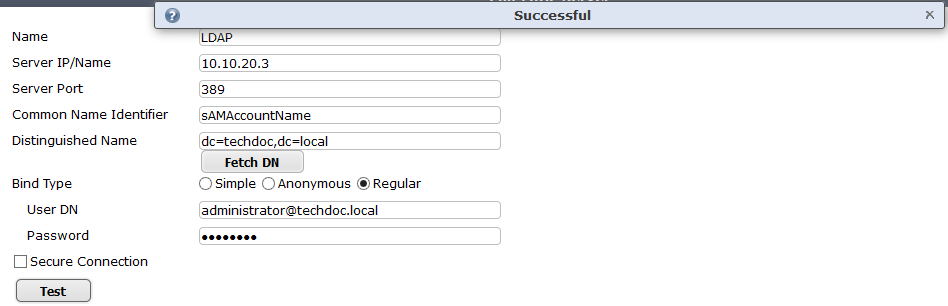
- Go to User & Device > LDAP Servers and select Create New.
- Enter the Server IP/Name and Server Port (default 389).
- In the Common Name Identifier field, enter sAMAccountName.The default common name identifier is
cn. This is correct for most LDAP servers. However some servers use other identifiers such asuid. - In the Distinguished Name field, enter your organization distinguished name. In this example, Distinguished Name is dc=techdoc,dc=local
- Select Fetch DN, this will fetch the Windows AD directory.
- Set Bind Type to Regular.
- In the User DN field, enter the administrative account name that you created for FSSO.
- Enter the administrative account password in the Password field.
- Optionally select Secure Connection.
- In the Protocol field, select LDAPS or STARTTLS.
- In the Certificate field, select the appropriate certificate for authentication.
- Select OK.
- Test your configuration by selecting the Test button. A successful message confirming the right settings appears.

For example, if the account is administrator, enter “administrator@techdoc.local”.
Note that you need to configure the Windows AD for secure connection accordingly.
To configure LDAP for FSSO - CLI example:
config user ldap
edit LDAP
set server 10.10.20.3
set cnid sAMAccountName
set dn dc=techdoc,dc=local
set type regular
set username administrator@techdoc.local
set password <your_password>
next
end
Specifying your collector agents or Novell eDirectory agents
You need to configure the FortiGate unit to access at least one Collector agent or Novell eDirectory agent. You can specify up to five servers on which you have installed a Collector or eDirectory agent. The FortiGate unit accesses these servers in the order that they appear in the list. If a server becomes unavailable, the next one in the list is tried.
To specify Collector agents - GUI:
- Go to Security Fabric > Fabric Connectors and select Create New.
- Under SSO/Identity, select Fortinet Single Sign-On Agent.
- Enter a Name for the Windows AD server. This name appears in the list of Windows AD servers when you create user groups.
- Enter the Server IP/Name and Password of the server where this agent is installed. Maximum name length is 63 characters. For the collector agent, passwords are only required only if you configured the agent to require authenticated access.
- Set Collector Agent AD access mode to Advanced, and select the LDAP Server you configured previously. See Configuring LDAP server access.
- Select the Users or Groups or Organizational Units tab to select the users, groups, OU that you want to monitor.
- Select OK.
If the TCP port used for FSSO is not the default, 8000, you can change the setting in the CLI using the config user fsso command. See Configuring collector agent settings.

To specify the FSSO collector agent - CLI:
In this example, the SSO server name is techdoc and the LDAP server is LDAP.
config user fsso
edit techdoc
set ldap-server LDAP
set password <your_password>
set server 10.10.20.3
set port 8000
end
Creating FSSO user groups
You cannot use Windows or Novell groups directly in FortiGate security policies. You must create FortiGate user groups of the FSSO type and add Windows or Novell groups to them.
To create a user group for FSSO authentication - GUI:
- Go to User & Device > User Groups.
- Select Create New.
The New User Group dialog box opens. - In the Name box, enter a name for the group, FSSO_Internet_users for example.
- In Type, select Fortinet Single Sign-On (FSSO).
- In Members, select the required FSSO groups.
- Select OK.
To create the FSSO_Internet-users user group - CLI :
config user group
edit FSSO_Internet_users
set group-type fsso-service
set member CN=Engineering,cn=users,dc=office,dc=example,dc=com CN=Sales,cn=users,dc=office,dc=example,dc=com
end
Creating security policies
Policies that require FSSO authentication are very similar to other security policies. Using identity-based policies, you can configure access that depends on the FSSO user group. This allows each FSSO user group to have its own level of access to its own group of services
In this situation, Example.com is a company that has its employees and authentication servers on an internal network. The FortiGate unit intercepts all traffic leaving the internal network and requires FSSO authentication to access network resources on the Internet. The following procedure configures the security policy for FSSO authentication. FSSO is installed and configured including the RADIUS server, FSSO Collector agent, and user groups on the FortiGate
For the following procedure, the internal interface is port1 and the external interface connected to the Internet is port2. There is an address group for the internal network called company_network. The FSSO user group is called fsso_group, and the FSSO RADIUS server is fsso_rad_server.
To configure an FSSO authentication security policy - GUI:
- Go to Policy & Objects > IPv4 Policy and select Create New.
- Enter the following information.
- Select OK.
- Ensure the FSSO authentication policy is higher in the policy list than more general policies for the same interfaces.
| Incoming Interface | port1 |
| Source Address | company_network |
| Source User(s) | fsso_group
|
| Outgoing Interface | port2 |
| Destination Address | all |
| Schedule | always |
| Service | HTTP, HTTPS, FTP, and Telnet |
| Action | ACCEPT |
| NAT | ON |
| UTM Security Profiles | ON for AntiVirus, IPS, Web Filter, and Email Filter, all using default profiles. |
| Log Allowed Traffic | ON. Select Security Events. |
To create a security policy for FSSO authentication - CLI:
config firewall policy
edit 0
set srcintf port1
set dstintf port2
set srcaddr company_network
set dstaddr all
set action accept
set groups fsso_group
set schedule always
set service HTTP HTTPS FTP TELNET
set nat enable
end
Here is an example of how this FSSO authentication policy is used. Example.com employee on the internal company network logs on to the internal network using their RADIUS username and password. When that user attempts to access the Internet, which requires FSSO authentication, the FortiGate authentication security policy intercepts the session, checks with the FSSO Collector agent to verify the user’s identity and credentials, and then if everything is verified the user is allowed access to the Internet.
Users belonging to multiple groups
Before FSSO 4.0 MR3, if a user belonged to multiple user groups, the first security policy to match any group that user belonged too was the only security policy applied. If that specific group did not have access to this protocol or resource where another group did, the user was still denied access. For example, test_user belongs to group1 and group2. There are two FSSO authentication policies — one matches group1 to authenticate FTP traffic and one matches group2 to authenticate email traffic. The group1 policy is at the top of the list of policies. If test_user wants to access an email server, the first policy encountered for a group test_user belongs to is the group1 policy which does not allow email access and test_user is denied access. This is despite the next policy allowing access to email. If the order was reversed in this case, the traffic would be matched and the user’s traffic would be allowed through the firewall. However if the policy order was reversed, FTP traffic would not be matched.
As of FSSO 4.0 MR3, if a user belongs to multiple groups multiple then attempts to match the group are attempted if applicable. Using the above example, when the attempt to match the group1 policy is made and fails, the next policy with a group that test_user is a member of is attempted. In this case, the next policy is matched and access is granted to the email server.
When configuring this example the only difference between the policies is the services that are listed and the FSSO user group name.
Authenticating through multiple groups allows administrators to assign groups for specific services, and users who are members of each group have access to those services. For example there could be an FTP group, an email group, and a Telnet group.
Enabling guest access through FSSO security policies
You can enable guest users to access FSSO security policies. Guests are users who are unknown to the Windows AD or Novell network and servers that do not logon to a Windows AD domain.
To enable guest access in your FSSO security policy, add an identity-based policy assigned to the built-in user group SSO_Guest_Users. Specify the services, schedule and protection profile that apply to guest users — typically guests receive reduced access to a reduced set of services.
IPv6 support for FSSO
FortiGate FSSO supports connecting to an FSSO agent over IPv6 and collecting and sending IPv6 details about endpoints. This is enforced in the same manner as IPv4 FSSO traffic.
Syntax
config user fsso
edit <fsso agent name>
set source-ip6 <IPv6 address for source>
end
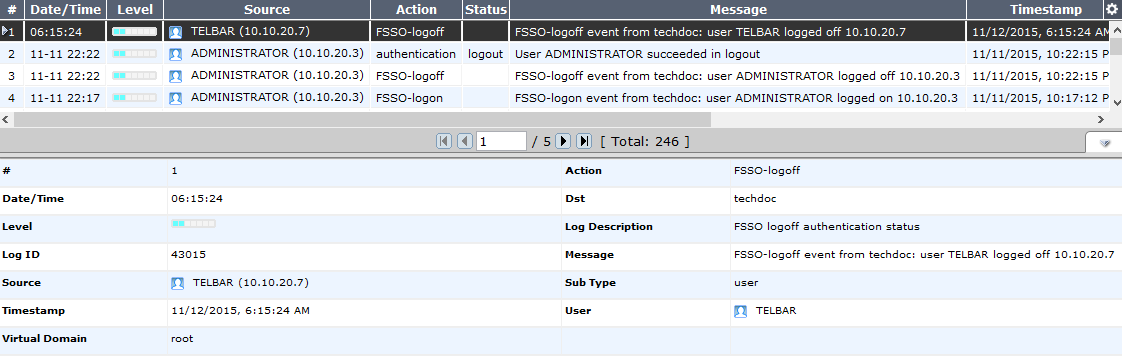
FortiOS FSSO log messages
There are two types of FortiOS log messages — firewall and event. FSSO-related log messages are generated from authentication events. These include user logon and log off events, and NTLM authentication events. These log messages are central to network accounting policies, and can also be useful in troubleshooting issues. For more information on firewall logging, see "Enabling security logging". For more information on logging, see the FortiOS Handbook Log and Reporting guide.
Enabling authentication event logging
For the FortiGate unit to log events, that specific type of event must be enabled under logging.
When VDOMs are enabled certain options may not be available, such as CPU and memory usage events. You can enable event logs only when you are logged on to a VDOM; you cannot enable event logs globally.
To ensure you log all the events need, set the minimum log level to Notification or Information. Firewall logging requires Notification as a minimum. The closer to Debug level, the more information will be logged. While this extra information is useful, you must
To enable event logging:
- Go to Log & Report > Log Settings.
- In Event Logging, select:
- Optionally you can enable any or all of the other logging event options.
- Select Apply.
| System activity event | All system-related events, such as ping server failure and gateway status. |
| User activity event | All administration events, such as user logins, resets, and configuration updates. |
Authentication log messages
List of FSSO related log messages
| Message ID | Severity | Description |
|---|---|---|
| 43008 | Notification | Authentication was successful |
| 43009 | Notification | Authentication session failed |
| 43010 | Warning | Authentication locked out |
| 43011 | Notification | Authentication timed out |
| 43012 | Notification | FSSO authentication was successful |
| 43013 | Notification | FSSO authentication failed |
| 43014 | Notification | FSSO user logged on |
| 43015 | Notification | FSSO user logged off |
| 43016 | Notification | NTLM authentication was successful |
| 43017 | Notification | NTLM authentication failed |
For more information on logging, see the FortiOS Handbook Log and Reporting guide.
Using filters
Logon events are detected by the FSSO CA by monitoring the Security Event logs. Additional logon event filters, such as ServiceName and ServiceID, have been implemented so as to avoid instances of conflicting security events, where existing FSSO logon user information could be overwritten and impact user connectivity.
The problem arises when a scenario such as the following occurs:
- User1 logs on to PC1 on 1.1.1.1, which is logged as a successful Kerberos logon event with an ID of 4769.
- The FortiGate creates an authenticated FSSO user log entry for User1/1.1.1.1.
- User1 then maps a network drive and uses credentials for User2 to logon to the same PC (PC1).
- The FortiGate sees this as a separate logon to PC1 by a new user, User2. As a result, the log entry is updated to User2/1.1.1.1.
- If User2 is a member of a different user group to User1 (i.e. has different access permissions), User1 could lose access to their network resources.
The new filter makes the CA ignore the event log created when User1 mapped a network drive, meaning that the original entry for User1 will not be changed.
|
|
While this is a useful feature, it is highly recommended to test filters in a redundant test environment. |
Testing FSSO
Once FSSO is configured, you can easily test to ensure your configuration is working as expected. For additional FSSO testing, see Troubleshooting FSSO.
- Logon to one of the stations on the FSSO domain, and access an Internet resource.
- Connect to the CLI of the FortiGate unit, and if possible log the output.
- Enter the following command:
- Check the output. If FSSO is functioning properly you will see something similar to the following:
- Check the FortiGate event log, for FSSO-auth action or other FSSO related events with FSSO information in the message field.
- To check server connectivity, run the following commands from the CLI:
diagnose debug authd fsso list
----FSSO logons----
IP: 10.10.20.3 User: ADMINISTRATOR Groups: CN=FORTIOS WRITERS,CN=USERS,DC=TECHDOC,DC=LOCAL Workstation: WIN2K8R2.TECHDOC.LOCAL MemberOf: FortiOS_Writers
IP: 10.10.20.7 User: TELBAR Groups: CN=FORTIOS WRITERS,CN=USERS,DC=TECHDOC,DC=LOCAL Workstation: TELBAR-PC7.TECHDOC.LOCAL
Total number of logons listed: 2, filtered: 0
----end of FSSO logons----
The exact information will vary based on your installation.
FGT# diagnose debug enable
FGT# diagnose debug authd fsso server-status
FGT# Server Name Connection Status Version
----------- ----------------- -------
techdoc connected FSSO 5.0.0241
Troubleshooting FSSO
When installing, configuring, and working with FSSO some problems are quite common. A selection of these problems follows including explanations and solutions.
Some common Windows AD problems include:
- General troubleshooting tips for FSSO
- Users on a particular computer (IP address) cannot access the network
- Guest users do not have access to network
- Can’t find the DC agent service
- User logon events not received by FSSO collector agent
- Mac OS X users can’t access external resources after waking from sleep mode
General troubleshooting tips for FSSO
The following tips are useful in many FSSO troubleshooting situations.
- Ensure all firewalls are allowing the FSSO required ports through.
FSSO has a number of required ports that must be allowed through all firewalls or connections will fail. These include: ports 139, 389 (LDAP), 445, 636 (LDAP) 8000, and 8002. - Ensure the Collector agent has at least 64kbps bandwidth to the FortiGate unit.
If not the Collector agent does not have this amount of bandwidth, information FSSO information may not reach the FortiGate unit resulting in outages. The best solution is to configure traffic shaping between the FortiGate unit and the Collector agent to ensure that minimum bandwidth is always available.
Users on a particular computer (IP address) cannot access the network
Windows AD Domain Controller agent gets the username and workstation where the logon attempt is coming from. If there are two computers with the same IP address and the same user trying to logon, it is possible for the authentication system to become confused and believe that the user on computer_1 is actually trying to access computer_2.
Windows AD does not track when a user logs out. It is possible that a user logs out on one computer, and immediate logs onto a second computer while the system still believes the user is logged on the original computer. While this is allowed, information that is intended for the session on one computer may mistakenly end up going to the other computer instead. The result would look similar to a hijacked session.
Solutions
- Ensure each computer has separate IP addresses.
- Encourage users to logout on one machine before logging onto another machine.
- If multiple users have the same username, change the usernames to be unique.
- Shorten timeout timer to flush inactive sessions after a shorter time.
Guest users do not have access to network
A group of guest users was created, but they don’t have access.
Solution
The group of the guest users was not included in a policy, so they do not fall under the guest account. To give them access, associate their group with a security policy.
Additionally, there is a default group called SSO_Guest_Users. Ensure that group is part of an identity-based security policy to allow traffic.
Can’t find the DC agent service
The DCagent service can’t be found in the list of regular windows services. This is because it has no associated Windows service.
Instead DCagent is really dcagent.dll and is located in the Windows\system32 folder. This DLL file is loaded when windows boots up and it intercepts all logon events processed by the domain controller to send these events to the Collector agent (CA).
Solution
To verify that the DCagent is installed properly
- Check that DCagent.dll exists in
Windows\system32folder. - Check that the registry key exists:
[HKEY_LOCAL_MACHINE\SOFTWARE\Fortinet\FSAE\dcagent]
If both exist, the DCagent is properly installed.
User logon events not received by FSSO collector agent
When a warning dialog is present on the screen on the Collector agent computer, the Collector agent will not receive any logon events. Once the dialog has been closed normal operation will resume.
If polling mode is enabled, it is possible the polling interval is too large. Use a shorter polling interval to ensure the collector agent is capturing all logon events.
|
|
The polling interval can only be adjusted using the firewall-embedded agent itself, not on agents deployed to member servers. |
If NetAPI polling mode is enabled, consider switching to Event logs or Event Logs using WMI polling as it provides better accuracy.
Mac OS X users can’t access external resources after waking from sleep mode
When client computers running Mac OS X (10.6.X and higher) wake up from sleep mode, the user must authenticate again to be able to access external resources. If the user does not re-authenticate, the user will maintain access to internal web sites, but will be unable to access any external resources.
This issue is caused by Mac OS X not providing sufficient information to the FSSO. This results in the FortiGate blocking access to the user because they cannot be authenticated.
Solution
The security settings on client computer(s) must be configured to require that a username and password be entered when exiting sleep mode or screen saver. With this feature enabled in Mac OS X, the FortiGate will receive the authentication information it requires to authenticate the user and allow them access.
Note that if the user reverts their settings to disable the password requirement, this will cause the issue to reappear.