
Creating a detector
Create custom detectors using a unique query or from a saved query. Each account can store up to 50 detectors. If you reach this limit, an error message will appear. We recommend regularly reviewing your detectors to ensure they are still in use and deleting any that are no longer needed. To increase the detector limit for your account, please contact Customer Support.
|
|
Before you create a detector, consider using a detector filter to customize a detector created by Fortinet. detector filters save time creating a new detector and help manage the number of detectors in your account. For information, see Adding custom filters to a detector query. |
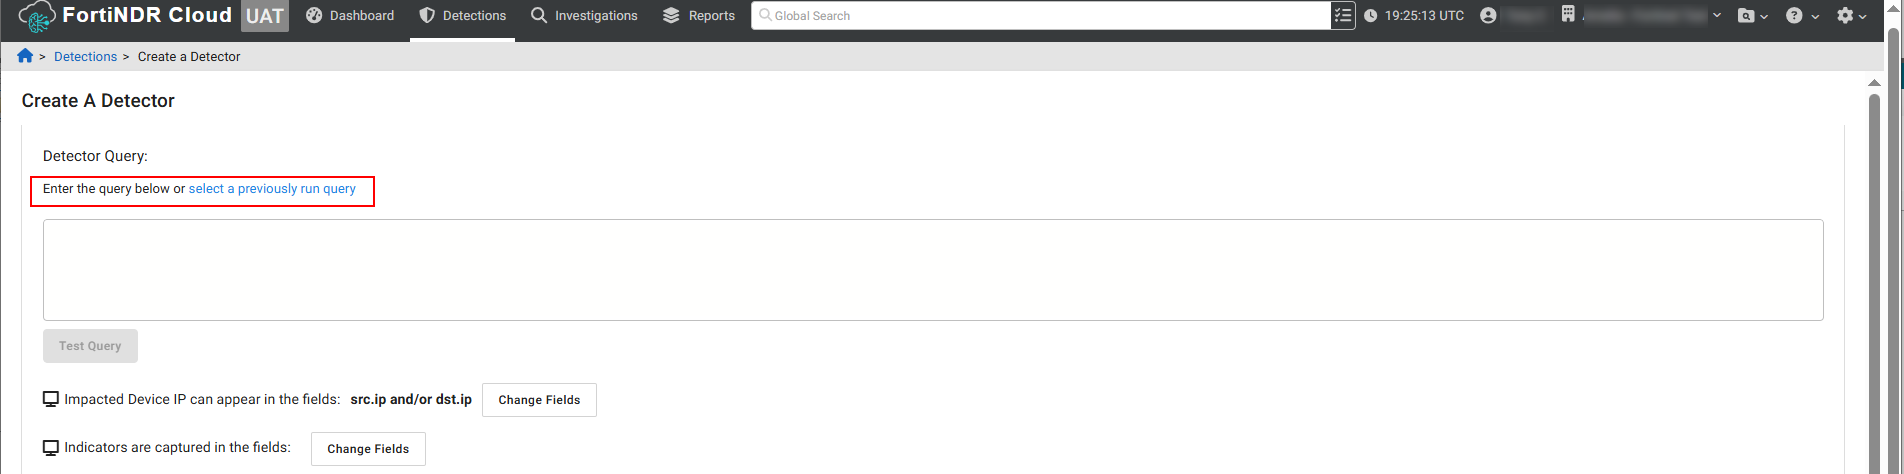
To create a new detector:
- Click the Detections tab.
- In the toolbar at the top-right of the page, click the shield icon. The Create A Detector page opens.

- Enter a query in the text field and click Test Query.
- Resolve any errors flagged by the system.
- Configure the detector settings and click Save Detector.
To create a detector from an existing query:
- Click the Detections tab.
- In the toolbar at the top-right of the page, click the shield icon. The Create A Detector page opens.
- Under Detector Query, click the hyperlinked text, select a previously run query. The Select a New Query page opens.
-
Select a query from the Saved Queries or Query History tab and click Select. The query is added to the text field.
- If necessary, edit the query, and click Test Query.Resolve any errors flagged by the system.
You do not need to test the query if you do make any edits.
-
Configure the detector settings and click Save Detector.
Detector settings
| Impacted Device IP can appear in the fields | Click Change Fields to select the specific fields you want to use to generate a detection. By default, any internal IP address in the src.ip or dst.ip fields will be used to generate detections. |
||
| Indicators are captured in the fields | Click Change Fields to add or remove an Indicator Field for a detector. You can choose up to five fields. | ||
| Name | Enter a name for the detector. | ||
| Severity | Choose High, Moderate or Low. | ||
| Confidence | Choose High, Moderate or Low. | ||
| Category | Click the drop down to select a category from the list. | ||
| Primary Technique | Enter the Primary Technique ID. | ||
| Secondary Technique | Enter the Secondary Technique ID. | ||
|
Run on Accounts |
When creating a detector on a parent account, enable Current account and all children account to run the detector on the current account and child accounts. When creating a detector on a child account, select Move to parent (Account1) and run on parent and all children accounts to run on the detector on all accounts (current, parent and children). This option is only available to customers with parent and child accounts.
|
||
|
Data Sources |
Enable/disable Zeek, Fortinet, Zuricata, or Zscaler. |
||
|
Resolution Style |
Select Auto or Manual. |
||
|
Automatic Resolution Period |
Select 6 hours to 1 Month. |