Fortinet white logo
Fortinet white logo

IDP

IDP

FortiSASE Sovereign supports using an external identity provider with SAML 2.0 authentication. Once the setup is complete, external users can authenticate with the desired provider and access FortiSASE Sovereign services based on the roles defined by the administrator.

FortiSASE Sovereign supports fine grained permission profiles for external IdP users through IAM Permission Profile. External IdP roles are authenticated with a custom login page. After the user is authenticated, they are redirected to a page where the administrator assigned to their account.

Note: IDP will only be available in Multi Tenancy mode.

Configuring IDP Server

To Configuring an IDP Server:

  1. Click Create to add a new IDP Server.

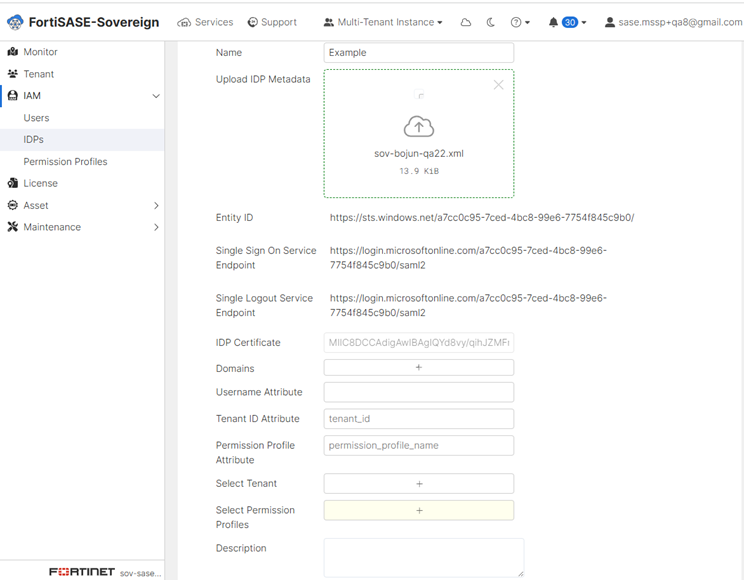
  2. Enter the IDP Server details and click Confirm.

    Configuration Settings

    Description

    Name Type the server name.
    Upload IDP Metadata Import IDP Metadata profile.
    Domains Type the domains to be used for IAM User access.
    Username Attribute Enter the value as set in your IdP configuration.
    Tenant ID Attribute Enter the value as set in your IdP configuration.

    Permission Profile Attribute

    Enter the value as set in your IdP configuration.

    Select Tenant

    Enter the value as set in your IdP configuration.

    If set, this value is used to match the tenant user with an onboarded tenant.

    Select Permission Profiles

    This value is used to match the Permission Profile assigned by administrator.

    Description

    Type a description of the IDP Server.

  3. Download the SP Metadata under “Download Metadata” column and import back to IDP Server.
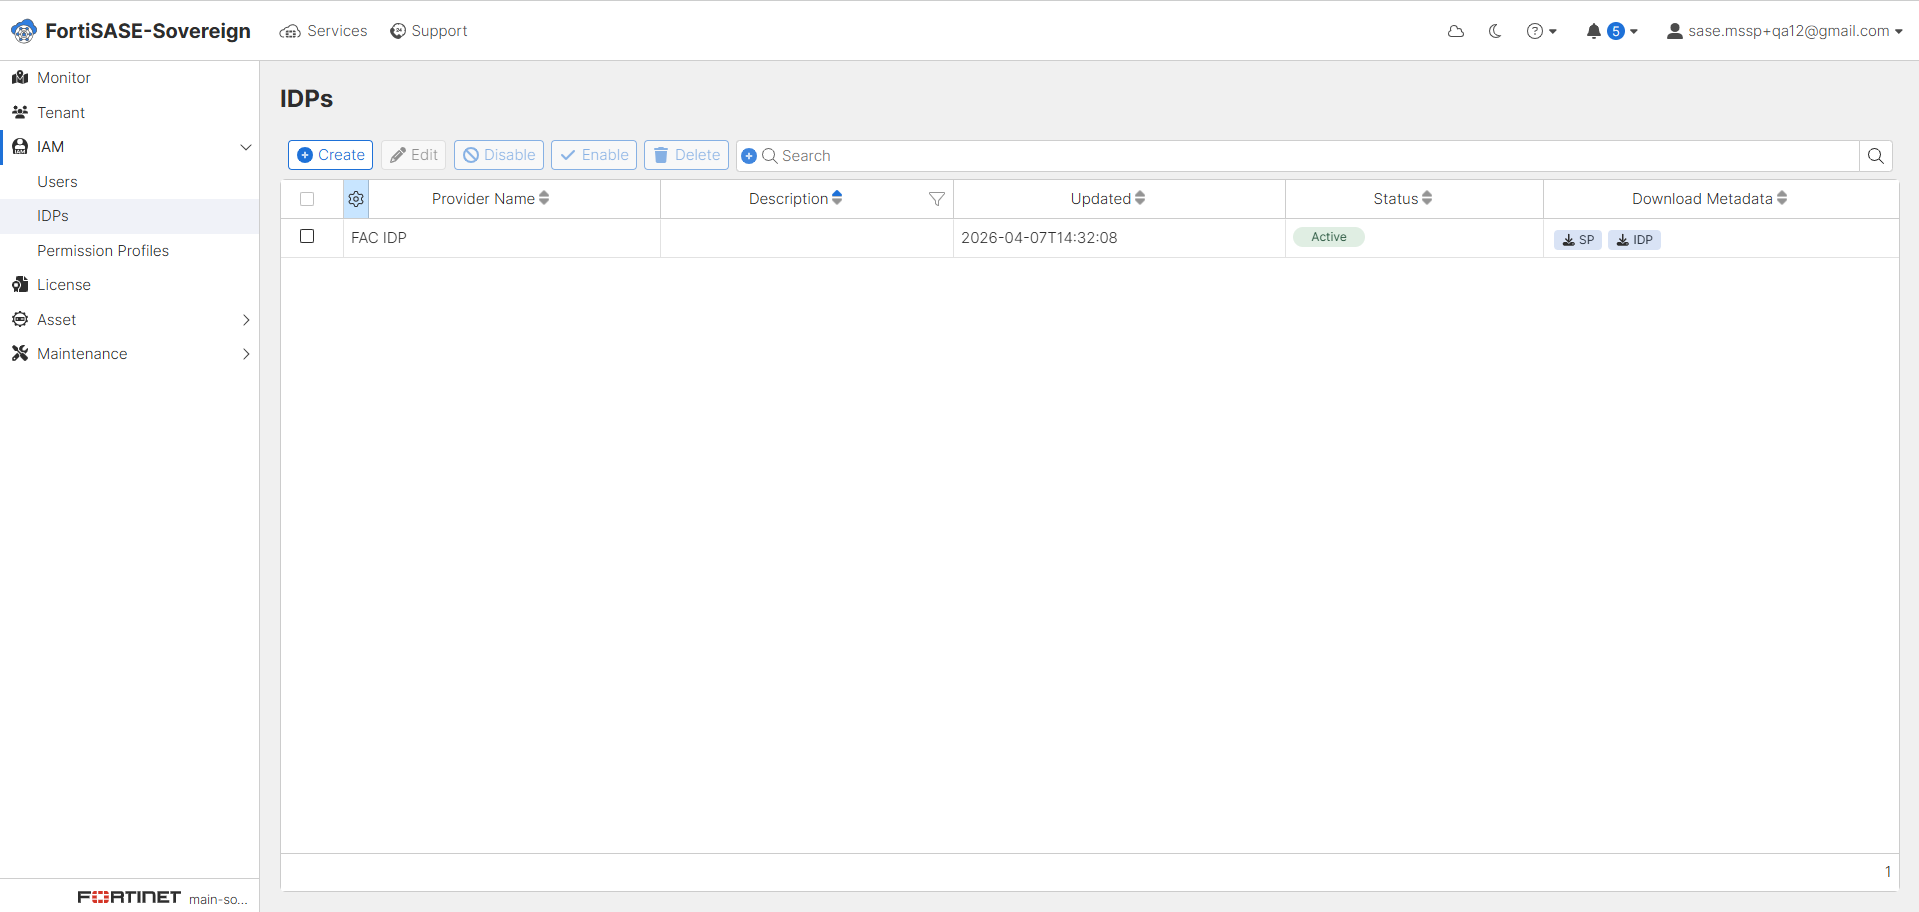
Example of configuring Azure IDP:

To add an Azure IDP server:

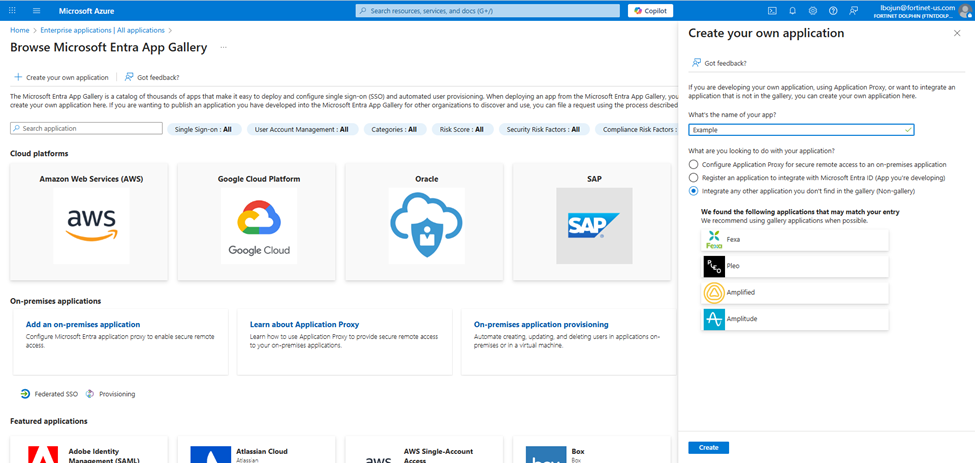
  1. Create an new application on Azure.

  2. Go to SAML Configuration.

  3. Input some fake data into “Entity ID” and “ACS URL”(We will update real data here later).
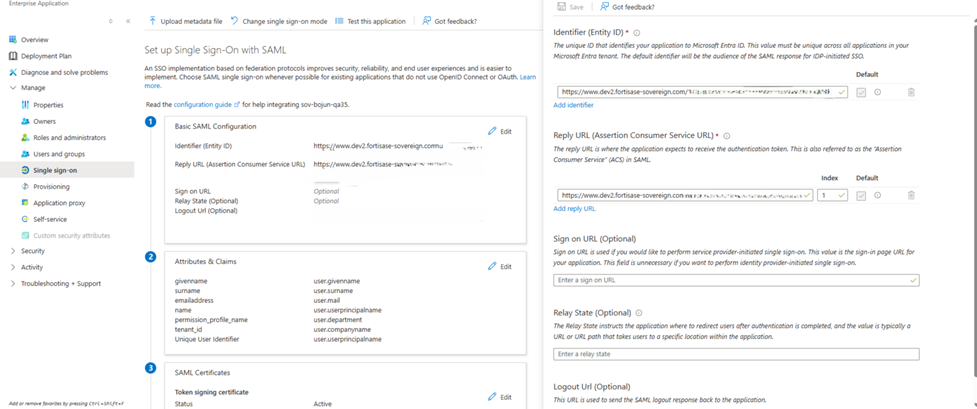
  4. Download IDP Metadata from SAML Certificates - Federation Metadata XML.
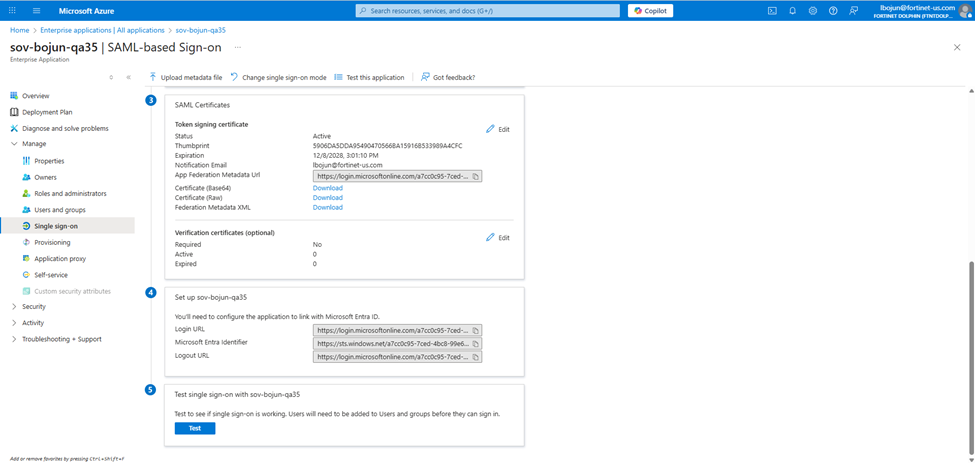
  5. Go to MSSP Portal and create new IDP(Default username always read “Unique User Identifier (Name ID)” when it’s empty here).
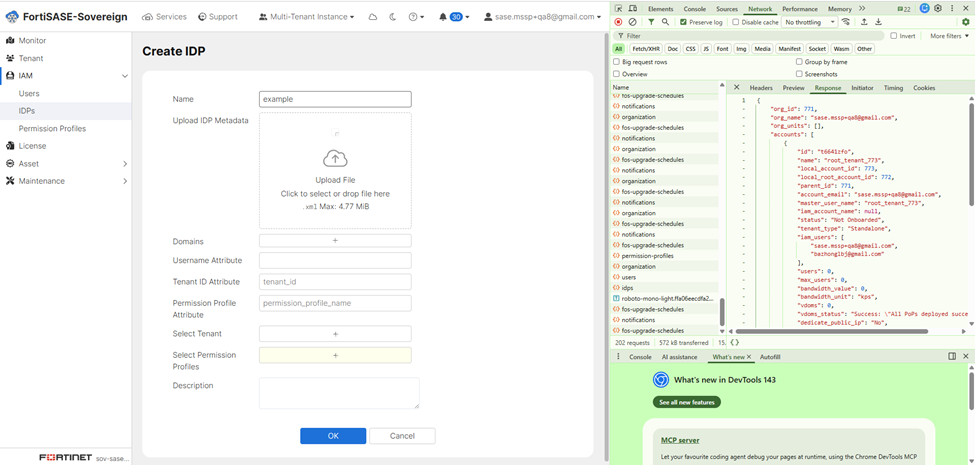
  6. Upload your downloaded Metadata file.

  7. Config “Select Permission Profile”(If you select any Tenant Permission Profile, you must also choose “Select Tenant” to add Tenant ID).
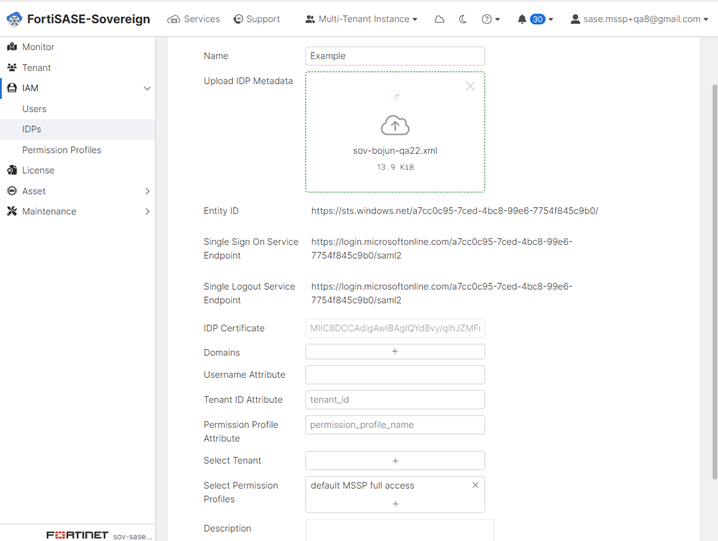
  8. Click save and Download “SP” from “Download Metadata”.
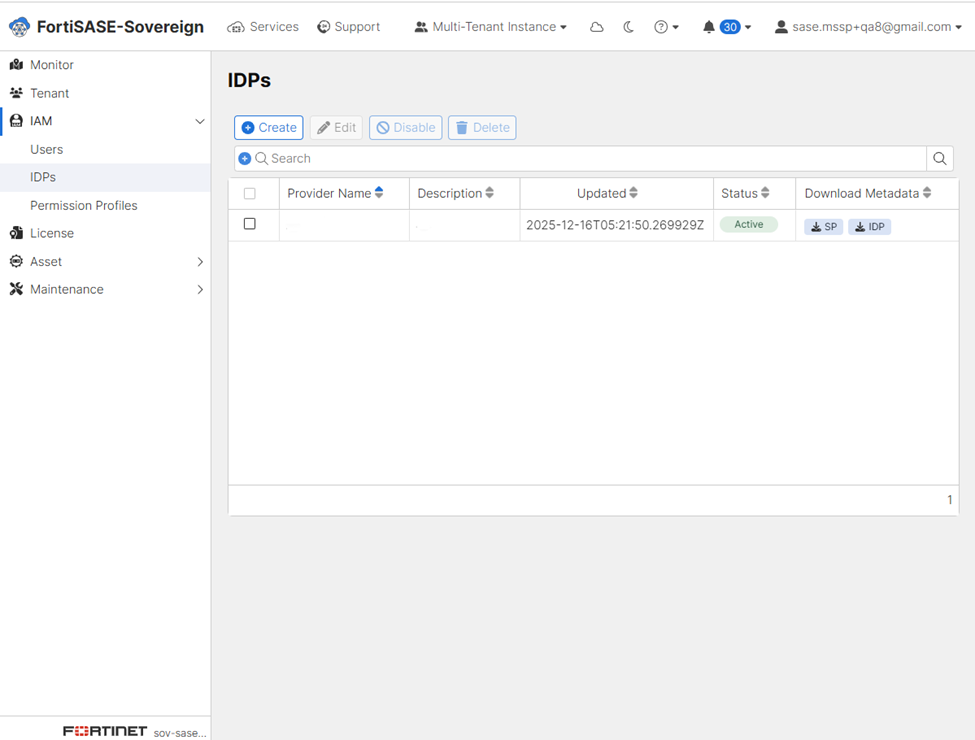
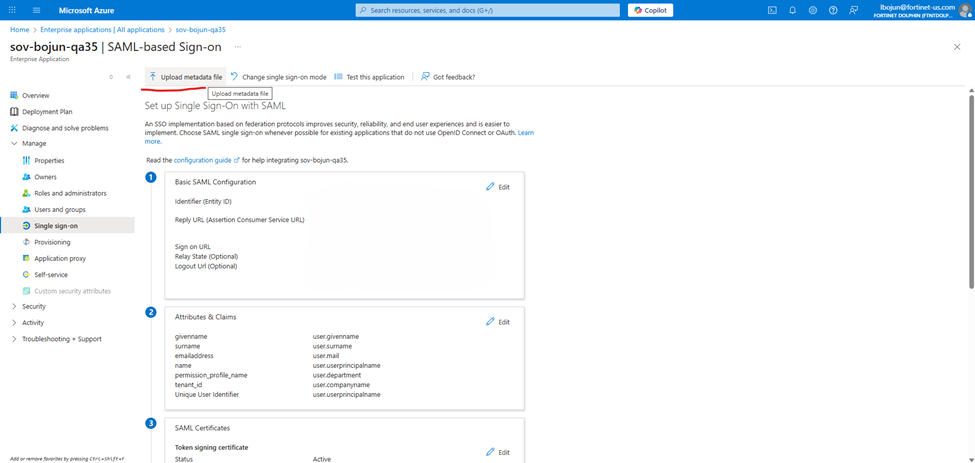
  9. Upload SP File back to Azure.

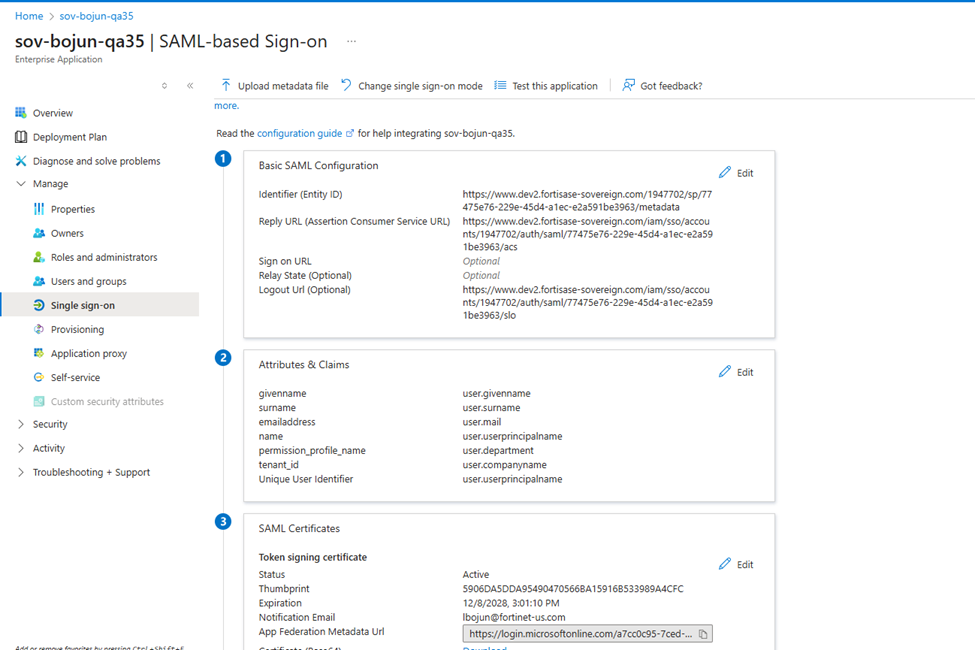
  10. Config SP Attribute to IDP(Create new Claim in Azure, name should as same as value in Username/Tenant ID/Permission Profile attribute name).

    Base on below config in “IDP”, we should add following new claim to Azure.

    “tenant_id”: “user.companyname”

    “permission_profile_name”: “user.department”

    For IDP users, we need to add following config to match SP settings:

    MSSP User:

    Company:

    (We can leave it empty here because MSSP User don’t need specific tenant ID)

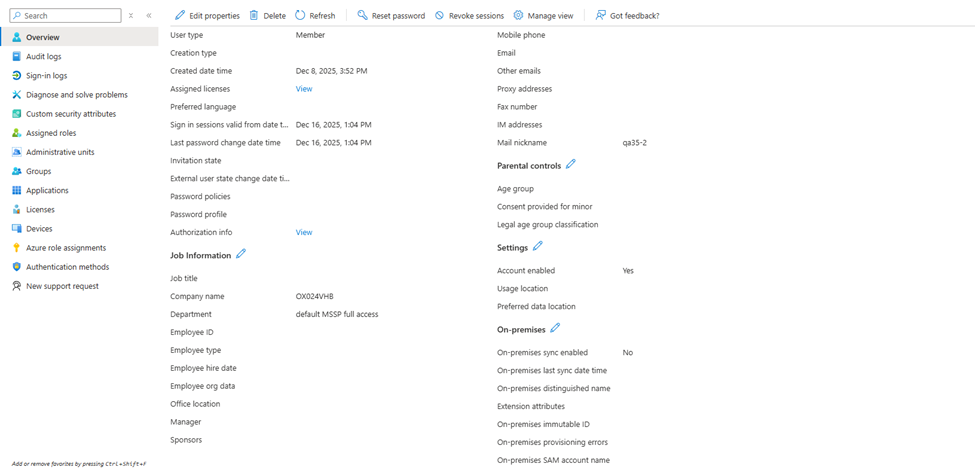
    Department: default MSSP full access

    Tenant User:

    Company: MOY7UMID

    Department: default Tenant full access
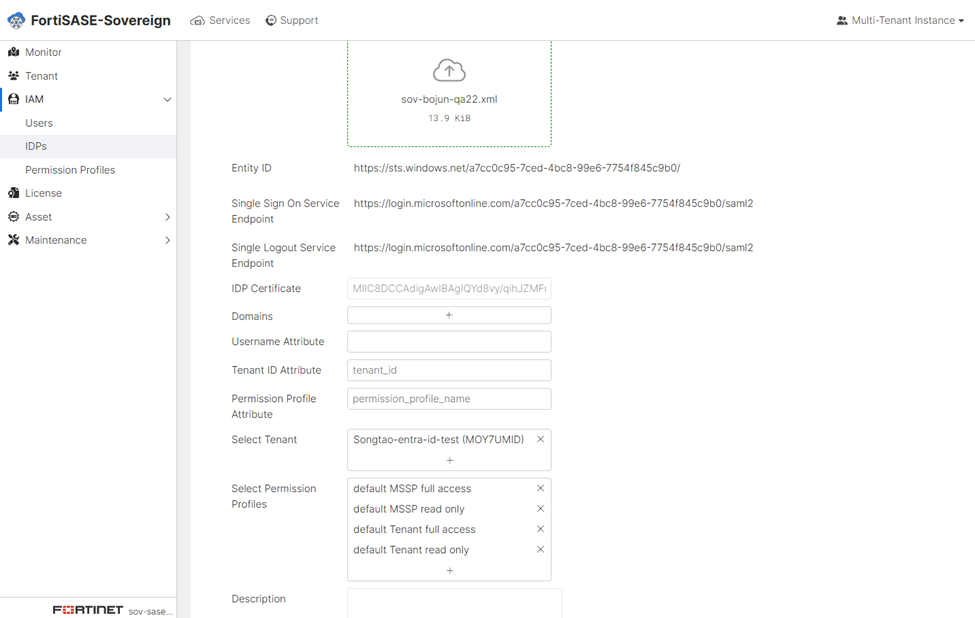
IDP

IDP

FortiSASE Sovereign supports using an external identity provider with SAML 2.0 authentication. Once the setup is complete, external users can authenticate with the desired provider and access FortiSASE Sovereign services based on the roles defined by the administrator.

FortiSASE Sovereign supports fine grained permission profiles for external IdP users through IAM Permission Profile. External IdP roles are authenticated with a custom login page. After the user is authenticated, they are redirected to a page where the administrator assigned to their account.

Note: IDP will only be available in Multi Tenancy mode.

Configuring IDP Server

To Configuring an IDP Server:

  1. Click Create to add a new IDP Server.

  2. Enter the IDP Server details and click Confirm.

    Configuration Settings

    Description

    Name Type the server name.
    Upload IDP Metadata Import IDP Metadata profile.
    Domains Type the domains to be used for IAM User access.
    Username Attribute Enter the value as set in your IdP configuration.
    Tenant ID Attribute Enter the value as set in your IdP configuration.

    Permission Profile Attribute

    Enter the value as set in your IdP configuration.

    Select Tenant

    Enter the value as set in your IdP configuration.

    If set, this value is used to match the tenant user with an onboarded tenant.

    Select Permission Profiles

    This value is used to match the Permission Profile assigned by administrator.

    Description

    Type a description of the IDP Server.

  3. Download the SP Metadata under “Download Metadata” column and import back to IDP Server.

Example of configuring Azure IDP:

To add an Azure IDP server:

  1. Create an new application on Azure.

  2. Go to SAML Configuration.

  3. Input some fake data into “Entity ID” and “ACS URL”(We will update real data here later).

  4. Download IDP Metadata from SAML Certificates - Federation Metadata XML.

  5. Go to MSSP Portal and create new IDP(Default username always read “Unique User Identifier (Name ID)” when it’s empty here).

  6. Upload your downloaded Metadata file.

  7. Config “Select Permission Profile”(If you select any Tenant Permission Profile, you must also choose “Select Tenant” to add Tenant ID).

  8. Click save and Download “SP” from “Download Metadata”.

  9. Upload SP File back to Azure.

  10. Config SP Attribute to IDP(Create new Claim in Azure, name should as same as value in Username/Tenant ID/Permission Profile attribute name).

    Base on below config in “IDP”, we should add following new claim to Azure.

    “tenant_id”: “user.companyname”

    “permission_profile_name”: “user.department”

    For IDP users, we need to add following config to match SP settings:

    MSSP User:

    Company:

    (We can leave it empty here because MSSP User don’t need specific tenant ID)

    Department: default MSSP full access

    Tenant User:

    Company: MOY7UMID

    Department: default Tenant full access