Use case: Automated response to FortiGuard Database (FDS DB) updates
Scenario
The FortiGuard Database, which provides up-to-date threat intelligence, has been updated with new threat signatures.
How FortiWeb responses to this issue
- Trigger Detection: FortiWeb detects an update to the FortiGuard Database.
- Notification: An alert is sent to the IT team via Teams, informing them of the update.
- Verification: A Jira ticket is created for the IT team to verify that the new signatures and policies are correctly applied and tests to ensure they are functioning as expected.
- Follow-up action: After verified, approve the signature updates so that traffic matches the signatures can be blocked.
This automation stitch ensures the latest threat intelligence is applied in time. It helps protect your application from emerging threats and vulnerabilities.
Configurations on FortiWeb
Before performing the following steps, make sure:
-
You have already got the URL of the Teams channel you want to send notifications to. For how to get the URL. See Microsoft Teams Notification action.
-
You have already created a Jira service project and an API token in the Jira account for authentication purpose. See Jira Notification action.
To configure the stitch on FortiWeb:
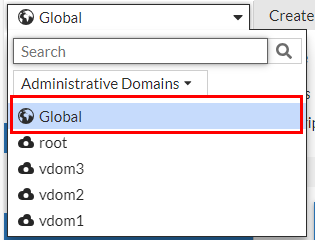
- Switch the Administrative Domain to Global.
- Go to Security Fabric > Automation.
- Select the Action Tab.
- Click Create New to create a Teams notification action.
- Select Microsoft Teams Notification.
Configure the settings:
Name Enter a name.
Description Enter a description.
URL Paste the webhook URL you got from Teams. - Please leave the "https://" out when you paste the URL because the system will automatically append "https://" to the URL you enter.
Message Type Text Message FortiGuard Database has been updated. Please log in to FortiWeb and go to System > Config > FortiGuard to review the updated signatures and approve them.
%%log%%
- Click OK.
- Click Create New to create a Jira notification action.
- Select Jira Notification. Configure the settings:
Name Enter a name.
Description Enter a description.
Account Enter the Jira account name. This account must have User Management Access privilege. Token
Enter the API token.
URL Enter the URL of your Jira account. Please leave the "https://" out when you paste the URL because the system will automatically append "https://" to the URL you enter.
Message FortiGuard Database has been updated. Please log in to FortiWeb and go to System > Config > FortiGuard to review the updated signatures and approve them.
%%log%%
- Click OK.
- Select the Stitch tab.
- Enter a name and brief description for this stitch. Enable the status.
- Click Add Trigger, select FDS_UPDATE, then click Apply.
- Click Add Action, select the Microsoft Teams Notification action you just created, then click Apply.
- Click Add Action, select the Jira Notification action you just created, then click Apply.
- Click OK.
- When this automation stitch is triggered, you will receive the following message in Microsoft Teams and Jira:

- Log in to FortiWeb, go to the Signature Update Management tab on System > Config > FortiGuard.
- Verify the signatures first to ensure they don't trigger false positives or block legitimate traffic.
- Select the verified signatures and click Approve.