
Creating and Editing Modules
Use the Module Editor to add new modules and to add new fields and edit existing fields within a module. You can open the module editor by clicking Settings and in the Application Editor section, click Modules. This displays the Modules page.
Important: Some fields in some modules are system fields and only FortiSOAR can create system fields. Changing the properties of the system fields could lead to issues with the working of FortiSOAR. Therefore, you cannot modify any properties of these fields, and they appear as read-only when you select them in the Fields Editor tab. An example of this type of field is the First Name field in the People Module as shown in the following image:

Creating a New Module
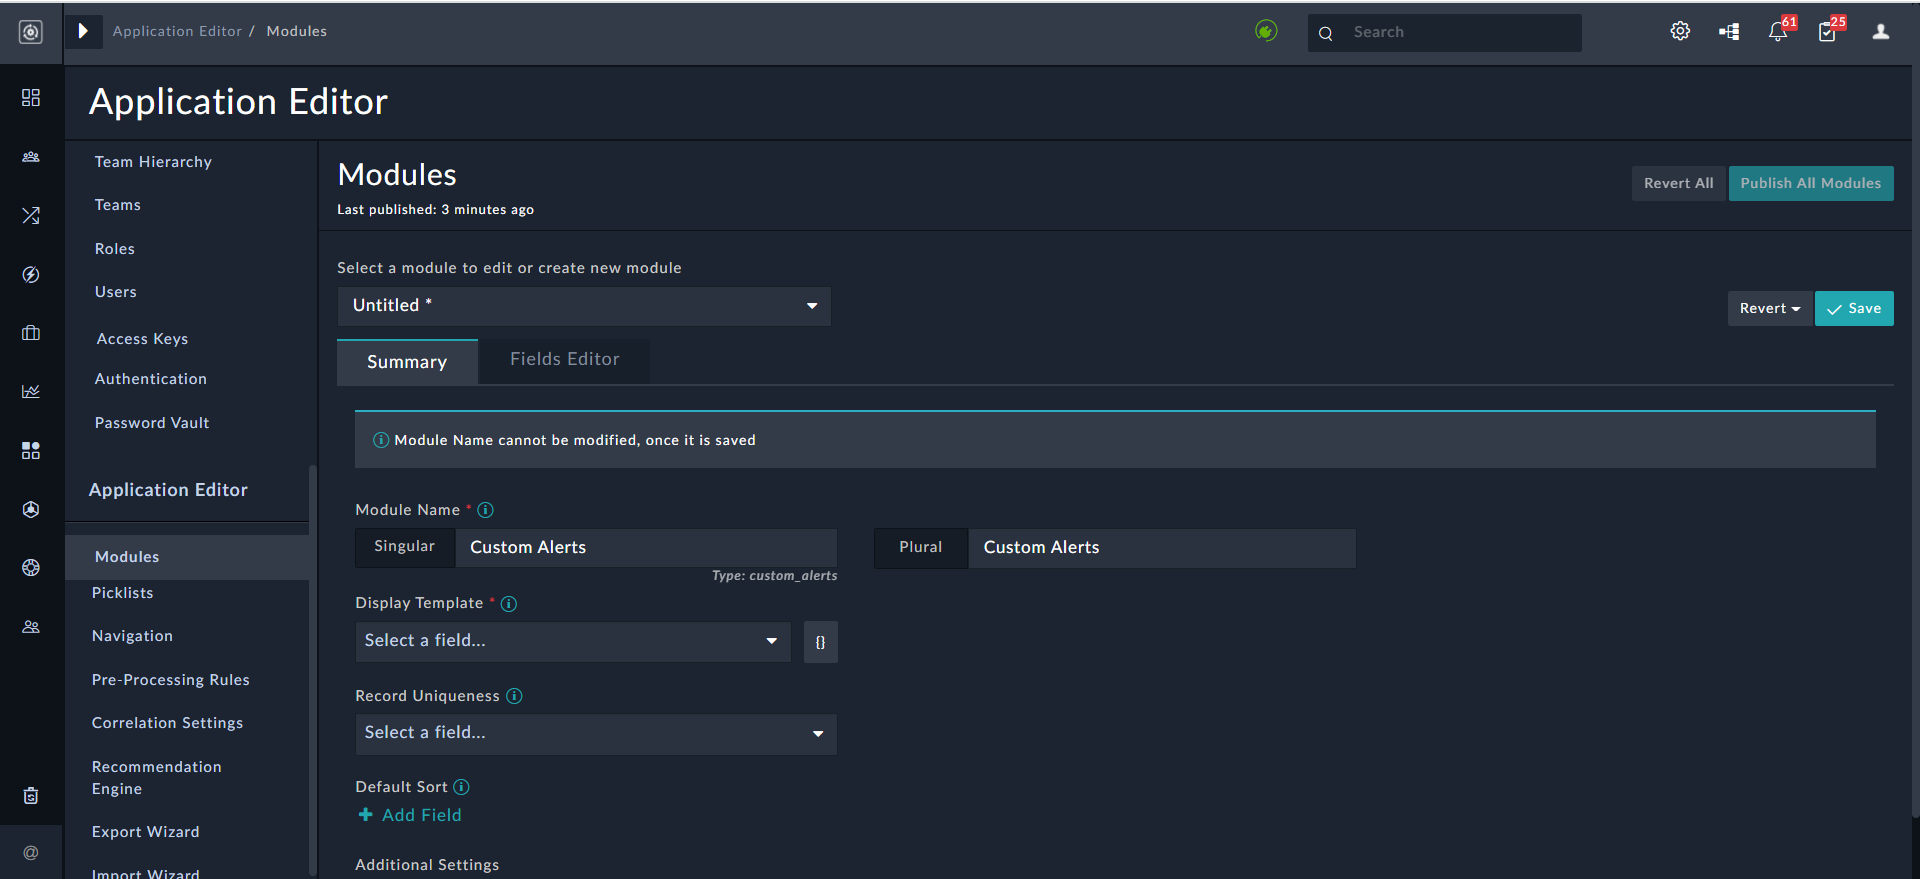
To create a new module, click Settings > Modules. This displays the Modules page. Use the +Create new module option that appears at the top of the editor to define the properties of the module. By default, when choosing the Module Editor, the ability to define the new modules is available.
Bear in mind there are requirements to realize the addition of the new module, notwithstanding the need to allow for the interface to recognize this module.
Users only need to provide only the Module Name while creating the module. This simplification of module creation enhances user experience and also eliminates errors that occur due to incorrect inputs.
To add a module, do the following:
- Click Settings and click Modules in the
Application Editorsection, to open the Module Editor.
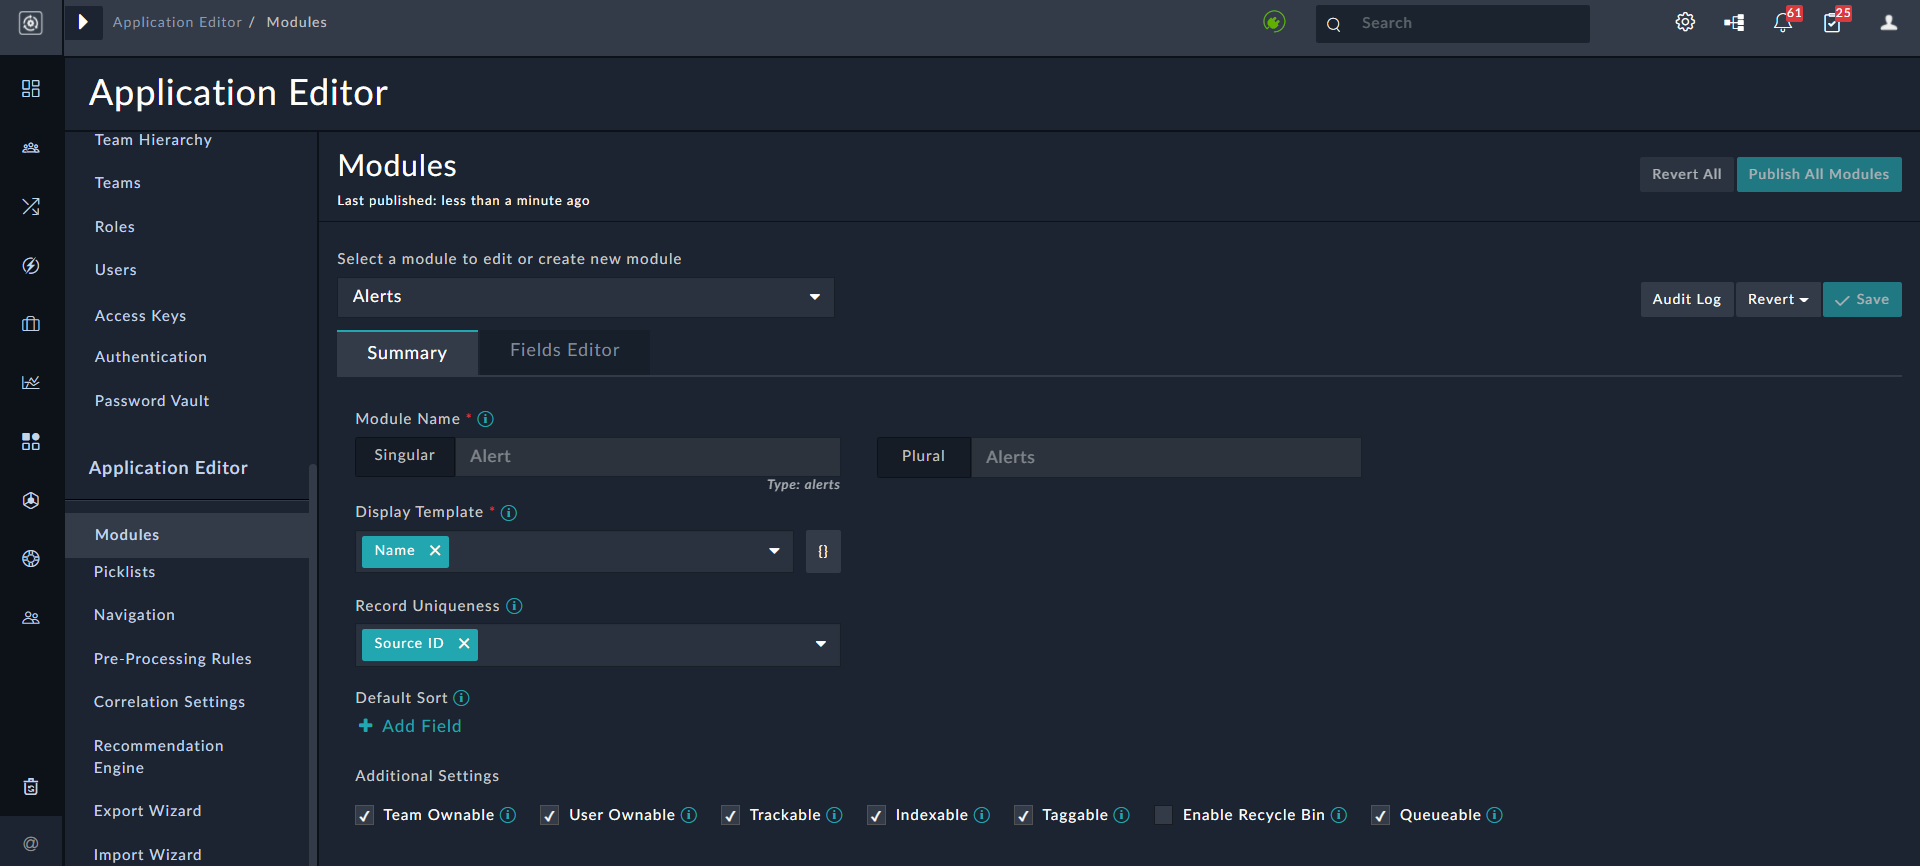
This displays theModulespage. - On the Summary tab configure the following fields for defining a module using the Module Editor.
Note: To add any field to theSummaryview, you must ensure that you have already added the field using theField Editor. See the Modifying Existing Modules section for information on how to add and edit fields.- Module Name: The name of the module itself, when it is in the singular context (individual record). For example, an Incident refers to an individual record in a module, whereas the module is Incidents.
Once add the name of the module in the Singular context, the name of the module in the Plural context gets automatically populated.
Note: The module 'Type' is also automatically populated based on the name you specify in the Singular field. Type is used to identify the module in the API. - Display Template: This field uses an Angular Template expression to display a record appropriately. This template specifies the fields that will be displayed when a record from this module is referenced in the application. Fields of a module can be specified in the display template as
{{ field_name_api }}.
Important: Ensure that you add the fields that you specify in Display Template in the module that you are creating or updating.
For example, if you have added{{ name }}in Display Template, then ensure that you have added Name as a field in the module, its Field Title (Field API Key) attribute will be set asname.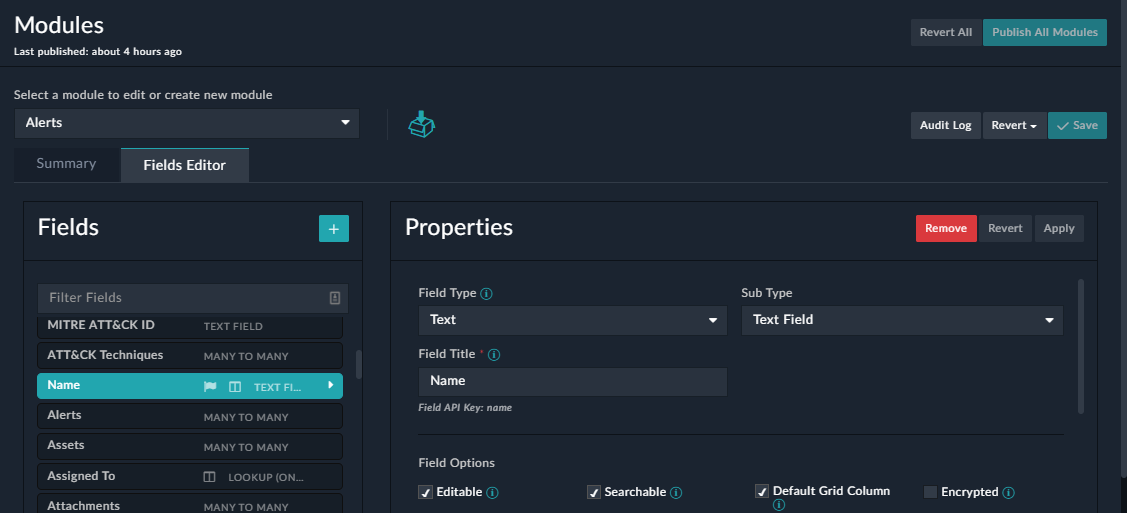
You can also add an attribute of a picklist as part of the Display Template. See the following Display Template topic for more details. - Record Uniqueness: This section allows you to choose one or more published fields from the existing module that would be used to define a unique condition. This ensures that only unique records will be created in FortiSOAR and any record that matches the unique field or the combination of unique fields would not be created.
For example, Type + Value is a unique combination in theIndicatorsmodule as shown in the following image: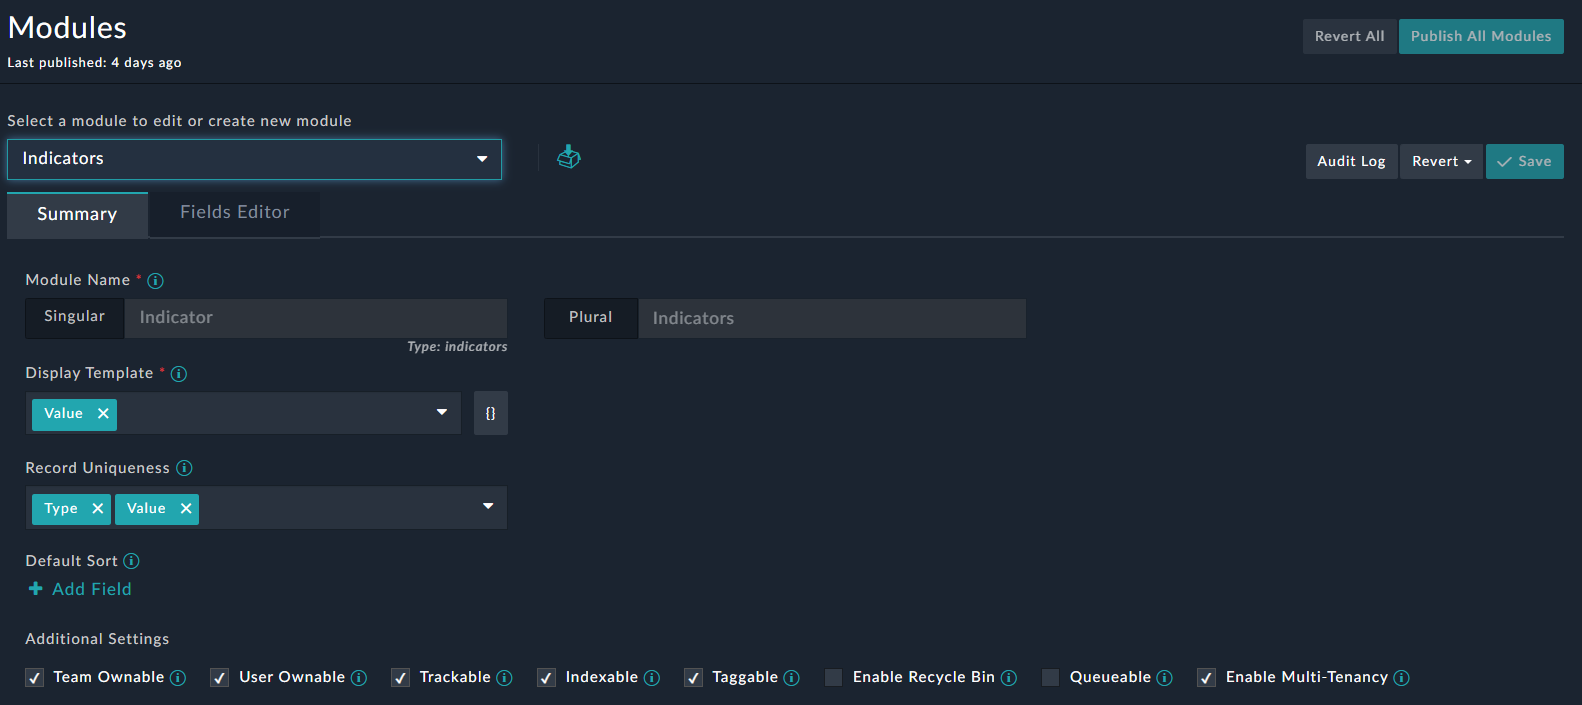
This will ensure that indicator records will be created with unique "Type and Values" values.
If you want to add any other field to for part of the unique combination of fields, then from theRecord Uniquenesssection, select that field from the Select a Field drop-down list, and then click Add Field. Similarly, if you want to remove any field from the unique combination, you need to click the red X on that field. - Default Sort: Click Add Field to add a field based on which the list of records in the module will be sorted, either in the ascending or descending order. For example, indicators will be sorted based on when they were created, if you add Created On in the Default Sort section, as shown in the following image:

- Team Ownable: Records that are ownable can be owned by a team or multiple teams. An example of a module that you should make ownable is Alerts. When a new record is created in an ownable module, the ownership is assigned by default to the user or appliance that created the record.
For example, if User X, who belongs to both Team A and Team B, creates a record named 'Alert 1', the record will be automatically associated with both Team A and Team B. Consequently, all users in these teams will have access to 'Alert 1'. Similarly, if a record named 'Alert 2' is created by a Playbook Appliance, the ownership will be assigned to the Playbook Appliance Team, even if no team is explicitly specified during record creation.
Note: If you do not select this option, then the records within this module will be visible to all teams and users who have access to that module. An example of a module that should not be ownable is Addresses. Additionally, if you change a module from not ownable to ownable, then the records created before you have changed the ownership are visible to "All". However, until owners (teams) are assigned these records are read-only, meaning their fields cannot be edited. Also, users' who are editing the same record (with no owners) must assign their team to the records to ensure that the records continue to be visible to those users and/or teams. - Trackable: Selecting this option ensures that FortiSOAR tracks the date that the record was created, user who has created the record, date that the record was modified, and user who has modified the record on all records in the module.
Important: Once a module has been created, you must not modify theTypeandTable Namefields. You can edit the Singular and Plural names whenever required. However, note that the Singular name plus ansis used for API endpoint generation during module creation. Changing the Singular name could disrupt existing API calls to the endpoint. - Indexable: Selecting this option ensures that this module has fields that can be indexed.
- Taggable: Selecting this option ensures that the selected module is taggable, i.e., you can enter tags to records in this module making it easier to search and filter records in the module.
- Enable Recycle Bin: Selecting this option enable soft deletion of selected module's records, i.e., records that are deleted from this module move to the recycle bin from where they can be restored, if needed. For more information on recycle bin, see the Recovering Deleted Module Records and Workflows topic in the Resilience & Recovery chapter of the "Best Practices Guide."
Note: You cannot select the Enable Recycle Bin checkbox for system modules, i.e., for the 'People', 'Appliances', 'Agents', 'Approvals', 'Tenants', 'Routers', 'Comments', and 'Saved Reports' modules. Therefore, recycle bin for these modules cannot be configured and records of these modules are always permanently deleted. - Queueable: Selecting this option ensures that this module is displayed as an option for auto-assignment while creating or configuring queues, i.e., records of this module can be auto-assigned using queues. For more information, see the Queue, Shift, and Leave Management chapter.
- Enable Multi-Tenancy: (Only applicable to multi-tenant setups): Selecting this option enables replication of data for the selected module across peers' setups. Enabling this option also adds the 'Tenant' field to the schema for the selected module, which can then be used to associate records with specific tenants in the system.
NOTE: You cannot enable multi-tenancy for system modules such as 'Agents', 'Appliances', 'People', etc.
- Module Name: The name of the module itself, when it is in the singular context (individual record). For example, an Incident refers to an individual record in a module, whereas the module is Incidents.
- On the Fields Editor tab, add the required fields to the module and click Save. See the Modifying Existing Modules section for information on how to add and edit fields.
- On the Summary tab, click Save to save the changes to save the changes to the module and publish the module to reflect the changes in the system. For information on the Save operation, see the Saving Changes section. For information on publishing, see the Publishing Modules section.
To clear any changes made in the interface since the lastSaveevent, click Revert.
Modifying Existing Modules
To modify an existing module, do the following:
- Click Settings and click Modules in the
Application Editorsection, to open the Module Editor.
This displays theModulespage. - To edit an existing module, from the Select a module to edit or create new module drop-down list, select the module.
For example, selectAlerts. - To add fields to the module, or to edit any of the fields belonging to the module, add or update the fields on the Fields Editor tab on the
Modulespage.
Some fields in some modules are system fields and changing properties of these fields could lead to issues with the working of FortiSOAR. Therefore, you cannot modify any properties of these fields and they appear as read-only when you select them in the Fields Editor tab. An example of this type of field is theFirst Namefield in thePeopleModule.
Note: One-time edits are allowed for read-only fields, in the following cases:- If the value of the field had not been set, i.e., it is 'null' or 'blank'
- If the field name is "tenant", and the field value is "self"
- To add fields, on the
Modulespage, click the Fields Editor tab and click the Add (+) icon besideFields.
Note: The Fields Editor pane displays the list of fields that have been defined for the module. You can filter the fields by typing the search term in the Filter Fields text box: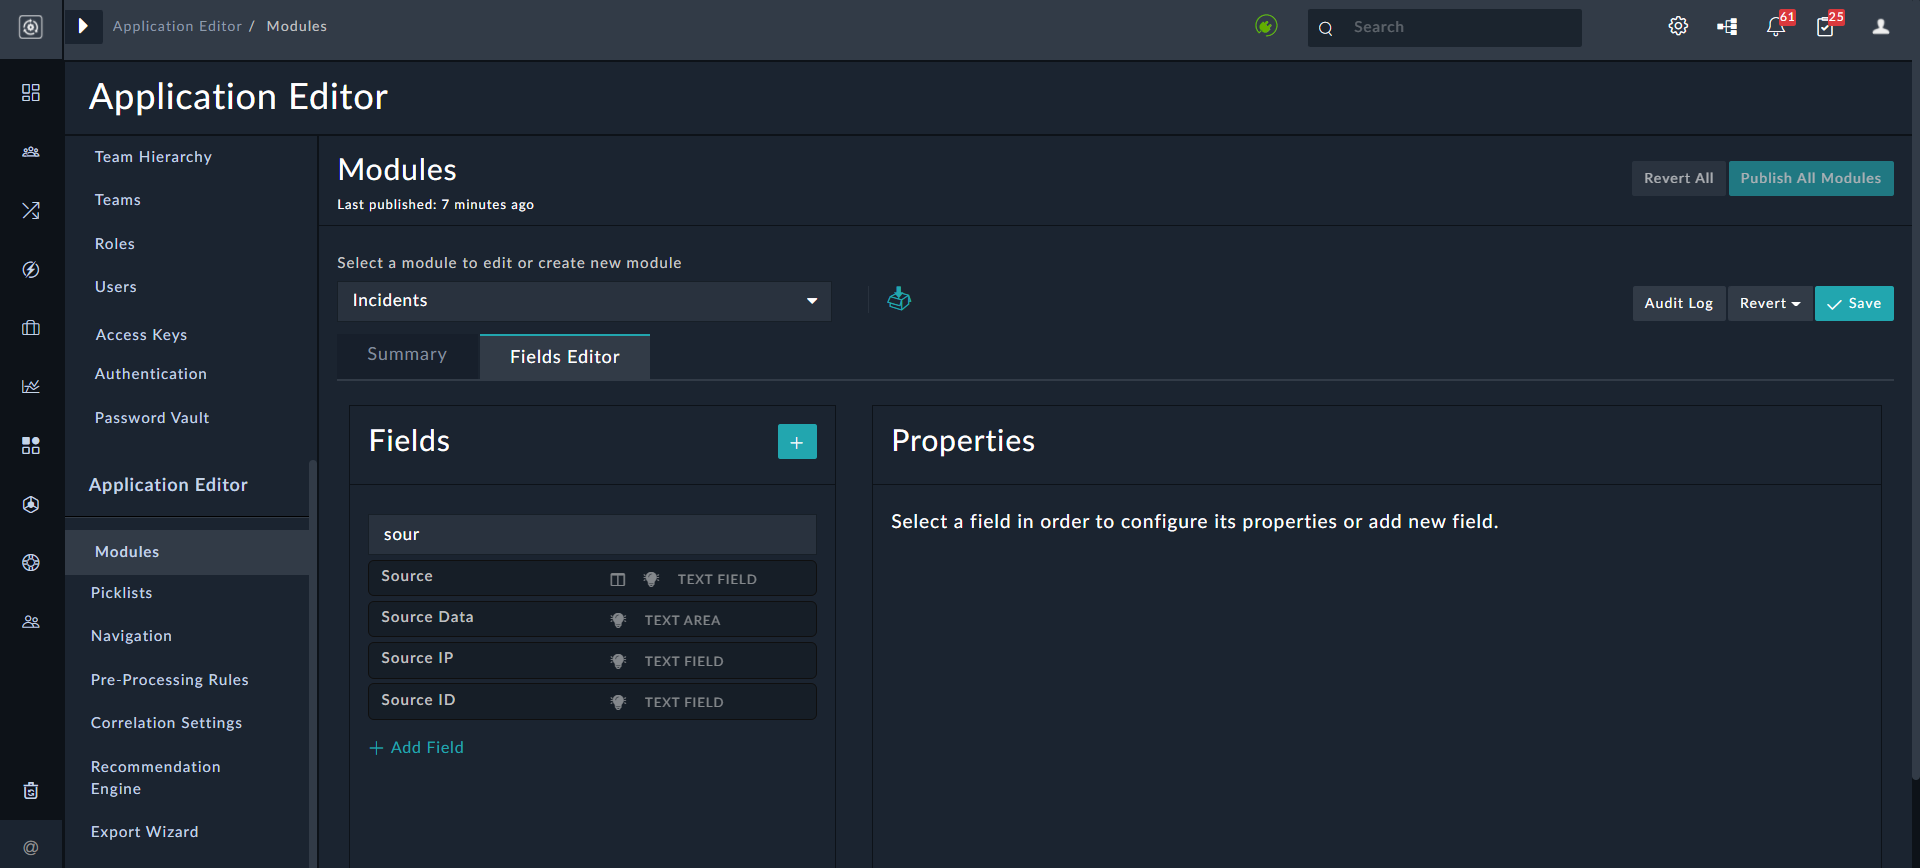
- Define the following properties for the newly added field:
- Field Type: The type of field; it specifies the type of form used to render this attribute. Examples of field types are text, file field, checkbox, integer, decimal, date/time, picklist, and relationship fields.
It is recommended that when you create a field of typeInteger, then you should set its default value as "zero".
Use the JSON field type for fields such as,Source Data, which commonly store data in the JSON format to allow playbooks to get to the JSON data directly, without having to use a JSON parse step. You can also define the height of the JSON field in pixels by editing your record template.
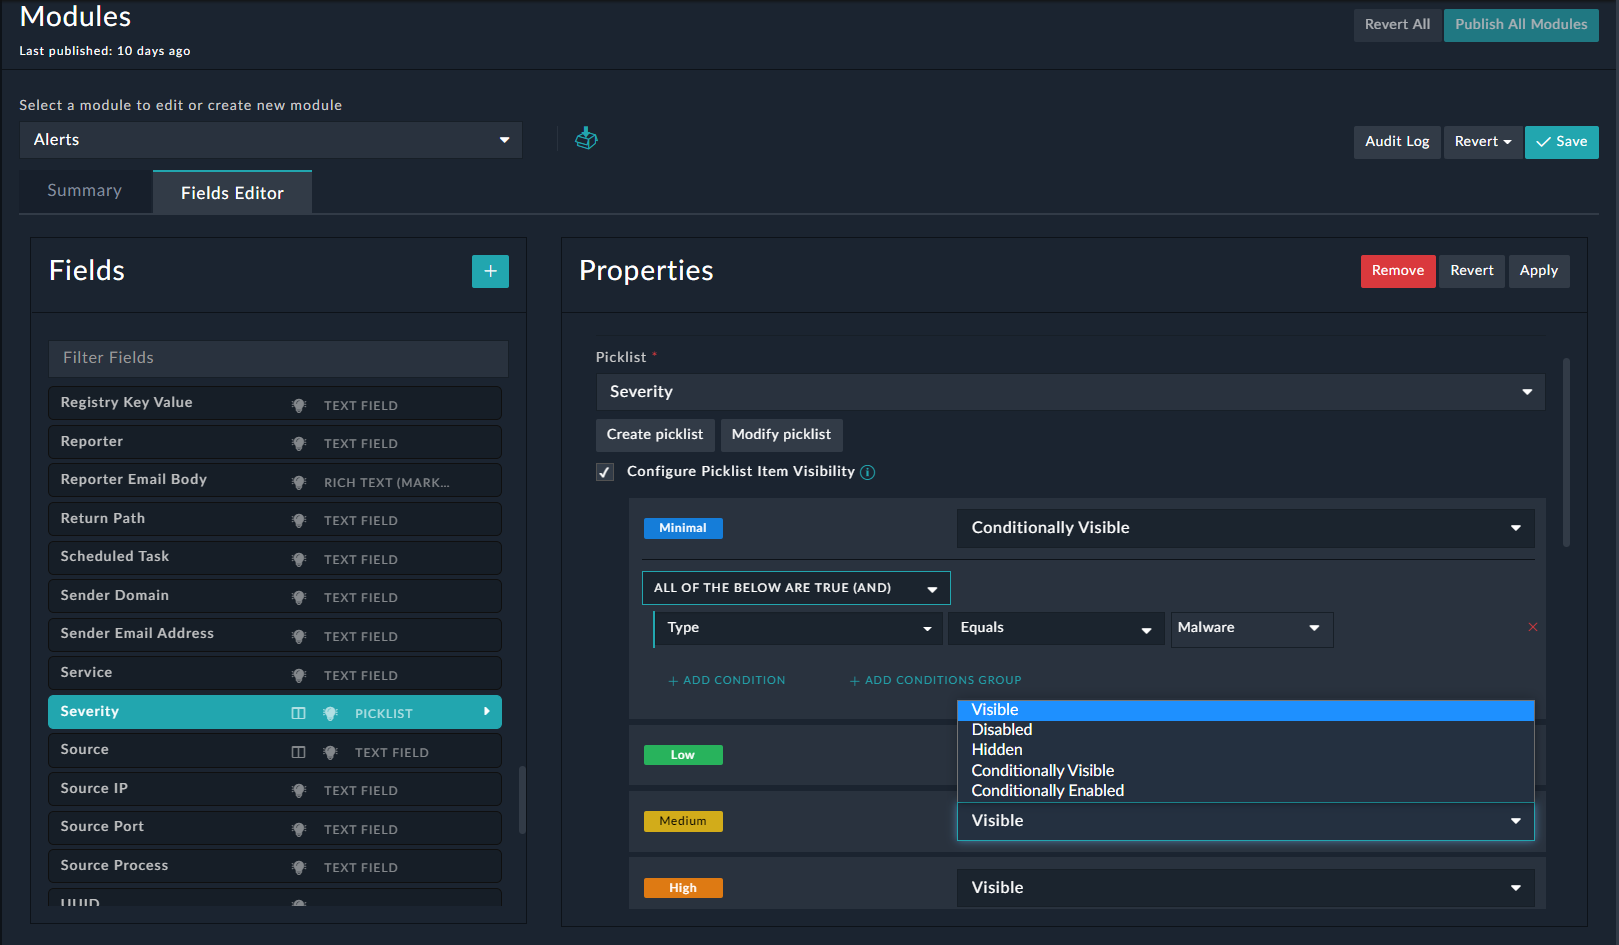
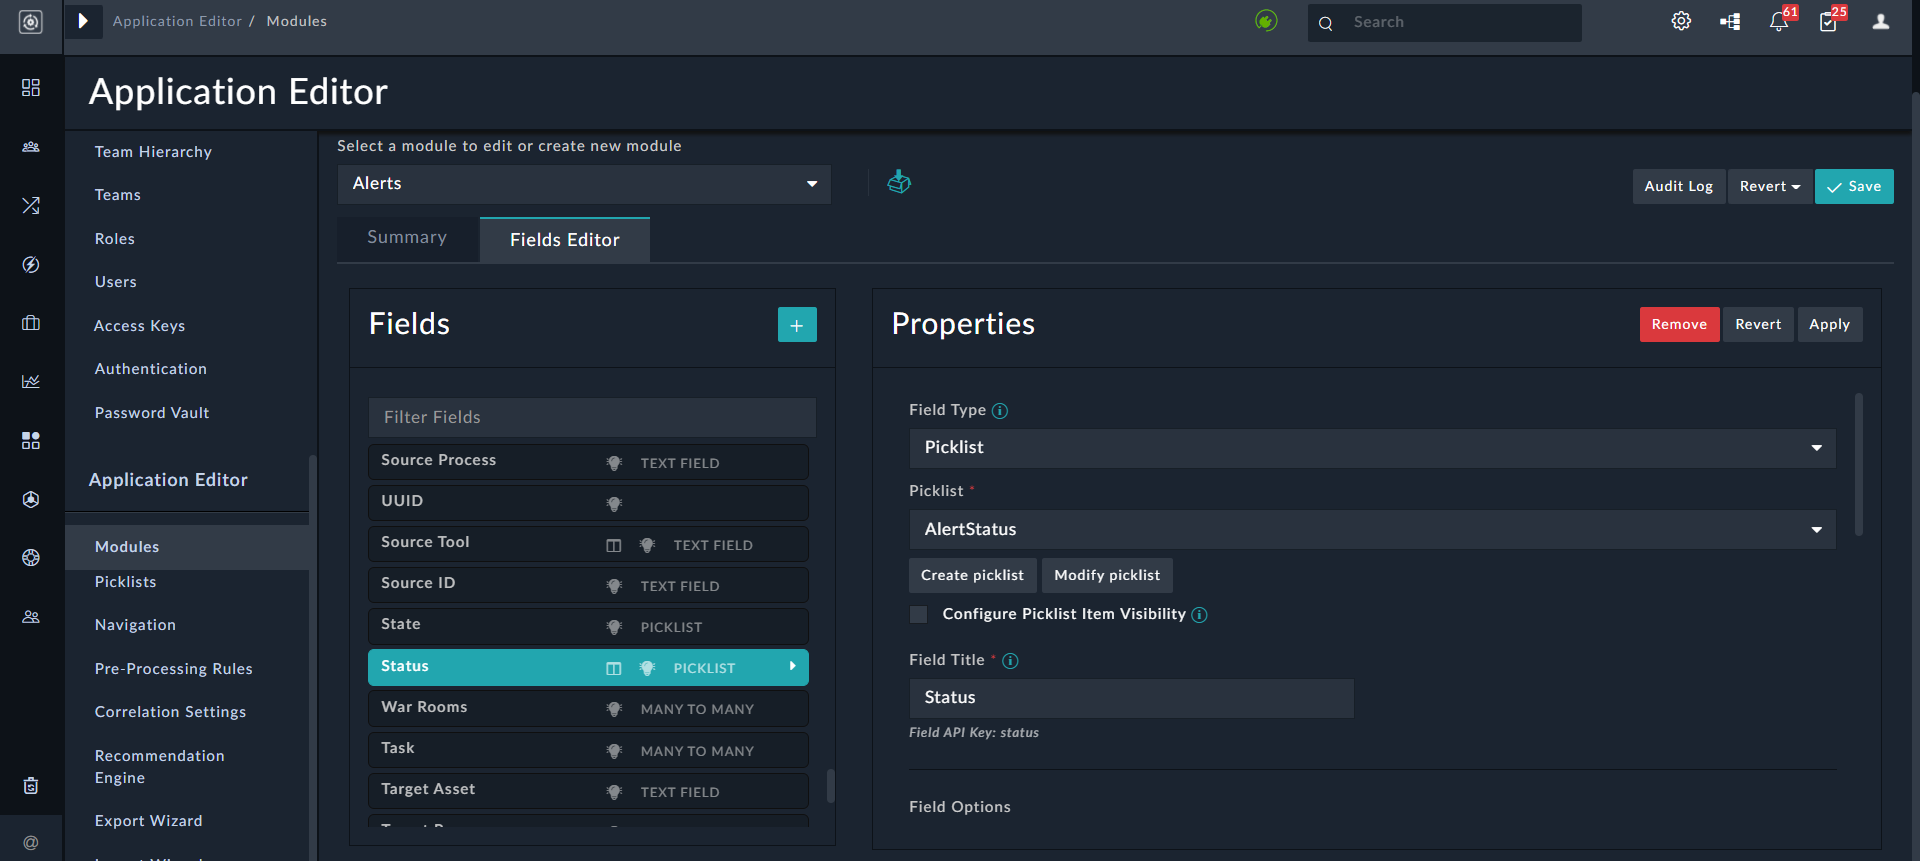
Based on the Field Type that you select, you can see an additional field. For example, if you select the field type asPicklist, a Picklist drop-down list will appear, and you must select the picklist associated with the field or click Create new picklist to add a new picklist. Use the Configure Picklist Item Visibility checkbox to hide (or display) a picklist items for the field based on specified conditions. Once you check this checkbox, the picklist items are displayed and you can choose whether the item should be Visible, Disabled, Hidden, Conditionally Visible, or Conditionally Enabled.- Visible: The picklist item is always visible.
- Disabled: The picklist item is visible but not selectable when adding or editing the field.
- Hidden: The picklist item is hidden when adding or editing the field; however the picklist item is searchable.
- Conditionally Visible: The picklist item is visible only when the specified conditions are met; else it is hidden.
- Conditionally Enabled: The picklist item is visible and selectable only when the specified conditions are met; else it is disabled.
FortiSOAR also supports a special type of picklist, called "Multiselect Picklist". You can use the multiselect picklist for fields that can contain more than one value. For example, you can have an alert be assigned more than one "Type", i.e., an alert can be of type Brute Force Alert and Malware. In such a case you can assign Multiselect Picklist as the Field Type for the "Type" field.
To create a new picklist click Create new picklist and then assign the picklist items to that picklist: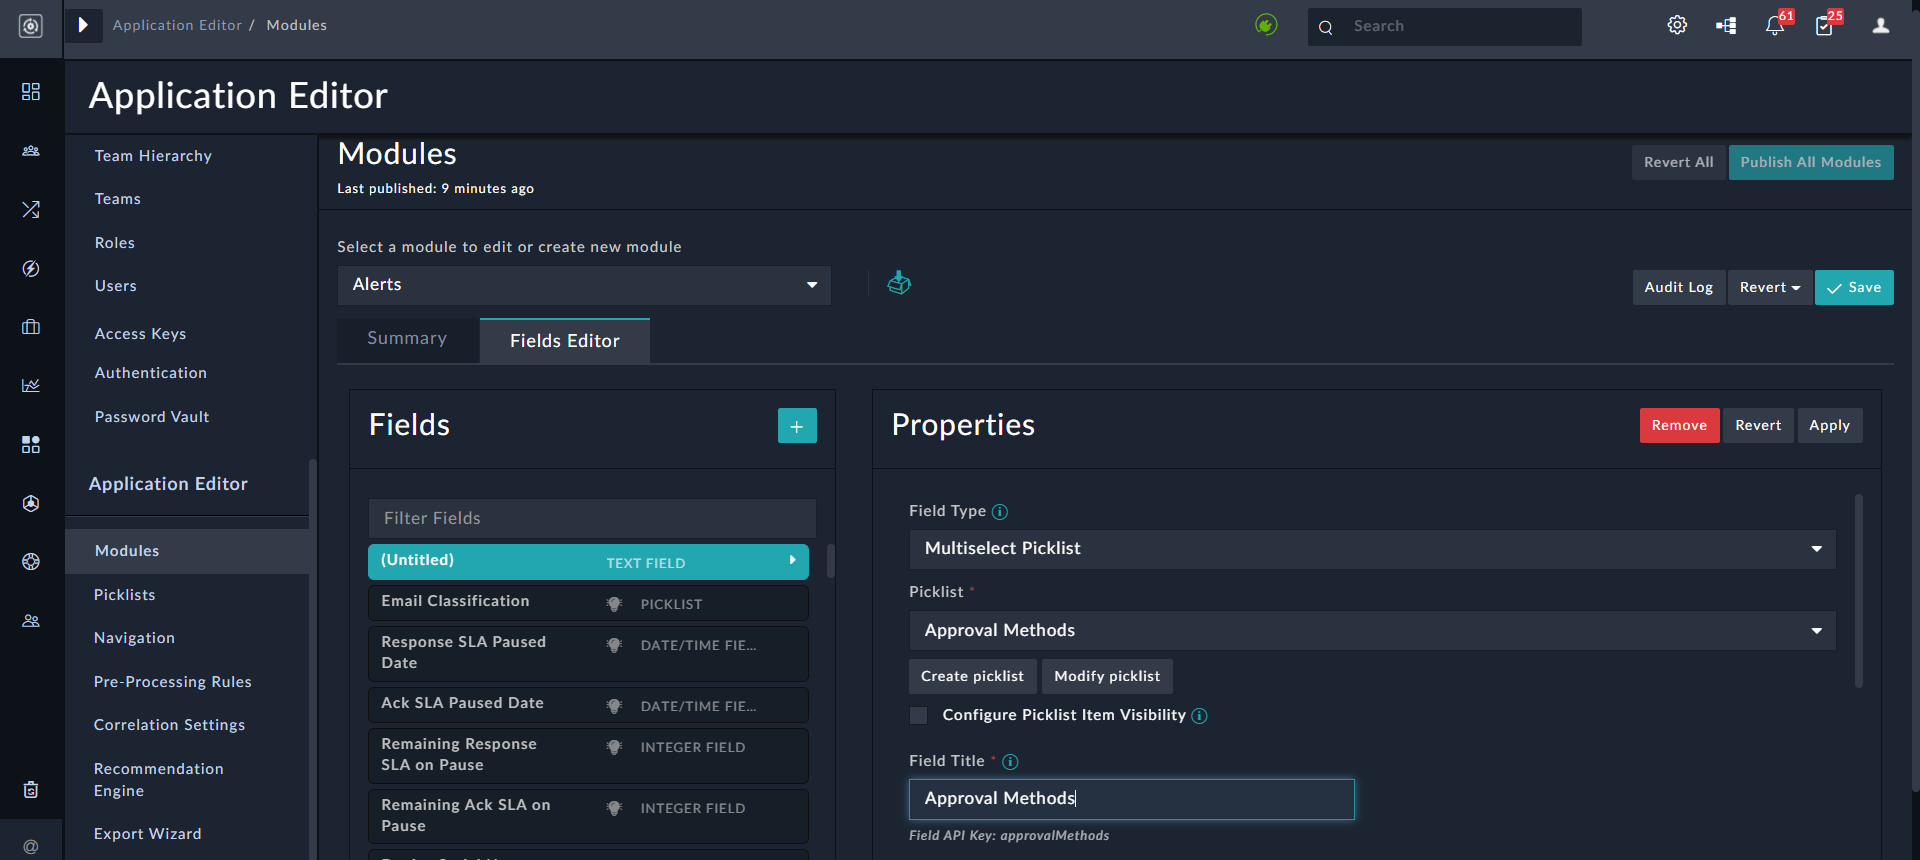
You can also modify an existing picklist, for example AlertType, by adding or removing picklist items or changing the properties of the picklist itemsselect an existing picklist
Relationship fields:
To add a relationship field, i.e., selectLookup (One to Many or One to One),Many to One, orMany to Many, a Related Model drop-down list will appear from where you can select the related module, and provide the Field Title before you publish the module.
Also, in case of theMany to Manyrelation field type, fields are by default added with same module name to the other side of related module, which simplifies the process of creating many to many relation fields.
Notes with respect to Relationship fields:- If you have added a
Many to Onerelationship field in a module, then it is recommended that you set up aLookuprelation field on the related module for the modules to work as expected. If you do not set up aLookuprelation field on the related module, the 'Publish' operation fails with an appropriate error message displayed on the FortiSOAR UI. The error message displayed is as follows: "For many-to-one "<nameOfRelationshipField>" field in "<nameOfModule>" module there is no lookup field present in "<nameOfRelatedModule>" module." - In the case of
Lookup (One to Many or One to One)fields that havePeopleas a related module contain theFilter Settingsection. If you select the Only show users with record ownership checkbox in theFilter Settingssection, then the list of users displayed in the lookup on the UI is restricted to include only those users who have record ownership. Further, you can also limit the list of users displayed in the lookup based on permissions given to the user on the module using the Limit ownership users to ones with module access to option. In the Limit ownership users to ones with module access to option, you can choose to display users who have Read access or Update (Read + Update) access.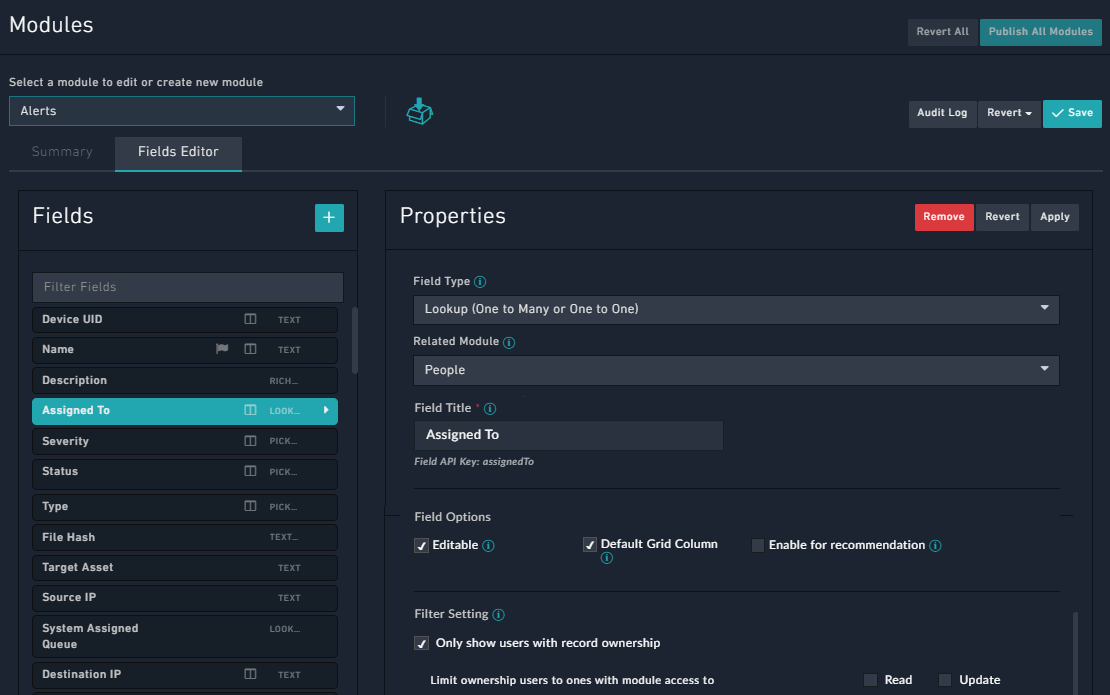
Example: In the Alerts module, we have an Assigned To field, which is of typeLookup (One to Many or One to One), with People as the related module. In this case by default, all users will be displayed in the Assigned To lookup, when you open an alert record. However, this could include users who belong to other teams, and who, therefore, would not have access to the record, even if you assign that record to that user.
Therefore, to restrict the users to only those users who have access to the record, you can select the Only show users with record ownership checkbox. You can further restrict users displayed in the Assigned To lookup based on the module access. For example, if you want to display only those users who can update the record, in the Limit ownership users to ones with module access to field, select the Update checkbox (once you select the Update checkbox, the Read checkbox is automatically checked).
You can drag and drop files in the "File Field" type field. An example of a "File Field" is "Email"; therefore, if you have an Email field in your record, then you can drag and drop an email to attach it to the record as shown in the following image:
- Sub Type: The "Sub Type" field can be used along with the Text and DateTime type fields.
When you select DateTime in theField Type, then the Sub Type drop-down list is displayed, from which you can select either Date Field or Date/Time Field as the sub types. Select the sub type as Date for fields that do not require the time component, and only require the date to be displayed. For Date fields, the time is considered as 12 A.M.
Note:DateTimefields, such as 'Created On', 'Modified On', etc. are stored with milliseconds precision (earlier it was seconds). If you have upgraded to release 7.2.0 or later from a release earlier to 7.2.0, and users add new values to any existingDateTimefields, then those are stored with milliseconds precision; however, values in theDateTimefields that were present before the upgrade would yet be present in the old format, i.e., stored with the seconds precision.
When you select Text in theField Type, then the Sub-Type drop-down list is displayed, from which you can select the sub-types such as, Text Field, Rich Text (Markdown), Rich Text (HTML), Text Area, IPv4, IPv6, Domain, URL, or Filehash. The sub-type field enforces the format of data that the user can enter in that field. For example, in a Rich Text (HTML) or Rich Text (Markdown) fields, you can use formatting options or you can use the IP address and domain field types to lookup threat intelligence tools and whois info. You can also add images in the richtext fields (or in the Richtext Content widget); however, in case of .svg files, the Chrome browser does not restrict expansion of XML entities inside SVGs, which can rendering of image tag with any link in the href attribute that could case a client-side denial of service. Therefore, administrators can choose to not load SVG files enabled in HTML or Markdown Editors by updating the/opt/cyops-ui/vendor/config.jsonfile usingSSH. In theconfig.jsonfile, update the value of theAllowSVGContentparameter to 'false'. In such a case the SVG will render as "<\\img src="https:\/\/link.svg">" in a richtext field, such as the 'Description' or the 'Comment' field.
Important: When you select Rich Text (HTML) or Rich Text (Markdown) for a field that expects data to be populated from external data sources using data or email ingestion, then ensure that the System View Template (SVT) of that field is set to 'IFrame' to prevent any XSS attack attempts or overriding of the parent CSS styling. For information on setting SVTs, see the Working with System View Templates topic.
Note: For all modules, the default rich text editor is set to "Markdown", i.e., the Rich Text (Markdown) is selected for rich text fields. You can change the editor from markdown to HTML by selecting the appropriate sub-type for a field and then publish the module for the changes to reflect. - Field Title: A short descriptive name describing the item.
TheField API Key is automatically created based on the value of Field Title field. The field can be alphanumeric and starts with a lower-case alphabet and does not contain any spaces, underscores or any special characters. Note that the value of this field does not get changed once the field has been created and the module has been published. This is because there is no migration path from the old name to the new name, so you risk data loss if this value is changed. Therefore even if you change the Field Title value the value of the Field API Key will not be changed.
Note: If you have a field, in a module, whoseField Title(Singular Description) attribute value contains a.or$, then the Audit Logs replace the.or$with an_. For example, if you have a field SourceID whose singular description you have specified asSource.ID, then in this field will appear asSource_IDin Audit Logs. - Editable: Selecting this option allows you to modify the field after the creation of a module record. If this option is not selected, then you cannot modify the initial value after the record is created.
- Delete Associations With Parent: Selecting this option cascades the deletion of a parent record to all the associated records for the
Many to Onerelation type fields. For example,EventsandAlertshave aMany to Onerelationship, i.e., one alert could have many associated events. If you select this option, then if an alert is deleted all its associated events also get deleted. Another example would be the case where one alert has multiple comments, and selecting this option cascade deletes the comments that are associated with a deleted alert.
Warning: Select this option with caution since RBAC is Not applied for child records. For example, if you haveDeletepermissions on theAlertsmodule but not on theEventsmodule, and you have selected this option, then deleting an alert with associated events, leads to the associated events getting deleted, irrespective of the permissions on theEventsmodules. - Searchable: Selecting this option makes this field searchable in the grid view.
- Default Grid Column: Selecting this option makes the field appear as a column by default in the grid view. The order of the grid columns is defined by order of the fields in the Field Editor list. For information about grids, see the Working with System View Templates topic.
- Enable for recommendation: Selecting this option enables this field to accept values generated from the recommendation engine. Once you select this option, then an 'Auto populate' checkbox will appear beside this field while configuring data ingestion and also while creating or updating records using playbooks. This option appears for fields of type 'Picklist' and 'Lookup'.
- Encrypted: Selecting this option enables encrypting of field values before storing in the database for enhanced security. FortiSOAR UI will continue to display the non-encrypted values. Currently, Text Fields, Email Fields, Rich Text Area and Text Area fields can be encrypted. FortiSOAR uses AES-256 encryption to encrypt and store the values in the database.
Important: Once you enable encryption you cannot search the field values in FortiSOAR UI. Filters also will not work on encrypted fields. You also cannot use the upsert functionality for fields that are encrypted. - Required: Specifies whether the field is a required field.
The options are: Not required, Required, or Required (by condition).
Once you select Required (by condition), FortiSOAR displays the Condition Builder options where you must add the necessary condition.
Note: FortiSOAR also supports advanced date operations and nested conditions for the Required (by condition) fields i.e., the Add Condition Group link is now available for these fields.
Important: Do not choose the Visibility = Hidden option for Required (by condition) fields. - Visibility: Specifies whether the field is visible or not.
The options are: Hidden, Visible and Visible (by condition).
If you select the Hidden option, then the field is only accessible at the API level and not shown in the UI.
If you select the Visible option, then the field is displayed on the UI. If you select the Visible (by condition) option, then the field is displayed on the UI only if the specific conditions are met.
Once you select Visible (by condition), FortiSOAR displays the Condition Builder options where you must add the necessary condition.
Note: FortiSOAR also supports advanced date operations nested conditions for the Visible (by condition) fields i.e., the Add Condition Group link is now available for these fields: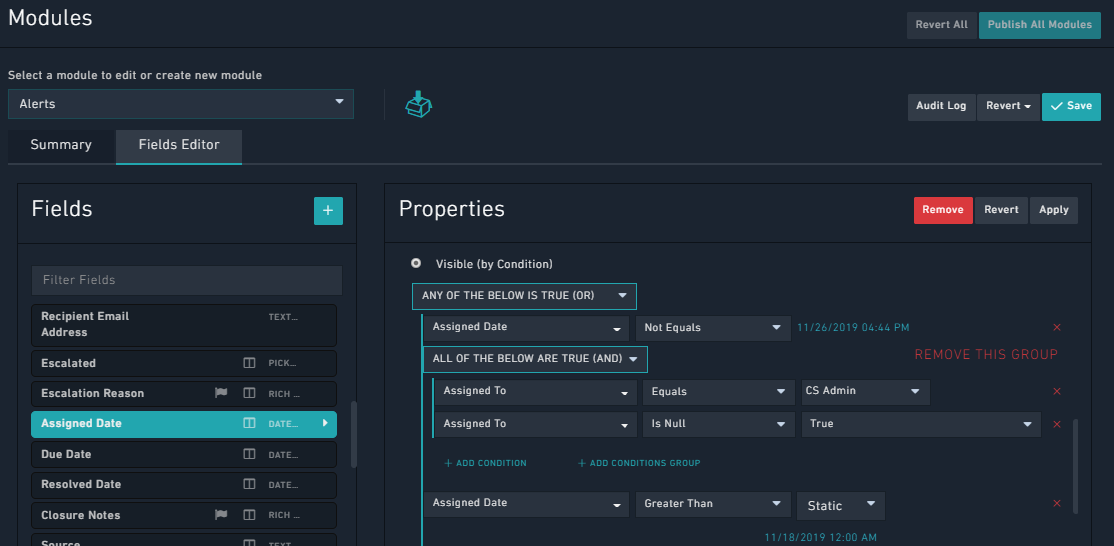
- Default Value: Specifies the default value of this field. Once you specify a value in this field, then this value will be displayed, by default when you add a record in the selected module.
For example, if you want the status of a newly created alert to be set to Open, by default, then select the Status field and from the Default Value drop-down list, select Open as shown in the following image: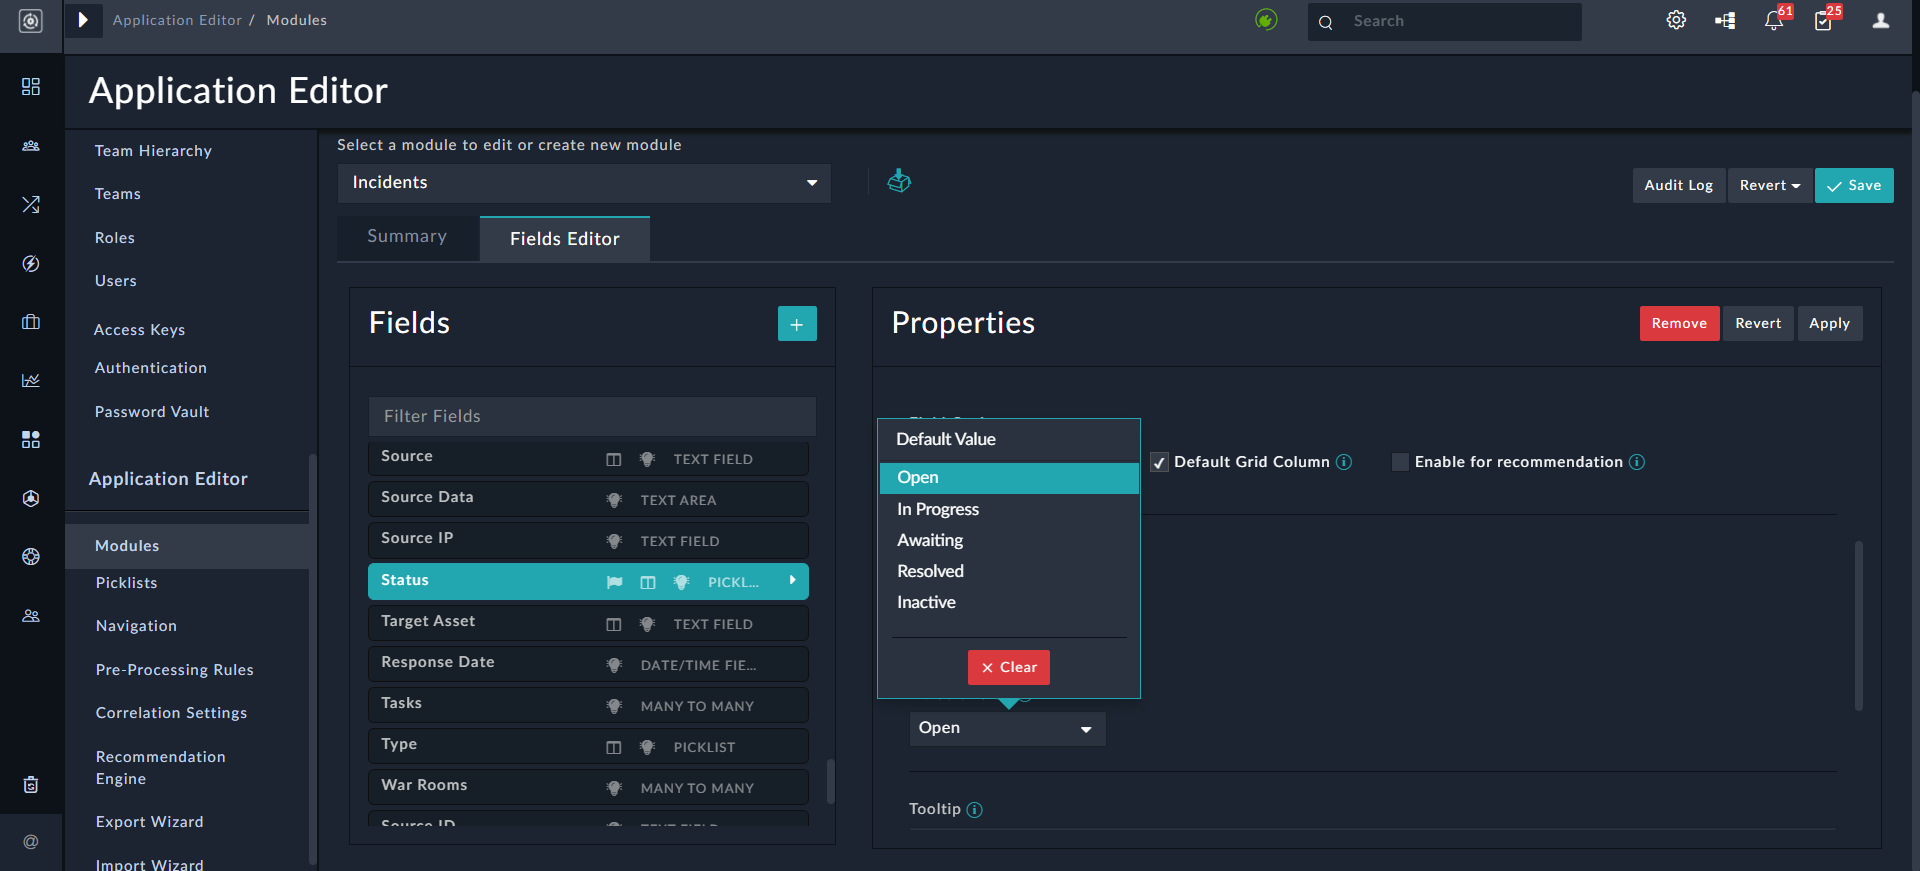
Once you set the default value, then whenever you add a new record in theAlertsmodule (in our example), then by default Open will be displayed in the Status field.
In the Default Value field for theDate/Timefield type you can specify either a Static date/time or a Custom date/time. If you select Static, click the Select Date icon to display the Calendar and select the required date/time. If you select Custom, then you can specify a date/time relative to the current date/time such as 1 hour from now, or 3 hours ago.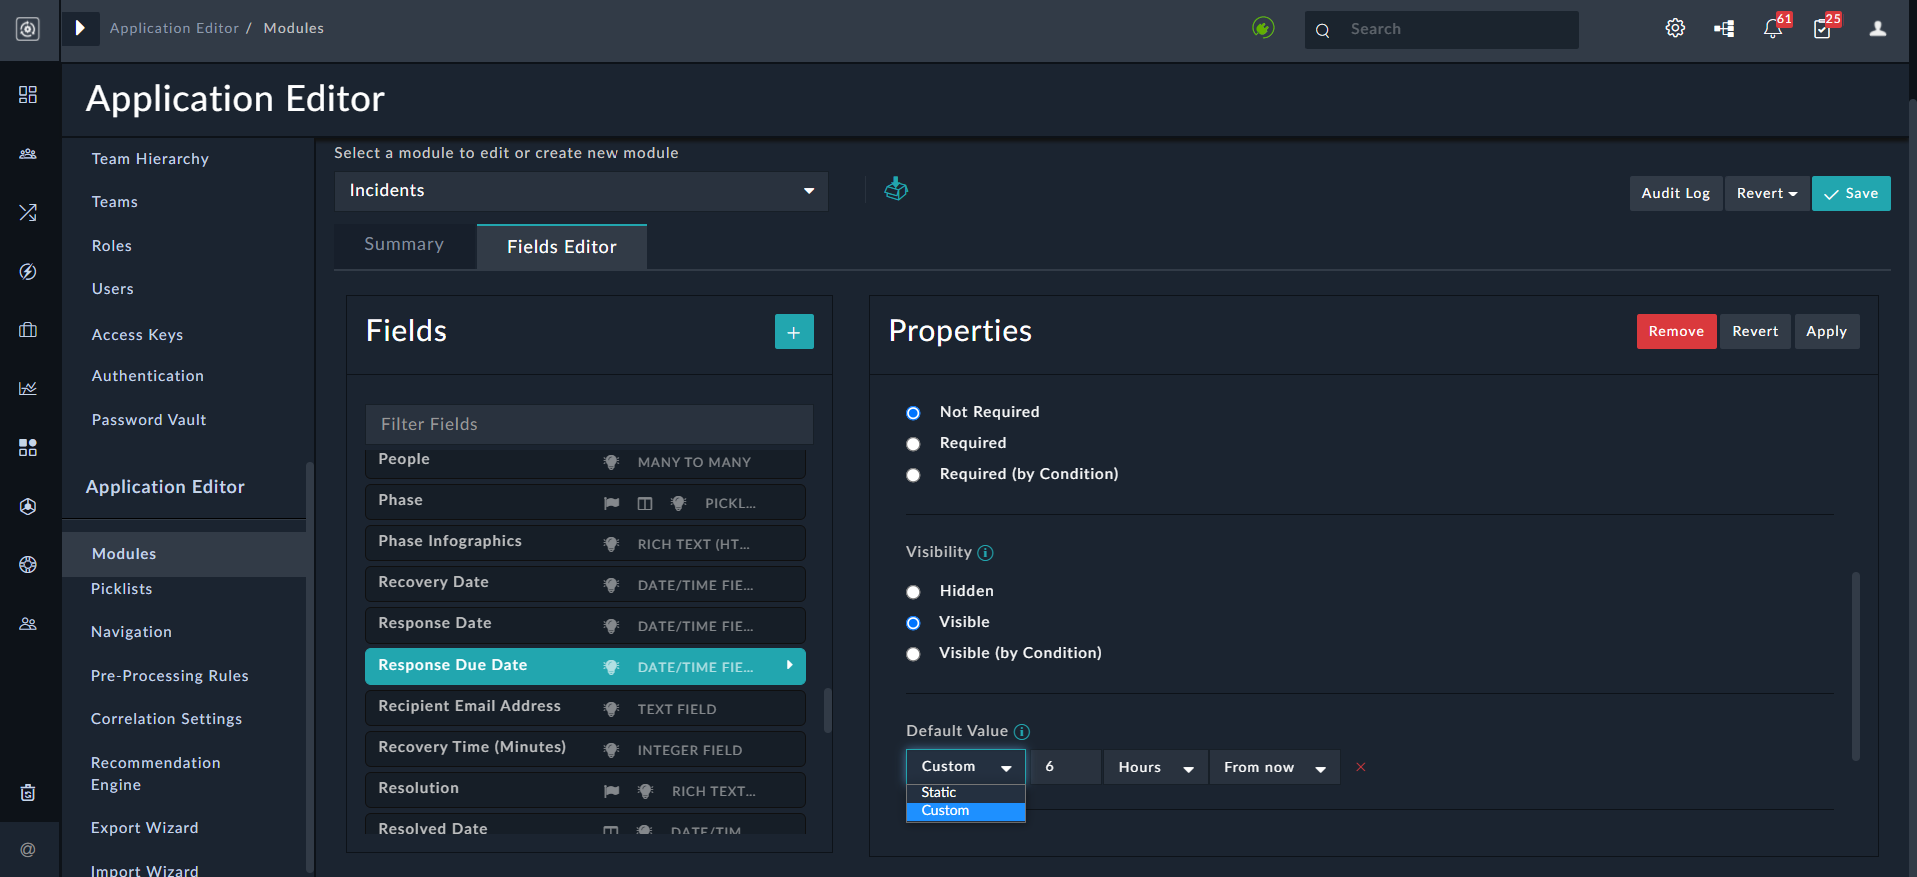
Note: In case you have upgraded to version 5.0.0 or later, then you will have to reselect your datetime default values, since the new datetime format is not backward compatible. You will be able to see the older applied datetime default value in the FortiSOAR fields. However, if you want to edit the default field, then you will have to specify the datetime again in the Default Value field. - Tooltip: Brief definitions that you can optionally add to fields. This definition is displayed when you click the information (i) icon of the field that has tooltip information added while creating, updating, or viewing records.
- Length Constraints: In case of a Text field with sub-type set as Text Field or Text Area, you can specify length constraints by clicking the Add minimum/maximum range checkbox, if you want to override the default field length constraints by providing a minimum-maximum range for a field. Once you select the Add minimum/maximum range checkbox, you can specify the minimum character length for the field in the Minimum field and the maximum character length for the field in the Maximum field. You can enter any number from
0to the maximum character length that is applicable for that field in the database. FortiSOAR will display a validation message if the maximum character length for the field is exceeded, or if the minimum character length for the field is not met. - Bulk Edit: Selecting the Allow Bulk Edit option to allow bulk edit operations on the selected field.
For example, if you have selected the Severity field, in theAlertsmodule, and have clickedAllow Bulk Edit, this means the users can select multiple records in the grid view of theAlertsmodule and change the severity of those records to a particular severity level.
You must enter the following details for the button that you want to use for the bulk edit operation:
Button Text: In the Button Text field, type the name of the label that will be displayed on the bulk action button. For example, type Change Type.
Button Icon: From the Button Icon drop-down list, select the icon that will be displayed on the bulk action button. If you do not want an icon to be displayed, select None.
Button Classes: From the Button Classes drop-down list, select from the Default, Primary, Danger, or Warning styles.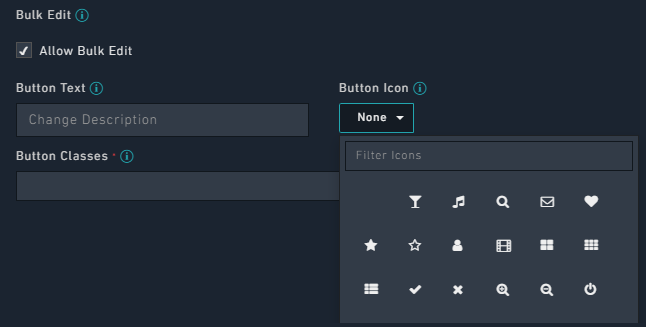
Once you save the changes and publish the module, a Change Severity button is added to theAlertsmodule in the action bar. For more information on how to use the bulk action button, see the Working with Detail Views topic. You can add the bulk edit action button for any other fields, such as Status, Assigned To, and Type.
- Field Type: The type of field; it specifies the type of form used to render this attribute. Examples of field types are text, file field, checkbox, integer, decimal, date/time, picklist, and relationship fields.
- Click Apply to add the field or click Revert to clear any changes made to the field since the last
Saveevent or click Remove to remove the field.
For information on the save and revert operations, see the Saving Changes section.
- You can also define the order of the default grid columns, which is defined by the order of the fields in the
Fields Editorlist. Fields are listed in the Fields column and you can drag-and-drop the fields to sequence the fields. You can also filter fields using the Filter Fields box.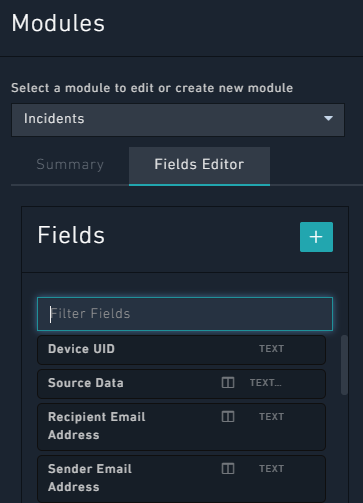
- Click Save to save the changes to the module or click Revert > Revert to last saved to clear any changes made in the interface since the last
Saveevent or click Revert > Revert to last published to clear any changes made since the last Publish event. For fields, you can revert only to the last published instance.
For information on the save and revert operations, see the Saving Changes section.
Once you have completed making modifications to the module, you must publish the modules to reflect the changes in the system. This takes the system down for up to a few minutes while the changes are made. See the Publishing Modules section for more information.
|
|
The Module Editor changes the relational database schema, therefore for changes to go live in the environment, you must perform a Publish to the database. This temporarily takes the application offline while the database operations are being performed. All users in the application must save their work prior to this occurring before this occurs or you risk data loss. |
Display Template
A module's Display Template refers to one or more fields in the data model itself that is used to display a record in the general interface. Certain widgets, or visualizations in the interface, use the Display Template to identify records to the user. This template specifies the fields that will be displayed when a record from this module is referenced in the application. Fields of a module can be specified in the display template as
{{ <*name of the module's field*>_name}}. If multiple fields are part of the display template, then you can specify multiple fields as {{field_name1,field_name2,…}}.
|
|
If you were to use just the name of the module itself, such as Incidents, every Incident record in the interface would include a label named |
You can also include an attribute, such as itemValue, of a picklist field in the Display Template, add the following jinja: {{picklistFieldName.itemValue}} . For example if you want to include the status of the alert in the Display Template, then the picklist to be used would be AlertStatus, and the picklist field name would be status:
Therefore you require to add the following jinja: {{status.itemValue}} in the Display Template.
Example
We have taken the Asset module as an example. Assets represent computing resources, typically on the network. Assets generally have a hostname, IP Address, or MAC Address. We are using the hostname as an example.
To create a Display Template for the Assets module with the hostname, you must ensure that you have already added the hostname field using the Field Editor. Once the hostname is added as a field in the Assets module, use the following expression in the Display Template field:
{{ hostname }}The double curly braces, {{ }}, is used to identify a variable, specifically a field name. In our case, we are calling the hostname field. Any expression in the Display Template field that uses a field from the module data fields must use the double curly braces surrounding the field name. When the record is displayed, the hostname of each asset is used in the interface, so users know the asset they are selecting. For example, a user can know that they are selecting an HR Server.
Assets have a unique situation. They might only have one of those pieces of identifiable information depending on what is known about a resource. A laptop on a DHCP network might have only a MAC address. If we set the Asset Display Template to always be a hostname, in many cases the asset might have a blank Display Template in the interface. For these situations, the Angular Template expression allows you the flexibility to modify the format of the Display Template in a way that can account for variation. Taking the asset example, asset information is used to help users identify the asset when in the interface. Because using only a single asset field could potentially lead to a lot of blank Display Templates, we use multiple fields such as hostname, IP address and Mac address:
{{ hostname }} {{ ip }} {{ mac }}This Display Template expression instructs the system to use all three fields based on their field names. If a field is not present, it displays as blank. In some cases, depending on what is known about the asset, the Display Template will include all three pieces of information, in others just one.
You can further extend this to display static information that identifies the parts of the Display Template. The following example includes the static text of Hostname:IP: and MAC: in every Display Template. This might be redundant but is an option.
Hostname:{{ hostname }} IP:{{ ip }} MAC:{{ mac }}We recommend that to keep things simple, most of the time you would want to use the following expression for a Display Template, assuming you always create a name field for a module:
{{ name }}This ensures that the Display Template points to whatever is in the name field on any module record. If you create name as a required field, then it will always be populated.
Saving Changes
Whenever you make any changes to a module or a field, you must stage those changes by saving. At the top-right of the Module Editor is the Save button, which applies any changes made to the staged data. To update the database and make your changes to go live, you must Publish the updated modules.
The Revert button clears any changes made in the interface since the last Save event. If you go into a module and realize that you have edited the wrong field, use Revert to clear the changes. However, once you press Save, you require to undo the changes manually.
Viewing Changes
Editing any of the fields of a module does not mean those fields are accessible immediately within the UI or the API. The fields must be first represented in the database. The templates included might automatically discover these fields, or these fields might need to be added manually to the template to specify their location within the interface. However, you can set the grid defaults within the attribute data for the model itself.
To update the database and make your changes to go live, you must Publish the updated modules.
Publishing Modules
Whenever you change a field or a module and click Save, the change is staged but is not yet live in the system. You must perform a Publish to ensure that the changes are made in the system.
You initiate a publish action by clicking the Publish All Modules button at the top-right of the Module Editor page. Publishing pushes the changes that you have made to fields and modules to the database. Up until the Publish point, all changes to the data model in the Module Editor are saved as metadata, which is information that describes the structure of other information.
A Publish is the point at which the changes are truly irreversible, meaning that an unintended field deletion could cause irretrievable data loss. Use Publish carefully and verify changes before Publishing to avoid any problems.
|
|
"Publishing is a sensitive operation" |
If there is any error during the publish operation, FortiSOAR displays a meaningful error message at the top of the module editor, so that it becomes easier for you to resolve issues.
|
|
If you have not selected an appropriate field from the Related Model drop-down list, for a |