
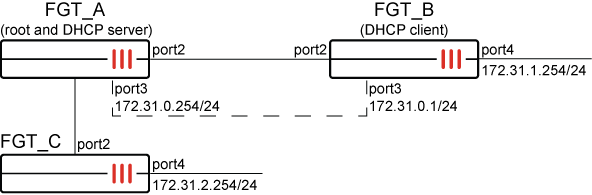
Example 1: IPAM in a Security Fabric setup
In this example, FGT_A is the Security Fabric root with IPAM enabled. FGT_B and FGT_C are downstream Fabric devices and retrieve IPAM information from FGT_A.
The Fabric interface on all FortiGates is port2. FGT_A acts as the DHCP server, and FGT_B acts as the DHCP client.
General configuration steps
This section breaks down the configuration for this example into smaller procedures:
-
Configure the root FortiGate unit:
-
Configure the IPAM Settings.
-
Configure the IPAM Subnets.
-
Configure the IPAM Rules.
-
Assign an IP address using the IPAM.
-
-
Configure the downstream FortiGate units:
-
Configure FGT_B and FGT_C to receive an IP address using the IPAM.
-
Configure FGT_B to receive an IP address using the DHCP.
-
-
Verify IPAM allocations and DHCP clients.
Configuring IPAM in the GUI
Use the following steps to configure the example configuration in the GUI.
To configure the root FortiGate (FGT_A):
-
Configure the IPAM settings:
-
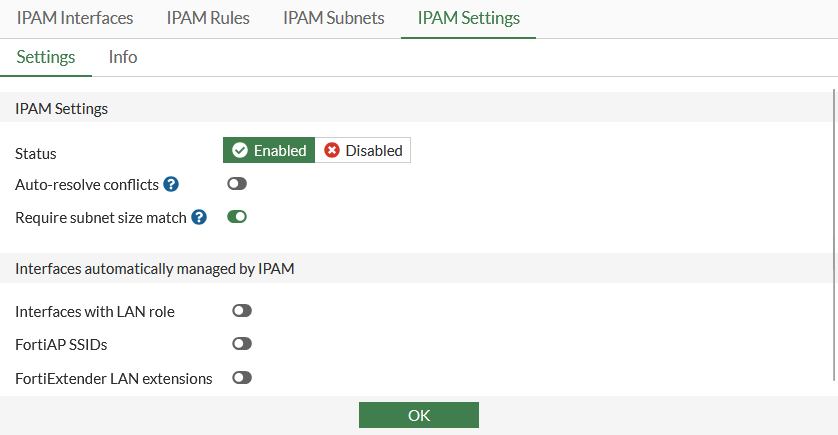
Go to Network > IPAM and select the IPAM Settings tab.
-
Set Status to Enabled.
-
Click OK.
-
-
Configure the IPAM subnets:
-
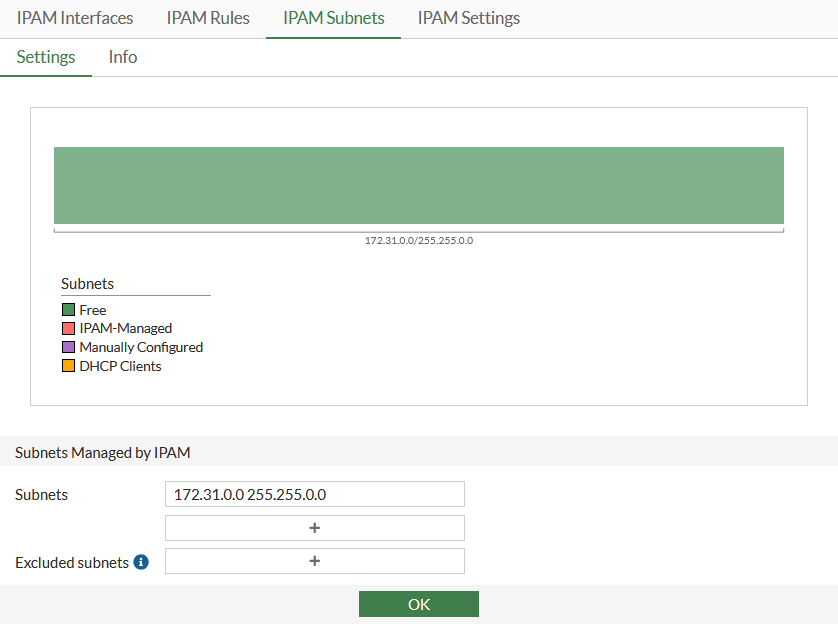
Go to Network > IPAM and select the IPAM Subnets tab.
-
Configure subnet 172.31.0.0/16
-
Click OK.
-
-
Configure the IPAM rules:
-
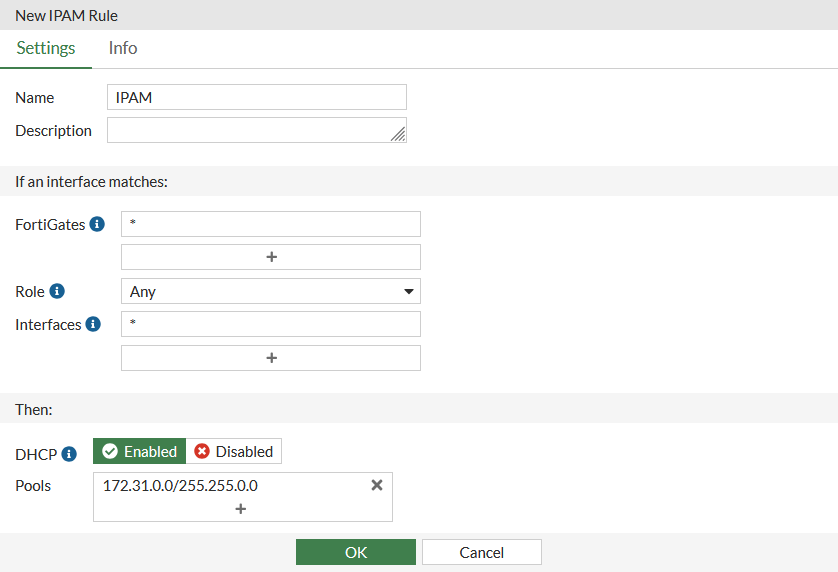
Go to Network > IPAM and select the IPAM Rules tab.
-
Click Create New and configure the settings:
Option
Value
Name
IPAM
Description
Optional
FortiGates
*
Role
Any
Interfaces
*
DHCP
Enabled
Pools
172.31.0.0/255.255.0.0
-
Click OK.
-
-
Assign an IP address using the IPAM:
-
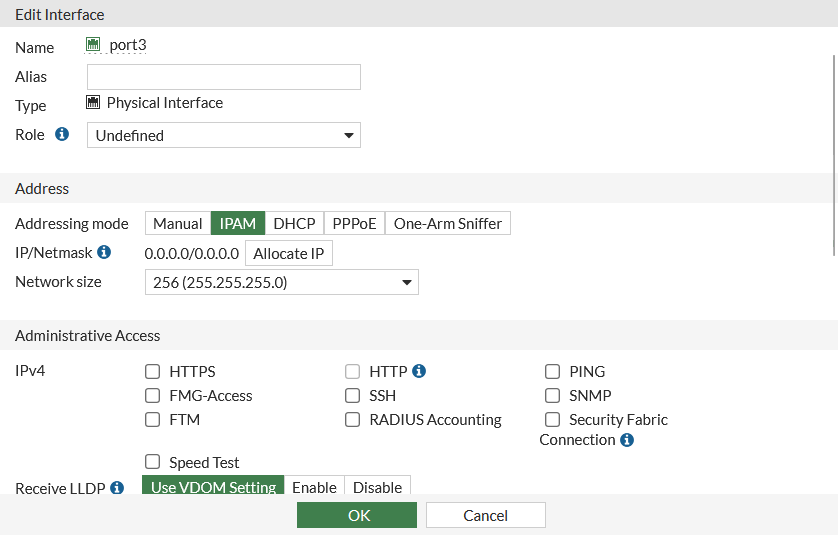
Go to Network > Interfaces and edit port3.
-
Set Addressing Mode to IPAM
-
Leave Network size as the default subnet.
-
Click OK.
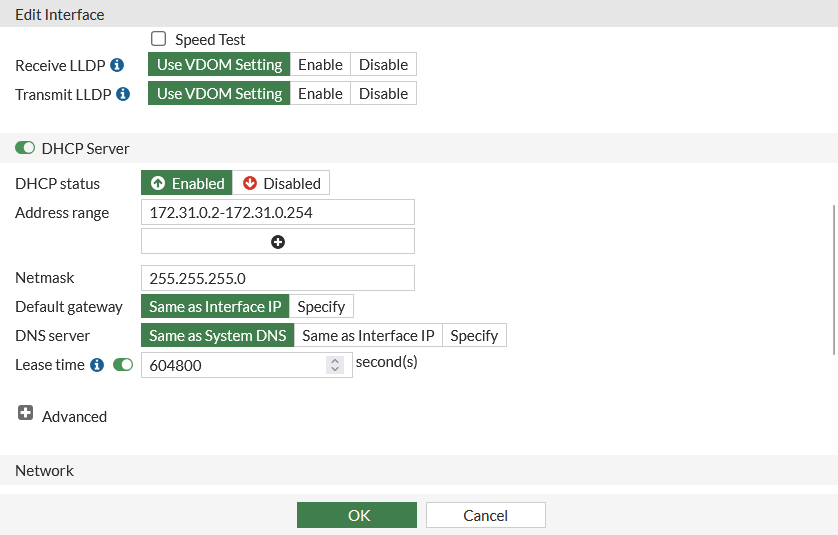
Since IPAM is managing a 172.31.0.0/16 network, the IP/Netmask field in the Address section is automatically assigned a class C IP by IPAM. The Address range and Netmask fields in the DHCP Server section have also been automatically configured by IPAM.
-
To configure the downstream FortiGate units:
-
Configure FGT_B and FGT_C to receive an IP address using the IPAM:
-
Log in to FGT_B and set the Addressing Mode of port4 to IPAM. The subnet assigned from the pool on the root is 172.31.1.254/24.
-
Log in to FG_C and set the Addressing Mode of port4 to IPAM. The subnet assigned from the pool on the root is 172.31.2.254/24.

Any interface on a downstream FortiGate can be managed by the IPAM server. The interface does not have to be directly connected to the Fabric root FortiGate.
-
-
Configure FGT_B to receive an IP address using the DHCP:
-
Log in to FGT_B and set the Addressing Mode of port3 to DHCP.
-
Click OK.
The IP assigned from the DHCP pool on the root is 172.31.0.1/24.
-
To verify IPAM allocations and DHCP clients:
Log in to FGT_A, go to Network > IPAM and select the IPAM Interfaces tab to view the IP addresses allocated by IPAM (port3, port4, and port4)
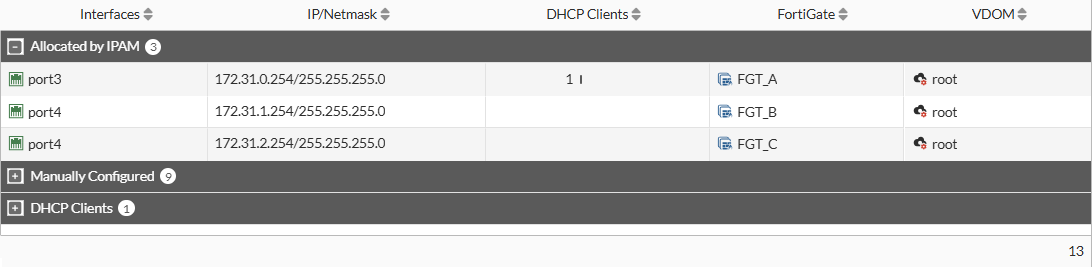
FGT_B, port3 is a DHCP client and the DHCP server interface (FGT_A port3) is managed by IPAM, so it is displayed in the DHCP Clients section:

Configuring IPAM in the CLI
Use the following steps to configure the example configuration in the CLI.
To configure the root FortiGate (FGT_A):
Enable IPAM and configure IPAM subnets and rules:
config system ipam
    set status enable
    config pools
        edit "1"
            set subnet 172.31.0.0 255.255.0.0
        next
    end
    config rules
        edit "IPAM"
            set device "*"
            set interface "*"
            set pool "1"
            set dhcp enable
        next
    end
end
To configure the downstream FortiGate units:
-
On both the FGT_B and FGT_C, receive an IP address using the IPAM:
config system interface edit "port4" set ip-managed-by-fortiipam enable next end -
On FGT_B, receive an IP address using the DHCP:
config system interface
    edit "port3"
        set mode dhcp
    next
end
To verify IPAM allocations and DHCP clients:
# diagnose sys ipam list entries
Entries: (sn, vdom, interface, subnet/mask, conflict)
  IPAM Entries:
  FGVMSLTM25016113 root port3 172.31.0.254/24
  FGVMSLTM25016114 root port4 172.31.1.254/24
  FGVMSLTM25016115 root port4 172.31.2.254/24

  Static Entries:
  FGVMSLTM25016113 root fortilink 10.255.1.1/24 C
  FGVMSLTM25016113 root port1 172.16.200.1/24 C
…
  DHCP Entries:
  FGVMSLTM25016114 root port3 172.31.0.1/24