
Decoy Status
The Decoy Status page shows the status of the Decoys on your network. Use the page to start, stop or delete a decoy. You can also view the decoy's configuration details and copy the decoy template.
We recommend operating Decoy VMs with the same status for expected behavior.
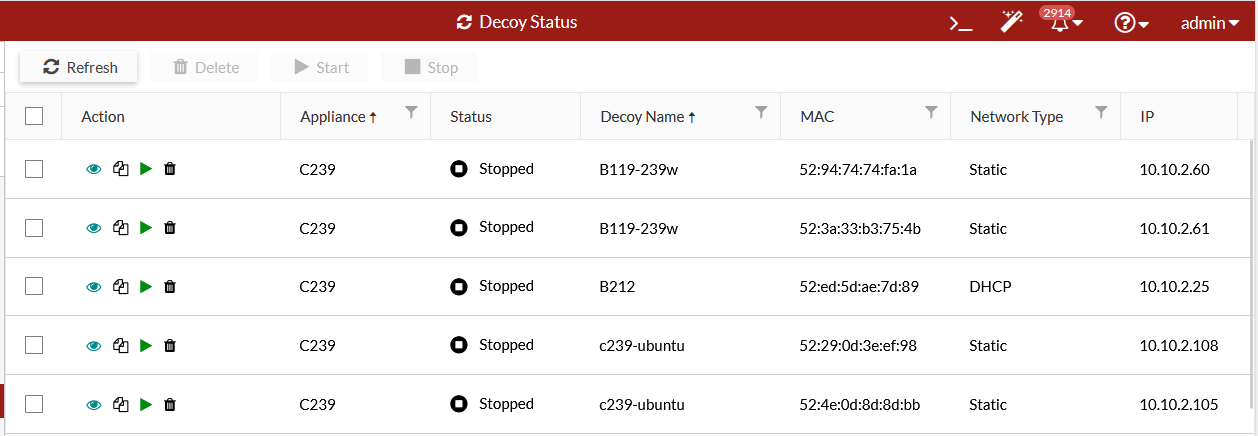
The Decoy Status page displays the following information:
|
Status |
The status of the decoy can be Initializing, Running, Stopped, or Cannot Start. If the Decoy VM cannot start, hover over the VM to see the reason. |
|
Decoy Name |
Name of the decoy. |
|
Initialize Time and Start Time |
The decoy's initialization time and its last start time. |
|
OS |
Operating system of the decoy. |
|
VM |
The name of the Decoy VM. |
|
IP |
The IP address of the Decoy VM. |
|
Services |
List of services enabled. Hover over an icon to see a text list. |
|
Network Type |
Shows if the IP address is Static or DHCP. |
|
DNS |
DNS of the Decoy VM. |
|
Gateway |
Gateway of the Decoy VM. |
To view the decoy configuration details:
- Go to Deception > Decoy Status and select a decoy.
- In the Action column, click View Details
 . The Config Detail page opens.
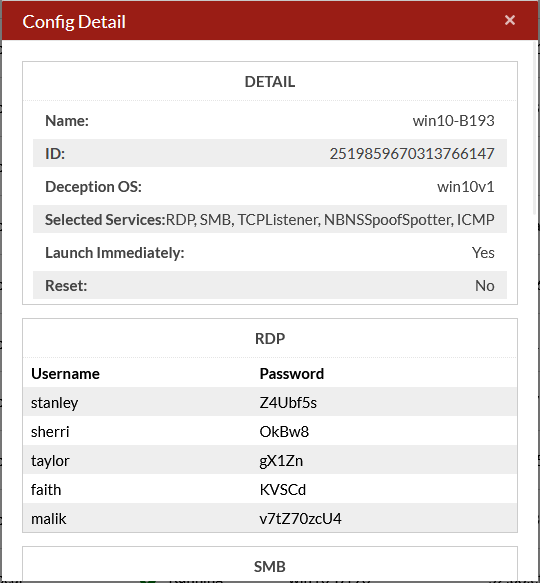
To copy a decoy the Deployment Wizard:
- Go to Deception > Decoy Status and select a decoy.
- Click Copy to Template
 . The template is copied to the Deployment Wizard.
To delete Decoy VMs:
- Go to Deception > Decoy Status and select one more decoys.
- In the Action column, click Delete
 .
. - Click OK.
To start a Decoy VM:
- Go to Deception > Decoy Status and select one more decoys that are stopped.
- In the Action column, click Start
 .
.
To stop a Decoy VM:
- Go to Deception > Decoy Status and select one more decoys that are running.
- In the toolbar, click Stop. The decoy status changes to Stopped
 .
.
To edit a Decoy VM:
- Go to Deception > Decoy Status and select a decoy with any status.
- In the toolbar, click Edit. The decoy can also be modified in the Deploy Decoy page.
- Edit and updated the decoy domain. A decoy that is:
- Not joined to a domain can be configured to join a domain.
- Joined to a domain can be configured to leave the domain.
- Joined to Domain A can be reconfigured to join Domain B. This requires entering the DNS addresses for both Domain A and Domain B in Deployment Wizard > Set Network > DNS/DNS2 (the order does not matter).
FortiDeceptor 6.2 does not support editing decoys created in version 6.1 for Cloud VMS, Cloud VME, or 100G clients.
Starting in version 6.1, the default deception OS, Windows 10v1, also supports joining an AD domain. In previous versions, only customized images with AD domain could join the same AD domain when deploying a decoy. The procedure remains the same.