
Creating SSIDs
In central management mode, the SSIDs are profiles that can be applied to multiple controllers. SSID profiles can be created for different traffic modes, including Tunnel, Bridge, or Mesh.
For more information on SSID settings, see the FortiWiFi and FortiAP Configuration Guide on the Fortinet Document Library.
The settings available in the GUI change depending on which traffic mode is selected.
|
|
FortiManager includes Fortinet recommended factory default SSID profiles that you can activate and use in your environment. See Using Fortinet recommended profiles. |
To create a new SSID:
-
Go to AP Manager > SSIDs.
-
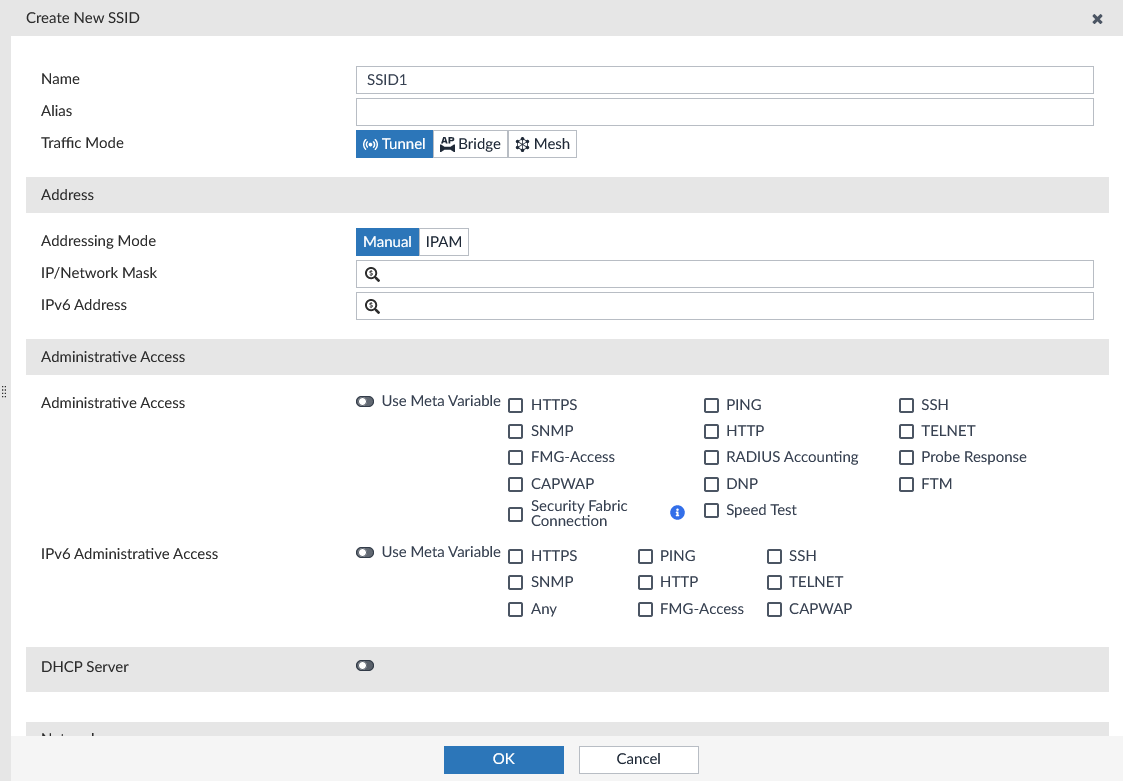
In the toolbar, click Create New > SSID. The Create New SSID windows opens.
-
Enter the following information:
Name
Type a name for the SSID.
Alias
Set the alias for SSID.
Traffic Mode
Select the traffic mode: Tunnel, Bridge, or Mesh.
Address
These options are only available when Traffic Mode is Tunnel.
Address Mode
Select Manual or IPAM.
When to use IPAM
Choose Always or Inherit IPAM auto-manage settings.
This setting is only available when the IPAM Address Mode is selected.
Network Size
Select the network size. IPAM will allocate an IP subnet with the selected size.
This setting is only available when the IPAM Address Mode is selected.
IP/Network Mask
Enter the IP address and netmask for the SSID.
This setting is only available when the Manual Address Mode is selected.
IPv6 Address
Enter the IPv6 address.
Administrative Access
Administrative Access
Select the allowed administrative service protocols.
IPv6 Administrative Access
Select the allowed administrative service protocols.
DHCP Server
Enable or disable a DHCP server. To assign IP addresses to clients, enable DHCP server.
DHCP Status
Set the DHCP status as Enabled or Disabled.
IP Range Managed by IPAM
Choose if the IP range is managed by IPAM.
Default Gateway
Choose the default gateway as Same as Interface IP or Specify to configure the gateway.
DNS Server
Choose the DNS server as Same as System DNS, Same as Interface IP, or Specify to configure the DNS server.
Lease Time
Set the lease time. Disabling the lease time will result in clients having an unlimited lease time.
Network
Device Detection
Enable or disable device detection.
- Configure the WiFi Settings:
SSID
Type the wireless service set identifier (SSID), or network name, for this wireless interface. Users who want to use the wireless network must configure their computers with this network name.
Client Limit
The maximum number of clients that can simultaneously connect to the AP (0 - 4294967295, default = 0, meaning no limitation).
Broadcast SSID
Enable/disable broadcasting the SSID (default = enable).
Broadcasting enables clients to connect to the wireless network without first knowing the SSID. For better security, do not broadcast the SSID.
Beacon Advertising
Enable/disable beacon advertising. When beacon advertising is enabled, you can select which element(s) you want to advertise from the following:
Name: The FortiAP name
Model: The FortiAP model
Serial Number: The FortiAP serial number.
Encrypt
Select the data encryption protocol:
- TKIP: Temporal Key Integrity Protocol, used by the older WPA standard.
- AES: Advanced Encryption Standard, commonly used with the newer WPA2 standard (default).
- TKIP-AES: Use both protocols to provide backward compatibility for legacy devices. This option is not recommended, as attackers will only need to breach the weaker encryption of the two (TKIP).
This option is only available when the security mode includes WPA or WPA2.
Security Mode
Select a security mode:
OSEN
WPA3 Enterprise Open
WPA 3 Enterprise (PMF Protection) Opportunistic Wireless Encryption (OWE)
WPA3 Enterprise Transition WPA2 Enterprise WPA3 SAE WPA Personal
WPA3 SAE Transition Only Open, WPA2 Personal, and WPA3 SAE modes are available when the traffic mode is Mesh.
Authentication
Select the authentication method for the SSID, either Local or RADIUS Server, then select the requisite server or group from the dropdown list.
This option is only available when the security mode is includes OSEN, WPA2 Enterprise, WPA3 Enterprise, WPA3 Enterprise (PMF Protection) or WPA3 Enterprise Transition.
PMF
Set PMF settings as Disabled, Enabled, or Optional.
This option is only available when the security mode is includes WPA2 Enterprise or WPA2 Personal.
SAE-PK Authentication
Enable/disable SAE PK Authentication. When enabled, enter a SAE-PK Private Key.
Hash-to-Element (H2E) only
When enabled, use hash-to-element-only mechanism for PWE derivation.
This option is only available when the security mode includes WPA3 SAE or WPA3 SAE Transition.
Captive Portal
Select if you want to configure a Captive Portal to authenticate users through a customizable web page.
Portal Type
Select the portal type: Authentication (default), Authentication and MAC Authentication, Disclaimer Only, Disclaimer and Authentication, Email Collection, and External MAC Authentication.
Authentication Portal
Select Local or External. If External is selected, enter the URL of the portal.
User Groups
Select the user group to add from the dropdown list. Select the plus symbol to add multiple groups.
Customize Portal Messages
Select to allow for customized portal messages. Portal messages cannot be customized until after the interface has been created.
Exempt Sources
Select exempt sources to add from the dropdown list.
Exempt Destinations
Select exempt destinations to add from the dropdown list.
Exempt Services
Select exempt services to add from the dropdown list.
Redirect after Captive Portal
Select Original Request or Specific URL. If Specific URL is selected, enter the redirect URL.
Pre-shared Key
Mode
Select Single to specify a single passphrase.
Select Multiple to specify a multiple pre-shared key group.
MPSK Profile
Select a MPSK Profile or click the Create button to create a new MPSK profile.
Passphrase
When Pre-shared Key Mode is set to Single, enter the pre-shared key for the SSID.
This option is only available when the security mode includes WPA2 Personal, WPA3 SAE, or WPA3 SAE Transition.
Client MAC Address Filtering
Enable/disable client MAC address filtering.
For more information, see the FortiWiFi and FortiAP Configuration Guide.
Additional Settings
Schedule
Select a schedule to control the availability of the SSID. For information on creating a schedule object, see Creating objects.
Block Intra-SSID Traffic
Enable/disable blocking communication between clients of the same AP (default = disable).
Split Tunneling
Select to enable some subnets to remain local to the remote FortiAP. Traffic for these networks is not routed through the WiFi Controller. Specify split-tunnel networks in the FortiAP Profile.
Optional VLAN ID
Select to enable the unit to block intra-SSID traffic.
Broadcast Suppression
Optional suppression of broadcast message types:
- All other broadcast: All other broadcast messages
- All other multicast: All other multicast messages
- ARPs for known clients: ARP for known messages
- ARP poison: ARP poison messages from wireless clients
- ARP proxy: ARP requests for wireless clients as a proxy
- ARP replies: ARP replies from wireless clients
- ARPs for unknown clients: ARP for unknown messages
- DHCP downlink: Downlink DHCP messages
- DHCP starvation: DHCP starvation req messages
- DHCP uplink: Uplink DHCP messages
- IPv6: IPv6 packets
- NetBIOS datagram service: NetBIOS datagram services packets
- NetBIOS name service: NetBIOS name services packets
Quarantine Host
Enable/disable station quarantine (default = enable).
This option is only available when the security mode includes WPA or WPA2.
VLAN Pooling
Enable/disable VLAN pooling, allowing you to group multiple wireless controller VLANs into VLAN pools. These pools are used to load-balance sessions evenly across multiple VLANs.
- Managed AP Group: Select devices to include in the group.
- Round Robin
- Hash
This option is not available when the traffic mode is Mesh.
-
Configure advanced options. For information, see the FortiOS CLI Reference.
-
Enable per-device mapping to override the SSID profile settings for selected devices. See Adding SSID per-device mapping.

If you select WPA Enterprise, WPA Only Enterprise, or WPA2 Only Enterprise, you can add a different RADIUS server using per-device mapping. See Adding SSID per-device mapping.
-
Click OK.