
SAML SSO
FortiNDR Cloud translates SAML authentication from the identity provider into the native authentication scheme. User login is the same regardless of whether the user has logged in using SAML or a password. The session state in FortiNDR Cloud is independent of the SAML session. Logging out of SAML does not log the user out of FortiNDR Cloud.
When enabling SAML SSO keep the following considerations in mind:
-
First time FortiNDR Cloud users will have a user record created automatically when they first authenticate using SAML. Users are required to have a first name, but the last name is optional. These users will initially have no permissions. An Admin will need to grant roles to these users using the normal Account Management UI.
-
When existing users authenticate using SAML, any changes to their first and last name will be updated in FortiNDR Cloud as well.
-
FortiNDR Cloud identifies users from SAML by their email address. If the user's email address has changed in the SAML SSO Provider, FortiNDR Cloud will create a new user record for that user the next
-
Disabling a user in FortiNDR Cloud also disables SAML authentication for that user. However, disabling a user in the SAML SSO Provider does not disable the user in FortiNDR Cloud. The user will still have access if they have a password or API token. Users need to be manually disabled in FortiNDR Cloud as well.
-
Users authenticating with SAML are also allowed to authenticate using passwords as well. Typically, at least one Admin in the account should have a password as a backup in case SAML authentication fails.
Failure Scenarios
There are a variety of reasons why SAML authentication may fail.
-
SAML has not been configured for the account.
-
SAML has been configured, but disabled.
-
The user is attempting to authenticate with the wrong account. For example, the user belongs to the Acme account but is trying to authenticate with the Acme Subsidiary account.
-
The user has been disabled in FortiNDR Cloud.
-
The user does not have a first name.
For security reasons, FortiNDR Cloud may not provide the exact reason for the failure. Please make sure that SAML is configured correctly for the account and the user.
To enable SAML login:
- Click the gear icon at the top-right of the page and select Account Management.
- Select an account.
- Click the Settings tab.
-
Click Set up SAML SSO. The SAML Single Sign-on (SSO) Initial Setup dialog opens.
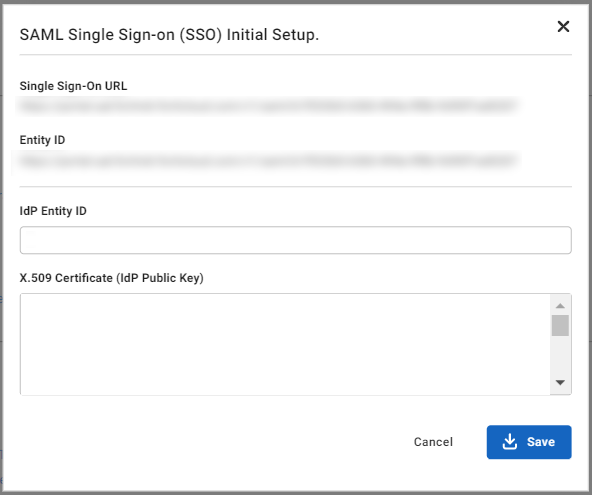
- Copy the values from the Single Sign-On URL and Entity ID fields and paste them into the general settings of your SAML Provider configuration.

Entity ID may also be called Audience URI or SP Entity ID.
-
Set the application's subject or username to Email.
-
Add an attribute statement,
first_name, with the value for a user's first name. -
Add an attribute statement, last_name, with the value for a user's last name.
-
Enter the following information from your SAML SSO Provider into the SAML Single Sign-on (SSO) Initial Setup dialog:
-
IdP Entity ID
-
X.509 Certificate (IdP Public Key)
-
-
Click Save.
To login with SAML SSO:
-
Navigate to your SAML SSO Provider's dashboard
-
Click the ThreatINSIGHT or FortiNDR Cloud button from the SAML SSO Provider's dashboard
|
|
|
To disable SAML SSO:
- Click the gear icon at the top-right of the page and select Account Management.
- Select an account.
- Click the Settings tab and click Disable SAML Settings.
- In the Confirmation Dialog, click Confirm.
OneLogin SAML Configuration
Requirements:
- SAML Single Sign-On URL.
To configure OneLogin:
- Add a new application using the SAML Custom Connector (Advanced). For more information, see the product documentation.
- In the Configuration section, use your FortiNDR CloudSingle Sign-On URL for the following fields:
- Audience (EntityID)
- Recipient
- ACS (Consumer) URL Validator
- ACS (Consumer) URL
The ACS (Consumer) URL Validator is a regular expression. Replace the beginning of the URL:
https://portal.fortindr.forticloud.com/v1/saml/With the following:
^https:\/\/portal.fortindr.forticloud.com\/v1\/saml\/ - Make sure the SAML initiator field is set to OneLogin.
- Change the SAML signature element to Both.
- In the Parameter section, add the following fields and select the Include in SAML assertion flag for each:
Name Value first_name
First Name
last_name
Last Name
- In the SSO section, copy the Issuer URL and the X.509 Certificate. You will need these later.
To configure FortiNDR Cloud:
Update the SSO SAML Setup fields with the OneLogin values you copied earlier.
| Field | Value |
|---|---|
|
IdP Entity ID |
OneLogin Issuer URL. |
|
X.509 Certificate |
OneLogin X.509 Certificate. |
Mandatory SSO
You can require all users to log into FortiNDR Cloud using SSO. Before enabling mandatory SSO, keep the following considerations in mind:
- Multi-Factor Authentication (MFA) is disabled.
- You can only edit API users
- Change my password and Enable MFA are disabled in Profile Settings > My Profile > Authentication
- Edit User and Email Password Reset are disabled in Account Management > Users > Actions.
Requirements:
- SAML SSO must be enabled.
- User must have account.sso_required.update permissions
To enable mandatory SSO:
- Click the gear icon at the top-right of the page and select Account Management.
- Select an account.
- Click the Settings tab.
- Under SAML SSO enable Require SSO Login (disable login with username/password). The Confirm enabling mandatory SSO login dialog opens.
- Click Confirm.