
User groups
A user group is a list of user identities. A user identity can be a:
- Local user account (username/password) stored on the FortiGate
- Remote user account (password stored on a RADIUS, LDAP, or TACACS+ server)
- PKI user account with a digital client authentication certificate stored on the FortiGate
- RADIUS, LDAP, or TACACS+ server, optionally specifying particular user groups on that server
- User group defined on an FSSO server
User groups provide the ability to combine users that require the same permissions so they can be referenced at once, which enables consistency in configurations. User groups allow for remote servers to be referenced by leveraging the pre-existing user accounts, instead of redefining them on the FortiGate.
For example, when a new employee joins a department, they can be added to their respective group, whether in the remote authentication server or local group, and be subject to the same access as their colleagues in the same department. In FortiOS, user groups can be used when configuring firewall policies, traffic shaping policies, proxy policies, SSL VPN portals, IPsec VPN XAUTH, ZTNA, wireless networks (SSIDs), web filtering profiles, identity-based routing, and system administrators with remote authentication.
In most cases, the FortiGate authenticates users by requesting their username and password. The FortiGate checks local user accounts first. If a match is not found, the FortiGate checks the RADIUS, LDAP, or TACACS+ servers that belong to the user group. Authentication succeeds when a matching username and password are found. If the user belongs to multiple groups on a server, those groups will also be matched.
Four types of user groups can be configured:
Configuring firewall user groups
Firewall user groups are used locally as part of authentication. For example, when a firewall policy allows access only to specified user groups, users must authenticate before matching the policy. If the user authenticates successfully and is a member of one of the permitted groups, the policy is applied to the user. A firewall user group may contain local users (defined locally or authenticated remotely), PKI users, or authentication servers.
There are two options to add users in a firewall group configuration: members or remote groups. Members are the individual users who have been defined in FortiOS. Remote groups are remote server that users may authenticate to. One or more user groups can be specified within that server to limit which users can authenticate to the firewall user group. Both options may be used at the same time. The FortiGate attempts to authenticate users in the members list first, and then the remote groups if the initial authentication does not succeed.
When adding remote groups to user groups, FortiTokens cannot be applied to the users. To use remote authentication servers and FortiToken for multi-factor authentication, a remote user type must be created and then added as a user group member.
The following user group configuration examples have local members and a remote authentication server user group. There are two LDAP users, but the principle applies to other remote authentication server types.
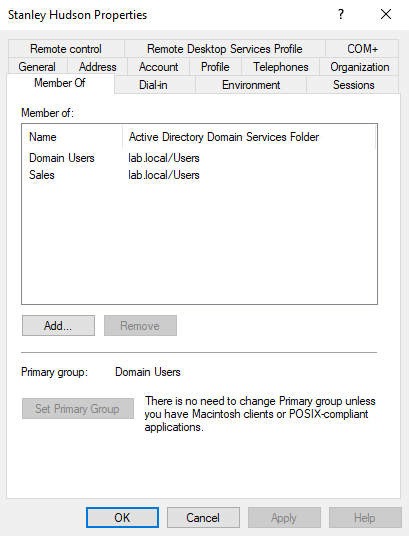
Both LDAP users (shudson and tflenderson) belong to the primary group, Domain Users. The user, shudson belongs to the Sales group; tflenderson belongs to the HR group.

Example 1: Adding multiple remote groups to a user group
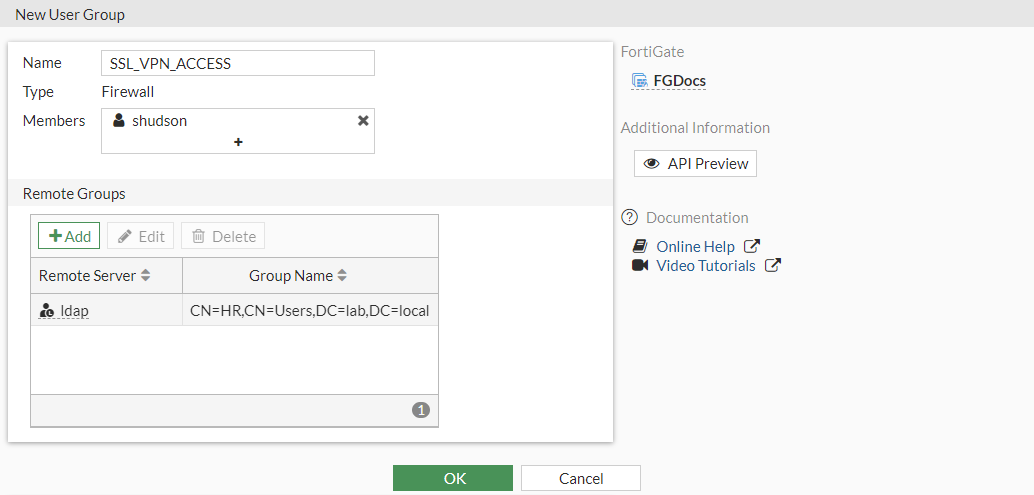
In this example, two remote groups (HR and Sales) are added to a firewall group called SSL_VPN_ACCESS.
To add multiple remote groups to a user group:
- Go to User & Authentication > User Groups and click Create New. Firewall is selected as the default Type.
- Enter the group name, SSL_VPN_ACCESS.
- In the Remote Groups Section, click Add.
- Set Remote Server to the LDAP server (ldap).
- In the Groups table, select Sales, then right-click and select Add Selected.
- Select HR, then right-click and select Add Selected.
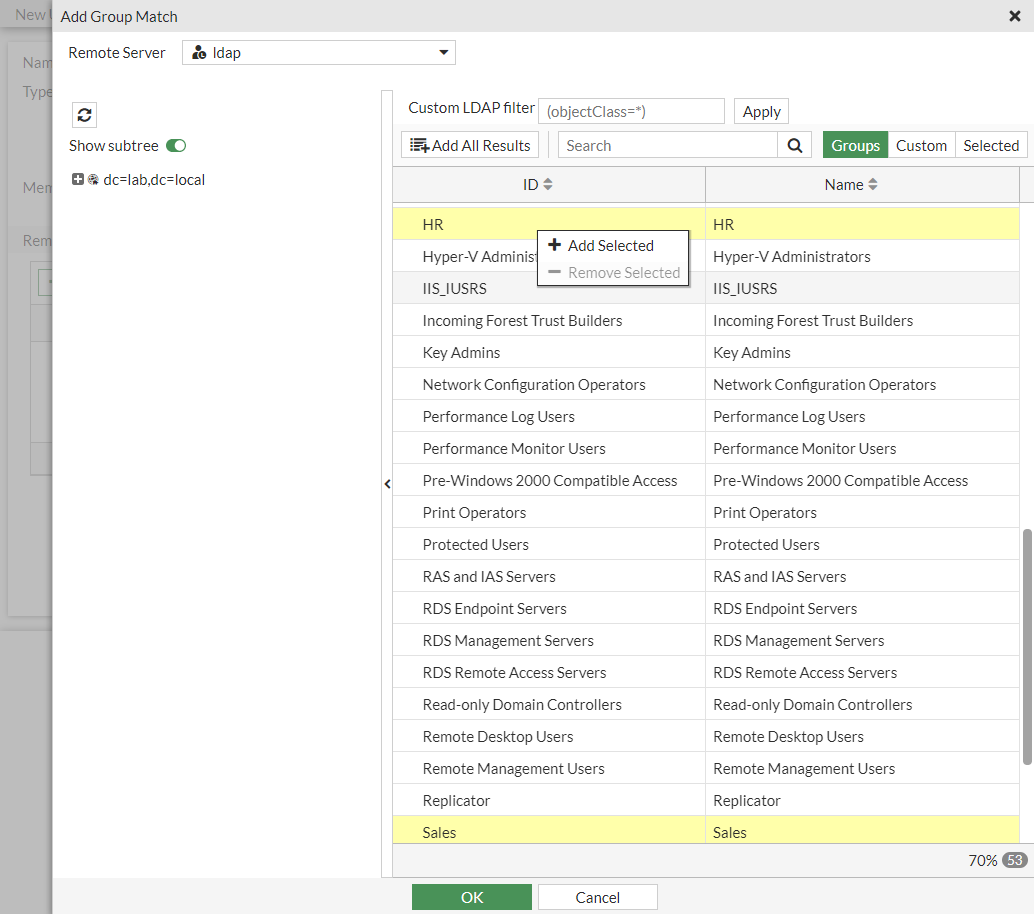
- Click OK.
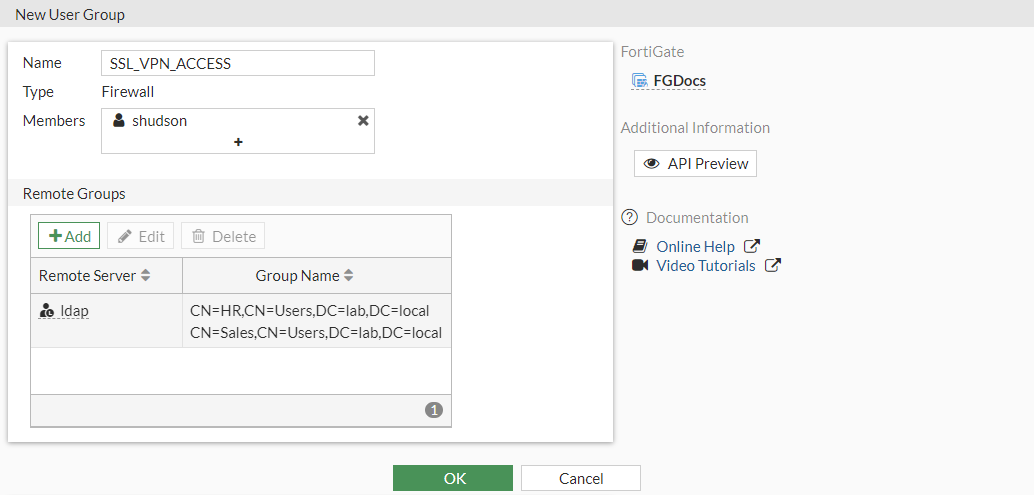
Both user group paths are specified under the Group Name.
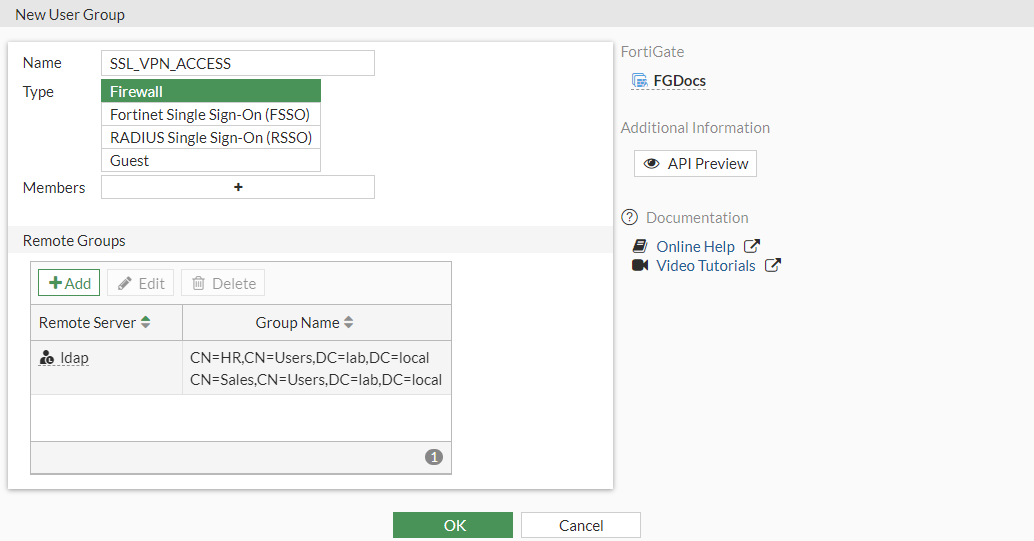
- Click OK.
In this configuration, shudson and tflenderson would be able to authenticate to this group.
Example 2: combining remote groups and local users in a user group
In this example, the firewall group (SSL_VPN_ACCESS) is configured to contain the HR remote group and a local LDAP user (shudson) with multi-factor authentication.
To combine remote groups and local users in a user group:
- Go to User & Authentication > User Groups and click Create New. Firewall is selected as the default Type.
- Enter the group name, SSL_VPN_ACCESS.
- In the Remote Groups Section, click Add.
- Set Remote Server to the LDAP server (ldap).
- In the Groups table, select HR, then right-click and select Add Selected.
- Click OK.
-
In the Members field, click the + and add shudson.
-
Click OK.
In this configuration, shudson, tflenderson, and any members of the HR LDAP group would be able to authenticate to the user group. Other users in the Sales group are not allowed.
Example 3: adding a user as a member and their group as a remote groups
This example uses a combination of the previous examples. The HR and Sales groups are added as remote groups similar to example 1. The local LDAP user, shudson (using a FortiToken), from example 2 is added as a group member.
|
|
This example is for demonstration only. It may cause unwanted results, so this configuration is not advised. |
To add a user as a member and their group as a remote groups:
- Refer to example 1 to configure the two remote groups.
- In the Members field, click the + and add shudson.
- Click OK.
One unwanted scenario from this configuration is that a user might be able to bypass multi-factor authentication on LDAP by changing the username case (see the related PSIRT advisory). By default, the username of the remote LDAP user is case sensitive. This means the username has to match what is configured (shudson). If a user types sHudson, for example, this will not match the user shudson, so it falls through to remote group authentication. It will match the Sales group in this example. To prevent this, disable username case sensitivity (see SSL VPN for remote users with MFA and user sensitivity for more details).
To disable case sensitivity on the remote user:
config user local
edit <name>
set type ldap
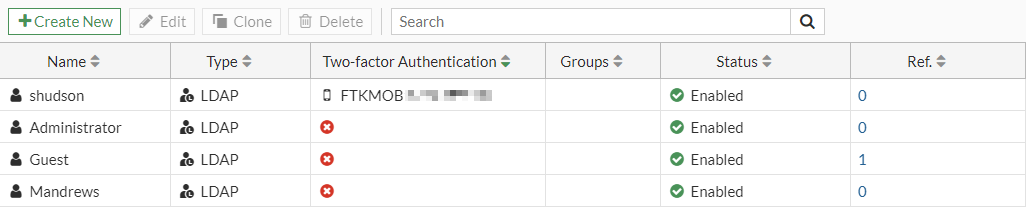
set two-factor fortitoken
set fortitoken "FTKMOBxxxxxxxxxx"
set email-to <email_address>
set username-sensitivity disable
set ldap-server <server_name>
next
end
There is another unwanted scenario from this configuration than can occur to bypass multi-factor authentication. The LDAP server, ldap, has a user named shudson. Another LDAP server, ldap2, also has a user named shudson, but with a different password. If the ldap and ldap2 servers are added to the user group in addition to the remote shudson user, if a user tries to log in using shudson and the password on the ldap2 server, they would be able to bypass multi-factor authentication.
Configuring FSSO user groups
FSSO user groups contain only Windows, Citrix, and Novell network users. Information about these user groups and their member logon activities are provided by the corresponding FSSO connector. See the FSSO section for more information.
Configuring RSSO user groups
RADIUS single sign-on user groups leverage a RADIUS server to authenticate connecting users. This requires users to log in to their computer using their RADIUS account. The FortiGate does not interact with the remote RADIUS server. It only monitors RADIUS accounting records that the server forwards (originating from the RADIUS client). These records include the user IP address and user group. See RADIUS single sign-on agent for more information.
Configuring guest user groups
In some scenarios, an administrator might need to create temporary user accounts with a defined expiry time to access network resources. For example, if there is a large conference and may attendees require temporary network access for a few days. Guest Management can be used to combine many guest users into a group. Many guest accounts can be created at once using randomly-generated user IDs and passwords.
A guest group must be configured first. The guest user account user ID can be an email address, a randomly generated string, or an ID that the assigned by the administrator. The password can be assigned by the administrator or randomly generated. The guest group configuration determines the fields that are provided when creating guest user accounts in Guest Management.
To create a guest user group:
-
Go to User & User & Authentication > User Groups and click Create New.
-
Enter a name, and set the Type to Guest.
-
Configure the following:
Batch Guest Account Creation
Create multiple accounts automatically. When enabled:
- The user ID and password are automatically generated.
- The accounts only have user ID, password, and expiration fields. The expiration field is editable in the GUI in the Start Countdown and Time settings.
- An administrator can print the account information.
- Users do not receive an email or SMS notification.
User ID
Select one of the following:
- Email: use the user's email address
- Auto Generate: FortiOS creates a random user ID
- Specify: the administrator assigns a user ID
Maximum Accounts
Enable to set a maximum number of guest accounts that can be created for this group (disabled = unlimited).
Guest Details
Enable Name
If enabled, the user form has a field to enter a name.
Enable Email
If enabled, the user is notified by email.
Enable SMS
If enabled, the user is notified by SMS.
Password
Select one of the following:
- Auto Generate: FortiOS creates a random password
- Specify: the administrator assigns a password
If the setting is disabled, no password is used.
Sponsor
If enabled, the user form has a field to enter a sponsor (Optional). Select Required if the sponsor field is mandatory.
Company
If enabled, the user form has a field to enter a company (Optional). Select Required if the company field is mandatory.
Expiration
Start Countdown
Select one of the following:
- On Account Creation: the countdown starts from the time the account is created
- After First Login: the countdown starts from the time the first time the user logs in
Time
Set the expiry time. There are fields to enter values for Days, Hours, Minutes, and Seconds.
-
Click OK.
To manually create a guest user account:
- Go to User & User & Authentication > Guest Management.
- If more than one guest user group is configured, select the group from the dropdown beside the search box.

- Click Create New and enter the information in the Create User pane. The fields are based on the guest group configuration. Optional fields can be left blank, such as Sponsor in this example.
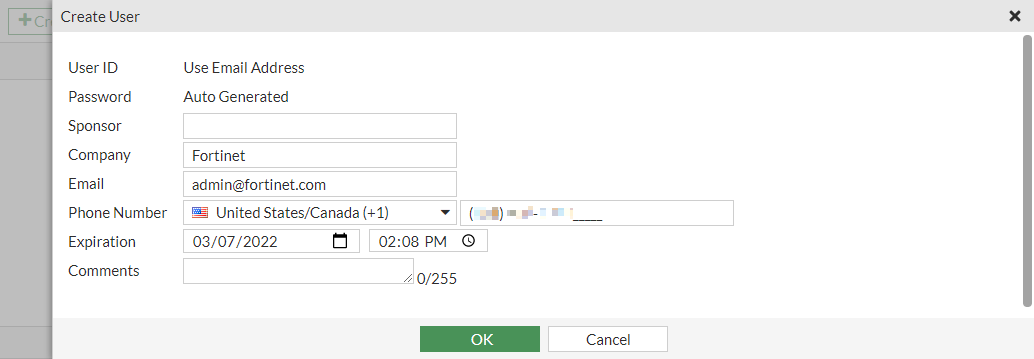
- Click OK.
To automatically create multiple guest user accounts:
- Go to User & User & Authentication > Guest Management.
- If more than one guest user group is configured, select the group from the dropdown beside the search box. The group must have Batch Guest Account Creation enabled.
- Click Create New > Multiple Users and enter the Number of Accounts.
- Optionally, edit the Expiration date and time.
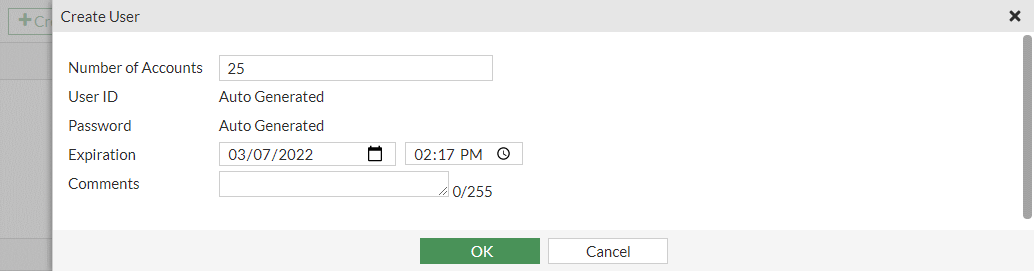
- Click OK.