


SSL VPN with Okta as SAML IdP
In this configuration, the FortiGate acts as a SAML service provider (SP) requesting authentication from Okta, which acts as a SAML identity provider (IdP). The following shows the topology in this configuration:

The authentication process is as follows in this deployment:
- The user initiates an SSL VPN request to the FortiGate.
- The FortiGate sends the browser POST redirect to FortiClient.
- FortiClient redirects the SAML authentication request to Okta.
- The user authenticates with Okta using their credentials.
- Okta sends a SAML assertion that contains the user and group authentication in a POST redirect to the SSL VPN login page.
- FortiClient sends the redirected Okta request that contains the SAML assertion to the FortiGate.
- The FortiGate consumes the assertion and provides the user with access to resources based on the defined firewall security policy.
The example assumes that you already have an Okta account. This example uses users locally defined within the Okta directory and does not include LDAP mapping. The instructions describe the steps that you take if using the free Okta developer edition.
To configure Okta for SSL VPN with FortiOS:
- Log in to the Okta portal as the registered admin user.
- Add the FortiGate application:
- Go to Applications.
- Click Applications, then click Create App Integration.
- Click SAML 2.0, then Next.
- Configure SAML settings:
- Proceed through the application creation wizard. In the Single sign on URL field, enter https://<FortiGate IP address>:<port>/remote/saml/login/. In this example, it is https://10.0.3.254:10443/remote/saml/login/.
- Enable Use this for Recipient URL and Destination URL.
- In the Audience URI (SP Entity ID) field, enter the https://<FortiGate IP address>:<port>/remote/saml/metadata/. In this example, it is https://10.0.3.254:10443/remote/saml/metadata/.
- Click Download Okta Certificate to download the Okta certificate to your machine. You provide this certificate to the FortiGate.
- Click Show Advanced Settings. From the Response dropdown list, select Signed.
- From the Assertion Signature dropdown list, select Signed.
- In the Single Logout URL field, enter https://<FortiGate IP address>:<port>/remote/saml/logout/. In this example, it is https://10.0.3.254:10443/remote/saml/logout/.
- In the SP Issuer field, enter https://<FortiGate IP address>:<port>/remote/saml/metadata/. In this example, it is https://10.0.3.254:10443/remote/saml/metadata/.
- In the Signature Certificate field, first download the Fortinet_Factory certificate by logging into FortiOS, going to System > Local Certificate, then browsing to and uploading the FortiGate certificate. Okta uses this to authenticate the SAML SP.

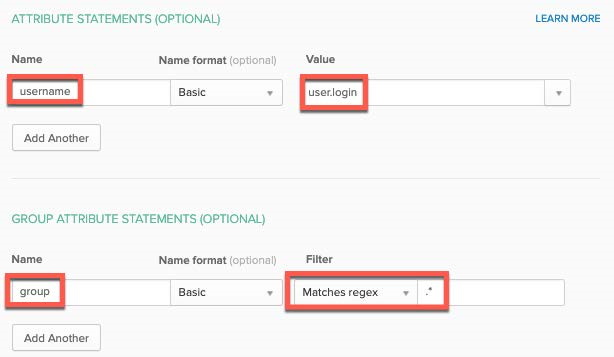
- Under ATTRIBUTE STATEMENTS and GROUP ATTRIBUTE STATEMENTS, define attribute mappings for Okta to use in SAML assertion. In this example, the following is entered as a attribute statement and a group attribute statement, respectively:
- username, with value user.login
- group, with Matches regex filter
- On the Feedback step, select I'm an Okta customer adding an internal app.
- Select This is an internal app that we have created.
- Click Finish.
- Go to Directory > People.
- Click Add Person.
- Enter the person's details as desired. Click Save.

- Add a group:
- Go to Directory > Groups.
- Click Add Group.
- Enter the desired name, then click Add Group. In this example, the name is corporate-saml.
- Select the newly added group, then click Assign People.
- Add the person that you created as a member of the new group. Click Save.
- Assign the group to the FortiGate application:
- Go to Applications > FortiGate application > Assignments.
- From the Assign dropdown list, select Assign to Groups.
- Assign the group that you created to the FortiGate application.
- To view the SAML setup instructions, do the following:
- Click the newly created application's name.
- Click Sign On.
- Go to View SAML Setup Instructions. Note down the Identity Provider Single Sign-On URL, Identity Provider Single Logout URL, and Identity Provider Issuer values.
- Download the Okta certificate and upload it to FortiOS:
- From View SAML Setup Instructions, download the certificate.
- In FortiOS, go to System > Certificates.
- From the Create/Import dropdown list, select Remote Certificate.
- Click Upload and upload the downloaded Okta certificate.
To configure the FortiGate:
- Configure the FortiGate SP to be a SAML user:
config user saml
edit "okta-idp"
set cert "Fortinet_Factory"
set entity-id "https://10.0.3.254:10443/remote/saml/metadata/"
set single-sign-on-url "https://10.0.3.254:10443/remote/saml/login"
set single-logout-url "https://10.0.3.254:10443/remote/saml/logout"
set idp-entity-id "http://www.okta.com/exk103foxaa8gk5qy4x7"
set idp-single-sign-on-url "https://fortinet01.okta.com/app/fortinetorg878484_fortigate_1/exk103foxaa8gk5qy4x7/sso/saml"
set idp-single-logout-url "https://fortinet01.okta.com/app/fortinetorg878484_fortigate_1/exk103foxaa8gk5qy4x7/slo/saml"
set idp-cert "Okta-IDP_Certificate"
set user-name "username"
set group-name "group"
next
end
-
Configure user group assertion on Okta as part of the SAML assertion attributes. It is important that the group attribute value received is locally matched with the
group-namevalue:config user group
edit "corporate-saml"
set member "okta-idp"
config match
edit 1
set server-name "okta-idp"
set group-name "corporate-saml"
next
end
next
end
- Go to VPN > SSL-VPN Settings. Configure VPN settings as desired. When testing the VPN solution, starting with a web-based configuration, then moving to a tunnel-based configuration is recommended. Web-based testing can help in troubleshooting.
- Configure a local or RADIUS user as a backup. This setting also provides a login web user with a choice of local or SSO login.
- Go to Policy and Objects > Firewall Policies. Configure a policy as desired.
- Increase the global authentication timeout period to allow users to fill in their credentials in time. The default timeout is five seconds:
config system global
set remoteauthtimeout 60
end
To configure EMS:
- In EMS, go to Endpoint Profiles > Manage Profiles. Edit a VPN profile.
- Under VPN Tunnels, click Add Tunnel.
- In the Remote Gateway field, enter the FortiGate IP address. In this example, it is 10.0.3.254.
- In the Port field, enter the port number. In this example, it is 10443.

- In Advanced Settings, enable Enable SAML Login.
- Click Add Tunnel.
- Save the profile.
- After the policy synchronizes to the endpoint, the SAML Login button is visible on the Remote Access tab in FortiClient.
To test the configuration:
- Test web-based SSL VPN authentication using Firefox with the SAML tracer plugin enabled. Install the SAML-tracer plugin to Firefox.
- In Firefox, go to the FortiOS SSL VPN login page. In this example, this is https://10.0.3.254:10443.
- Open the SAML tracer.
- The browser redirects to the Okta SAML login page. Enter the Okta credentials, then click Sign in.
- Upon successful authentication, the browser redirects to the authenticated SSL VPN page. If authentication does not succeed, review the SAML tracer to confirm the SAML assertion attributes that are passed during the authentication session. Select the POST message with the SAML information. On the SAML tab, confirm the username and group attributes.

- To test tunnel mode, go to the Remote Access tab in FortiClient. Click the SAML Login button.
- A FortiAuthenticator web login page opens within FortiClient. Enter the Okta credentials, then log in to connect to the VPN tunnel.
To troubleshoot the configuration:
You can view FortiOS event logs in Log & Report > Events to verify successful authentication and user group allocation.
You can also run the diagnose debug application samld -1 command to verify that the SAML IdP sent the correct information. The following shows example output for this scenario:
