Defining VLANs
Before we can select VLANs in a FortiSwitch template, we must define the VLANs. For the sake of simplicity, we will only create a VLAN named Wired_Lan for our wired clients. More VLANs can be added to cover different use cases. The VLAN named Wired_Lan will run a DHCP server.
As mentioned in FortiAP deployment method, we also need to create a VLAN named AP_Management that will be assigned to port2, where we will connect our FortiAP. We will use the VLAN named AP_Management to manage our FortiAPs, and we need to enable Secure Fabric Connection on the interface.
Please note that any options defined in the VLAN will be applied to all FortiSwitches that are attached to the template. This may be convenient when we need a VLAN that always has the same subnet on all branches. However most deployments need a way to specify a different subnet for each branch. You can specify a different subnet for each branch by using the following methods:
- Use the per-device mapping feature when you define a VLAN by using the GUI. The per-device mapping feature lets you define a specific subnet, a DHCP server range, or any other relevant setting.
- Use CLI templates with meta fields to define the subnet, DHCP server range, or any other relevant setting.
While the per-device mapping feature provides some visibility in the GUI, it is not the most practical method for large SD-WAN deployments, as subnets will most probably need to be specified in other templates, such as routing for example.
This topic includes the following sections:
- Defining the Wired_Lan VLAN with the GUI
- Defining the Wired_Lan VLAN with CLI templates
- Defining the AP_Management VLAN with the GUI
Defining the Wired_Lan VLAN with the GUI
In this section we use the FortiManager GUI to create a VLAN named Wired_Lan with the per-device mapping feature enabled.
To define the Wired_LAN VLAN with the GUI:
- In FortiManager, go to FortiSwitch Manager > FortiSwitch Templates > VLANs.
- Click Create New, and define a VLAN named Wired_LAN.


Any options that we define in the VLAN will be applied to all FortiSwitches that are attached to the template. This may be convenient when we need a VLAN that always has the same subnet on all branches.
- If you want to define a specific subnet, a DHCP server range, or any other relevant setting, set Per-Device Mapping to ON, and click Create New to create a mapped device.
With per-device mapping enabled and configured, we can directly see the list of branches and their assigned subnets on the GUI:

Defining the Wired_Lan VLAN with CLI templates
Below is an example of a CLI template for the VLAN named Wired_Lan that uses variables and meta fields. The CLI template is applied directly to the FortiGate. We use the CLI template to modify the subnet of the VLAN on the FortiGate while still using the template to assign it to FortiSwitch ports.
config system interface
edit "Wired_Lan"
set type vlan
set vdom "root"
set ip $(wired_lan_net:4,1) $(wired_lan_netmask)
set role lan
set interface "fortilink"
set vlanid 10
next
end
config system dhcp server
edit 1
set dns-service default
set ntp-service default
set default-gateway $(wired_lan_net:4,1)
set netmask $(wired_lan_netmask)
set interface "Wired_Lan"
config ip-range
edit 1
set start-ip $(wired_lan_net:4,10)
set end-ip $(wired_lan_net:4,250)
next
end
next
end
Please note that we are using CLI template syntax to set and modify our variables. In the CLI template example, ($ (wired_lan_net:4,1) means use the wired_lan_net meta-field content, but change the last bytes with the value 1”). For example, if wired_lan_net = 10.0.0.0, then the IP address of the Wired_Lan interface would be 10.0.0.1.
|
|
For more information on CLI template syntax, see the FortiManager 6.2 New Features Guide. |
CLI template is the recommended method for large deployments as it allows an admin to configure a list of predefined variables that are necessary to deploy a full branch while streamlining the whole process.
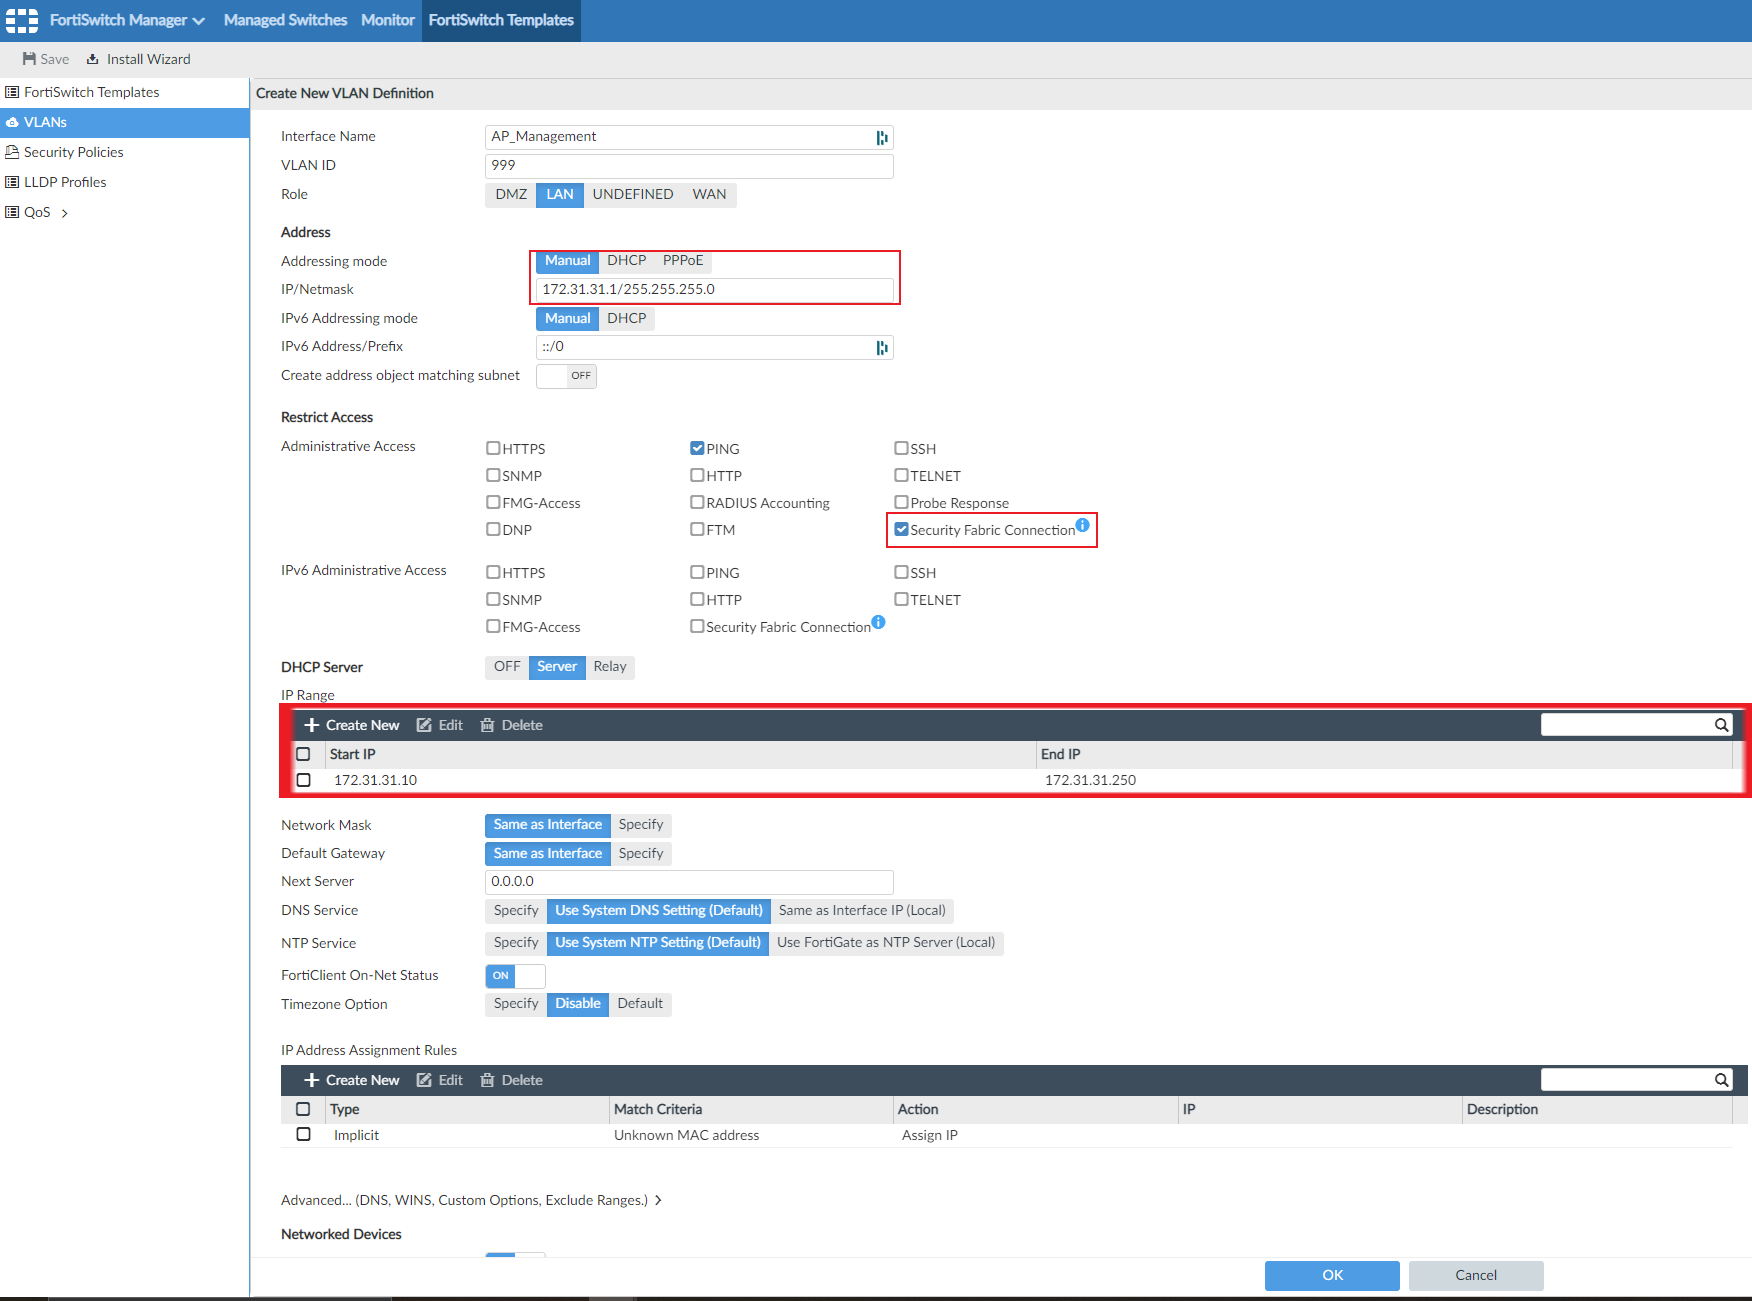
Defining the AP_Management VLAN with the GUI
We will also create our VLAN named AP_Management. Again, we could use the VLAN named Wired_Lan for our FortiAPs, if we wanted to bridge our wireless clients into the wired network. We may use the same subnet for all our branches, and ensure that you select Secure Fabric Connection to allow our FortiAPs to communicate with our FortiGate (on the control plane).
To define the AP_Management VLAN with the GUI:
- In FortiManager, go to FortiSwitch Manager > FortiSwitch Templates > VLANs.
- Click Create New, and define a VLAN named AP_Management.