


Guest Users SSID with Preconfigured Username and Password
The FortiGate WiFi Controller enables multiple options for Guest networking. For this topic, we will cover predefined guest users that can be printed out and handed to a visitor who checks in at the front desk.
Create a Guest Group
- Go to User & Authentication > User Groups.
-
Click Create New.

The New User Group window loads.
- Enter a group Name.
- In Type, select Guest.
- Enable Batch Guest Account Creation.
- For Start Countdown select After First Login.
-
Adjust Time to match your campus network policies. The default is 4 hours.

- Click OK.
-
The new user group is saved and added to the list of user groups.

Create Multiple Preconfigured Guest Users
- Go to User & Authentication > Guest Management.
-
Click Create New and select Multiple Users.

The Create User screen loads.
-
In the Create User screen:
- Enter the Number of Accounts you want to create.
- Optionally, adjust the Expiration time.
- Optionally, add any Comments.
- Click OK.

-
Once the users are generated, select the group and click Print.

Depending on print options, the print output may look like the following example, with the auto-generated usernames and passwords.

Add a Guest Administrator to the WiFi Controller
You can increase the flexibility of guest administration and registration by adding one or more guest administrators.
- Go to System > Administrators.
- Click Create New and select Administrator.
- Enter a Username.
- Choose the Type.
- Add a Password or other type dependent information.
- Enable Restrict admin to guest account provisioning only.
-
Assign the Guest Group.

- Click OK.
Create the Guest SSID with Captive Portal
- Go to WiFi & Switch Controller > SSIDs.
- Click Create New and select SSID.
-
Name the interface.
All SSIDs are also interfaces on the FortiGate WiFi Controller.
-
Set the IP Address/Netmask.
-
Enable the DHCP Server, adjust settings.

-
Configure the following under WiFi Settings:
- Name the SSIDs – this is the over-the-air name of the WLAN.
- For Security Mode select Captive Portal.
- For Portal Type choose either Authentication or Disclaimer + Authentication.
- For Authentication portal, select Local.
- In User Groups, select the group you previously created.

-
Click OK.
The Guest SSID is now broadcasting, but the NGFW of the FortiGate will not pass traffic that is not specifically allowed. Firewall Policies must be added, as above for the authorized user WLAN. As a guest WLAN, it makes sense for this to be more restricted. The following example shows a limited, Internet specific service set. More restrictions are possible, but beyond the scope of this document.
Add Firewall Policies for the Guest Users SSID
- Go to Policy & Objects > Firewall Policy.
-
Click Create New.
The New Policy screen appears.
- Configure the following:
- Enter a Name for the policy.
Select the Incoming Interface.
The Incoming Interface is the Guest SSID Interface. FortiGate WiFi Controller automatically creates an address object.
- Following the above example configurations, the Outgoing Interface is the WLAN-uplink interface.
- For simplicity, configure the Source and Destination fields as all.
- Click Services and scroll to the Services Group category to select the following:
- Email Access
- Exchange Server
- Web Access
- Windows AD
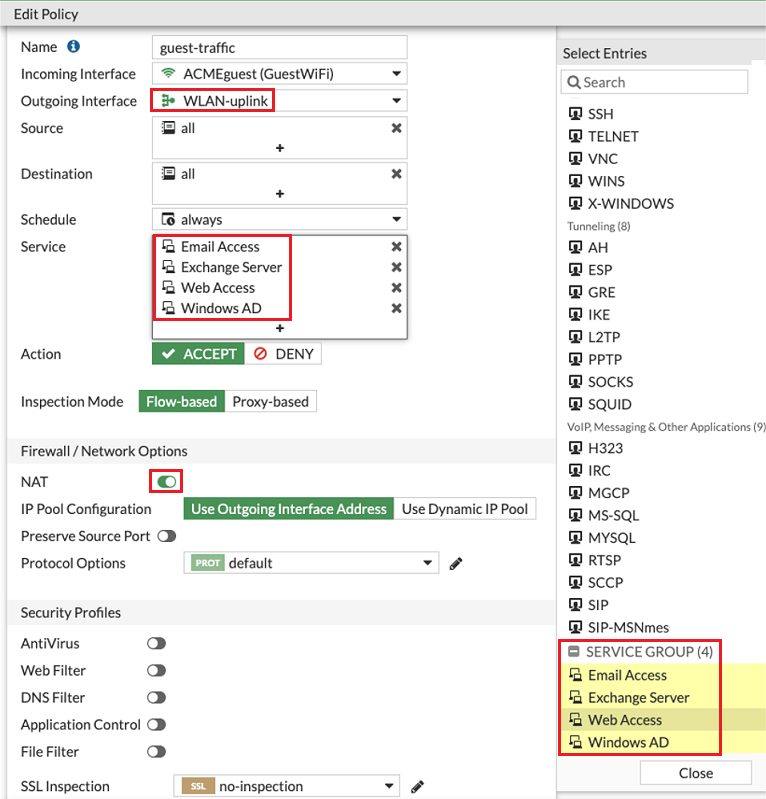
- Leave the other fields with the default settings.
- Ensure that NAT is enabled.
Click OK.
Guest Access is now fully enabled.
The FortiGate WiFi Controller remains very versatile and can support a great deal of customization of Guest Access. See https://docs.fortinet.com/product/fortigate/7.0 for more options.
As configured, the guest user will need one of the generated username/password combinations from above. When opening a browser, they will be presented with disclaimer screen to click through, and then an authentication page in order to access the Internet.
