
Configuring OSPFv3 routes
FortiADC supports OSPFv3 (Open Shortest Path First version 3), a link-state routing protocol for IPv6 networks that extends OSPFv2's core functionality, including shortest path calculation using the Dijkstra algorithm and maintaining a Link-State Database (LSDB) for network topology management.
This initial implementation enables FortiADC to advertise IPv6 virtual server IP addresses, as well as "connected" and "static" IPv6 routes, improving routing efficiency in IPv6 environments.
Before you begin:
- You must know how OSPFv3 has been implemented in your network, and you must know the configuration details of the implementation.
- You must have Read-Write permission for System settings.
To configure OSPFv3:
-
Navigate to Network > Routing.
-
Click the OSPFv3 tab.
-
Configure the Router settings.
Setting
Description
Router ID 32-bit number that sets the router ID of the OSPF process. The router ID uses dotted decimal notation. The router ID must be an IP address of the router, and it must be unique within the entire OSPFv3 domain to the OSPFv3 speaker. Redistribute Connected Enable/disable to redistribute connected routes to OSPFv3. Redistributed routes are distributed into OSPFv3 as Type-5 External LSAs into links to areas.
This is disabled by default.
Redistribute Static Enable/disable to redistribute static routes to OSPFv3. Redistributed routes are distributed to OSPFv3 as Type-5 External LSAs into links to areas.
This is disabled by default. When enabled, the static routing will be advertised to the OSPFv3 neighbors.
-
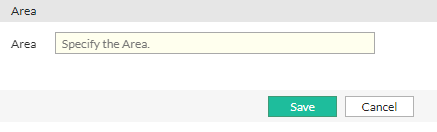
Configure the Area.
-
Under the Area section, click Create New to display the configuration editor.
The maximum number of supported Area configurations is 1. -
Configure the Area ID:
Setting
Description
Area 32-bit number that identifies the OSPFv3 area. An OSPFv3 area is a smaller part of the larger OSPFv3 network. Areas are used to limit the link-state updates that are sent out. The flooding used for these updates would overwhelm a large network, so it is divided into these smaller areas for manageability.
-
Click Save to commit the changes and exit the dialog.
The new entry will appear under the Area section.
-
-
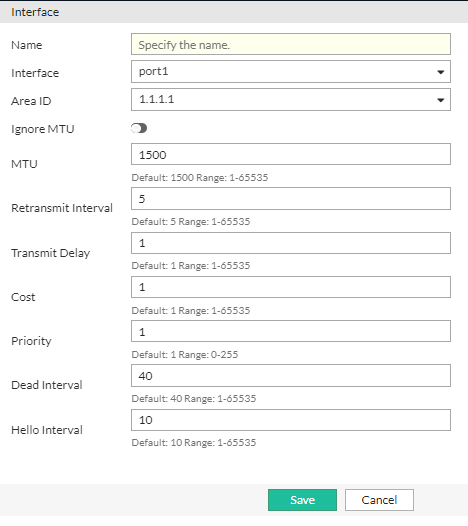
Configure the Interface.
The IPv6 virtual server IP address will be advertised to OSPFv3 neighbors by putting the virtual server interface in the OSPFv3 interface.-
Under the Interface section, click Create New to display the configuration editor.
The maximum number of supported Interface configurations is 128. -
Configure the Interface settings:
Setting
Description
Name Configuration name. Valid characters are A-Z,a-z,0-9,_, and-. No spaces. After you initially save the configuration, you cannot edit the name.Interface Select the interface on which to enable OSPFv3. Area ID Select the Area ID. Ignore MTU Ignores MTU mismatches between OSPFv3 neighbors. This is disabled by default. MTU Specify the maximum packet size for transmission. The default value is 1500, and the valid range is 1-65535. Retransmit Interval Specify the interval between LSA retransmissions when acknowledgements are not received. The default value is 5 seconds, and the valid range is 1-65535. Transmit Delay Additional time added to the LSA age during transmission. The default value is 1 second, and the valid range is 1-65535. Cost
Set the link cost for the specified interface, with lower metric values being preferred for path selection. This cost value is applied to the router-LSA's metric field and used in the SPF (Shortest Path First) calculation. The default value is 1, and the valid range is 1-65535.
Priority
The router's priority setting determines its eligibility for DR/BDR (Designated Router/Backup Designated Router) election, with higher values increasing the likelihood of becoming the DR. The router with the highest priority will have a greater chance of being elected as the DR, while setting the priority to 0 makes the router ineligible for DR election. The default value is 1, and the valid range is 0-255.
Dead Interval
The Dead Interval defines the time, in seconds, after which a neighbor is declared down if no Hello packet is received. This interval must be consistent across all routers on a shared network. The default value is 40 seconds, and the valid range is 1-65535.
Hello Interval
The Hello Interval specifies the time between Hello packets sent on a configured interface to maintain neighbor relationships, while the Dead Interval determines the time after which a neighbor is declared down if no Hello packet is received. Both intervals must be consistent across all routers on the same network to ensure proper OSPF operation. The default value is 10 seconds, and the valid range is 1-65535.
-
Click Save to commit the changes and exit the dialog.
The new entry will appear under the Interface section.
-
-
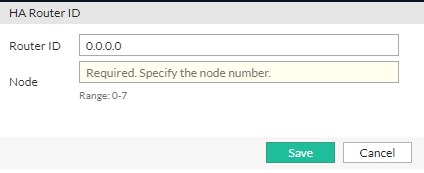
Configure the HA Router ID.
-
Under the HA Router ID section, click Create New to display the configuration editor.
The maximum number of supported HA Router ID configurations is 128. -
Configure the HA Router ID settings:
Setting
Description
Router ID You use the HA Router list configuration in an HA Active-Active deployment. On each HA cluster node, add an HA Router configuration that includes an entry for each cluster node. When the appliance is in standalone mode, it uses the primary OSPFv3 Router ID; when it is in HA mode, it uses the HA Router list ID.
Specify a unique 32-bit router ID for the OSPFv3 process in dotted decimal notation. This router ID must be an IP address assigned to the router and must remain unique across the entire OSPFv3 domain to ensure proper identification of the OSPFv3 speaker.
In an HA Active-Active-VRRP deployment, each Router ID must be configured independently for each node.
In an HA Active-Passive deployment, the router ID defaults to 0.0.0.0 in the neighbor node.
Node Specify the HA Node ID. The valid range is 0-7. -
Click Save to commit the changes and exit the dialog.
The new entry will appear under the HA Router ID section.
-
-
Click Save again to commit the changes to each section of the OSPFv3 configuration.
Repeat the configuration steps for OSPFv3 on the neighbor node. OSPFv3 requires at least two OSPFv3-capable devices to form a neighbor relationship and exchange routing information.
Troubleshooting
The following CLI commands have been introduced to retrieve information about the OSPFv3 configuration.
|
Command |
Guidelines |
|---|---|
get router ospf6 |
Use this command to retrieve basic information of the OSPFv3 configuration. |
get router info6 ospf6 database get router info6 ospf6 interface get router info6 ospf6 neighbor get router info6 ospf6 route get router info6 ospf6 status |
Use these commands to retrieve detailed information of the OSPFv3 configuration. |
diagnose debug module ospf6d |
Use this command to retrieve detailed debug information for the OSPFv3. |