
Flannel VXLAN CNI
To support ClusterIP services, FortiADC must participate in the Flannel overlay network. This is achieved by establishing a VXLAN tunnel and registering the FortiADC appliance as a "fake node" within the Kubernetes cluster. This registration allows the Kubernetes network to route traffic to the FortiADC even though it is not a physical server in the cluster.
 to FortiADC connecting via overlay tunnel.")
To configure the Flannel VXLAN CNI:
-
Check Flannel Details: Use the
kubectlcommand to check the flannel VXLAN public IP and the VNI of the control plane node.When using VXLAN backend, flannel uses UDP port 8472 for sending encapsulated packets.
kubectl describe node [NODE NAME] | grep flannel
-
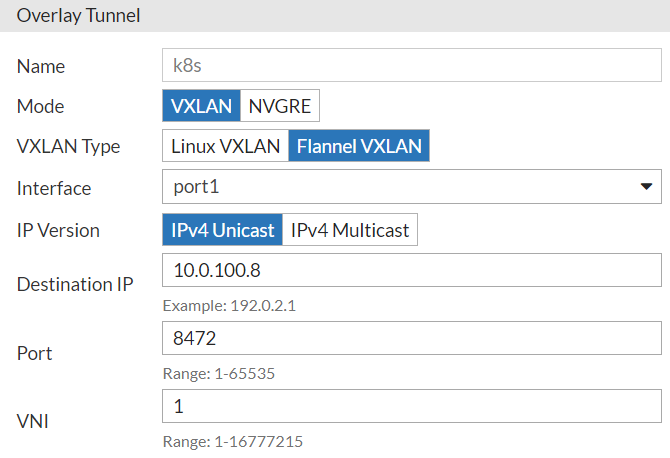
Create Overlay Tunnel: To integrate the FortiADC overlay tunnel with the flannel VXLAN, an overlay tunnel with the VXLAN type must be created on FortiADC.
-
In FortiADC, go to Network > Interface and click the Overlay Tunnel tab.
-
Create a new Overlay Tunnel configuration using the flannel VXLAN public IP obtained from the previous step as the Destination IP.
-
Select VXLAN as the Mode and Flannel VXLAN as the VXLAN Type.
-
-
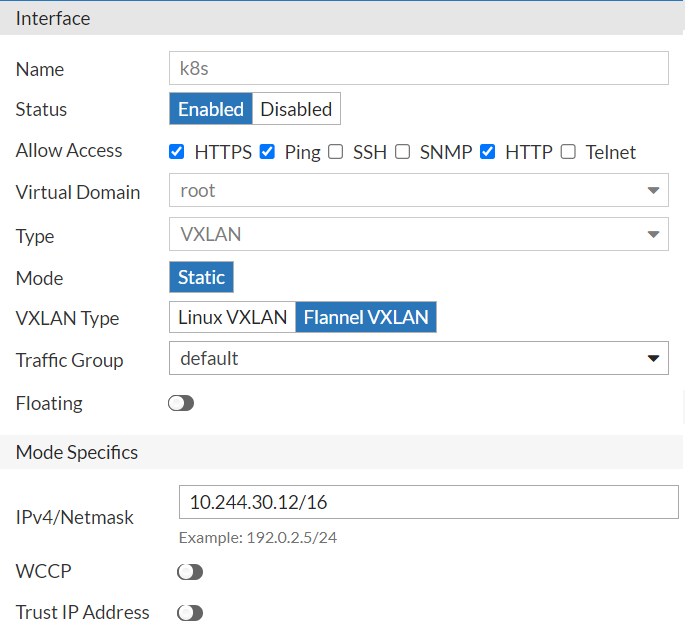
Configure Interface: After the overlay tunnel is configured, you need to configure its interface to connect with your Kubernetes cluster.
-
Go to Network > Interface. In the Interface page, locate the Interface configuration that share the same name as the overlay tunnel you just created.
-
In the Interface configuration, specify the network interface IP and the netmask as the one used in your Kubernetes cluster CIDR netmask size.
You can set the interface IP in any subset of the pod network if and only if the network subset is not used by another node. For example, we claim the subset10.244.30.0/24for FortiADC and set10.244.30.12/16as the interface IP/netmask.Allow ping/http/https traffic to go through the interface.
-
-
Retrieve MAC Address: Go to the FortiADC CLI and use the
get system interfacecommand to get the VXLAN interface MAC address (mac-addr).FortiADC-VM # get system interface k8s type : vxlan mode : static vdom : root redundant-master : ip : 10.244.30.12/16 allowaccess : https ping http mtu : 1450 speed : auto status : up retrieve_physical_hwaddr : disable mac-addr : e4:74:eb:7c:c7:xx flow-sniffer : disable wccp : disable trust-ip : disable floating : disable recv-seg-offload-override : disable send-seg-offload-override : disable vxlan-type : flannel_vxlan
-
Deploy "Fake Node": Deploy FortiADC as the fake node installed with the flannel CNI plugin in your Kubernetes cluster using the following manifest:
apiVersion: v1
kind: Node
metadata:
  name: fad
  labels:
    topology.kubernetes.io/zone: "fake-node"
  annotations:
    #Replace public-ip with outgoing interface IP of overlay tunnel
    flannel.alpha.coreos.com/public-ip: "10.0.100.133"
    #Replace VtepMAC with your VXLAN interface MAC
    flannel.alpha.coreos.com/backend-data: '{"VNI":1,"VtepMAC":"e4:74:eb:7c:c7:xx"}'
    flannel.alpha.coreos.com/backend-type: "vxlan"
    flannel.alpha.coreos.com/kube-subnet-manager: "true"
spec:
	podCIDR: "10.244.30.0/24"
|
|
Using the label Since FortiADC is deployed as a fake node, the status of the fake node will always be shown as “NotReady”. This will not affect the connection between FortiADC and servers in the Kubernetes clusters. |