


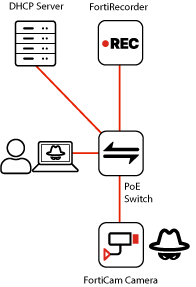
Connecting cameras to a DHCP server and FortiRecorder
You can use this scenario if you already have an existing network with a DHCP server where you will install your FortiRecorder, FortiCam or third-party ONVIF cameras, and any other devices such as an access control system (ACS).
Like the other quick setup method, this deployment could be isolated from your office LAN. Often, however, the PoE switch is connected to an existing router, and the existing DHCP server also gives IP addresses to other existing devices on the same subnet.
The cameras get network settings from your DHCP server, but FortiRecorder does not. Like any server, FortiRecorder uses a static IP address so that its GUI or CLI can always be reached at the same location.
-
Use Ethernet cables to connect your DHCP server (and router, if any) to your power-over-Ethernet (PoE) switch.
Your DHCP server must have a range of IP addresses (pool) that is larger than all of the devices that you will connect.
-
Use Ethernet network cables to connect the cameras to the switch.

If you connected the cameras too soon, before a DHCP server was available, then they are using a default IP address. The default address will not work with your network. To fix this, unplug the cameras and then plug them in again. This reboots the cameras and requests a correct IP address from the DHCP server.
-
On your DHCP server, create a reservation for each camera so that it always gets the same IP address.

Fortinet strongly recommends to either:
- configure your cameras with a static IP address (see Address), or
- configure your DHCP server with lease reservations
Without reservations, the IP address provided by the DHCP server might appear to work initially, but later, when the DHCP lease expires, the DHCP server might change the IP address of the camera. DHCP servers do not notify FortiRecorder about the camera's new dynamic IP address. During this time, FortiRecorder will try to control the camera at its old IP address. This does not work. Connections with that camera will be broken and all video from that camera could be lost during that interruption. To fix this, create IP address reservations on your DHCP server and then update the camera's Address with its current IP address.
-
Use Ethernet network cables to directly connect port1 of FortiRecorder to your computer.
Do not put your switch between them yet. FortiRecorder network settings are not configured yet.
-
Temporarily change your computer's IP address to be 192.168.1.98 with subnet 255.255.255.0. (If your computer has a static IP address, write it down so that you can restore the settings later.) Steps vary by whether you use Apple macOS, Linux, or Microsoft Windows.
Alternatively, you can use a different IP address, but it must be on the same subnet as the default IP address of FortiRecorder port1: 192.168.1.0/24.
-
On your computer, open a web browser and go to:
Log in with the name
adminand no password. - Change the password. For details, see Setting the "admin" account password.
-
Configure port1:
- Go to System > Network > Interface.
- Select port1. Click the Edit button.
- Enable Discover cameras on this port.
-
In IP/Netmask, enter the IP address and netmask that FortiRecorder will have on your network.

Do not use one of the range of IP addresses that the DHCP server assigns to cameras, computers, etc. (This can cause IP address conflict error messages.)
- Click OK.
- Change your computer's IP address and subnet back to its original settings.
- Unplug the Ethernet cable between your computer and FortiRecorder port1, and then plug them both into the switch.
- In your web browser, go to the new IP address of FortiRecorder. Log in.
-
Discover and configure the cameras:
- Go to Camera > Configuration > Camera.
-
Click the Discoverbutton.
After several seconds, a list of cameras appears.Newly discovered cameras are highlighted in yellow, and their Status column displays Not Configured.

-
Double-click each camera to adjust its settings. For details, see Configuring cameras.
Repeat this step for all cameras.
-
To verify that FortiRecorder is able to receive video from the camera, go to Monitor > Video > Video. You should be able to see the camera's live video feed.