


Fabric integration via FortiManager proxy
This article provides the steps on how to configure a Fortinet Security Fabric environment for monitoring with FortiMonitor using the FortiManager as a proxy. See Security Fabric for an overview of the solution.
Note: This solution only works with the FortiManager virtual appliance. FortiManager Cloud is not supported.
Supported Fortinet devices
The following Fortinet devices are supported:
-
FortiGate (plus SD-WAN)
-
FortiSwitch
-
FortiAP
-
FortiExtender
Prerequisites
-
FortiGate Firewall, running FortiOS 6.0.0 or later
-
FortiGate must be authorized in FortiManager
-
FortiManager is installed
-
A FortiManager administrator account setup to allow FortiMonitor's access. See Create an administrator account.
-
Web Service access must be enabled in FortiManager. See Enable Web Service access.
-
OnSight is installed into a network that can reach FortiManager
FortiManager configuration
Create an administrator account
An administrator account must be created to allow FortiMonitor to access FortiManager. The steps and field description are detailed in Creating administrators.
When filling out the form, make sure to select the correct Admin Profile and JSON API Access settings.
-
Admin Profile - Select Super_User.
-
JSON API Access - Select Read.

Enable Web Service access
Web Service access must be enabled for the FortiManager management port.

The steps on how to enable the setting can be found in Configuring network interfaces.
FortiMonitor configuration
After completing the prerequisites and FortiManager configuration, you can now connect FortiMonitor to your FortiManager for Fabric monitoring.
-
Log in to FortiMonitor (https://fortimonitor.forticloud.com/).
-
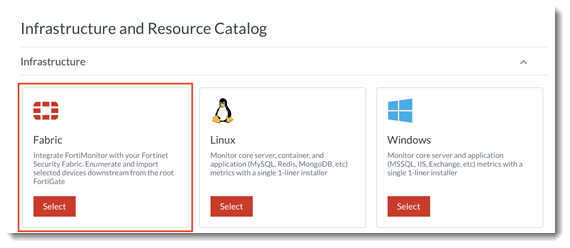
From the navigation menu, click Add. The Infrastructure and Resource Catalog is displayed.
-
Select Fabric from the Infrastructure section of the catalog.
-
Select FortiManager Proxy.
-
From here, follow the on-screen prompts.

-
OnSight - Select an OnSight. The selected OnSight will perform the monitoring of the environment.
-
FortiManager IP/FQDN - Enter the IP address where FortiManager can be reached from the OnSight.
-
FortiManager Port - Enter the FortiManager HTTPS port. This is usually 443.
-
FortiManager Serial Number - Enter the serial number. The FortiManager serial number can be found in the System Information dashboard in FortiManager.
-
FortiManager Username - Enter the FortiManager username of the administrator account you created.
-
FortiManager Password - Enter the FortiManager password of the administrator account you created.
-
Instance Group - Select or create an Instance Group. This allows you to define the instance hierarchy and organize your instances. By default, all devices discovered through this wizard are placed in the group Staging Environment.
-
-
Click Continue to Discover & Select.
-
You can now begin the process of device selection and import. Select the devices to import.
-
Once device selection is complete, you may now assign tags, monitoring templates, and alert timelines.
-
A summary view of the configuration will be displayed before you can add the devices.
-
After selecting Finish to add the devices, you have the option to be alerted upon completion.
Note: Depending on the number of devices in your Fabric environment, this process may take a few minutes. A banner will be displayed once the process is complete.
-
Once the process completes, the individual devices may be located on their respective instance pages.
-
You can manage the Fabric integration by going to Settings > Fabric Settings.