Use case: Automatic IP banning
Scenario
An application experiences an SQL injection from an IP address.
The application has a FortiGate device deployed in front of FortiWeb. To block further requests from the same IP address at the first point of entry, the company wants to send threat feeds to FortiGate's IP ban list when malicious IP addresses are detected. FortiGate by default will block this IP address for 10 minutes.
How FortiWeb responses to this issue
- Trigger Detection: FortiWeb detects SQL injection from certain IP addresses.
- Notification: An alert is sent to the security team via Teams, highlighting the malicious activity.
- Automated Response: The malicious IP addresses are automatically added to the FortiGate IP Ban list, blocking further attempts from those sources for 10 minutes.
- Review and Audit: A Jira ticket is created for the security team to review the incident and ensure no legitimate traffic was blocked.
This proactive approach quickly mitigates threats by blocking malicious traffic before it can cause harm, maintaining the integrity and security of the application.
Configurations on FortiWeb
Before performing the following steps, make sure:
-
You have already got the URL of the Teams channel you want to send notifications to. For how to get the URL. See Microsoft Teams Notification action.
-
You have already created a Jira service project and an API token in the Jira account for authentication purpose. See Jira Notification action.
-
You have a REST API administrator account in FortiGate and have the token ready. For more information, see REST API administrator in "FortiGate/FortiOS Administration Guide".
Perform the following steps on FortiWeb:
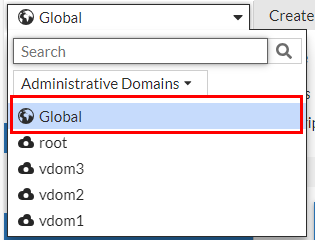
- Switch the Administrative Domain to Global.
- Go to Security Fabric > Automation.
- Select the Trigger tab.
- Click Create New.
- Select FortiWeb Log to filter out the SQL logs.
- Configure the settings:
Name Enter a name.
Description Enter a description.
Event Click the Add icon, enter "20000008" in the search box, then select "Log event attack signature detect" from the result. Field Filter(s) This is optional. If you don't add any filters, all the signature attack logs will serve as a trigger. However, if you apply filters, the logs will be further filtered to match the specified conditions.
Field Name: Sub Type
Equal
Value: SQL Injection
- Click OK.
- Go to Security Fabric > Automation.
- Select the Action tab.
- Click Create New。
- Select IP Ban.Configure the settings:
Name Enter a name.
Description Enter a description.
API Token Enter the API token of the FortiGate REST API administrator account. URL Enter the URL to access FortiGate.
- Click OK.
- Select the Action tab.
- Click Create New to create a Teams Notification action.
- Select Microsoft Teams Notification.
Configure the settings:
Name Enter a name.
Description Enter a description.
URL Paste the webhook URL you got from Teams. - Please leave the "https://" out when you paste the URL because the system will automatically append "https://" to the URL you enter.
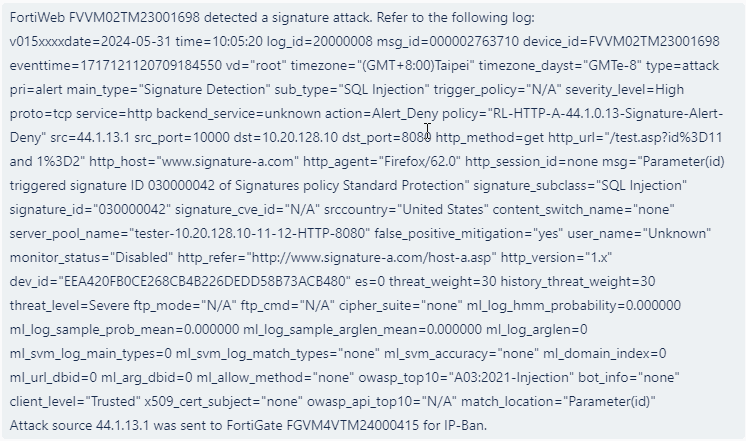
Message Type Text Message FortiWeb has detected an SQL signature attack. Refer to the following log:
%%log%%
Its source IP address "%%log.srcip%%" has been sent to FortiGate's IP Ban list. Further requests from this IP address will be blocked by FortiGate for the next 10 minutes.
Please review the incident and ensure no legitimate traffic was blocked.
- Click OK.
- Click Create New to create a Jira notification action.
- Select Jira Notification. Configure the settings:
Name Enter a name.
Description Enter a description.
Account Enter the Jira account name. This account must have User Management Access privilege. Token
Enter the API token.
URL Enter the URL of your Jira account.
Message { "fields": { "project": { "key": "KAN" }, "summary": "FortiWeb Automation Notification", "description": { "type": "doc", "version": 1, "content": [ { "type": "paragraph", "content": [ { "type": "text", "text": "FortiWeb has detected an SQL signature attack. Refer to the following log:\n%%log%%\nIts source IP address "%%log.srcip%%" has been sent to FortiGate's IP Ban list. Further requests from this IP address will be blocked by FortiGate for the next 10 minutes.\nPlease review the incident and ensure no legitimate traffic was blocked." } ] } ] }, "issuetype": { "name": "Task" } } } - Click OK.
- Select the Stitch tab.
- Enter a name and brief description for this stitch. Enable the status.
- Click Add Trigger, select the FortiWeb Log trigger, then click Apply.
- Click Add Action, select the IP Ban action you just created, then click Apply.
- Click Add Action, select the Microsoft Teams Notification action you just created, then click Apply.
- Click Add Action, select the Jira Notification action you just created, then click Apply.
- Click OK.
When this automation stitch is triggered, further requests from the IP address will be blocked by FortiGate for 10 minutes (you can configure it for a longer block period in FortiGate). You will receive the following message in Microsoft Teams and Jira. Please note that the following is just an example and may not correspond exactly to the messages configured for this use case.