Data Loss Prevention
The Data Loss Prevention (DLP) feature prevents sensitive data from leaving or entering your network by scanning for various patterns. Data matching defined sensitive data patterns is blocked, logged, allowed, or quarantined when it passes through FortiWeb.
The DLP feature is configured based on the following components:
| Component | Description |
|---|---|
| Data type | Define the type of pattern that DLP is trying to match. For example, this can be a pre-defined type including credit card or US social security number (SSN), or you can use keyword, regular expression, or a hexadecimal value to match data. |
| Dictionary | Combine multiple data type entries to match all or any. |
| Sensor | Define which dictionaries to check. You can match any or all dictionaries. It can also count the number of dictionary matches to trigger the sensor. |
| DLP rule | Define rules for matching a sensor based on file content or an HTTP Payload, and the email protocol being used to attach files. It also allows you to choose the action to allow, log, or block the address. |
|
DLP policy |
Define which DLP rules to check. |
|
DLP Exception |
Define conditions under which DLP rule enforcement is bypassed. Exceptions can be based on request or response attributes such as client IP, URI, headers, cookies, or payload/file hash. When traffic matches both a DLP rule and an associated exception, the rule is skipped for that request. |
In the backend, DLP uses Hyperscan to perform a one-parse algorithm for scanning multiple patterns. This allows DLP to scale up without any performance downgrade.
This section breaks down the DLP configuration into a sequence of steps:
FortiGuard DLP service
The DLP feature in FortiWeb integrates the FortiGuard Data Loss Prevention (DLP) service. It uses a customizable database of more than 500 predefined data patterns and policies to simplify and expedite DLP deployment and integration into existing environments. The FortiGuard DLP service database undergoes continuous maintenance and updates to stay in sync with the latest advancements in network security intelligence.
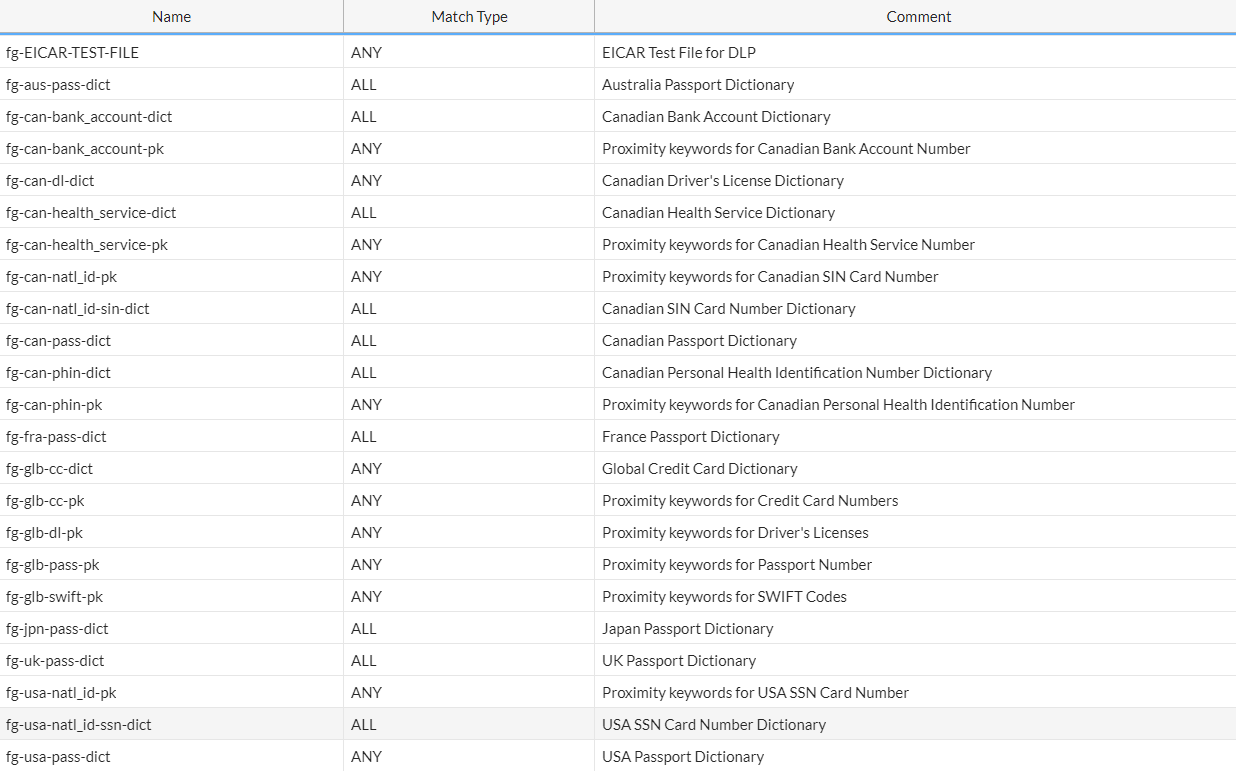
By enabling the FortiGuard Data Loss Prevention service in FortiWeb, you will have access to the following dictionaries (including but not limited to). If the HTTP payload or files passing through FortiWeb contain data that matches the patterns defined in these dictionaries, FortiWeb will initiate specified actions to safeguard the data.
|
|
Without the FortiGuard DLP service, FortiWeb still offers fundamental settings for you to defend against Data Loss. In the following sections, we will highlight the options associated with the FortiGuard DLP service for you to discern. |
FortiGuard DLP service license
You can contact Fortinet sales team to purchase a separate FortiGuard DLP service license, or a bundled license which combines the FortiGuard DLP service and FortiGuard Advanced Bot Protection service.
Update FortiGuard DLP database
- Register your license at the Fortinet Customer Service & Support website: https://support.fortinet.com. For information on how to register, see this article.
- Log in to FortiWeb. Go to System > Config > FortiGuard. Check the status of the FortiGuard DLP service license.

- The system will automatically update the DLP database from FortiGuard. If it's not up-to-date, click Update Now under the FortiWeb Update Service Options section on the System > Config > FortiGuard page, or you can run the following command.
# execute update dldb
|
|
The following command is for enabling or disabling FortiGuard DLP service database update. It's by default enabled. config system fortiguard set update-dldb {enable | disable} end |
Configuring the DLP dictionary
A DLP dictionary defines the patterns of data. The term "pattern" denotes a set of attributes specific to a given data type. For example, credit card numbers constitute numeric data that follow either the 14-digit or 16-digit patterns associated with credit cards. If the data adheres to these patterns, FortiWeb will identify it as a match.
To configure a DLP dictionary:
-
Go to Web Protection > Data Loss Prevention.
To access this part of the web UI, your administrator's account access profile must have Read and Write permission to items in the Web Protection Configuration category. For details, see Permissions. -
Select the DLP Dictionary tab and click Create New.
Please note that if FortiGuard DLP service is enabled, you will see a list of pre-defined dictionaries in the main table of the DLP Dictionary tab. - Enter a unique name that can be referenced by other parts of the configuration. The maximum length is 63 characters.
- Select Match type.
- All: Data meeting the criteria specified by all dictionary entries will be identified as a match.
- Any: Data meeting the criteria specified by any one of the dictionary entries will be identified as a match.
- Click OK.
- Click Create New.
-
Configure the following settings.
Type There are several basic types, including keyword, regex, hex, credit-card, and ssn-us.
keyword/regex/hex: Choose either keyword, regex, or hex to define the data pattern. This is beneficial when you are already familiar with the data patterns you wish to match.
Credit-card/ssn-us: Use the pre-defined patterns to identify credit card numbers or Social Security Number of US.
If you have the FortiGuard DLP service enabled, you will see additional types prefixed with "fg-", as illustrated below (please note that the screenshot is merely an example and may not include all "fg-xx" types).
The "fg-xx" dictionaries are provided by the FortiGuard DLP service database, which undergoes continuous maintenance and updates to align with the latest developments in network security intelligence.
If you find acronyms such as "fg-can-dl-bc" not easy to understand, you can refer to the Comment column in the Predefined table on the DLP Dictionary page for a detailed description of the dictionaries.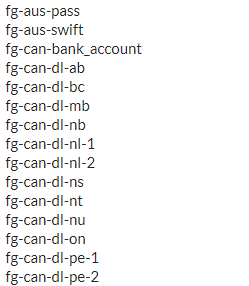
Pattern The term "pattern" denotes a set of attributes specific to a given data type. For example, credit card numbers constitute numeric data that follow either the 14-digit or 16-digit patterns associated with credit cards. If the data adheres to these patterns, FortiWeb will identify it as a match.
You can specify a keyword value, regular expression, or hexadecimal value to match data.
For instance, use the regular expression
demo(regex){1,5}to match data such as demoregex123.Case Sensitive Switch on to differentiate between upper case and lower case letters. Repeat Enable this option if you want to match data exclusively when it appears multiple times.
With this option enabled, you can specify the times of occurrence in the DLP Sensor settings.
Status Switch on to enable the dictionary. - Click OK to save the dictionary.
- Repeat step 6 to 8 if you want to add more dictionary entries.
Configuring the DLP sensor
A DLP sensor defines which dictionaries to check. You can match any dictionary or all dictionaries. It can also count the number of dictionary matches to trigger the sensor.
To configure a DLP sensor:
-
Go to Web Protection > Data Loss Prevention.
To access this part of the web UI, your administrator's account access profile must have Read and Write permission to items in the Web Protection Configuration category. For details, see Permissions. - Select the DLP Sensor tab and click Create New.
Please note that if FortiGuard DLP service is enabled, you will see a list of pre-defined DLP sensors in the main table of the DLP Sensor tab - Enter a unique name that can be referenced by other parts of the configuration. The maximum length is 63 characters.
- Select Match type.
- All: Data meeting the criteria specified by all dictionaries will be identified as a match.
- Any: Data meeting the criteria specified by any one of the dictionaries will be identified as a match.
- Click OK.
- Click Create New.
- Select the Dictionary from the dropdown menu.
- In the Count field, enter the occurrence threshold for the dictionary match. The sensor will be triggered when the dictionary match reaches the specified number of times.
For instance, if the dictionary applies to credit card numbers and the count is set to 4, the sensor will be triggered when credit card number occurs four times in the HTTP request or response.
Please note that if the count is set to 2 or larger values, make sure the Repeat switch is on in the DLP Dictionary settings. - Enable the Status if you intend to apply this sensor.
- Click OK to save the sensor entry.
- Repeat step 5 to 9 if you want to add more sensor entries.
Configuring the DLP rule
Create a DLP rule to match a sensor based on file content or an HTTP Payload, and the email protocol being used to attach files. It also allows you to choose the action to allow, log, or block the IP address.
To configure a DLP rule:
-
Go to Web Protection > Data Loss Prevention.
To access this part of the web UI, your administrator's account access profile must have Read and Write permission to items in the Web Protection Configuration category. For details, see Permissions. - Select the DLP Rule tab and click Create New.
- Configure the following settings.
Name Enter a unique name that can be referenced by other parts of the configuration. The maximum length is 63 characters. Host Status Enable Host Status if you want to apply this DLP rule to a specific web host.
Host Enter the IP address or FQDN of the host to which the DLP rule will be applied.
Only available if Host Status is enabled.
Request URL Type
Request URL
If you want to apply this DLP rule to specific URLs, you can use either a simple string or regular expression to specify the URL.
Simple String—The literal URL, such as /index.php, that the HTTP request must contain in order to match the DLP rule. The URL must begin with a backslash ( / ).
You can also use wildcards to match multiple URLs, such as /folder1/* ,or /folder1/*/index.htmRegular Expression—A regular expression, such as
^/*.php, matching the URLs to which the rule should apply. The pattern does not require a slash (/), but it must match URLs that begin with a slash, such as/index.cfm.
Do not include the domain name, such as
www.example.com, which is configured separately in Host.To test a regular expression, click the >> (test) icon. This icon opens the Regular Expression Validator window from which you can fine-tune the expression. For details, see Regular expression syntax
Please note that for scanning email attachments, it's not required to specify request URL.
Sensor Select the DLP sensor. Direction Select whether to safeguard the data when it enters (Request) or leaves (Response) FortiWeb, or for both directions. Type HTTP Payload: FortiWeb will scan the HTTP payload to identify any match.
Files: FortiWeb will scan files in a request or response to identify any match.
Please note that DLP only process the non-binary data in the HTTP payload or files, for example, the HTML body and XML body, or the multipart/form-data, multipart/related, and application/octet-stream files.
Attachments in Email
Enable Attachments in Email to restrict the file scan exclusively to attachments in emails.
Available only when Files is selected in Type.Protocol
Available only when Data Loss Prevention is enabled. Select one or all of the following options:
OWA—FortiWeb will scan attachments in Email sent and received via a web browser login.
ActiveSync—FortiWeb will scan attachments in Email sent and received via a mobile phone login.
- MAPI—FortiWeb will scan attachments in Email sent and received via the Messaging Application Programming Interface (MAPI), a transport protocol implemented in Microsoft Exchange Server 2013 Service Pack 1 (SP1).
Action
Select which action FortiWeb will take when it detects a violation of the rule:
- Alert—Accept the connection and generate an alert email and/or log message.
Alert & Deny—Block the request and generate an alert email and/or log message.
Period Block—Block subsequent requests from the same IP address for a number of seconds. Also configure Data Loss Prevention.
The default value is Alert. See also Reducing false positives.
Note: Logging will occur only if enabled and configured. For details, see Logging and Alert email.
Block Period
Enter the amount of time (in seconds) that you want to block subsequent requests from the same IP address after FortiWeb detects a DLP rule violation. This setting is available only when Data Loss Prevention is set to Period Block.
The valid range is 1–3,600 seconds (1 hour).
Severity
When FortiWeb records DLP rule violations in the attack log, each log message contains a Severity Level field. Select the severity level that FortiWeb will record when the rule is vioated:
- Informative
- Low
- Medium
- High
The default value is Medium.
Trigger Policy
Select the trigger policy, if any, that FortiWeb carries out when it logs and/or sends an alert email about a DLP rule violation. For details, see Viewing log messages.
- Click OK.
Configuring the DLP policy
To configure a DLP policy:
- Go to Web Protection > Data Loss Prevention.
To access this part of the web UI, your administrator's account access profile must have Read and Write permission to items in the Web Protection Configuration category. For details, see Permissions. - Click DLP Policy.
- Click Create New.
- For Name, enter a name for the DLP policy that can be referenced in Web Protection Profile.
- Optionally, select a DLP Exception to apply to the policy. For details, Configuring DLP Exception.
- Click OK.
- Click Create New.
- Select the DLP rule from the drop down list.
- Click OK.
- Repeat step 6 to 8 for each DLP rule that you want to add to the DLP policy.
- To apply the DLP policy, select it in an inline or Offline Protection profile. For details, see Configuring a protection profile for inline topologies or Configuring a protection profile for an out-of-band topology or asynchronous mode of operation.
Configuring DLP Exception
The DLP Exception feature allows you to define granular bypass conditions for traffic that would otherwise trigger Data Loss Prevention (DLP) rules. You can create exception objects composed of one or more match elements, each specifying conditions such as client IP, HTTP header, URI, or payload hash. These exceptions can be assigned to DLP policies to exclude matching traffic from enforcement. This enables more accurate DLP coverage while minimizing false positives and maintaining support for trusted applications and sources.
To configure DLP exception:
- Go to Web Protection > Data Loss Prevention.
To access this part of the web UI, your administrator's account access profile must have Read and Write permission to items in the Web Protection Configuration category. For details, see Permissions. - Click DLP Exception.
- Click Create New.
- For Name, enter a name for the DLP policy that can be referenced in Web Protection Profile.
- Click OK.
- Click Create New.
- Configure the following settings based on the Element Type.
-
Host Operation - String Match—Value is a literal host name.
- Regular Expression Match—Value is a regular expression that matches all and only the hosts that the exception applies to.
Value Specifies the Host:field value to match.
To create and test a regular expression, click the >> (test) icon. For details, see Regular expression syntax.URI Operation - String Match—Value is a literal URL, such as
/folder1/index.htmthat the HTTP request must contain in order to match the rule, or use wildcards to match multiple URLs, such as/folder1/*or/folder1/*/index.htm. - Regular Expression Match—Value is a regular expression that matches all and only the URIs that the exception applies to.
Value Specifies a URL value to match. You can use up to 2048 characters in regex configuration. The value does not include parameters. For example, /testpage.php, which match requests forhttp://www.test.com/testpage.php?a=1&b=2.
If Operation is String Match, ensure the value starts with a forward slash ( / ) (for example,/causes-false-positives.php).
If Operation is Regular Expression Match, the value does not require a forward slash ( / ). However, ensure that it can match values that contain a forward slash.
When the URL value is a string, such as /causes-false-positives.php, the URL must begin with a slash ( / ).
Do not include a domain name or parameters. To match a domain name, use the Host element type. To match a URL that includes parameters, use the Full URL type.
To create and test a regular expression, click the >> (test) icon. For details, see Regular expression syntax.Full URL Operation - String Match—Value is a literal URL, such as
/folder1/index.htmthat the HTTP request must contain in order to match the rule, or use wildcards to match multiple URLs, such as/folder1/*or/folder1/*/index.htm. - Regular Expression Match—Value is a regular expression that matches all and only the URLs that the exception applies to.
Value Specifies a URL value that includes parameters to match. For example, /testpage.php?a=1&b=2, which match requests forhttp://www.test.com/testpage.php?a=1&b=2.
If Operation is String Match, ensure the value starts with a forward slash ( / ) (for example,/testpage.php?a=1&b=2).
If Operation is Regular Expression Match, the value does not require a forward slash ( / ). However, ensure that it can match values that contain a forward slash.
Do not include a domain name. To match a domain name, use the Host element type. To match a URL that does not include parameters, use the URI type.
To create and test a regular expression, click the >> (test) icon. For details, see Regular expression syntax.Parameter Operation - String Match—Name is the literal name of a parameter.
- Regular Expression Match— Name is a regular expression that matches all and only the name of the parameter that the exception applies to.
Name Specifies the name of the parameter to match.
To create and test a regular expression, click the >> (test) icon. For details, see Regular expression syntax.Check Value of Specified Element Enable to specify a parameter value to match in addition to the parameter name. Value Specifies the parameter value to match.
To create and test a regular expression, click the >> (test) icon. For details, see Regular expression syntax.Cookie Operation - String Match—Name is the literal name of a cookie.
- Regular Expression Match— Name is a regular expression that matches all and only the name of the cookie that the exception applies to.
Name Specifies the name of the cookie to match.
To create and test a regular expression, click the >> (test) icon. For details, see Regular expression syntax.Check Value of Specified Element Select to specify a cookie value to match in addition to the cookie name. Value Specifies the cookie value to match.
To create and test a regular expression, click the >> (test) icon. For details, see Regular expression syntax.Client IP
Operation
-
Equal—The request source IP address must exactly match the specified IP address.
-
Not Equal—The request source IP address must not match the specified IP address.
Client IP
Specifies the source IP address to match. You can enter either an IPv4 or IPv6 address.
HTTP Header
Operation
- String Match—Name is the literal name of a HTTP header.
- Regular Expression Match— Name is a regular expression that matches all and only the name of the HTTP header that the exception applies to.
Name
Specifies the name of the HTTP header to match.
To create and test a regular expression, click the >> (test) icon. For details, see Regular expression syntax.Check Value of Specified Element
Select to specify a HTTP header value to match in addition to the HTTP header name. Value
Specifies the HTTP header value to match.
To create and test a regular expression, click the >> (test) icon. For details, see Regular expression syntax.Payload SHA256
Operation
-
String Match—The hash must exactly match the computed SHA-256 hash of the request payload.
Value
Specifies the SHA-256 hash of the request payload to match. The hash must be entered as a 64-character hexadecimal string.
File SHA256
Operation
-
String Match—The hash must exactly match the computed SHA-256 hash of the uploaded file.
Value
Specifies the SHA-256 hash of the file to match. The hash must be entered as a 64-character hexadecimal string.
Concatenate - AND—A matching request matches this entry in addition to other entries in the exemption list.
- OR—A matching request matches this entry instead of other entries in the exemption list.
Later, you can use the exception list options to adjust the matching sequence for entries.
- Click OK to save the Data Loss Prevention Exception Element entry.
- Repeat the previous steps for each entry that you want to add to the exception.
Note: You can create up to 128 exceptions for each element type.
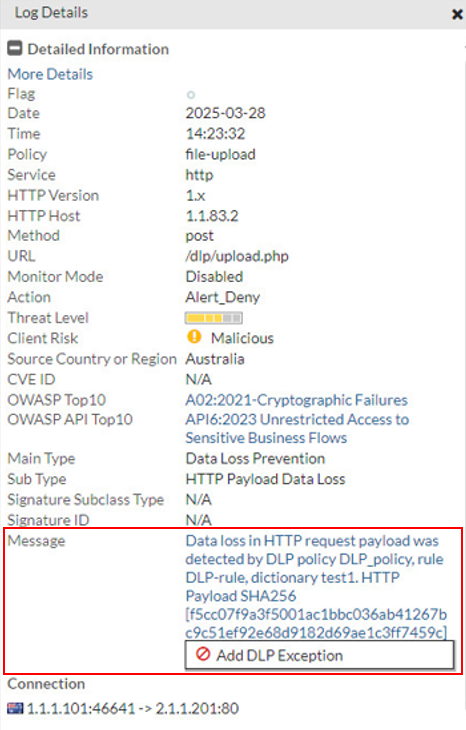
To add a DLP Exception from the Attack Log:
For DLP Policy violations, you can also add exceptions directly from the attack log.
Go to Log&Report > Log Access > Attack, and find the attack logs with Main Type set to "Data Loss Prevention". Double-click a log entry to view the log details. If you believe the request was falsely detected as an attack, click the Message field, then click Add DLP Exception.