


Migrating from FortiSIEM 5.3.x or 5.4.x
This section describes how upgrade the 3500G appliance from FortiSIEM 5.3.x or 5.4.x to FortiSIEM 6.1.2. FortiSIEM performs migration in-place, via a bootloader. There is no need to create a new image or copy disks. The bootloader shell contains the new version of FortiSIEM.
Pre-Migration Checklist
To perform the migration, the following prerequisites must be met:
- Make sure your system can connect to the Internet.
- Make sure you are running a 5.3.x or 5.4.x version of FortiSIEM. If you are not running these versions, first upgrade to any of these versions and then apply the procedures below.
- Delete the Worker from the Super GUI.
- Stop/Shutdown the Worker.
- Make sure the
/datadirectory (/) has at least 25+ GB of available space to store the new image. - Log in to your FSM as
rootand run the following commands:# mkdir -p /data/images
# ln -s /data/images /images
or if using NFS or Elasticsearch storage:
# mkdir -p /svn/images
# ln -s /svn/images /images
- Go to the
/imagesdirectory. Download the 6.1.2 hardware image from the support site, then unzip it. For example:# unzip FSM_Full_All_RAW_HARDWARE_6.1.2_build0119.zip
Note: The image size is about 25GB after extracting.
- Create a soft link to
images, for example:# ln -sf /images/FortiSIEM-RAW-Hardware-6.1.2.0119.img /images/latest
- Enter the
llcommand to ensurelatestlink is defined, for example:# ll
Migrate All-in-one Installation
- Download the Bootloader
- Prepare the Bootloader
- Load the FortiSIEM 6.1.2 Image
- Migrate to FortiSIEM 6.1.2
Download the Bootloader
Install and configure the FortiSIEM bootloader to start migration. Follow these steps:
- Download the bootloader
FSM_Bootloader_6.1.2_build0119.zipfrom the support site and copy it to the/imagesdirectory. - Unzip the file, for example:
# unzip FSM_Bootloader_6.1.2_build0119.zip
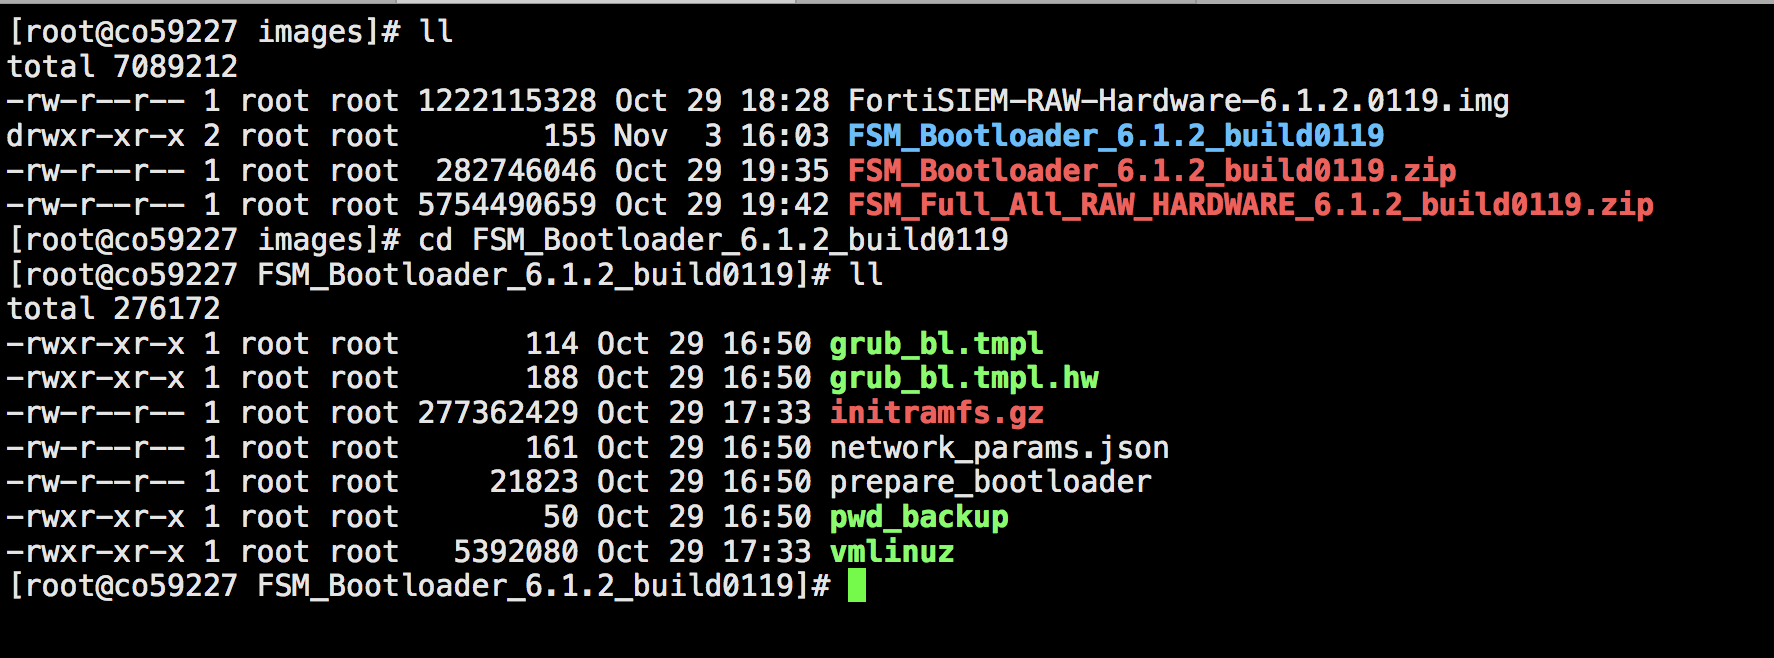
Prepare the Bootloader
Follow these steps to run the prepare_bootloader script:
- Go to the
bootloaderdirectory, for example:# cd /images/FSM_Bootloader_6.1.2_build0119
- Run the
prepare_bootloaderscript to install and configure the bootloader. This script installs, configures, and reboots the system. The script may take a few minutes to complete.# sh prepare_bootloader
- The script will open the FortiSIEM bootloader shell.

Note: you might have to reboot the system manually if auto-reboot does not work.
- In the FortiSIEM bootloader shell, choose FortiSIEM Boot Loader. Press Return.

Load the FortiSIEM 6.1.2 Image
Follow these steps to load the FortiSIEM image:
- Log in to the bootloader shell as user
rootwith passwordProspectHills.
- Create and mount the
/datadirectory:- Create a
/datadirectory, for example:# mkdir -p /data
or if using NFS or Elasticsearch storage:
# mkdir -p /svn
- Mount the
sdf1(the 50GB disk) to the/datadirectory, for example:# mount /dev/mapper/FSIEM3500G-phx_data /data
or if using NFS or Elasticsearch storage:
# mount/dev/mapper/FSIEM3500G-phx_svn /svn
- Create a symbolic
link to
imagesfromdata:# ln -sf /data/images /images
or if using NFS or Elasticsearch storage:
# ln -sf /svn/images /images
- Change to the
/imagesdirectory, for example:# cd /images
- Run the
llcommand to check disk usage.# ll
These steps are illustrated in the following screen shot.

- Create a
- Run the
load_imagescript to swipe the old image with the new image, for example:- Change to the
rootdirectory and check the contents, for example:# cd /
# ll

- Run the
load_imagescript, for example:# sh load_image

- Press Return again when the
load_imagescript finishes. - Reboot your system manually if it does not do so automatically.
- Change to the
Migrate to FortiSIEM 6.1.2
Follow these steps to complete the migration process:
- Log in to the bootloader shell as user
rootwith passwordProspectHills. You will immediately be asked to change your password. - Create and mount the
/imagesdirectory from/data:- Change directory to
root, for example:# cd /
- Create the
/datadirectory, for example:# mkdir -p /data
or if using NFS or Elasticsearch storage:
# mkdir -p /svn
- Mount the
datadirectory and symlink it to/images, for example:# mount /dev/mapper/FSIEM3500G-phx_data /data
# ln -s /data/images /images
or if using NFS or Elasticsearch storage:
# mount /dev/mapper/FSIEM3500G-phx_svn /svn
# ln -s /svn/images /images
- Change directory to
- Run the
configFSM.shcommand to configure the migration via a GUI, for example:# configFSM.sh
- In the first screen of the GUI select 1 Yes to set a timezone.
Press Next.

- Select a region for the timezone. In this example, US is selected. Press Next.

- Select a timezone in the selected region. In this example, Pacific is selected. Press Next.

- Select a target to configure. In this example, the Supervisor is selected. Press Next.

- Select option 6 migrate_6_1_1.

- Test network connectivity by entering a host name that can be resolved by your DNS Server (entered in the previous step) and responds to ping. The host can either be an internal host or a public domain host like google.com. In order for the migration to complete, the system still needs https connectivity to FortiSIEM OS update servers:
os-pkgs-cdn.fortisiem.fortinet.comandos-pkgs-c8.fortisiem.fortinet.com. Press Next.
- Press the Run command to complete migration, for example:

The options for the command are described in the following table:
Option Description -r The FortiSIEM component being configured -z The time zone being configured -i IPv4-formatted address -m Address of the subnet mask -g Address of the gateway server used --host Host name -f FQDN address: fully-qualified domain name -t The IP type. The values can be either 4 (for ipv4) or 6 (for v6) Note: the 6 value is not currently supported. --dns1, --dns2 Addresses of DNS server 1 and DNS server 2. -o Installation option. -z Time zone. Possible values are US/Pacific, Asia/Shanghai, Europe/London, or Africa/Tunis --testpinghost The host used to test connectivity - The script will take some minutes to run. When it is finished, migration is complete.
- Log in to your system again as user
rootwith your new password. - To ensure
phMonitoris running, execute thephstatuscommand, for example:# phstatus
Migrate Cluster Installation
This section provides instructions on how to migrate Supervisor, Workers, and Collectors separately in a cluster environment,
- Delete Workers
- Migrate Supervisor
- Install New Worker(s)
- Register Workers
- Set Up Collector-to-Worker Communication
- Working with Pre-6.1.0 Collectors
- Install 6.1.2 Collectors
- Register 6.1.2 Collectors
Delete Workers
- Login to the Supervisor.
- Go to Admin > License > Nodes and delete the Workers one-by-one.
- Go to the Admin > Cloud Health page and make sure that the Workers are not present.
Note that the Collectors will buffer events while the Workers are down.
- Shutdown the Workers.
SSH to the Workers one-by-one and shutdown the Workers.
Migrate Supervisor
Follow the steps in Migrate All-in-one Installation to migrate the supervisor node. Note: FortiSIEM 6.1.2 does not support Worker or Collector migration.
Install New Worker(s)
Follow the steps in Installing Workers to install new Workers. You can either keep the same IP address or change the address.
Register Workers
Follow the steps in Registering Workers to register the newly created 6.1.2 Workers to the 6.1.2 Supervisor. The 6.1.2 FortiSIEM Cluster is now ready.
Set Up Collector-to-Worker Communication
- Go to Admin > Systems > Settings.
- Add the Workers to the Event Worker or Query Worker as appropriate.
- Click Save.
Working with Pre-6.1.0 Collectors
Pre-6.1.0 Collectors and agents will work with 6.1.2 Supervisor and Workers. You can install 6.1.2 collectors at your convenience.
Install 6.1.2 Collectors
FortiSIEM does not support Collector migration to 6.1.2. You can install new 6.1.2 Collectors and register them to 6.1.2 Supervisor in a specific way so that existing jobs assigned to Collectors and Windows agent associations are not lost. Follow these steps:
- Copy the http hashed password file (
/etc/httpd/accounts/passwds) from the old Collector. - Disconnect the pre-6.1.2 Collector.
- Install the 6.1.2 Collector with the old IP address.
- Copy the saved http hashed password file (
/etc/httpd/accounts/passwds) from the old Collector to the 6.1.2 Collector.This step is needed for Agents to work seamlessly with 6.1.2 Collectors. The reason for this step is that when the Agent registers, a password for Agent-to-Collector communication is created and the hashed version is stored in the Collector. During 6.1.2 migration, this password is lost.
Register 6.1.2 Collectors
To register collectors, use the --update option instead of --add in the phProvisionCollector command. Other than this, use exactly the same parameters that were used to register the pre-6.1.2 Collector. Specifically, use this form of the
phProvisionCollector command to register a 6.1.2 Collector and keep the old associations:
# /opt/phoenix/bin/phProvisionCollector --update <user> '<password>' <Super IP or Host> <Organization> <CollectorName>
The password should be enclosed in single quotes to ensure that any non-alphanumeric characters are escaped.
Re-install new Windows Agents with the old InstallSettings.xml file. Both the migrated and the new agents will work. The new Linux Agent and migrated Linux Agent will also work.
Upgrading FortiSIEM
For upgrading FortiSIEM from 5.3.x or 5.4.0 to 6.1.2, refer to the section Upgrading a FortiSIEM Single Node Deployment in the Upgrade Guide.