


Configuring FortiSASE with AD FS SSO
FortiSASE supports claims-based SAML user authentication using Active Directory Federation Services (AD FS). FortiSASE acts as a service provider (SP) and AD FS acts as an identity provider (IdP) in the SAML authentication flow. In AD FS terminology, FortiSASE is also called a relying party.
The example that this topic discusses assumes that you have completed prerequisites to install AD FS, and the AD FS service is already installed on Windows Server 2016. See AD FS Requirements.
To export an IdP certificate from AD FS and import it in FortiSASE:
- On Windows 2016 Server Manager, open the AD FS management snap-in from Server Manager > Tools > AD FS Management.
- From the Service dropdown list, select Certificates. Double-click the certificate under Token-signing. In the Certificate menu, go to the Details tab and select Copy to File to export it to a suitable location using either .CER format.

- To import this certificate to FortiSASE, move it to a location that the machine where you will open the FortiSASE GUI can access.
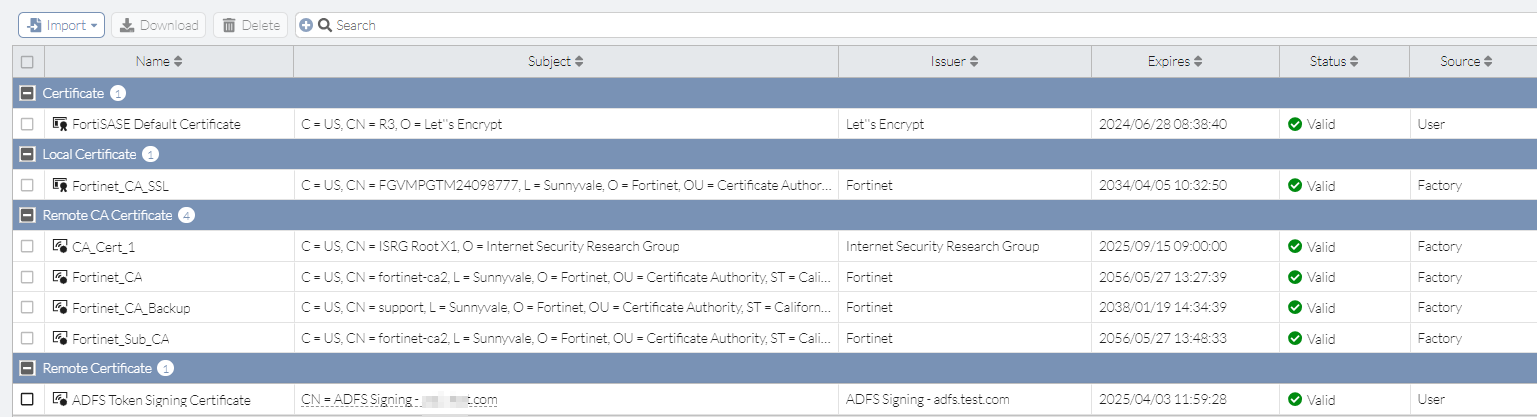
- In FortiSASE, go to System > Certificates. Select Import > Remote Certificate. For Type, select Remote Certificate and click Upload to import the IdP certificate. Give a suitable Certificate Name as desired.
- Click OK. The certificate is visible under System > Certificates > Remote Certificate. In this example, FortiSASE successfully imported ADFS Token Signing Certificate.
To export an SP certificate from FortiSASE:
In FortiSASE, go to System > Certificate, click FortiSASE Default Certificate and click Download from the toolbar. You will import this certificate to AD FS as the SP certificate in To configure AD FS relying party trust:.
|
|
FortiSASE Default Certificate is a built-in wildcard certificate on FortiSASE signed by a well-known public CA and remains same across all of your points of presence. FortiSASE Default Certificate also periodically renews. Thus, if IdPs are using Service Provider Certificate in their configuration, administrators must periodically update their IdP configuration with new SP certificate. To avoid having to update your IdP configuration frequently, we recommend uploading your own certificate. |
To retrieve IdP Configuration from AD FS:
- On the Windows server where AD FS is installed, open a web-browser to download the Federation metadata XML file using the URL https://<your-adfs.domain.com>/federationmetadata/2007-06/FederationMetadata.xml>, where your-adfs.domain.com is the FDQN of your AD FS server.
- Open the XML file and search for entityID, SingleSignOnService Location, and SingleLogoutService Location and copy the values (i.e. URLs) for these fields in a notepad file:
entityID="http://<your-adfs.domain.com>/adfs/services/trust"
<SingleSignOnServiceLocation="https://<your-adfs.domain.com>/adfs/ls/"
<SingleLogoutServiceLocation="https://<your-adfs.domain.com>/adfs/ls/"
These URLs will be used to configure IdP details on FortiSASE in To configure AD FS SSO on FortiSASE:.
To configure AD FS SSO on FortiSASE:
- In FortiSASE, to configure SSO for agent-based users, go to Configuration > VPN User SSO. Similarly, for agentless users using FortiSASE SWG, go to Configuration > SWG User SSO.
- For Configure Identity Provider, copy the values in the Entity ID, Assertion Consumer Service (ACS) URL, and Single Logout Service (SLS) URL fields to a Notepad file. These URLs are used in To configure AD FS relying party trust:. Click Next.
- In Configure Service Provider, paste the values (i.e. URLs) from Notepad that you retrieved in To retrieve IdP Configuration from AD FS: with the following mapping:
FortiSASE
Values copied from AD FS
IdP Entity ID
http://<your-adfs.domain.com>/adfs/services/trust
IdP Single Sign-On URL
https://<your-adfs.domain.com>/adfs/ls/
IdP Single Log-Out URL
https://<your-adfs.domain.com>/adfs/ls/
- For SAML Claims Mapping, in the FortiSASE Username field, enter username as copied from AD FS.
- Disable SAML Group Matching.
- From the dropdown list, select the IdP certificate that was imported into FortiSASE in To export an IdP certificate from AD FS and import it in FortiSASE::
- For Service Provider Certificate, select FortiSASE Default Certificate.

While configuring Service Provider Certificate, the FortiSASE instances that have existing or old SSO configuration, are by default configured with legacy default certificate (i.e. Fortinet_Factory) as its service provider certificate.
FortiSASE administrators have an option to change legacy default certificate (i.e. Fortinet_Factory) to use new FortiSASE Default Certificate. Once FortiSASE is configured to use FortiSASE Default Certificate, FortiSASE administrators can no longer configure and use the legacy default certificate (i.e. Fortinet_Factory). Thus, ensure to update the service provider certificate in your IdP configuration. Other FortiSASE instances, with fresh SSO configuration have the direct option to use the FortiSASE Default Certificate in the Service Provider Certificate dropdown menu.
The FortiSASE Default Certificate also periodically renewed. Thus, if the IdPs are using Service Provider Certificate in their configuration, administrators must periodically update their IdP configuration with new SP certificate. To avoid having to update your IdP configuration frequently, we recommend uploading your own certificate.
- For Digest Method, select SHA-256. FortiSASE supports both SHA-1 and SHA-256, but AD FS is by default configured with SHA-256 and this hash algorithm is also recommended by Microsoft.
- Click Next and then click Submit. Click OK after reading the Caution prompt.
To configure AD FS relying party trust:
- On Windows Server, open the AD FS Management snap in.
- Right-click Relying Party Trust and select Add Relying Party Trust.
- In the Welcome step, select Claims aware, then Start.
- In the Select Data Source step, select Enter data about the relying party manually. Click Next.
- In the Specify Display Name step, give the relying party a suitable Display name (such as SASE). Click Next.
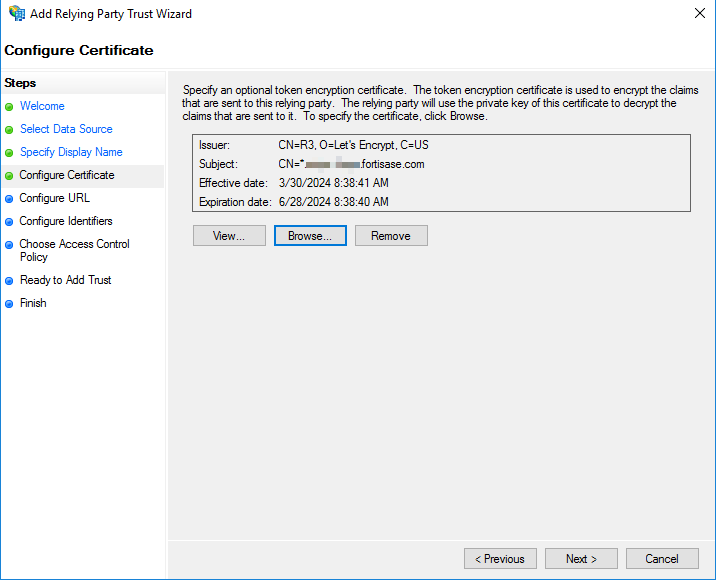
- (Optional) To encrypt the token claims sent to the relying party (i.e. FortiSASE), in the Configure Certificate step, copy the certificate FortiSASE Default Certificate downloaded in To export an SP certificate from FortiSASE: and move it to Windows Server in a suitable directory. Upload the certificate by clicking Browse to navigate to directory. Click Next.
- In the Configure URL step, select Enable support for the SAML 2.0 WebSSO protocol and enter the Assertion Consumer Service (ACS) URL from To configure AD FS SSO on FortiSASE:. Click Next.
- In the Configure Identifiers step, in the Relying party trust identifier field, paste the Entity ID value from To configure AD FS SSO on FortiSASE:. Click Add, then Next.
- In the Choose Access Control Policy step, Permit everyone is selected by default. If desired, restrict the access control policy to a specific group. Click Next. In the Ready to Add Trust step, click Next. In the Finish step, click Close.
To configure properties of AD FS Relying Party Trusts.
- On the AD FS management snap-in, click Relying Party Trusts. Right-click your configured relying party trust and click Properties.
- On the Signature tab, click Add to go to the folder to add FortiSASE Default Certificate.
- Click Apply.

- On the Advanced tab, for Secure hash algorithm, select SHA-256.
- Click OK.
To configure AD FS Claim Issuance Policy
- On the AD FS management snap-in, click Relying Party Trusts. Right-click your configured relying party trust and click Edit Claim Issuance Policy.
- In Issuance Transform Rules, click Add Rule. A new Add Transform Claim Rule Wizard opens.
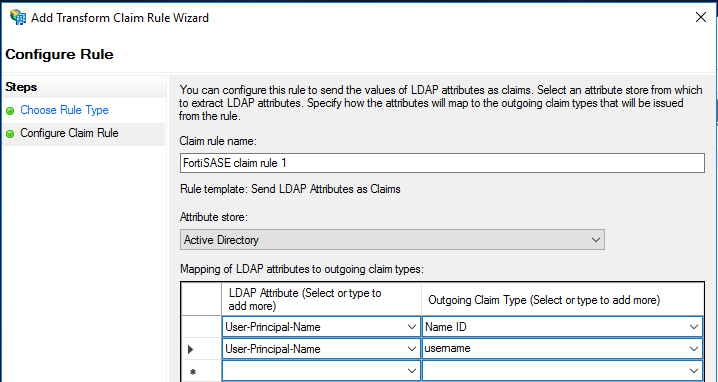
- For Choose Rule Type, in the Claim rule template, select Send LDAP Attributes as Claims from the dropdown list. Click Next.
- In Configure Claim Rule, give a suitable claim rule name.
- For Attribute store, select Active Directory.
- Enter the following claims that FortiSASE supports:
LDAP Attribute
Outgoing Claim Type
User-Principal-Name
Select Name ID from the dropdown list.
User-Principal-Name
username. As username is not available to select from the dropdown list, you must enter it manually.
- Click Finish. The claim rule is visible under Claim Issuance Policy.
- Click Apply. Click OK.
To configure SAML user groups on FortiSASE:
- On FortiSASE, go to Configuration > Users & Groups.
- Click Create, select User Group.
- Click Next.
- Enter a suitable Name for the group. From the Remote Groups table, click Create.
- From the Remote Server dropdown list, select VPN SSO. You must select VPN SSO even if you are using SWG.
- Click OK to save the remote server configuration.
- Click OK to save the user group configuration.
- Use the user group created inside respective policies for agent-based users or secure web gateway policies for agentless users to authenticate users connecting to FortiSASE using SSO using AD FS. See Policies and SWG Policies.
- For agentless users, do the following:
- Download the PAC file from System > SWG configuration. See Downloading the preconfigured PAC file.
- Customize the PAC file to add IdP URLs to exempt the IdP traffic to flow through FortiSASE. See Customizing the PAC file.
- Configure the proxy setting on your endpoint using the customized PAC file. See Windows.
|
|
While setting up SSO with AD FS or other custom Identity Providers (except Google, Entra ID, FortiTrustID, or Okta) for agentless users, it is mandatory to customize the PAC file to add IdP URLs to it such that the traffic to IdP URLs is not forwarded to FortiSASE secure web gateway (SWG) server and instead goes directly to Internet. See Customizing the PAC file. |