
Using SAML authentication with FortiAuthenticator
This example shows how to configure SAML authentication with FortiAuthenticator on a FortiProxy unit. You need to configure both FortiProxy and FortiAuthenticator to allow SAML authentication to work.
FortiProxy configuration
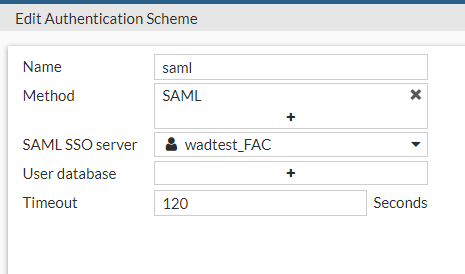
Step 1: Configure SAML
To configure SAML from the GUI:
-
Select User & Authentication > SAML and click Create New.

To configure SAML from the CLI:
config user saml
edit "wadtest_FAC"
set cert "Fortinet_CA_SSL"
set entity-id "https://fpx222.domain.local:7831/XX/YY/ZZ/saml/metadata/"
set single-sign-on-url "https://fpx222.domain.local:7831/XX/YY/ZZ/saml/login/"
set single-logout-url "https://fpx222.domain.local:7831/XX/YY/ZZ/saml/logout/"
set idp-entity-id "http://172.18.20.167/saml-idp/qw0uvzl3soh1o1w2/metadata/"
set idp-single-sign-on-url "https://172.18.20.167/saml-idp/qw0uvzl3soh1o1w2/login/"
set idp-single-logout-url "https://172.18.20.167/saml-idp/qw0uvzl3soh1o1w2/logout/"
set idp-cert "REMOTE_Cert_2" FAC certificate
set user-name "username"
set group-name "groupname"
set digest-method sha256
next
end
Step 2: Configure a user group
To configure a user group from the GUI:
-
Select User & Authentication > User Groups.

To configure a user group from the CLI:
FPX222 (saml_grp_fac) # show
config user group
edit "saml_grp_fac"
set member "wadtest_FAC"
config match
edit 1
set server-name "wadtest_FAC"
set group-name "test" [user group from FortiAuthenticator]
next
end
next
end
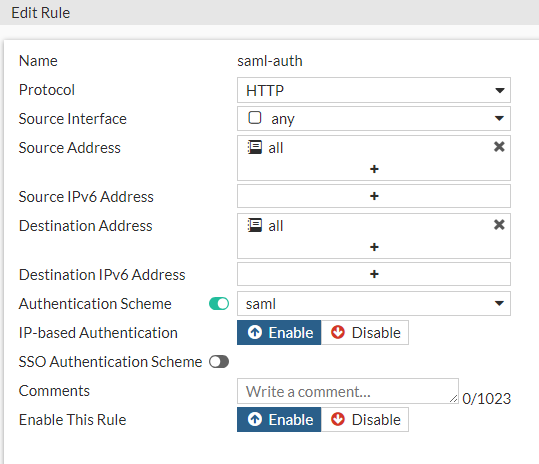
Step 3: Configure an authentication scheme
To configure an authentication scheme from the GUI:
-
Select Policy & Objects > Authentication Rules and click Create New > Authentication Scheme.
To configure an authentication scheme from the CLI:
config authentication scheme
edit "saml"
set method saml
set saml-server "wadtest_FAC"
next
end
Step 4: Configure an authentication rule
To configure an authentication rule from the GUI:
-
Select Policy & Objects > Authentication Rules and click Create New > Authentication Rule.
To configure an authentication rule from the CLI:
config authentication rule
edit "saml-auth"
set srcintf "any"
set srcaddr "all"
set dstaddr "all"
set active-auth-method "saml"
next
end
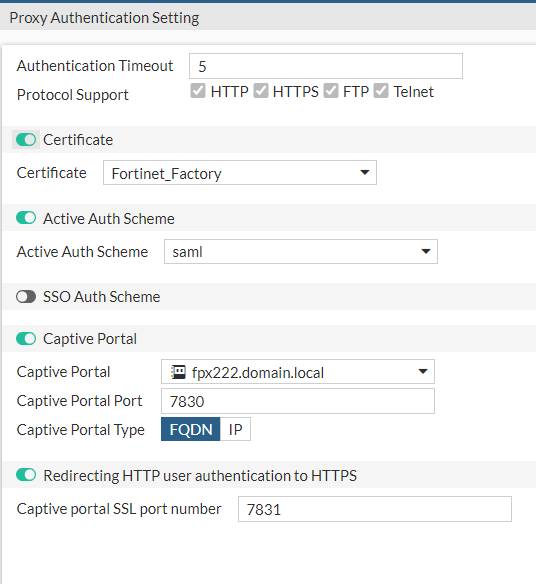
Step 5: Configure authentication settings
To configure authentication settings from the GUI:
-
Select Policy & Objects > Proxy Auth Setting.
To configure authentication settings from the CLI:
config authentication setting
set active-auth-scheme "saml"
set captive-portal "fpx222.domain.local"
end
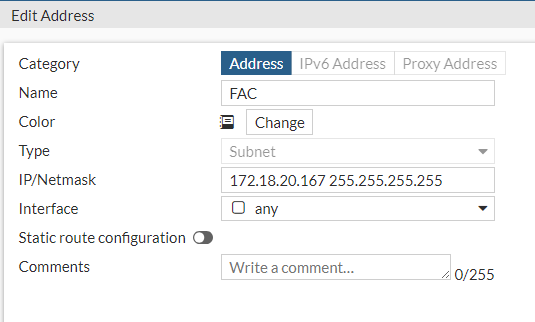
Step 6: Configure FortiAuthenticator proxy address
To configure a FortiAuthenticator proxy address from the GUI:
-
Select Policy & Objects > Addresses and click Create New > Address.
To configure a FortiAuthenticator proxy address from the CLI:
config firewall address
edit "FAC"
set uuid 3458d25e-478d-51ee-573d-6ff2acb8bba8
set subnet 172.18.20.167 255.255.255.255
next
end
Step 7: Configure a firewall policy
config firewall policy
edit 18
set type explicit-web
set name "SAML- ADFS _Access"
set uuid ceacefd8-4392-51ee-7278-44d09ef3bcd0
set dstintf "any"
set srcaddr "all"
set dstaddr "FAC"
set action accept
set schedule "always"
set service "webproxy"
set explicit-web-proxy "web-proxy"
next
end
config firewall policy
edit 16
set type explicit-web
set name "SAML_auth"
set uuid 8d2050cc-4389-51ee-b9bd-d28c45e0827d
set dstintf "any"
set srcaddr "all"
set dstaddr "all"
set action accept
set schedule "always"
set service "webproxy"
set explicit-web-proxy "web-proxy"
set groups "saml_grp_fac"
set ssl-ssh-profile "custom-deep-inspection"
next
end
FortiAuthenticator configuration
-
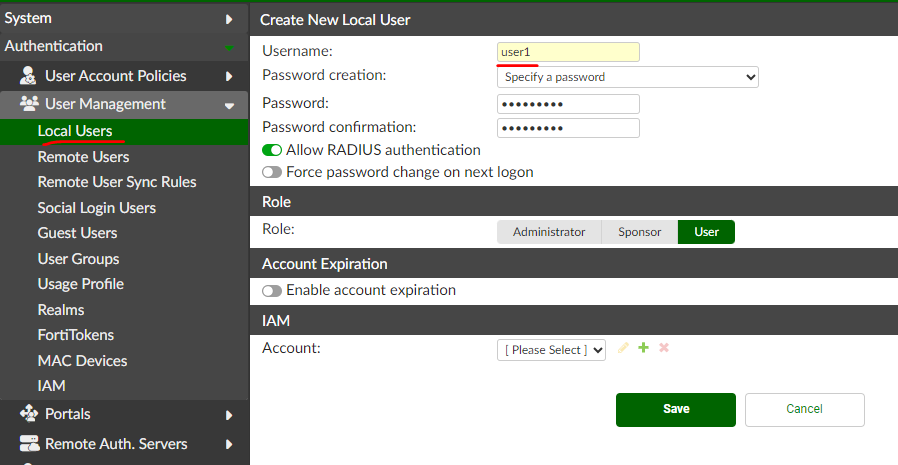
Create a user, for example, "user1".
-
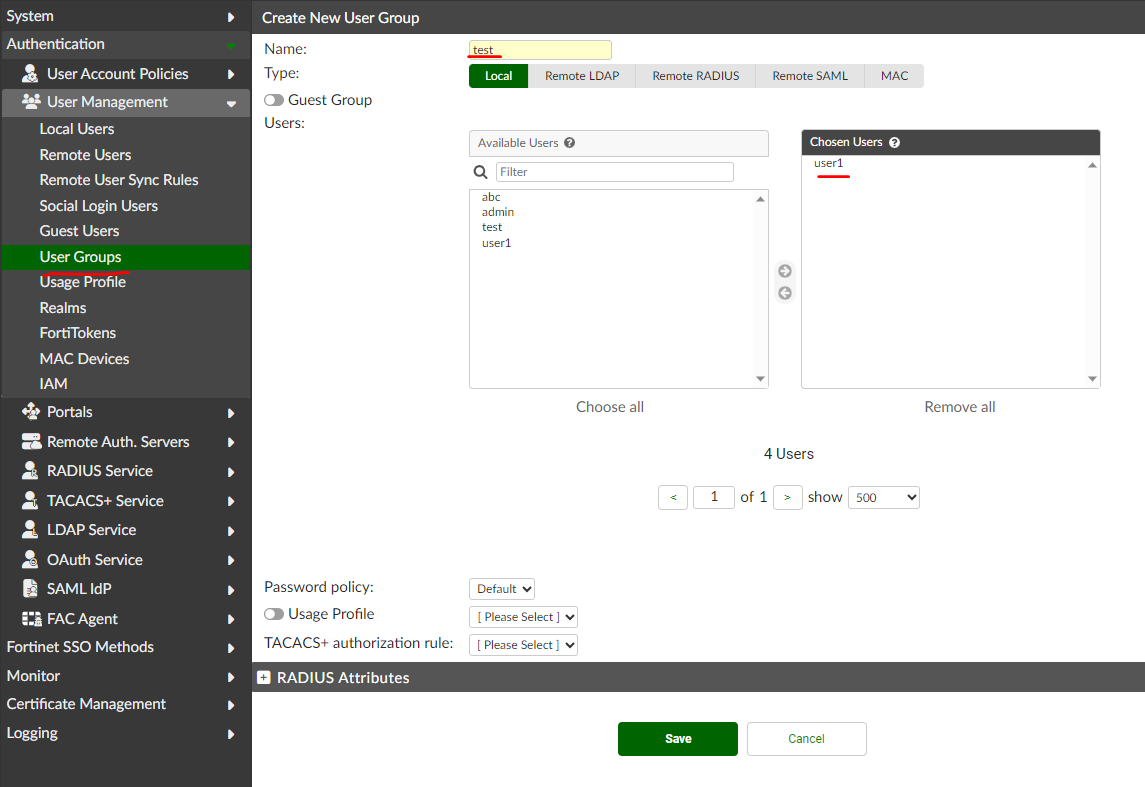
2. Create a user group, for example, “test”. Add “user1” to the group.
-
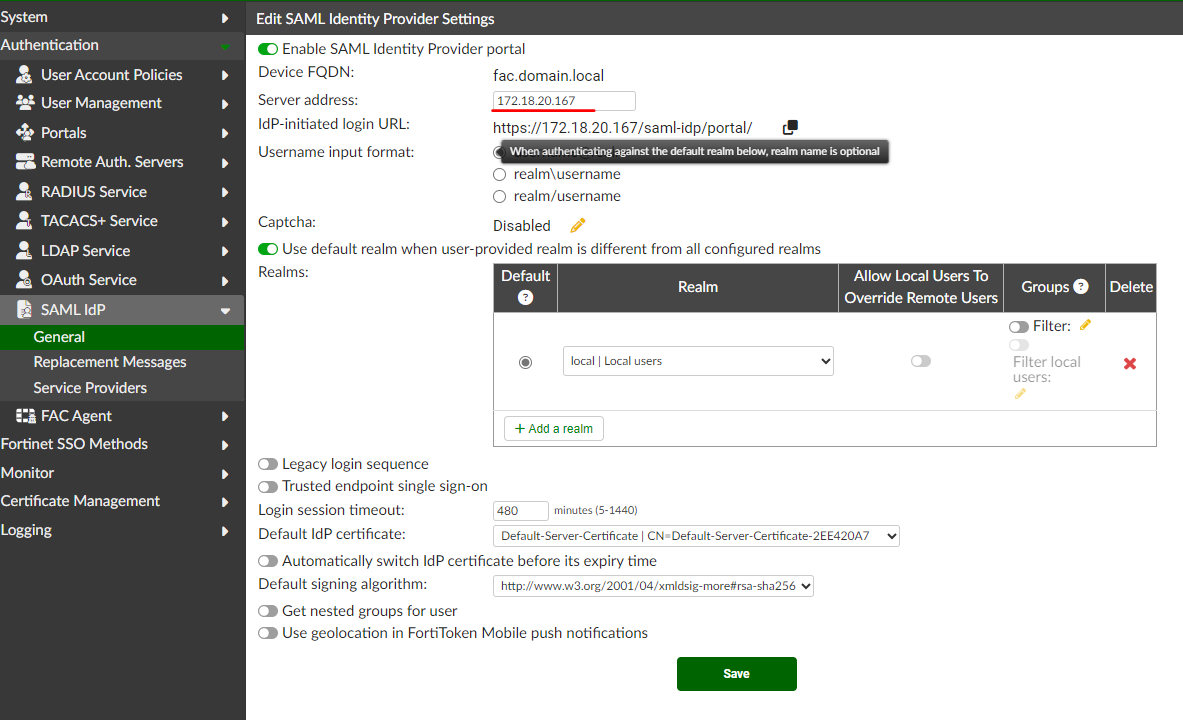
3. Enable SAML IDP portal and enter the FortiAuthenticator IP address.
-
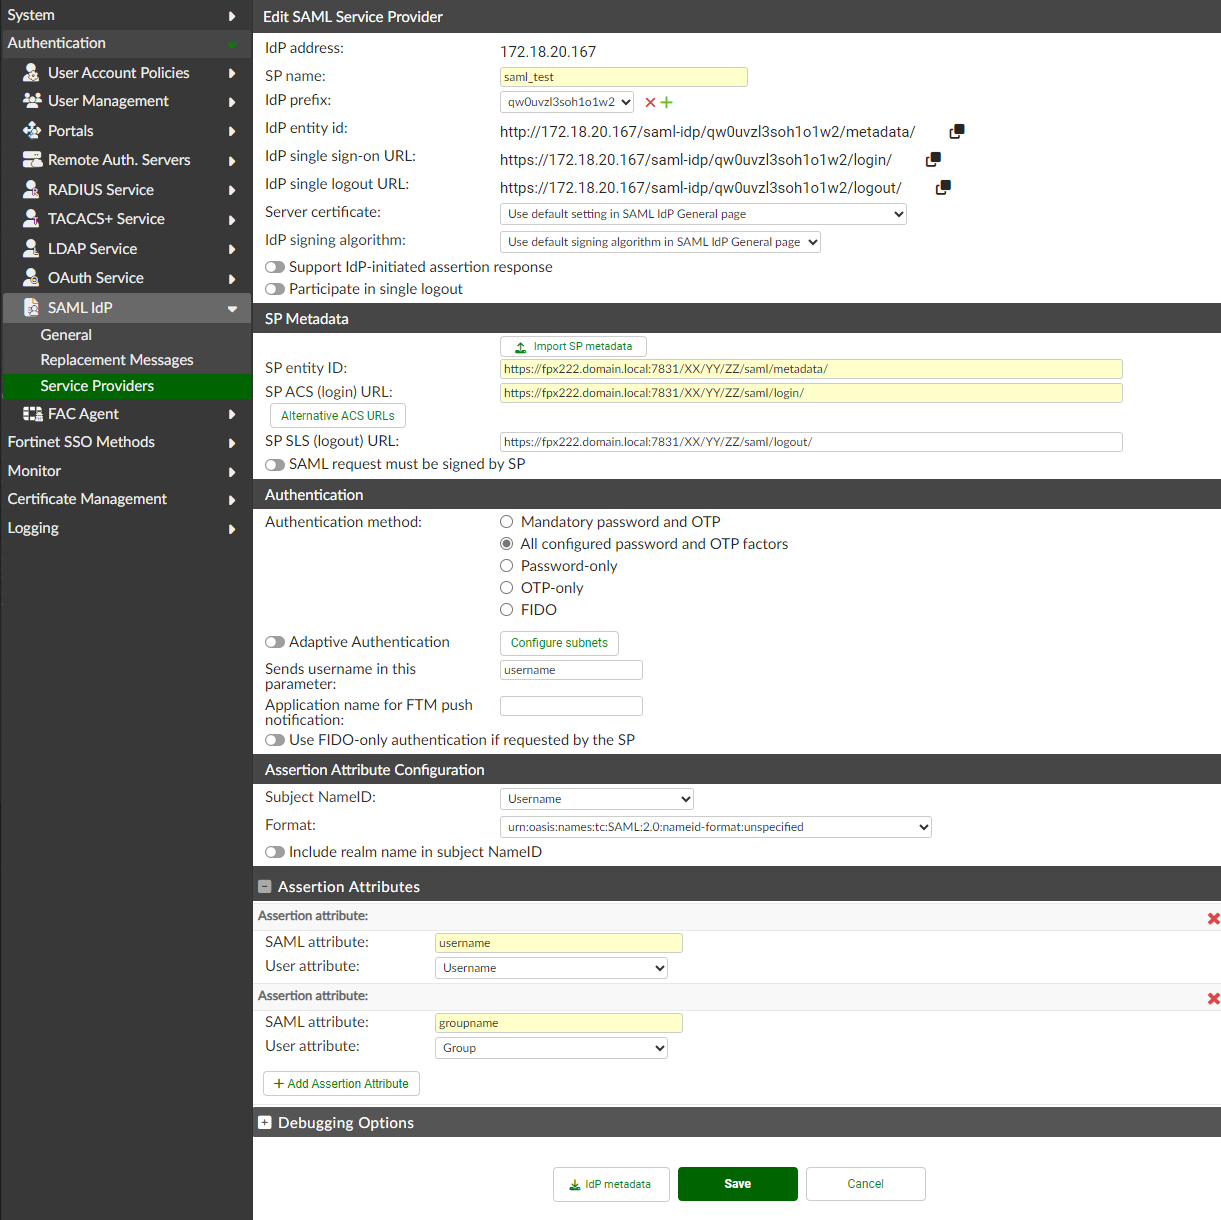
4. Create a new service provider.
-
5. Download the FortiAuthenticator certificate used in step 3, which is Default Server Certificate in this example. Upload the certificate to FortiProxy as remote certificate.

-
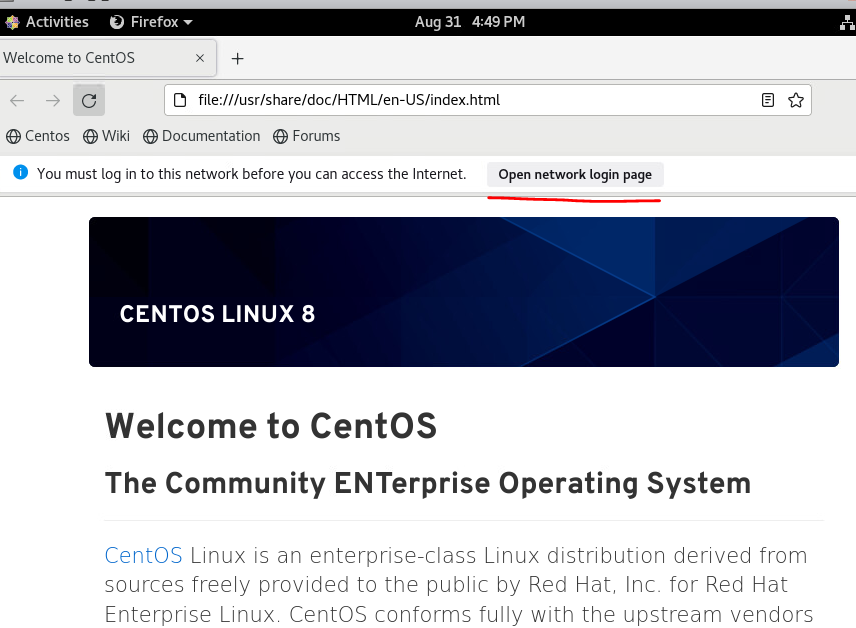
Verify that the configuration is successful by logging in from a client machine.
-
1. Enable proxy settings towards FortiProxy in the client browser.
-
Click Open network login page.
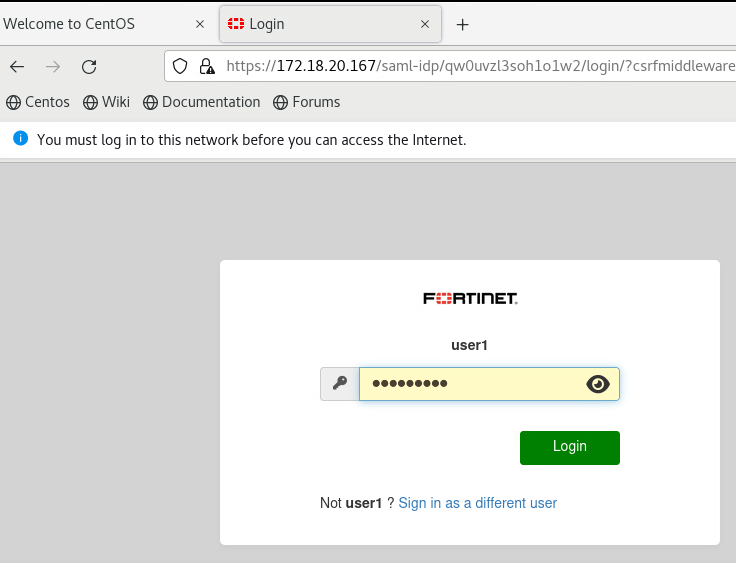
-
3. Enter the username (
user1in this example) and password configured in FortiAuthenticator and click Login.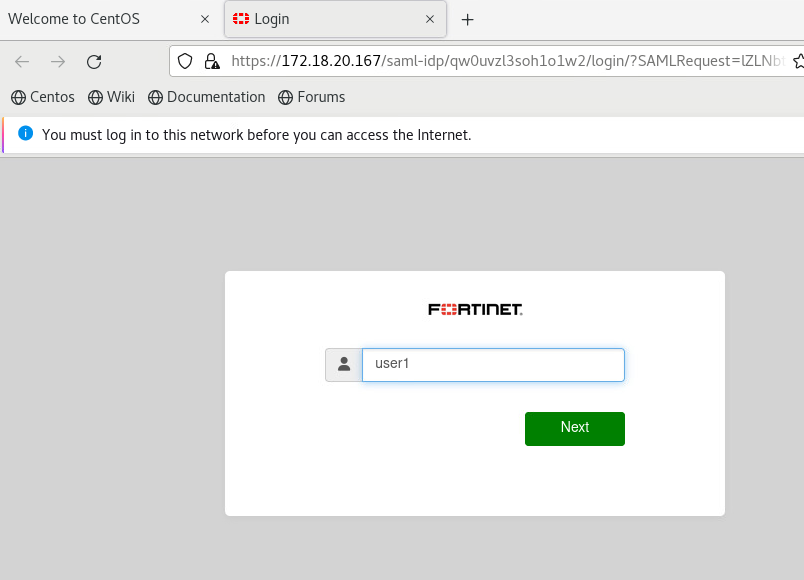
-
After successful login from the FortiAuthenticator client machine, run the following command on FortiProxy to verify that SAML authentication is successful with FortiProxy using FortiAuthenticator as the authenticator.
FPX222 # dia wad user list
ID: 35, VDOM: root, IPv4: 10.4.62.181
user name : user1
worker : 0
duration : 41 seconds
auth_type : IP
auth_method : SAML
pol_id : 16
g_id : 5
user_based : 0
expire : N/A (in use)
LAN:
bytes_in=111547 bytes_out=3013287
WAN:
bytes_in=773601 bytes_out=2540
-