


Create or edit a forwarding server
Select Create New to open the New Forwarding Server window.
To open the Edit Forwarding Server window, select a forwarding server and then click Edit.
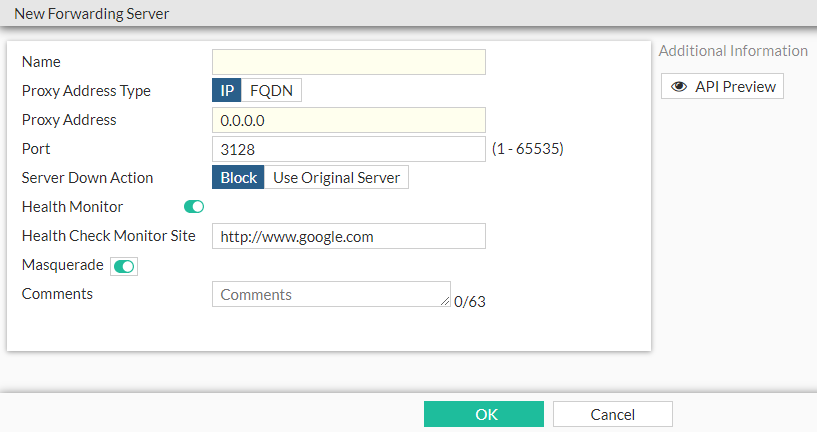
Configure the following settings in the New Forwarding Server window or Edit Forwarding Server window and then click OK:
|
Name |
Enter the name of the forwarding server. |
|
Proxy Address Type |
Select the type of IP address of the forwarding server, either IP or FQDN. |
|
Proxy Address |
Enter the IP address or the fully qualified domain name of the forwarding server. |
|
Port |
Enter the port number of the forwarding server. |
|
Server Down Action |
Select what action the FortiProxy unit will take if the forwarding server is down, either Block or Use Original Server. |
|
Health Monitor |
Enable or disable health check monitoring. |
|
Health Check Monitor Site |
If you enabled Health Monitor, enter the URL address of the health check monitoring site. After health check is enabled and configured, you can use the Forward Server Monitor widget in the dashboard to monitor the health status of the forwarding server. |
|
Masquerade |
Enable or disable whether the web proxy uses the device address to connect to the proxy server. |
|
Comments |
Enter an optional description of the forwarding server. |
|
API Preview |
The API Preview allows you to view all REST API requests being used by the page. You can make changes on the page that are reflected in the API request preview. This feature is not available if the user is logged in as an administrator that has read-only GUI permissions. |
To use the API Preview:
- Click API Preview. The API Preview pane opens, and the values for the fields are visible (data). If a new object is being created, the POST request is shown for the CMDB API that creates the explicit proxy configuration.
- Enable Show modified changes only to show the modified changes instead of the full configuration in the preview.
- Click Copy to Clipboard to copy the JSON code shown on the preview screen to the clipboard.
- Click Close to leave the preview.
To create a forwarding server in the CLI:
config web-proxy forward-server
    edit <server_name>
        set addr-type {ip | fqdn}
        set ip <IPv4_address>
        set fqdn <FQDN>
        set port <1-65535>
        set healthcheck {disable | enable}
        server-down-option {block | pass}
        set comment <string>
        set authentication {disabled | immediately | upon-challenge}
        set masquerade {enable | disable}
    next
end
Selectively forward web requests to a transparent web proxy
Web traffic over HTTP/HTTPS can be forwarded selectively by the FortiProxy unitʼs transparent web proxy to an upstream web proxy to avoid overwhelming the proxy server. Traffic can be selected by specifying the proxy address (set webproxy-forward-server), which can be based on a FortiGuard URL category.
|
|
The FortiGuard web filter service must be enabled on the downstream FortiProxy unit. |
Forwarding behavior
The forward server will be ignored if the proxy policy matching for a particular session needs the FortiProxy unit to see authentication information inside the HTTP (plain text) message. For example, assume that user authentication is required and a forward server is configured in the transparent web proxy, and the authentication method is an active method (such as basic). When the user or client sends the HTTP request over SSL with authentication information to the FortiProxy unit, the request cannot be forwarded to the upstream proxy. Instead, it will be forwarded directly to the original web server (assuming deep inspection and http-policy-redirect are enabled in the firewall policy).
The FortiProxy unit will close the session before the client request can be forwarded if all of the following conditions are met:
- The certificate inspection is configured in the firewall policy that has the
http-policy-redirectoption enabled. - A previously authenticated IP-based user record cannot be found by the FortiProxy unitʼs memory during the SSL handshake.
- Proxy policy matching needs the FortiProxy unit to see the HTTP request authentication information.
Use the following best practices to enable user authentication and use webproxy-forward-server in the transparent web proxy policy at the same time:
- In the firewall policy that has the
http-policy-redirectoption enabled, setssl-ssh-profileto use thedeep-inspectionprofile. - Use IP-based authentication rules; otherwise, the
webproxy-forward-serversetting in the transparent web proxy policy will be ignored. - Use a passive authentication method such as FSSO. With FSSO, once the user is authenticated as a domain user by a successful login, the web traffic from the user's client will always be forwarded to the upstream proxy as long as the authenticated user remains unexpired. If the authentication method is an active authentication method (such as basic, digest, NTLM, negotiate, form, and so on), the first session containing authentication information will bypass the forward server, but the following sessions will be connected through the upstream proxy.
Sample configuration
On the downstream FortiProxy proxy, there are two category proxy addresses used in two separate transparent web proxy policies as the destination address:
-
In the policy with
upstream_proxy_1as the forward server, the proxy addresscategory_infotechis used to match URLs in the information technology category. -
In the policy with
upstream_proxy_2as the forward server, the proxy addresscategory_socialis used to match URLs in the social media category.
To configure forwarding requests to transparent web proxies:
- Configure the proxy forward servers:
config web-proxy forward-server edit "upStream_proxy_1" set ip 172.16.200.20 next edit "upStream_proxy_2" set ip 172.16.200.46 next end - Configure the web proxy addresses:
config firewall proxy-address edit "category_infotech" set type category set host "all" set category 52 next edit "category_social" set type category set host "all" set category 37 next end - Configure the firewall policy:
config firewall policy edit 1 set srcintf "port10" set dstintf "port9" set srcaddr "all" set dstaddr "all" set action accept set schedule "always" set service "ALL" set utm-status enable set ssl-ssh-profile "deep-inspection" set av-profile "av" next end - Configure the proxy policies:
config firewall policy
    edit 1
        set type transparent
        set srcintf "port10"
        set dstintf "port9"
        set srcaddr "all"
        set dstaddr "category_infotech"
        set action accept
        set schedule "always"
        set logtraffic all
        set webproxy-forward-server "upStream_proxy_1"
        set utm-status enable
        set ssl-ssh-profile "deep-inspection"
        set av-profile "av"
    next
    edit 2
        set type transparent
        set srcintf "port10"
        set dstintf "port9"
        set srcaddr "all"
        set dstaddr "category_social"
        set action accept
        set schedule "always"
        set logtraffic all
        set webproxy-forward-server "upStream_proxy_2"
        set utm-status enable
        set ssl-ssh-profile "deep-inspection"
        set av-profile "av"
    next
end