
Managing DHCP servers
You can add, update, and delete DHCP servers.
Adding a DHCP server
- Select DHCP Server from the System dropdown.
- Select Create to create a new DHCP server.
- Enter values in the relevant fields. See DHCP server fields.
- Select Save.
Updating a DHCP server
- Select DHCP Server from the System dropdown.
- Select a DHCP server and then select Edit.
- Update the values that you want to change.
- Select Save.
Deleting a DHCP server
- Select DHCP Server from the System dropdown.
- Select a DHCP server and then select Delete.
- Select Yes in the confirmation dialog box to delete the selected DHCP server.
DHCP server fields
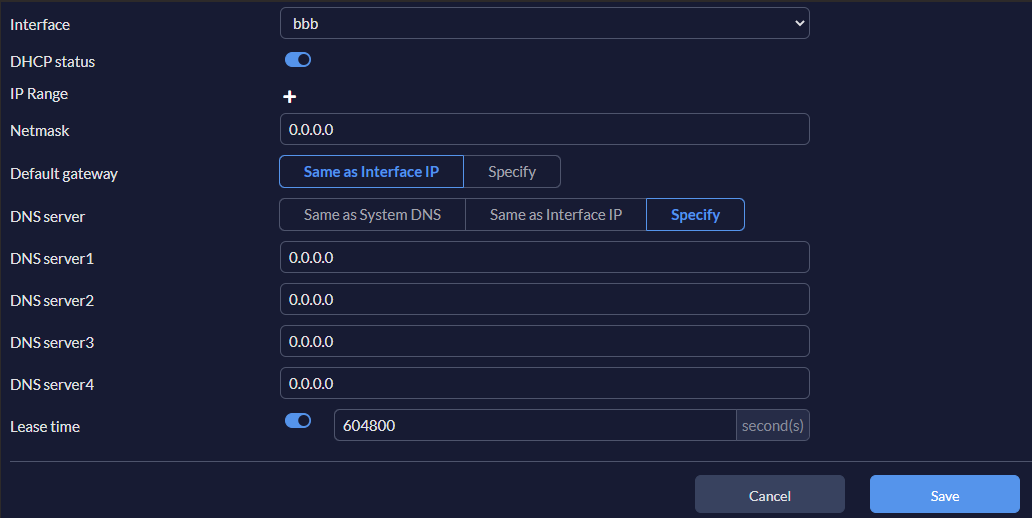
The Create DHCP Server and Edit DHCP Server dialogs contain the following fields:
|
Settings |
Guidelines |
|---|---|
|
Interface |
From the dropdown, select an interface. |
|
DHCP status |
Enable/disable DHCP status. Note: By default, the DHCP status is enabled. |
|
IP Range |
DHCP IP address range. The IP range of each DHCP server must match the network address range. |
|
Netmask |
Netmask assigned by the DHCP server. |
|
Default Gateway |
Select either Same as Interface IP (default) or Specify. When Specify selected, enter the default gateway IP address assigned by the DHCP server. |
|
DNS server |
Options for assigning DNS servers to DHCP clients:
|
|
DNS Server1 |
DNS server 1. Note: This option is only available when the DNS server is Specify. |
|
DNS Server2 |
DNS server 2. Note: This option is only available when the DNS server is Specify. |
|
DNS Server3 |
DNS server 3. Note: This option is only available when the DNS server is Specify. |
|
DNS Server4 |
DNS server 3. Note: This option is only available when the DNS server is Specify. |
|
Lease time |
Set the time after which the assigned IP address expires, in seconds. The default is 604800. |
|
IP Address Assignment Rules |
Configure IP address assignment rules. See Configuring an IP address assignment rule. Note: This option must be enabled by a system administrator. |
Configuring an IP range
To configure an IP range:
- In IP Range, select + to add a new IP address range.
- In the IP Range field, enter the IP range.
Configuring an IP address assignment rule
To configure an IP address assignment rule:
-
In IP Address Assignment Rules, click Create or select an existing rule and click Edit.
-
Specify the Type:
-
Mac Address: Assign an IP address based on a device MAC address.
-
DHCP Relay Agent: Assign an AP address based on relay agent information.
-
-
Configure the following settings:
Settings
Guidelines
Match Criteria
Mac Address
Enter a device MAC address.
Note: This option is only available when Type is set to Mac Address.
Circuit ID
Enter the option 82 circuit ID of the client that will get the reserved IP address.
Format:
<vlan><mod><port>-
vlan: VLAN ID (2 bytes)
-
mod: 1 = snoop, 0 = relay (1 byte)
-
port: port number (1 byte)
Note: This option is only available when Type is set to DHCP Relay Agent.
Remote ID
Enter the option 82 remote ID of the client that will get the reserved IP address.
Format: the MAC address of the client.
Note: This option is only available when Type is set to DHCP Relay Agent.
Action
Action Type
Select the action type:
-
Assign IP: Assign an available IP address.
-
Block: Do not assign an IP address.
-
Reserve IP: Assign a specific IP address.
Note: This option is only available when Type is set to Mac Address.
IP
If Action Type is set to Reserve IP or Type is set to DHCP Relay Agent, enter the IP address to assign.
-
-
Click Save.