
Configuring ZTNA on FortiGate for FortiPAM access
For information ZTNA and web proxy forwarding, see:
- Basic ZTNA configuration
- Technical Tip: How to configure web proxy forwarding server (proxy chaining)
Prerequisites
-
FortiGate ZTNA external IP address, e.g.,
10.59.112.158. - FQDN for FortiPAM, e.g.,
pam156b.fortipam.ca. - Public DNS server:
- FQDN (
pam156b.fortipam.ca) is resolved to the FortiGate ZTNA external IP address:10.59.112.158. - FQDN (
fos58.fortipam.ca) is resolved to the FortiGate GUI IP address:10.59.112.58.
- FQDN (
- Private DNS server: FQDN (
pam156b.fortipam.ca) is resolved to the FortiPAM GUI IP address:10.1.100.156. - The PC connects to the public DNS server.
- The FortiGate connects to the private DNS server.
Topology

Configuring ZTNA for FortiPAM access
To configure the FortiPAM FQDN:
- In the FortiGate GUI, go to Policy & Objects > Addresses, and select Create new to configure address for the FortiPAM FQDN.
The New Address window opens.
- In Name, enter a name for the address.
- Ensure that Interface is any.
- In Type, select FQDN.
- In FQDN, enter the FortiPAM FQDN.
pam156b.fortipam.ca
- Click OK.

Alternatively, in the CLI console, enter the following commands:
 config firewall address
  edit "pam_156b_fqdn"
   set uuid b0997e8a-7888-51f0-54aa-9b97280518cd
   set type fqdn
   set "pam156b.fortipam.ca"
  next
 end
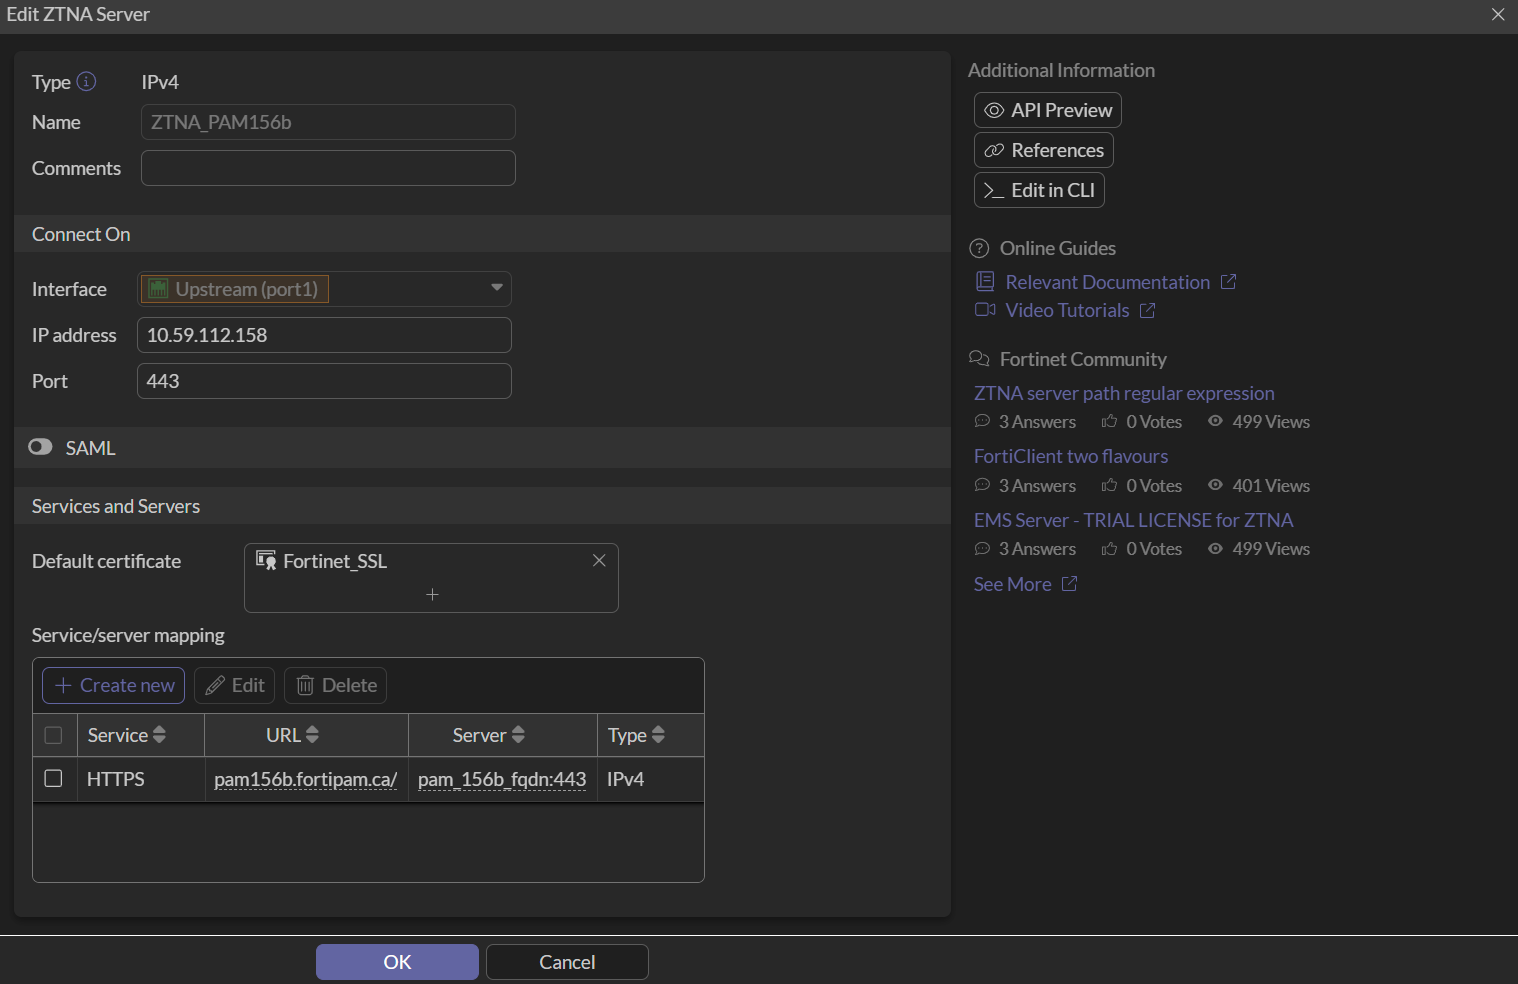
To configure the ZTNA server:
-
In the FortiGate GUI, go to Policy & Objects > ZTNA, and select Create new in the ZTNA Server tab.
The New ZTNA Server window opens.
- In Name, enter a name for the ZTNA server.
- In Interface, select port1.
- In IP address, enter the IP address for the FortiGate, e.g.,
10.59.112.158. - Ensure that the Port is
443. - In Default certificate, select Fortinet_SSL.
- In Service/server mapping, select Create new.
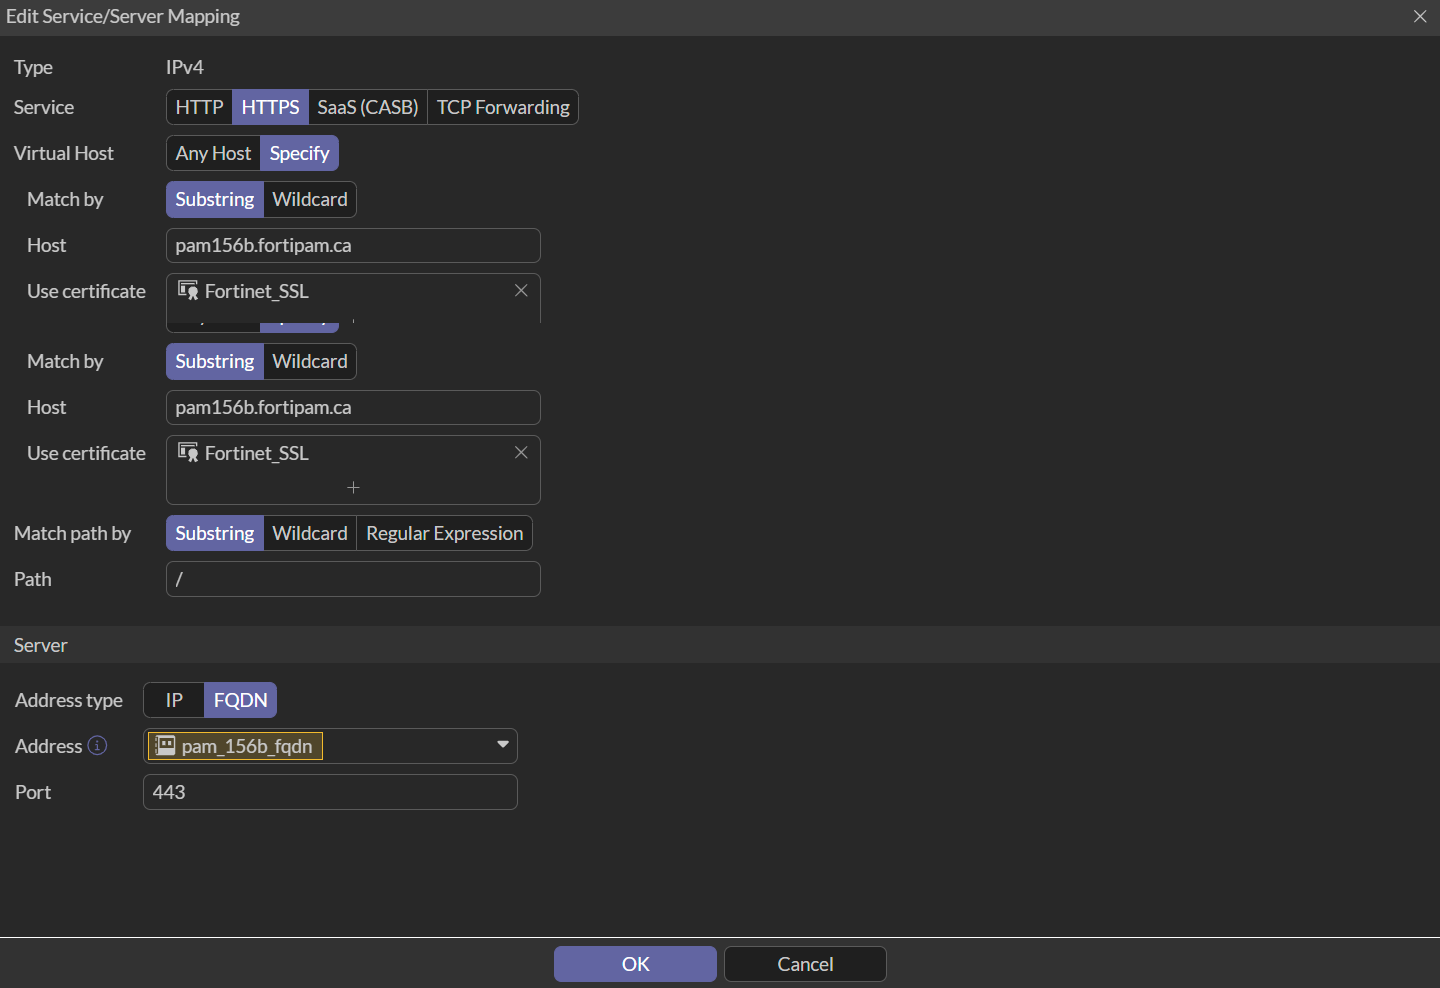
The New Service/Server Mapping window opens.
- Ensure that the Service is set to HTTPS.
- In Virtual Host, select Specify.
- In Host, enter the FortiPAM FQDN.
- In Use certificate, select Fortinet_SSL.
- Ensure that Match path by is Substring.
- In Address type, select FQDN.
- In the Address dropdown, select the FortiPAM FQDN created in Configuring the FortiPAM FQDN.
- Ensure that Port is
443. - Click OK.
- Click OK.
Alternatively, in the CLI console, enter the following commands:
 config firewall vip
  edit "ZTNA_PAM156b"
   set uuid f1ecb802-7888-51f0-222d-713912cbeb51
   set type access-proxy
   set server-type https
   set extip 10.59.112.158
   set extintf "port1"
   set extport 443
   set ssl-certificate "Fortinet_SSL"
  next
 end
 config firewall access-proxy
  edit "ZTNA_PAM156b"
   set vip "ZTNA_PAM156b"
   set client-cert disable #Disable if FortiGate is not connected with the EMS
   set svr-pool-multiplex disable
   config api-gateway
    edit 1
     set virtual-host "auto-ZTNA_PAM156b-0"
     config realservers
      edit 1
       set addr-type fqdn
       set address "pam_156b_fqdn"
      next
     end
    next
   end
  next
 end
 config firewall access-proxy-virtual-host
   edit "auto-ZTNA-PAM156-0"
    set ssl-certificate "Fortinet_SSL"
    set host "pam156b.FORTIPAM.CA"
   next
 end
To configure the firewall policy:
-
In the FortiGate console, enter the following commands:
 config firewall policy
  edit 6
   set name "ZTNA_PAM156b_Policy"
   set uuid 5c0cf6de-7889-51f0-24ae-e45e7e6a4f12
   set srcintf "port1"
   set dstintf "any"
   set action accept
   set srcaddr "all"
   set dstaddr "ZTNA_PAM156b"
   set schedule "always"
   set nat enable
  next
 end
To configure web proxy forwarding on FortiGate:
-
In the CLI console, enter the following commands:
 config system interface
  edit "port1"
   set  vdom "root"
   set ip 10.49.112.58 255.255.255.0
   set allowaccess ping https ssh http
   set type physical
   set explicit-web-proxy enable #enable web proxy
   set snmp-index 1
  next
 end
 config web-proxy explicit
  set status enable
  set https-incoming-port 8080
 end
 config web-proxy forward-server
  edit "pam156b_web_proxy"
   set addr-type fqdn
   set fqdn "pam156b.fortipam.ca"
   set port 8080
  next
 end
 config firewall proxy-policy
  edit 2
   set uuid 024adcf4-7967-51f0-01cd-00e184cc0c25
   set name "pam156b_proxy_policy"
   set proxy explicit-web
   set dstintf "any"
   set srcaddr "all"
   set dstaddr "all"
   set service "webproxy"
   set action accept
   set schedule "always"
   set logtraffic all
   set webproxy-forward-server "pam156b_web_proxy"
  next
 end
To configure FortiPAM:
-
In the CLI console, enter the following commands to enable web proxy on the port interface:
 config system interface
  edit "port2"
   set ip 10.1.100.156 255.255.255.0
   set allowaccess ping ssh
   set type physical
   set explicit-web-proxy enable
   set snmp-index 2
  next
 end
- In the CLI console, enter the following commands to change the
proxy-fqdnto the FortiGate GUI FQDN:config web -proxy global set proxy-fqdn "fos58.fortipam.ca" end
- In the CLI console, enter the following commands to verify the web proxy listening port number:
 config web-proxy explicit-proxy
  edit "web-proxy"
   set status enable
   set interface "any"
   set http-incoming-port 8080 #Sync with the web proxy forward port configured on the FortiGate
 next
end
- In the FortiPAM GUI, go to Secrets > Secrets, from the list, open a secret:
- Go to the Settings tab, enable Tunnel Encryption, and click Save.

- Go to the Settings tab, enable Tunnel Encryption, and click Save.